Student Uses AI and a 3D Printer To Do Their Homework Assignment for Them

Photo: Screenshot from TikTok
Artificial intelligence has been everywhere lately. Though it's presenting interesting prospects in the tech world, it's also proving to potentially make things very challenging for educators. For work that’s turned in online, there’s always the potential that an AI chatbot could do an assignment for the student. Having the pupil turn in a handwritten copy is one way to guard against that, but a TikTok user found a way around it. They used ChatGPT to complete the given assignment and then programmed a 3D printer to record the answers that the AI wrote.
TikTok user 3d_printer_stuff shared a series of videos detailing how it all came together, including one tutorial that shows the same steps you’d need to take if you wanted technology to do your homework, too.
The student began by opening up ChatGPT and entering the task in the program. They then instructed the AI to write the assignment. Once it was done, they went to another site called 3DWriter and copied the text there. After finding the right font and spacing for the sheet, they then positioned lined paper on the 3D printer so that it would record the text onto the lines—just like a human would. The final step? “Enjoy the time saved,” 3d_printer_stuff said .
Though this may be seen as a clever shortcut, it’s important to recognize how harmful it is to one’s education. If the point of homework is for extra practice outside of the classroom, then using these round-about methods of automating assignments is only hurting your future self and the grasp of class concepts. Some school districts have already recognized the possibilities for cheating and have banned ChatGPT as a result. The New York City Department of Education has restricted access to it on school-owned networks and devices, stating concerns for the “potential to undermine student learning.”

A TikTok user employed ChatGPT to complete a homework assignment and then programmed a 3D printer to record the answers that the AI wrote.
@3d_printer_stuff #fyp #chatgbt #3dprint #timelapse ♬ In The End – Mellen Gi Remix – Tommee Profitt & Fleurie & Mellen Gi
@3d_printer_stuff #fyp #easy #chatgbt #timelapse #3dprint ♬ The Business – Tiësto
They share how they did it in the video below.
@3d_printer_stuff #MadeWithKeurigContest #chatgbt #timelapse #fyp #3dprint #tutorial #easy ♬ Calm LoFi song(882353) – S_R
h/t: [ PC Gamer ]
Related Articles:
Man Fools Relatives Into Think He Has Girlfriend but She’s Actually AI
AI-Generated Artwork Wins Contest and Sparks Fierce Online Debate
AI Portraits Imagine How Celebrities Would Look If They Were Still Alive Today
AI Helped Val Kilmer Reprise His Iconic Role in ‘Top Gun: Maverick’
Get Our Weekly Newsletter
Learn from top artists.

Related Articles

Sponsored Content
More on my modern met.

My Modern Met
Celebrating creativity and promoting a positive culture by spotlighting the best sides of humanity—from the lighthearted and fun to the thought-provoking and enlightening.
- Photography
- Architecture
- Environment
This genius student uses the power of AI and a 3D printer to 'handwrite' their homework
A+ material.

As technology advances, you can always count on one thing: students will use it to avoid doing homework. One industrious student not only got an AI chatbot to do their homework assignment, but they also rigged it to a 3D printer to write it out on pen and paper, expending the maximum amount of effort required to do the minimum amount of homework. Bravo!
TikTok user 3d_printer_stuff shared a series of videos on how they programmed a 3D printer to produce homework with the answers that ChatGPT wrote.
They gave ChatGPT their assignment; it spit out an answer, and then they copy/pasted that text over to 3dwriter . As you can see, once you sort out the proper spacing and mount a pen onto your 3D printer, 3dwriter can write out the AI-generated text onto a sheet of paper perfectly between the margins. The tutorial video shows the process step-by-step.
ChatGPT has been in the news recently after Microsoft said it would invest $10 billion in OpenAI . The company developed an AI chatbot that scrapes the internet to produce long-form answers to questions in a human-like fashion. This is exactly why ChatGPT has already been banned in New York City public schools over cheating and plagiarism concerns. Ultimately the fear is that students will use it as a crutch and hinder the development of critical thinking skills, which is why the NYC Dept. of Education restricted access to the AI chatbot on its schools' computers. I don't blame them, considering one of the videos shows math homework being done on the fly.
@3d_printer_stuff ♬ Calm LoFi song(882353) - S_R
Of course, as many comments suggest, the next logical step in 3d_printer_stuff's scheme should be to train an AI to mimic their handwriting. That way, they could fool a teacher since the handwriting shown here is just a little too perfect. You could also use these tools for non-cheating purposes, I guess. I'd argue that setting up a rig to do your homework takes more time than just doing the homework yourself, but I applaud the hustle nonetheless.
Either way, it's interesting to see what the cross-section of AI and automation can produce that doesn't involve it being "light outs for us all," according to one CEO. I nor PC Gamer endorse cheating or scamming your way out of doing homework. We do think it's cool, though.

Best SSD for gaming : The best solid state drives around Best PCIe 4.0 SSD for gaming : Speedy drives The best NVMe SSD : Slivers of SSD goodness Best external hard drives : Expand your horizons Best external SSDs : Fast, solid, and portable
The biggest gaming news, reviews and hardware deals
Keep up to date with the most important stories and the best deals, as picked by the PC Gamer team.
Jorge is a hardware writer from the enchanted lands of New Jersey. When he's not filling the office with the smell of Pop-Tarts, he's reviewing all sorts of gaming hardware, from laptops with the latest mobile GPUs to gaming chairs with built-in back massagers. He's been covering games and tech for over ten years and has written for Dualshockers, WCCFtech, Tom's Guide, and a bunch of other places on the world wide web.
The internet is not a free-for-all—we shouldn't let big tech companies wish copyright out of existence
Google's dumb AI answers increased its greenhouse gas emissions by nearly 50% in the last 5 years
Today's Wordle answer for Saturday, July 6
Most Popular
- 2 Best RAM for gaming in 2024: I've tested the best DDR4 and DDR5 RAM to find the right kits for you
- 3 Best ultrawide monitor for gaming in 2024: the expansive panels I recommend for PC gamers
- 4 Best wireless gaming keyboard in 2024
- 5 Best gaming laptops in 2024: I've had my pick of portable powerhouses and these are the best
- 2 Alienware Pro wireless review
- 3 SteelSeries Arena 9 review
- 4 Asus ROG Strix Z790-I Gaming WiFi review
- 5 OXS Thunder Pro review
DIY Homework Writing Machine

Introduction: DIY Homework Writing Machine

In this Instructable, I'll show you how to create a completely functional 3D-printed writing machine for your science fair project at school or college. This project was created as part of my second-year engineering project at Gujarat's Chandubhai S. Patel Institute of Technology (CSPIT). I also make this video for my YouTube channel "Creativity Buzz".
To design this writing instrument, I used Autodesk Fusion 360. There are many different kinds of writing robots, but in this lesson, I create a corexy writing machine. Making use of this will teach you everything there is to know about this writing robot.
All of the 3D printed parts are attached stages in the .stl file. You can download this and edit it in Autodesk Fusion 360 as necessary.

There are three types of products need to make this Writing Machine.
1) Electrical Materials
2) Hardware Materials
3) Software and Firmware
- 3D Printer https://3dflyingbear.com/
- Arduino Uno (1 pc) https://amzn.to/3GtBDFT
- CNC Shield V3 Expansion board (1 pc) https://amzn.to/3GtBDFT
- A4988 Stepper Motor Driver (2 pcs) https://amzn.to/3GtBDFT
- Nema 17 Stepper Motor ( 2 pcs) https://amzn.to/3KjIoeN
- SG90 Servo Motor (1 pc ) https://amzn.to/3ZU7arD
- 12 Volt 2 A Adapter
- 2 pin Short Jumper ( 6 pcs )
- 8 mm Threaded Rod 42 cm long and Nut (2 pcs)
- 8 mm Plain Steel Rod 35 cm long (2 pcs)
- 8 mm Plain Steel Rod 27.5 cm long (2 pcs)
- 6mm Plain Steel Rod 6.5 cm long (2 pcs)
- 7mm Spring @ 20 Rs (1 pc)
- LM8UU Slider bearing (8 pcs) https://amzn.to/3KnvtIP
- LM6UU Slider bearing (2 pcs) https://amzn.to/40TpjHk
- 623ZZ 10x4x3 mm bearing (10 pcs)
- Stepper motor Pulley GT2 (2 pcs)
- GT2 6mm Belt 2 meter https://amzn.to/3ZWBTEp
- 3mm + Nut and Bolt ( 16mm , 40 mm length )
3) Software
- Autodesk Fusion 360 ( We use this software to design 3d .stl parts to use in 3d printer to make plastic parts )https://www.autodesk.in/products/fusion-360/
- Ultimate cura ( We use this software for slice .stl file to gcode for use in 3d printer ) https://ultimaker.com/software/ultimaker-cura/
- Arduino IDE ( For Install corexy Firmware to Arduino Uno ) https://www.arduino.cc/en/software
- Inkscape version 0.92 ( For make gcode file for writing or drawing or photo to use in universal gcode sender) https://inkscape.org/release/inkscape-0.92/?latest=1
- Universal gcode sender ( Import gcode file which exported from Inkscape and give command to writing machine) https://winder.github.io/ugs_website/download/
Step 1: Make Plastic Parts

We design plastic parts in Autodesk Fusion 360 and export them as .stl files. All .stl files that are attached to steps that use them. Import the stl files into the ultimaker cura slicer software and adjust the settings for the walls and nozzles you require.
Then, export the gcode file to a memory card and print it using PLA filament on a 3D printer. Make every 3D printed object step by step. To assemble this writing machine, we need 10 3D-printed components. The total weight is around 250 grammes.
Step 2: Make Y Axis Slider

Take two 42 cm long 8 mm threaded rods, 8 mm nuts, and the stepper motor holder after all the 3D-printed parts have been completed printing. Then, as shown in the picture, passing this threaded road from the bottom holes in the stepper motor holder. Next, insert threaded rods from the opposite end of the second stepper motor holder.
Fix two nuts on the second end of the threaded rods after passing them through both stepper motor holders.
Attachments

Step 3: Added Stepper Motors

Next, take two stepper motors and insert them into the stepper motor holders' casing. Then tighten every screw on the holder joint and stepper motor.
Take two 8 mm plain steel rods that are 35 cm long and pass them through the stepper motor holder's top holes.
If you need to write on a huge scale, you can use long steel rods, although large highways reduce the quality of your writing.
Step 4: Middle Slider for the X- Axis and Y-axes

After creating the y axis, create the middle slider that connects the x and y axes.
Take two middle slider plastic 3d printed parts for this, one additional 3d printed part, LM8UU Slider bearing (8 pieces), 623ZZ 10x4x3 mm bearing (8 pieces), and 40mm x 3mm bolts and nuts.
Place one 3D-printed slider object four LM8UU Slider bearings, and Attaché the other 3D-printed slider object four LM8UU Slider bearings. Next, insert four 40mm long bolts into the holes shown in the illustration. From the other side, attach two 623ZZ bearings to these bolts. Then attach all bolts from the opposite side and attach the middle 3D-printed part to the other middle part. Then secure the middle slider with the final four 40mm bolts.
After creating the middle slider, take the Y axis and remove half of the plain rod, and run the middle slider through this. After that, reattach the plain rods to the stepper motor holder.

Step 5: Pen Holder

The pen holder needs to be built once the Y-axis has been constructed.
Two 6.5 cm long 6mm plain steel rods, two LM6UU slider bearings, and a 7mm spring are the components you'll need to assemble a penholder using 3D printed materials. As shown in the picture, place two LM6UU bearings into the two holes in the grey 3D printed portion. Then, using two 6 mm plain rods, pass them through the wooden 3D-printed components of the pen holder as shown in the third picture. Place a 7 mm spring between the holder and bearing for the second rod while passing the first rod directly.
Use 16-mm bolts and nuts to attach the red pen stand to the grey 3D-printed portion.

Step 6: Make X Axis

Two 27.5 cm long 8 mm plain steel rods, a pen holder, and a 3D printed belt end portion are required to make the X axis.
Attach two 8mm steel rods to the belt end 3D printed item as shown in the picture. After that, move the Y axis' middle slider over this structure. Fix the pen holder to the second end of the steel rod after that. Fix a permanent junction with two 16mm bolts.

Step 7: Pulley and Roller

Then insert two 623ZZ bearings into the pen holder and fix them using a 40-mm bolt.
Get two GT2 stepper motor pulleys and attach each one individually to the stepper motor shaft.
Step 8: Run GT2 Belt

Take a 2-meter GT2 belt and attach one end to the wooden belt holder portion that was 3D printed.
Next, pass the second end of the GT2 belt through the 623ZZ bearing on the middle slider, the stepper motor GT2 pulley, the 623ZZ bearing on the pen holder, the GT2 pulley, and the 623ZZ bearing on the middle slider before attaching the second end to the belt holder 3D printed component as shown in the pictures.
Step 9: Make Controller Box

Arduino Uno, CNC Shield V3 Expansion board, two A4988 Stepper Motor Driver, and six short jumpers are required to create the controller box.
Take a controller box that was 3D printed and mount an Arduino Uno on it. On the Arduino Uno, attach the CNC Shield V3 Expansion board as shown in the picture. Then, as shown in the diagram, take a short jumper and place it on the CNC shield. Place the final two A4988 drivers into the CNC mill as shown in the illustration.

Step 10: Servo Motor and Wiring

The final step in building a writing machine with hardware and electrical components is this.
From the back, insert the SG90 servo motor into the pen holder's cavity. After that, link the stepper motor wire to the two motors. Take the controller box and insert it through the bottom threaded rods of the Y-axis. Then connect the SG90 servo motor wire and the stepper motor wire to the controller box.
Step 11: Firmware Installation

- Download the Corexy firmware using this link.
- https://github.com/jamescarruthers/PlotterXY
Download all of the software listed in this instructable's supply step.
Next, use a USB pin to connect an Arduino Uno to a computer. Next, launch the Arduino IDE software on your computer and choose the Arduino Uno board and Port.
Then use the file - open menu to open firmware in the Arduino IDE. then upload Arduino Uno with firmware.
Create a design in the Inkscape programme, then export it to the Universal Gcode Sender programme. then press "start" to begin writing on paper.
Step 12: Writing on Paper

Fix the pen in the pen holder upside down, 4 mm from the paper. Then press "Start" to write on paper.
You can write or draw any image on this writing machine.

Participated in the 3D Printing Student Design Challenge
Recommendations

Water Contest

Colors of the Rainbow Contest

Outdoor Life Contest

How-To Geek
How does 3d printing work.

Your changes have been saved
Email Is sent
Please verify your email address.
You’ve reached your account maximum for followed topics.
Everything You Need to Know About Microsoft Word's Styles
Here’s which motorola phones will get android 15, 7 things you didn't know run on linux, quick links, it all starts with 3d models, slicing the model for the print, waiting a long time, so should i buy a 3d printer.
Picture a robot-controlled hot glue gun that uses plastic instead of glue, and you have the basics of a 3D printer. Strands of plastic are fed into a print head, which is heated up to melt the material. The print head moves around very precisely in three dimensions and drops lines of plastic onto the print bed---the table on which it prints. The printer does this over and over, building up layers of plastic until it forms a 3D part.

Every object printed on a 3D printer starts with a 3D model. These are usually made in a CAD program designed for working on real-world 3D models, like TinkerCAD , Fusion360 , or Sketchup . This is a bit different to how 3D models might be made for movies or games, though you could certainly print out very detailed figures from traditional 3D modeling software.
Related: What is Sketchup (and How Do I Use It)?
One benefit of a 3D printer is that it can print nearly anything. Some models are so complex that they're impossible to make with traditional manufacturing techniques like molding or CNC routing, and that's where 3D printers take an obvious lead. However, they're not just used for making fancy geometric shapes, as it's usually much cheaper for a large factory's R&D department to print a single model in plastic rather than rigging up the whole factory to make the actual part. This is called prototyping, making a rough draft to help test the final copy without wasting valuable time and materials.

Since a printer doesn't understand how to take a complex 3D mesh and turn it into a printed model, the 3D model must be decoded into information that the printer can understand. This process is called slicing since it takes scans of each layer of the model and tells the printer how it should move the print head to create each layer in turn. It's done with the aid of a slicer, a program that handles all of this for you, like CraftWare or Astroprint .
The slicer will handle the "fill" of the model, creating a lattice structure inside a solid model to give it extra stability. This is one area where 3D printers shine---they can print very strong materials with really low densities, by strategically creating pockets of air inside the model and making it much lighter.
Another thing the slicer handles is support columns. Since the printer can't lay down plastic on thin air, support columns must be created to allow the printer to bridge the gap. These are removable but are used in the printing process to ensure it doesn't collapse.
Once the slicer is done, it will send the data over to the 3D printer to start the printing process.
Once the printer starts, you'll notice the main problem with 3D printing today: it's horrendously slow. While a 2D printer can print a whole book in a couple of minutes, most 3D prints will take several hours, if not days, to finish printing. And if you messed up the settings, misconfigured the slicer, or just bumped into it a bit, you could lose the whole print.
There are some faster technologies making splashes in the industry, like the Carbon M1, which uses lasers shot into a bed of liquid and pulls the print up out of it, speeding the process up significantly. But these kinds of printers are many times more complicated, much more expensive, and only work with plastic so far.
If you're not interested in designing and printing parts, you certainly aren't going to be replacing your boring 2D printer anytime soon.
The printers most consumers will buy usually print in plastic, though there are exotic (and expensive) printers used in the industry that can print pretty much anything. There's even a 3D printer that can print artificial meat. The technology is moving very quickly and has significant implications across many industries. Surely someday, you'll be able to print gourmet meals from an edible food printer, but until then it remains a hobbyist and industrial device.
Still, with prices coming down all the time, it can be a fun hobby---especially if you build anything where small plastic models are used.
Image Credits: Kaca Skokanova /Shutterstock
Can ChatGPT do my homework?
Reviewed By: Steve Hook
Table of Contents
Chatgpt homework examples, should chatgpt do my homework, is chatgpt safe to use for assignments, does chatgpt give the same answer to everyone, final thoughts.
Whether you are a student or just a bit curious, you may be wondering, can ChatGPT do my homework ? To be honest, there is no reason why ChatGPT can’t do your homework. But, whether it can do it well is another story. ChatGPT is a very powerful and versatile online AI chatbot. You can quite literally ask the model anything and it will generate a text response to answer your request. There are headlines about the model’s ability to write degree-level essays, pass university exams , and succeed in Google’s coding interview. It is pretty clear that this AI model is very capable but should you use it for your homework?
To see how well ChatGPT would respond to homework questions, we put the model to the test. We first asked the AI to answer a pretty straightforward high-school physics question.
PC Guide : “A box exerts a force of 100N on a table. The pressure on the table is 15 N/m². Calculate the area of the box that is in contact with the table.”
ChatGPT : “The pressure on the table can be calculated using the equation: pressure = force/area. So, the area of the box in contact with the table can be calculated as: area = force/pressure = 100 N / 15 N/m² = 6.67 m².”
So ChatGPT managed to answer this question correctly and showed it’s working, which is what most educators are looking for. Let’s look at another example. We decided to ask ChatGPT an essay-style question to see its versatility.
PC Guide : “Write an essay about the theme of love in Romeo and Juliet.”
ChatGPT : “Love is a central theme in William Shakespeare’s play “Romeo and Juliet.” The play is a classic example of young love, a love that is passionate, intense, and ultimately tragic. Shakespeare’s depiction of love in the play is both realistic and romantic, capturing the complex emotions that come with love, both positive and negative….”
We have cut down ChatGPT’s response here, but you get the idea. From what it seems, ChatGPT definitely has the intelligence and capability to do high-school-level homework – at least.
It is quite obvious that Chat GPT can do your homework and it can do it pretty well. The issue with using ChatGPT is that it is technically academic dishonesty.
Using the model’s answers and passing them off as your own goes against the academic integrity rules set by your school or university. So using ChatGPT can be considered cheating.
Additionally, OpenAI has already said that ChatGPT is not always accurate or correct. Taking the AI bot’s words to be true could firstly land you a bad score, but also expose you for using the model.
Recently, AI detectors have become increasingly available, so you need to be aware that your teachers or professors can run your submissions through AI classifier software .
To be honest, we don’t recommend using ChatGPT to complete your assignments. We understand that it is tempting, but by doing so, you do risk getting caught. You also risk limiting your career prospects by not really learning anything while learning is the only thing expected of you. Make the most of this time while you’re young to learn as much as possible – You’ll be too busy to learn when you’re older! Besides, ChatGPT is not always correct and could actually land you a bad mark anyway.
Let’s look at safety. As time has passed more and more AI detectors have been developed so assessors and teachers can now investigate your submissions. Despite not being 100% accurate, these tools are out right now so your teachers can use them to sniff out AI-generated assignments.
If you do desire to still use ChatGPT there is no harm in leveraging the AI bot to help you make an essay plan or even help you decide on a topic for your assignment.
According to some sources, when multiple users ask ChatGPT the same question, they almost always get the same answer. There may be a few word differences, but they will be nearly identical.
So can ChatGPT do your homework? In short, yes it can in some regards… But, should you use ChatGPT for your homework? It’s up to you, but probably not. There are various risks with using this language model as your homework fairy godmother, so you must act with caution in what you use it for. Morally, we do not recommend using ChatGPT for homework because the consequences after getting caught could be pretty serious. As much as we all hated homework when we were at school, you need to learn this stuff for a reason!
- NOW READ Can universities detect ChatGPT?
Funmi Somoye
Funmi joined PC Guide in November 2022, and was a driving force for the site's ChatGPT coverage. She has a wide knowledge of AI apps, gaming and consumer technology.
How to use Snapchat Dreams – step-by-step guide to…
How to slow down a video on snapchat –…, how to get a yellow heart on snapchat –…, how to hide and unhide chats on snapchat.
How to fix the most common 3D printing errors
This article is also available in following languages:

3D printing is quickly becoming a widely accessible and user-friendly technology. Despite this fact, some users (especially beginners) can sometimes run into various difficulties during the printing process. Such problems are usually caused by improper configuration or just by a random accident.
We have compiled a list of five more-or-less common issues you can theoretically encounter with your 3D printer. Plus, we’re offering useful tips how to solve these problems or prevent them from happening completely.
The first layer does not stick to the print surface
This is by far the most common 3D printing problem, and probably the first one you may encounter. The first layer is the essential one as it is the base of the printed object. Therefore, if it isn’t perfect, the chance of print failure increases.
What happens when the first layer isn’t perfect? Most of the time you will not be able to start the printing process, or the printed objects may continue to constantly detach from the print surface.
Making the first layer stick:
- Proper calibration of the first layer – First, you must perform the First layer calibration. Once you are happy with the result, you can start printing. Later on, you may apply small adjustments to the nozzle height through the Live Adjust Z option when the printer is creating the initial three layers. Just press the Knob and go to the Live Adjust Z . If you are not sure how the proper first layer looks, check out the photo above.
- Prepare the print surface – Keep the surface free of grease. Otherwise, your first layer will have a difficulty sticking to the print bed. Before starting any of your prints from ABS, PLA and many other materials, simply wipe the print surface clean with IPA 90%+ . Also, you should use Acetone from time to time, when prints stop sticking – but do not use it on daily basis. PETG is an exception, so do not use IPA 90%+ and Acetone when you are printing with this material. For PETG, we recommend using a separating agent (e.g. a glue stick). A complete guide how to prepare the print surface can be found at PEI print surface preparation
- Use proper printing temperatures – Make sure to use the proper nozzle and especially the correct heatbed temperatures. If you are experimenting with new materials that don’t adhere well, you can try to bump up the heatbed temperature by 5-10 ° C. This way the plastic will stick a bit better.
- Decrease the printing speed – If everything above failed, then try decreasing the printing speed. The easiest way how to do it is by rotating the knob during the printing process. Anti-clockwise = decrease speed, Clockwise = increase speed. We suggest decreasing the speed to about 75% for first three layers, then return it to normal.
Layer shifting
Layer shifting is an error which causes some of the layers to shift from their designated positions. It is usually associated with improper movement of an axis, leading the extruder head to be misaligned mid-printing without any notice. In other words, there is at least one layer which is not properly aligned.
You may experience layer shifts in different axis movements. To troubleshoot the issue correctly, it is crucial to diagnose to which axis it is happening. To clarify, check out the photo below which demonstrates three different kinds of layer shifts. Troubleshooting itself is the same for both axes.
Preventing layer shifts from happening:
- Check your printer’s power mode – For objects larger than 200–300g, or for objects with a complex geometry, run the printer in Normal mode . You can change Power mode in the LCD Menu – Settings – Mode .
- Check your X/Y belts – Make sure that belts are tight enough . Belts should be tight enough to sound like a low bass note when plucked.
- Check your X/Y axis pulleys – Make sure that the pulley on the motor shaft is secured and the idler pulley can move freely on the opposite end. A loose pulley is usually the main cause of staircase layer shifts.
- Make sure nothing is blocking the movement of your axis – Make sure there are no obstructions in the path of the bearings or any possible waste from previous printings stuck around the belt (usually around the Y-axis pulley). You can read more about general printer maintenance in this article .
- Difficult geometry to print – Objects with larger overhangs are generally harder to print. These overhangs might warp mid-printing and hit the nozzle. To prevent this, you can cut the object (check out one of our previous articles Cutting STL models ). You can also try to increase the print fan speed or increase the Z-hop distance in Slic3r PE. Both of these settings can be changed in our Slic3r PE. Print fan speed in Filament settings – Cooling and Z-hop distance in Printer Settings – Extruder 1 .
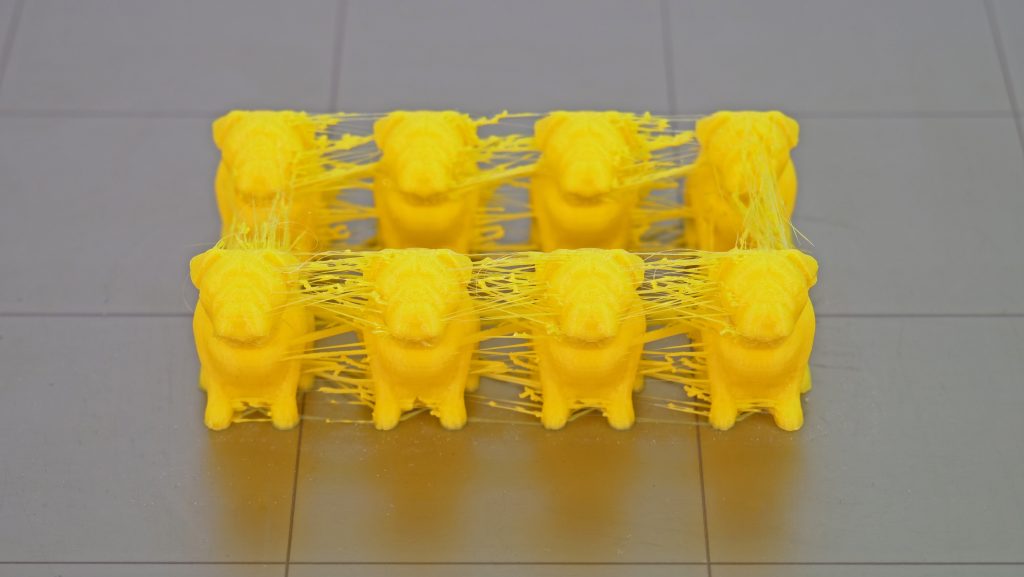
Stringing usually appears if your print settings are not accurate, while you are printing complex objects (such as Moon city ) or multiple objects at once. This is recognizable as a marginal line of plastic left behind or between the object/s. In other words, it’s that hairy bit of plastic we don’t like to see.
Keep in mind that some filaments, such as PETG or flexible filaments , may be stringy even with perfect print settings. In the photo below, you can see an extreme case of stringing. Usually, the stringing is not so severe, but if you encounter something similar to the objects in the photo, follow the instructions below.
Preventing strings from happening:
- Check the tension bolts – Before you touch any of the settings, make sure that the Tension bolts located on the extruder idler are properly tightened, although, this is not that common.
- Use proper printing settings – We highly recommend using the preset settings in Slic3r PE or PrusaControl. However, if you are printing with your own settings, make sure that you have the retraction settings set correctly. Retraction settings can be found in Slic3r PE in Printer Settings – Extruder 1 .
- Try to lower the nozzle temperature – Lowering the temperature will minimalize strings. Therefore, you can try to decrease it by 5 – 10 ° C.
- Don’t bother, just use a heat gun! – If you don’t feel like tweaking any of the settings, well, then there is an alternative. You can get rid of the strings with a heat gun (or possibly with a lighter). Just set it to around 200 ° C and aim at the strings for one or two seconds. This will melt the strings, and the printed object should remain undamaged.
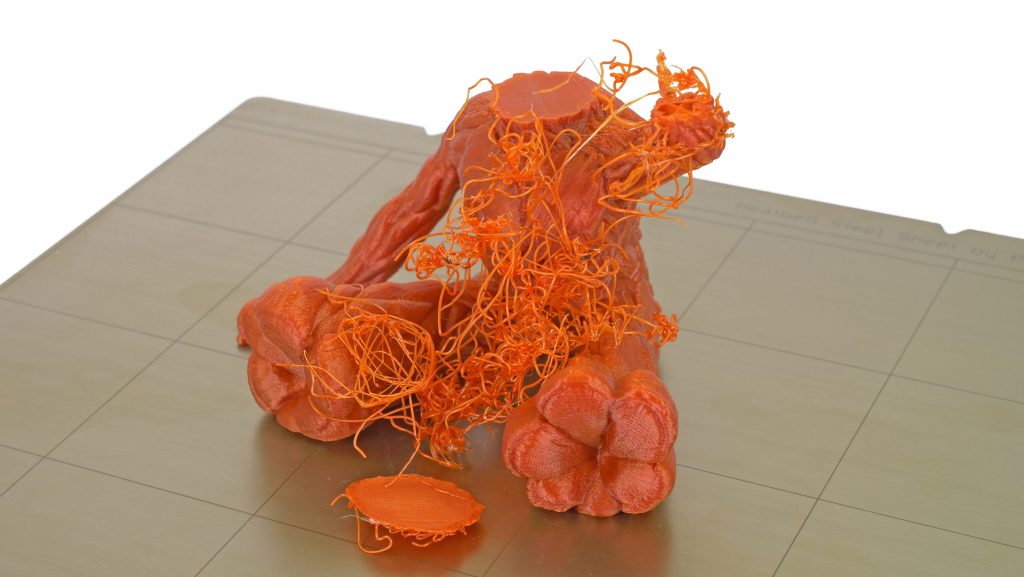
Spaghetti monster
Even though the name of this printing error sounds pretty cool, that’s about the only thing that’s good about it. It usually happens after most of the printing is complete.
As mentioned above, once the first layer isn’t perfect, the chance of any type of print failure increases. The so-called spaghetti monster is a perfect example of this. What usually happens is that the printed object detaches from the print bed mid-printing, and the remaining layers stop sticking to the object. The other common source of this problem may be an error within the STL object.
How to prevent the spaghetti monster from appearing:
- Check the first layer – Simply make sure that the first layer is sticking properly to the whole print surface. You can refer to “ The first layer does not stick” chapter mentioned above.
- Check the object for errors – Always check the generated G-code in the Preview of our Slic3r PE . In case you find any gaps or broken geometry, you can either repair the STL object yourself or you can use one of our previous guides where we show How to repair corrupted 3D objects .
- Try to increase the bed temperature – If you have already experienced this error, try to re-run the print and increase the bed temperature by 5 ° C. This should help with the first layer adhesion. You don’t have to re-slice the object and prepare a new G-code. Just start the print, go to the LCD Menu – Tune – Bed .
Extruder blob
Extruder blob is one of the worst printing problems you might face with your 3D printer. Unlike the spaghetti monster, this issue occurs earlier in the process, usually during the initial 5 minutes of the print. The first layer becomes detached and covers the nozzle, while the extruder keeps extruding and the blob grows and grows, leaving you with a non-working printer.
Don’t worry, it is really easy to prevent this situation from happening. However, it is quite tricky to clear it after it happens. Just to make it a bit easier for you, we have prepared a short video where we show you how to remove it.
How to prevent extruder blob from happening:
- Check the first layer – Since an improper first layer is the source of extruder blob in most of the cases, make 100% sure that the first layer is sticking properly to the entire print surface. You can refer to the “ First layer not sticking” above.
- Monitor the print for 5–10 minutes – Let the printer run for 10 minutes and check the progress. We recommend doing this every time. If you observe any issues, restart the print. If everything seems running okay, then you can just let your printer finish the job. After the initial 10 minutes, it is unlikely your printer would create an extruder blob.
Related articles
- Download our new Sustainability report: After one year, we are back with update
- Electroplating 3D Prints: the Symphony of Plastic and Metal
- PrusaSlicer 2.7.2 Is Out – Smarter Color Painting, Better Color Change (M600) and No More Perl!
8 Replies to “How to fix the most common 3D printing errors”
Could you simple add the values (optimal ones) of the belt tension as it is possible to see instead writing ‘sound like a low bass note when plucked’ it would be much more useful for everybody. In the book it is written values 240 +/- 40 are good. What does it mean if I will have lets say 100 and what if I will have 400? It would be nice to explain it. Thank you.
The measuring of the belt tension by the stepper drivers isn’t accurate enough at the moment for us to be able to tell you “This number is wrong” or “It should be exactly this value”. It’s a unitless value measured as an average motor load and currently, it’s only there to quickly recognize very badly tensioned belts or loose pulley.
“PETG is an exception, so do not use IPA 90%+ and Acetone when you are printing with this material.” Why?
Because the print will stick too well to the bed, however I find that when using the textured sheet and printing petg, it works well with IPA. But the PEI sheet can be damaged.
after a ton of perfect prints I had to go through this again, because of a new textured sheet. The old one I ruined with aceton. After feeling like a newbie again, I think a have a fix, which I think prusa could apply for everyone. I am printing at low ambient temperatures (10°C) so I guess this is why Prusa and many others may be not affected of my problems. I believe the problem is leaving the extruder too long at high temperatures without printing. The filaments start to clog an drool out because heating my bed can take a few minutes. Each time printing the intro line made a very small blob on the nozzle. The nozzle was super clean before starting and dirty after the intro line. If you have the same problems this might be for you. With a dirty nozzle it collects more filament and looses it clogging to the print object. Well that was it for a lot of my prints.
So here is the fix: In the beginning heat the extruder to 30-40 °C less than needed for printing. Wait for the bed to be heated. While mesh bed leveling go to final extruder temp. This gives a super clean intro line an nozzle through the print.
Here is my user defined G-Code: … M83 ; extruder relative mode
M104 S190 ; set extruder temp just below melting too much M140 S[first_layer_bed_temperature] ; set bed temp M190 S[first_layer_bed_temperature] ; wait for bed temp G28 W ; home all without mesh bed level M104 S[first_layer_temperature] ; set extruder temp G80 ; mesh bed leveling M109 S[first_layer_temperature] ; wait for extruder temp G1 Y-3.0 F1000.0 ; go outside print area
G92 E0.0 …
Happy printing!
@Prusa: this would help almost everyone I guess. A print will take only 2 seconds longer.
Is there a reporting function for spam in comments?
My base layers dont stay flat. Filament pulls away and leaves empty spaces and the printer head just catches the hard pieces and pulls up my prints. Looks like water surgmface 8n some spots and the bottom is trashed. Besides this bed does not go flat on the mini
Wow! Looks like water surface.
You must be logged in to post a comment.

3D Print First Layer Problems Explained (With Fixes)

Written by: Tom Bardwell
October 25, 2023
Key Takeaways
- Rough first layer : Caused by nozzle too close to bed. Adjust Z-offset and run calibration test.
- Gaps between lines : Caused by nozzle too far from bed. Level the bed and increase first layer height and width.
- Poor adhesion : Caused by low bed temperature, dirty bed, or incorrect adhesive. Clean the bed, raise the temperature, and use suitable adhesive.
- Inconsistent first layer : Caused by different filament types or printer models. Check the recommended settings and tips for your specific filament and printer.
Your 3D print’s first layer is probably the most important layer — and most common 3D printing problems stem from a poor first layer, so it’s essential to provide proper adhesion to the build plate.
There are a variety of factors that can affect your 3D printer’s first layer failure, and in this article we’ve listed every potential issue, with exactly how to fix each one.
How to fix:
How to fix this first layer issue:, filament specific tips, how to fix:, what are the most common causes of first layer problems.
Here’s a breakdown of the most common culprits behind the problem, why it happens, and how to fix:
- Nozzle too close to the bed
- Nozzle too far away from the print bed
- Print Not Sticking To Bed
- Use The Right Bed Adhesion
- Slow Down First Layer Speed
- Use Brims and Rafts
- Check You Have the Temperature Right Settings
- Adjust Your First Layer Height and Line Width
What Causes a Rough First Layer?
A rough first layer is caused when the printer’s nozzle is positioned too close to the print bed, catching on previous deposited filament and creating unsightly and uneven peaks, ripples, and mounds of filament that affect the overall quality of a print.
Start as you intend to go on, as the saying goes. Left unchecked, the problem can manifest in later layers, which in term may spoil the finish of the parts outer walls/shell. You want to aim for as even and uniform a first layer as possible.

1. Nozzle too close to the bed

Signs that your nozzle might be too close to the bed:
- The printed line is way thinner than desired. It might get so thin that it turns transparent.
- Excess filament is squished upwards at the edges of the current printing line creating a rough surface and wavy patterns. (You can feel the roughness when touching it carefully even during the print.)
- Filament is getting torn off the bed when the next neighboring line is printed.
- Finished prints are hard to remove from the print bed.
Explanation:
- If your nozzle is too close to the bed, there is not enough space to extrude the proper amount of filament. Excess filament is either squished upwards between individual printed lines or isn’t extruded at all, putting additional pressure in the hot end.
- Excess filament that gets squished to the sides and upwards might get torn off the bed on the next pass by the nozzle, destroying adhesion and making the top of your first layer very rough.
- Excess filament might also get picked up by the nozzle and could drip back on your print later. This is especially common for PETG .
- If filament backs up in the hot end because it can’t be extruded due to the nozzle being too close to the bed, your extruder might even get jammed and start clicking.
- Squishing your first layer too much into the bed can lead to prints that are almost impossible to remove from the build plate when printed. These prints can damage your bed when removed, too.

Firstly, ensure your bed is leveled correctly by either doing so manually, or better yet if the printer has it, run automatic bed leveling. After this, you’ll want to adjust the Z-offset, the distance between the nozzle and the print bed, the major concern when trying to eradicate a rough first layer.
We recommend the trusty old paper technique:
- Level the bed and return it to the home position of the Z-axis, then slide a standard piece of A4 printing paper between the nozzle and bed.
- Lower the Z-offset progressively (either in slicer, on the printer interface, or using G-code commands) until the paper is trapped under the nozzle.
- Raise the Z-offset until you only feel a slight resistance as you slide the paper back and forth under the nozzle.
- Once this is done, download an STL for a Z-offset calibration test. Thingiverse is packed with them, so take your pick, but we recommend Thingiverse creator zekettek’s version .
As the test runs, you can make minor adjustments to the Z-offset on the fly, until you’re getting smooth, even print lines.
Remember there’s a fine line between having the nozzle too close and too far from the bed, so don’t raise the Z-offset too high or you’ll open the door to a whole host of other issues linked to first-layer adhesion.
2. Nozzle too far away from the print bed

Signs that your nozzle might be too far away from the bed:
- When looking at the bottom of your printed object, you can clearly make out individual lines with a noticeable gap between each line.
- During 3D printing of the first layer, the individual lines don’t touch each other.
- There’s small gaps where the lines of the infill don’t touch the outlines of the wall.
- The shape of the extruding line is very round. With the proper distance, the extruded line of filament is slightly squished, and pancake-shaped.
- Individual printed lines barely stick to the build plate.
- Parts are warping off the build plate or become loose during the prints.
If your nozzle is too far from the bed, there is not enough filament extruded to properly fill the space between nozzle and bed.
The line currently extruding is barely making contact with the bed. Individual lines making up the first layer are not connected to their neighbors and they’re not touching the outlines of your object’s wall.
All this usually leads to poor adhesion problems like warping or the detaching of your object mid-print.
Adjust your nozzle to the correct bed distance either by tightening the 3 or 4 leveling screws of your printer and using thicker paper stock for manual bed leveling or by adjusting your z-offset value when using a bed leveling sensor. Make sure you’re not pressing down on your bed when leveling it.
If your printer has auto bed leveling , then use these features to correctly level the bed so that the nozzle is not too close.
3. Print Not Sticking To Bed

Signs that your print isn’t sticking:
Your print is detaching from the bed, warping, curling, or, worse, isn’t adhering to the bed at all creating a tangled mess of wasted filament resembling a bird’s nest. The problem is easily diagnosed and you’ll generally know within minutes, if not sooner, if the first layer isn’t sticking to the bed.
There are three common reasons why a print isn’t sticking to the bed, all of which are linked to adhesion, or the capacity for the filament to correctly bond to the print bed.
First, insufficient heated bed temperature or nozzle – filament needs heat to remain in a malleable state to adhere to the bed as it’s extruded from the nozzle and lands on the bed.
Second, the print bed is dirt, caked over with foreign debris preventing the filament from adhering as intended. Natural oils from fingers and hands, dust, left over filament from previous prints, residual adhesive like glue, and general grime – these can all affect adhesion.
Lastly, the bed isn’t leveled correctly or the Z-offset isn’t set correctly. These are generally to blame if a print is sticking on parts of the bed but not others or the nozzle appears to be printing into thin air rather than onto the bed.
A fix for a surprising broad range of 3D printing issues, we recommend leveling the bed as your first port of call, whether manually or using automatic bed leveling features. A basic fix, but one that often gets overlooked when trying to troubleshoot complex problems.

Next, adjust the Z-offset – the distance between the nozzle and bed when the print head is homed – right after leveling the bed. We recommend the classic paper technique: slide it under the nozzle then lower the Z-offset until you feel a slight resistance, then run a calibration test ( like this one ) and adjust the offset until you get a smooth, uniform layer, free of bumps or ripples.
Clean the bed. Depending on the type of build plate (glass, steel, PEI-coated, etc.) the optimal cleaning regime differs, but for most a base damp rag or cloth does the job. For ingrained grime, isopropyl alcohol works well, but tread lightly so as not to damage the plate’s surface. If you have a removable bed, and the blessing from the manufacturer to do so, cleaning it with washing up liquid and hot water works well. Remember to dry off the plate completely before firing up the printer; water and filament don’t mix well.
Raise the bed temperature. It’s best to check the temperature range recommended by the filament manufacturer and start from there, then raise the temperature in small increments until you see improvements in first layer adhesion. Beyond a certain point – 65°C to 70°C – you can safely assume something else is causing the prints not to stick to the bed.
Though no fixes per se, but more workarounds, you can also add rafts to prints to help with adhesion or use third-party adhesives, like glue , painter’s tape, Magigoo, hairspray , and others. Use sparingly, aiming for a light layer.

- PLA likes to be squished more into the bed than other filament types to provide good adhesion.
- PETG usually prints better with a higher nozzle to bed distance to avoid the nozzle picking up filament that might drip on your print later during the print. Also, the extra distance helps prevent excessive adhesion issue that for example might occur when printing on glass or PEI beds.
- TPU and Flexible PLA will also adhere stronger than you might like if printed too close to a PEI or specialist bed surface (such as BuildTak).
4. Use The Right Bed Adhesion
Signs that you aren’t using the right bed adhesion:.
If you’re using an adhesive to encourage better bed adhesion and the 3D print first layer still isn’t sticking properly to the bed, it’s likely you’re using the wrong adhesive.
Different bed surfaces and filaments have different requirements when it comes to bed adhesion. This is linked to their thermal properties and the qualities of the surface used.
The goal of using an adhesive is to promote better first-layer adhesion by creating a sticky layer on the build plate.
If the incorrect adhesive or even any adhesive is used with the wrong type of build plate, then the adhesive won’t help improve adhesion.
Use the right adhesive, as follows:
- PLA : PVA glue, Kapton tape, blue painter’s tape , Magigoo, PEI sheets , hairspray
- ABS : PVA glue, Kapton tape , blue painter’s tape, Magigoo, PEI sheets, hairspray
- PETG : Superglue , Gorilla glue, Magigoo
- TPU : PVA glue, Blue painter’s tape
Though PLA and ABS can generally be printed without adhesive on heated build plates, PETG and TPU nearly always benefit from some adhesive help.

5. Slow Down First Layer Speed
Print speed can also affect first-layer adhesion.
Set the print speed too fast and the filament doesn’t have time to cool sufficiently to bond to the bed causing it to detach from the bed almost immediately and create a messy bird’s nest of filament. The problem is especially pronounced when other settings aren’t dialed to promote strong first layer adhesion, compounding the issue.
To fix the issue, you’ll want to slow down the print speed. Rather than slowing down the entire printing process, jump into your slicer settings and adjust the initial or first-layer heights (different programs have different names for the setting).
We recommend starting slow, at around 30 to 40 mm/s, then lowering in small increments until you see an improvement in first-layer adhesion. Once the first layer is firmly rooted to the bed, the printer can then ramp up the print speed for subsequent layers.
Slowing down the first layer print speed adds a little more time to the print process, but is well worth it. As we’re dealing with the first layer, you can test different speeds quickly as you only need to monitor the printer as the first layer goes down.
6. Use Brims and Rafts

Signs that You Need to Use Brims, Rafts, Skirts:
If you’ve tried all the other most common first layer issue fixes and are still having trouble finding good adhesion, then it may be an option to use an in-slicer adhesion helper, specifically brims and rafts.
A brim is a short edge, usually no more than a few lines that sits around the base on the print’s first layer, helping to improve adhesion by offering a broader and stronger bond to the build plate.
Rafts work in a similar fashion, but adds an entire layer below and around the print’s first layer to create a foundation or base structure to promote strong first layer adhesion.
Skirts deposit a small segment of filament, usually a line or two around the print without touching it. They are useful not just to purge the first few stringy bits of filament emerging from the nozzle, but also to pick up on any potential 3D printing first layer problems before the print starts in earnest.
Rafts, brims, and skirts are also configurable in your slicing software. You set the size, print speed, and other parameters to fine-tune them to your liking and allow you to test what works best for your particular project.
You’ll consume more filament, but it’s worth it for the peace of mind of almost guaranteed first layer adhesion.
We recommend starting with a skirt to pick up on any early signs of issues, then pivoting to a brim, and finally, if those don’t bear fruit, going for a raft.
7. Check You Have the Right Temperature Settings

Signs You Don’t Have the Right Temperature Settings:
A clear sign that your bed temperature is to blame for first layer issues is if the filament isn’t failing to stick properly to the bed. This can range from partial adhesion to the filament failing to stick to the bed at all, to the first layer detaching from the print bed when the printer deposits subsequent layers.
Filament is reliant on the right thermal environment to stick to the bed properly. If the bed temperature is set too low, the filament will cool down before it’s able to bond with the bed surface. By remaining malleable and soft for longer, the filament has more time to stick to the bed properly.
You can adjust bed temperature in your slicer settings. We recommend sticking with the manufacturer recommended range, then raising the temperature in small increments until the adhesion issues disappear.
In most slicers, you can even set a specific first layer temperature, allowing you to further fine tune the printer to secure a solid first layer before lowering the temperature for the layers that follow.
Be wary about cranking up the temperature too high as doing so can cause other issues such as elephant’s foot , whereby an insufficiently cooled, and therefore, soft first layer bulges outwards as the pressure from subsequent layers pushes down on it.
8. Adjust Your First Layer Height and Line Width
If your first layer is not adhering well to the print bed or if it appears uneven and inconsistent, it may be due to incorrect first layer height and line width settings. This can result in poor adhesion, warping, or even print failure.
The first layer height and line width settings play a crucial role in ensuring proper adhesion to the print bed. Increasing the first layer height can help mitigate the effects of slight errors in bed leveling, while increasing the line width allows the layers to squish into the bed and get a better hold.
You can adjust the first layer height and line width in your slicer settings. For the first layer height, we recommend increasing it to around 0.3 mm with a standard 0.4 mm nozzle. This will help compensate for any slight unevenness in the print bed and improve adhesion.
For the first layer line width, try increasing the setting to twice the nozzle bore size (usually 0.4 mm). This will allow the layers to spread out more and adhere better to the print bed.
Be cautious when adjusting these settings, as setting them too high can lead to over-extrusion and other print quality issues. It’s essential to find the right balance that works for your specific printer and filament.
By fine-tuning these settings, you can achieve a solid first layer that adheres well to the print bed and provides a strong foundation for the rest of your print.
First Layer 3D Printing Tips for Specific 3D Printers

- Prusa MK2/MK2S : The Prusa’s PINDA sensor is temperature sensitive and will give false readings if the probe is heated before the mesh bed leveling. Raise your probe a good distance off the bed during the preheat before mesh leveling at the beginning of a print.
- Creality CR10 /Tevo Tornado : Both printers come with a fairly large bed. And they’re not necessarily the flattest. Try leveling the bed not at the outermost corners but rather a bit further in.
- Wanhao i3 : Keep your hands well away from the bed while feeling the paper dragging during the leveling process. The stock bed frame is rather flimsy and looking at it sternly screws up the results. Repeat leveling procedure at least 3-4 times or more to make sure it stays level. Try leveling at full printing temp, use Preheat in the menu.
- Tevo Tarantula : The green stock SN04 sensor is unreliable. Level manually and keep your hands well away from the bed while feeling the paper dragging during the leveling process. The stock bed frame is rather flimsy and looking at it sternly screws up the results. Repeat leveling procedure at least 3-4 times or more to make sure it stays level. Try leveling at full printing temp, use Preheat in the menu.
- Ultimaker 2/2+ : The bed carrier flexes a lot when turning the leveling screws, especially the ones in the front. Keep hands clear. Don’t bother with the bed level assistant, just run through it and do the rest manually.
- Ender 3 : The coupler connecting the Bowden PTFE tubing to the hot end is known to be of poor quality, allowing the tube to slip as it exits the extruder, which can affect extrusion, which in turn can lead to first layer issues. Replace the coupler with a more reliable alternative.
How Do You Improve the First Layer of a 3D Print?

First, make sure your bed is correctly level, either by leveling it manually or using an in-built automatic bed leveling system if you have one.
After leveling, adjust the Z-offset to ensure the nozzle is neither too close or too far from the bed.
Thirdly, ensure the heated bed temperature is set within the range recommended by the filament manufacturer. Don’t hesitate to raise the temperature in small increments to improve first-layer adhesion.
Cleaning the build plate regularly to remove any filament residue, dust, grime, and natural oils is also recommended to improve the first layer.
If all these don’t help, consider using an adhesive such as glue, glue stick , tape, or hairspray, and slicing your models to include rafts, brims, and skirts.
What Should a First Layer Look Like in 3D Printing?
The first layer in 3D printing should look like a smooth and neat collection of slightly overlapping extrusions that bond uniformly to one another and are free of bumps, peaks, and other blemishes. The lines should be squished onto the build surface so that there are no holes or gaps between them, but not enough to cause bulges, flare outs, or bubbles. A consistent pattern is a sign of a perfect first layer.
What Causes Ripples in the First Layer of a 3D Print?
Ripples on the first layer of a 3D print is a sign that the nozzle is positioned too close to the build surface. You can fix this by adjusting the Z-offset and setting the nozzle closer to the bed, but not too close or you’ll usher in a new set of problems, including elephant’s foot.

What Is the First Layer of a 3D Print?
The first layer of a 3D print is the initial layer that’s deposited onto the build surface at the start of the 3D printing process. The first layer is the foundational layer upon which the rest of the print depends. A solid first layer sets up a print for success.
How Thick Should the First 3D Print Layer Be?
There’s no blanket answer to this as it depends on many factors including the diameter of your nozzle, what type of filament you’re using, and the size of part/model you are printing. For most hobby projects using PLA, we recommend a 0.2 mm initial layer height, but adjust this based on results.
How to Slow Down the First Layer in a 3D Print?
You can adjust the first layer or initial layer print speed in your slicer software before sending the sliced file to your printer for printing.
How Do You Make the First Layer of a 3D Printer Stick?
To make the first layer of a 3D printer stick, there are several steps. First, level the bed and set the Z-offset. Cleaning the print surface also helps as does using an adhesive such as glue, hairspray, or tape. You may also want to slow down the first layer print speed and adjust the bed temperature higher to allow the filament enough heat to bond with the bed before cooling.
Related posts:
- Best Hairspray for 3D Printing
- Best Affordable Auto Leveling 3D Printers
- What is a 3D Printing Raft, Brim or Skirt
- How To Fix PETG Not Sticking to the Print Bed
- 3D Print Not Sticking To Bed: All Problems Fixed
- How To Fix PLA Not Sticking to the Print Bed
- How To Fix Under Extrusion Problems or Clicking Sounds?
- Prints Pillowing, 3D Printer Stringing and Layers Splitting
- All Fixes for Filament Sticking to PTFE Tube
Was this content helpful? Give us your feedback here.

Tom Bardwell
Learn More About 3D Sourced

6 Best Large 3D Printers in 2024 (All Budgets)

5 Best 3D Printers for Miniatures & Terrain in 2024

4 Fastest 3D Printers in 2024 (All Budgets)
The 56+ Coolest Things To 3D Print in 2023

44 Common 3D Print Problems – Troubleshooting Issues 2023

13 Best Free 3D Modeling Software (For Beginners) 2024

11 Best 3D Printers in 2024 (All Budgets)

5 Best 3D Printers For Beginners in 2024
Exceptional value with anycubic’s latest 3d printer deals.

40+ 3D Printing Industry Statistics (2024 Update)

22+ Coolest 3D Printed Robotics Projects (2024 Update)

8 Best DIY 3D Printer Kits in 2024 (From $150!)

3D Printing In Space – Top Projects in 2023

Best 3D Printed Shoes in 2023 (Sneakers, Heels & More)

The Best 3D Printer Buyer's Guide Resource & 3D Printer Reviews
[email protected]
3D Printers 3D Scanners 3D Software Guides Rankings Interviews News
Most Popular
Best 3D Printers Best 3D Scanners Best 3D Modeling Software Best 3D Slicers Best Resin 3D Printers Fastest 3D Printers Best Large 3D Printers
Useful Links
About us About the team How we do our reviews Careers Contact Us
Sign up to our newsletter
Privacy policy
Affiliate disclaimer
Editorial policy
10 Causes and Fixes of 3D Printer Not Printing

3D printers can be complex devices, which means that there are many things that can go wrong when printing. Whether your problem is that your printer isn’t printing at all or you are struggling with some of the common printing issues, knowing how to fix these issues can improve your experience with your 3D printer. This will address 10 of the most common issues with a 3D printer not printing or printing improperly to help you better understand these issues and fix them.
So what are 10 causes and fixes of 3D printer not printing?
Why is the 3Dprinter not printing?
When it comes to the 3D printer, there are a lot of reasons why your printer won’t print or has trouble printing out your project as you intended. These 10 major issues include:
- Clogged Nozzle/Extruder
- Filament Doesn’t Stick
- Other Filament Issues
- Nozzle Too Close
- Plastic is Overheating
- Over-extrusion
- Elephant’s foot
- Snapped Filament
- Printer Stops Extruding while printing
There are plenty of other reasons why your 3D printer is having a problem, but these are some of the most common causes that you will likely encounter. By reading on, you can learn all about the different problems as well as the ways that you can fix these problems.
Clogged Nozzle/Extruder: What is this problem?
You will inevitably have to deal with a clogged extruder at some point during your time with a 3D printer. The first sign that this is a potential problem for you is that you will hear a loud, grinding noise that is disturbing to the ears. After hearing the noise, you may look and notice that there is no filament coming out of the extruder. If the nozzle is only partially clogged, the filament will still come out but you will notice signs of under-extrusion such as cracks, thin layers, and holes in the finished project.
How does the extruder get clogged? There are a few different causes for this problem. Typically, this is as a result of leftover filament clogging up the nozzle. This may also be because there was some other obstruction that got into the extruder, such as dust. You can prevent this problem by using high-quality filament and printing at the proper temperature. Regular maintenance, including cleaning and lubricating the extruder.
How do you fix a clogged nozzle/extruder?
There are 2 different ways that you can fix this problem. The first approach is to remove your filament from the printer. Then, you will need to heat up the extruder to the last temperature that you used or the temperature that you use most often. After heating up the extruder, take a needle or something else that is small enough to fit inside of the extruder’s hole. It could take several attempts to clear out the blockage and this approach works best for PLA or if the problem is the result of dust.
The second option is to do a cold pull, which is the best approach if you are working with filaments that are flexible, like nylon. This process starts by heating up the temperature of the nozzle to the same temperature as the filament. You will then push out as much filament as you can manually, without putting too much pressure on it. Once you have done this, you will need to let the nozzle cool down to about 100 degrees Celsius. Then, you can pull your filament up and out of the nozzle. This approach can remove the obstruction out and the filament so that you can load another spool (or reload that spool) and start your project again.
If neither of these approaches work, you will probably have to take apart the extruder to remove the obstruction or soak it in some liquid to dissolve the obstruction.
Filament Doesn’t Stick: What is this problem?
When printing out your project, the project will depend on whether or not that first layer sticks properly to the surface you are printing it on. You may notice that everything looks like a crazy string everywhere if this is a problem. This is easily one of the most common problem that people encounter when they use a 3D printer. The first layer is the foundation of the project, so if this doesn’t print out well then the rest of the project will suffer. If you notice this is an issue, you need to do what you can to fix it right away.
There are a couple of reasons why this is happening, though the most common issue is that the printer bed is not properly leveled.
How do you fix the filament not sticking?
The first thing that you should check is to make sure that the bed temperature is high enough so that it prevents the project from cooling down. When it cools down, it will begin to curl up as it contracts. You may need to try a few different temperatures until you achieve the look that you want for your project.
The next thing that you should check is the vertical Z-axis. This needs to be at the correct height to get the perfect amount of pressure between the extruder and the print bed. Make sure that this is not only at the right height, but it’s also leveled to ensure that evenness that is so important to a solid foundation.
If nothing else works, you may want to make sure that the print bed is clean of grease and debris, which could prevent the filament from sticking. You will need to be careful about how you clean it as you don’t want to scratch the surface or cause some other type of damage that can negatively impact future projects.
Knotted Filament: What is this problem?
Did you start a print project, only when you checked on your print you notice that it stopped at some point during the process? If your printer just suddenly stops printing in the middle of a project, the reason is usually as a result of a knotted filament. This isn’t a manufacturer defect that you can blame on anyone but user error.
When you look at a new spool, you will notice that the filament is either taped down to its spool or it gets weaved through any of the holes on the edge of the spool. If you cut the filament loose, the tension will make it so that the filament will uncoil. The problem here is that the filament can slip under another coil, which causes it to tangle and become knotted. You may also have not taken the right amount of care when changing the filament, which caused it to knot up.
The good news is that in both of these cases, it can be a relatively simple process to tangle the knots.
How do you fix knotted filament?
Even for those more difficult looking knotted filaments, it is fixable. It’s also important to know that this is fixable without you having to uncoil the entire filament spool. One of the most important things to understand is that you can’t just uncoil the filament to find the knot. This will just lead you to making it much worse than it was before you tried to fix it.
The best approach is to give yourself enough slack so that you can create entire loops that go over the edge of the filament spool. As you first do this, you may notice that there are 3 “paths” of filament. This means that you still need to get the knot out. You should continue this process until you only notice 1 path. This will mean that you have gotten the tangle off of the spool. At this point, you can start to respool the filament, keeping tension on then end and getting out knots as needed through this process. Once the knot has been completely untangled, you need to be sure that you use tape or clip to pass the filament through a hole on the side of the spool.
A knotted filament is a problem that can be prevented. You should avoid getting to the end of the filament unless it’s still tight enough where it doesn’t unspool or not letting the filament go until the end unless it’s in the extruder. Maintaining the control end of the filament spool can also help you prevent this problem.
Nozzle too Close: What is this problem?
Have you loaded everything in right but nothing is printing out? Your issue could be that the nozzle is too close to the print bed. If you have properly loaded the filament into the printer and there’s nothing else that appears wrong with the printer but it’s still not printing, this is generally a sign that the print bed and nozzle are too close together.
This can be a significant problem. This could cause the filament to not stick properly or you lose out on layers of your project, or this could lead to a blockages as the filament gets backed up into the extruder. If this happens, you will end up with a bigger problem thanks to any blockages that this may cause.
There are a few reasons why this could have happened. Maybe you accidentally turned the print bed in a way that moved it too close to the nozzle. Maybe when you set up the printer, you set the print bed up too close to the nozzle. Whatever the case may be, this can usually be a pretty simple fix.
How do you fix the nozzle being too close to the print bed?
When it comes to fixing the issue of the nozzle being too close to your print bed, there are a couple of different approaches that you can take. The first approach is to do a z-axis offset. This approach requires you to move the nozzle so that it isn’t too close. For the most part, 3D printers have a setting within their system settings to do this for you. You are able to use the program to give the z-axis a positive value, which will raise the nozzle higher. However, you need to remember that a negative value can fix any sticking issues that you may be having. What this means for you is that you need to find the best balance between the printer not printing because the nozzle is too close or the filament not sticking because it’s too far away.
The other option you have is to just simply lower the print bed. The problem with this solution is that you may not always have the option of lowering the print bed, depending on the 3D printer that you have. If your 3D printer does have this capability, you can try this approach as well. You just have to remember that when you do this, you have to make other adjustments to your printer as well. This includes releveling and recalibrating the print bed.
Printer Overheating: What is this problem?
Overheating can be a major problem for a 3D printer, one that can cause serious issues. When overheating happens, simple things like misshaped or warped projects can occur. It can also lead to the printer inevitably shutting down and being unable to finish up the print. The printer can not only overheat, it can also cause the filament to overheat.
How do you fix the printer overheating problem?
One of the best approaches to fix this problem that you can take is to cool every layer. Typically, fans come with their own fans already but you may want to spend the money to get another fan. Adding another fan can make the cooling process faster and far more effective.
There are other ways that you can help this problem, such as lowering the temperature. However, this can cause a wide variety of different issues. It can be difficult to balance the quality of the finished project with the lower temperature, so this approach will require some patience. This is also why this approach is considered to be a last resort. Another alternative that you can consider is to reduce the speed of printing your project. By reducing the printing speed, you are giving the layers an adequate amount of time to cool off while you are printing, which can help to prevent these problems.
Over-Extrusion: What is this problem?
A common problem that 3D printer users of all experience levels face is over-extrusion. This problem occurs when your 3D printer is pushing out more plastic than it should be and can cause a blockage or jam at the end of the nozzle. As this jams up, this can lead to a more serious blockage and can lead to your printer overheating.
You can notice that this is an issue because you will see signs of the plastic stringing or oozing out. The minute you notice these signs, you should check to see if your printer has an over-extrusion problem.
How do you fix over-extrusion?
You have a few different approaches that you can take here. One of the first things that you should do is to decrease the extrusion multiplier. You can change the flow setting in the 3D printer software that you are using to print from, which slows the rate that the 3D printer extrudes plastic. You should decrease this rate by about 2.5% increments until you achieve the appropriate level of extrusion.
If doing this doesn’t work, then you need to take a different approach. The next approach that you should try out is to lower the print temperature. When you use a high temperature for your 3D printing, the filament ends up melting faster, causing too much filament to come out of the extruder. Slowly decrease the temperature until you get to the point where it’s melting as it’s intended to. You can lower the temperature in 10 degree increments until you achieve the perfect level.
Warping: What is this problem?
Warping is an incredibly common problem that people with 3D printers has is with warping. You will notice warping typically at the bottom of the project, where it will look curled up or just uneven. You may even notice that the project is completely lifted up off of the printing bed. The print becomes smaller as it cools off, but problems occur when it starts to warp too much that your print doesn’t look or function as you need it to.
How do you fix warping?
For the most part, warping is usually always caused by temperature control issues. This means that it’s easier to determine what the cause is, so that you have an easier time in fixing the problem. There are 2 primary fixes that you can use to remedy this issue.
The first option that you can use to fix the problem is to use a print bed that has been heated so that the filaments can have an easier time sticking to the print bed. Most high temperature filaments such as ABS can gain a lot of benefit from using a print bed that is heated to prevent warping, but PLA can as well. What’s great about heated print beds is that this can not only prevent the cooling and warping that can occur, but it can also help the print stick better to the board to get a better quality print.
Another approach that you can take is to take a look at the type of printer that you are using. When you use an open-frame or semi-enclosed printer, your print is going to be more susceptible to the environment. This means that if there’s so much as a draft of cool wind coming into the area, your print can be negatively impacted. If this is a problem for you, you may want to consider building or buying an enclosure that can keep your printing process more controlled. This will prevent the environment from impacting your print, improving the print quality.
Elephant’s Foot: What is this problem?
The elephant’s foot is the term that has been given to when the base has an outward bulge. To put it more simply, this term refers to when the print curves or bows at the bottom of the base. While heated beds are generally a great tool to use to prevent a lot of common issues when printing on your 3D printer, it can also be the cause of some issues as well. Elephant’s foot is one of the issues that can be attributed to your heated print bed.
Taller prints are going to be more susceptible to this problem, since the weight of the print will push down on the print and create this effect on the base.
How do you fix Elephant’s Foot?
One of the first things that you should look at is if the print bed is even. This is especially true if you just noticed that this is a new problem. You should check the printer bed to see that it is level according to the specifications of your printer. You can also try to manually level your print bed, as this can be a more accurate way to level the print.
Is your print bed level and this is still an issue? You may need to adjust the settings on your printer. You should first try raising up the extruder just a little bit, which can stop the extruder from interfering with how well your first layers print out. You will then want to try lowering the temperature of your heated print bed, which will allow the first layers to dry a little quicker. Lastly, you can lower the speed of extrusion for the first layer as this can give the filament more time to become solid and stick to the print bed.
Snapped Filament: What is this problem?
Snapped filaments can occur for a few primary reasons. One reason is that the moisture causes the filament to get brittle and snap. This is why filament is typically stored in a plastic bag, as this can help keep the moisture out. These bags can be vacuum sealed or have silica beads. This is just one issue that can occur.
Another problem is that there is mechanical stress caused by being curled in a reel for a longer time. This can cause a lot of tension that causes the filament to be brittle and lack flexibility. Any sections of filament that are held straight will be more likely to break in this case.
Lastly, there is the problem of using lower quality filament for your project. You may notice that you have a problem with snapped filaments a lot when you buy a specific brand but not with others. You shouldn’t confuse high quality filament with the most expensive, as you can find some inexpensive but high quality filament.
How do you fix a snapped filament?
If you keep trying the same brand of filament and end up with the same issues, the first thing that you should try is switching to a higher quality brand. Be careful to check reviews before buying to ensure that you are investing in a high quality filament. If this doesn’t work, you will want to check to make sure that your temperature and flow rate are properly set.
You can also prevent this problem by:
- Properly storing the filament
- Drying out filament in case of moisture
- Reduce the amount of moisture in the air
Printer Stops Extruding While Printing: What is this problem?
It’s a common problem to have the printer stop extruding during the printing process. There are a few reasons why this happens, including:
- Printer is Out of Filament
If you are working on a project that takes a lot of filament, you should be sure that you have enough filament in the printer to work on the project. It’s always a good idea to check the spool before you start working on any project.
- Extruder Clogged While Printing
While the printer was printing, it is possible that the extruder became clogged. Look to see if you notice signs of the extruder being clogged. If not, check for any dust or debris in the spool that might have clogged the extruder.
- The Extruder Motor Has Overheated
As the printer prints, the mechanism in it is constantly in motion. This can cause the motor to overheat as it moves back and forth printing the project out.
How do you fix the printer stopping extrusion while printing?
The first thing that you should do is to check to see if you have the amount of filament that you need for the project. If this is the problem, you just need to put a new spool in. If this isn’t the issue, you should check to see if the extruder clogged while printing. Clean out the extruder and/or filament spool and you should be able to print uninterrupted again. If neither of these are the issue, you may need to just shut off your printer and let it cool down.
Recent Posts
Is Buying a 3D Printer Worth It? (Useful Guide)
If you are learning about 3D printers recently, it might sound like an awesome tool to you. Indeed, it’s a productive machine, but everyone might not find it useful. The initial investment is high,...
How Much Does 3D Printing Cost? Learn From My Expenses
3D printing costs largely depend on what and how you are going to print your 3D object. If you purchase your own 3D printing machine, the most significant expense will be the cost of the 3D printing...
Get the Reddit app
/r/3DPrinting is a place where makers of all skill levels and walks of life can learn about and discuss 3D printing and development of 3D printed parts and devices.
I came home from work to find out this is how my print failed. How do I fix this or is my printer just dead now?
IMAGES
VIDEO
COMMENTS
TikTok user 3d_printer_stuff shared a series of videos detailing how it all came together, including one tutorial that shows the same steps you'd need to take if you wanted technology to do your homework, too. The student began by opening up ChatGPT and entering the task in the program. They then instructed the AI to write the assignment.
"In this video, we'll show you how to use the website 3dwriter.com and a 3D printer to bring your chatbot's outputs to life! We'll guide you through the proc...
@3d_printer_stuff ♬ Calm LoFi song(882353) - S_R. Of course, as many comments suggest, the next logical step in 3d_printer_stuff's scheme should be to train an AI to mimic their handwriting.
Well it wrote a quite underwhelming homework with weird sentences: Pyramids are ancient structures in Egypt & North Africa. Burial places for pharaohs & families. Most famous: Cheops pyramid in Giza (2560 BC). Made of stones, mostly square base, sloping side. Top. Chambers contain tomb of pharaoh.
A simple demonstration of chatGPT and 3D printing technology!chatGPT website: https://openai.com/blog/chatgpt/Text from gCode: https://3dwriter.io/Visit us a...
Sure, but the problem here is that the 3d printer has the pen straight up and down, not at an angle. Maybe since the pen is only fixed with duct tape, there will be enough variation between letters. Probably not though. The calligraphy ai does not use a font, it literally generates every stroke.
Let alone, having the tech savvy to acquire, configure, calibrate, and use a 3D printer or plotter; the utilize that tutorial successfully. And the awareness and comfort with chatGPT (or similar tools); etc. Lastly, on the other point, "top of the class" I'll adjust my comment above to mean "functionally top of their class".
3D printer does my homework that ChatGPT write 📝 #shorts
Step 2: Make Y Axis Slider. Take two 42 cm long 8 mm threaded rods, 8 mm nuts, and the stepper motor holder after all the 3D-printed parts have been completed printing. Then, as shown in the picture, passing this threaded road from the bottom holes in the stepper motor holder.
3D printing is the automated process of building a three-dimensional object by adding material rather than taking material away (as in drilling or machining). The process, also known as additive manufacturing, was first introduced in the late 1980s. It was first commercially used as a rapid prototyping method in the aerospace and automotive ...
Picture a robot-controlled hot glue gun that uses plastic instead of glue, and you have the basics of a 3D printer. Strands of plastic are fed into a print head, which is heated up to melt the material. The print head moves around very precisely in three dimensions and drops lines of plastic onto the print bed---the table on which it prints.
To be honest, there is no reason why ChatGPT can't do your homework. But, whether it can do it well is another story. ChatGPT is a very powerful and versatile online AI chatbot. You can quite literally ask the model anything and it will generate a text response to answer your request. There are headlines about the model's ability to write ...
Also choosing a specific location for the Z-scar will prevent the z-scar from splattering 3D printing blobs all over the print and confines them in more or less straight line along the Z-axis. Dents. 3D printer blobs and zits also appear on the surface of your print in random locations if your filament absorbed too much moisture.
This is our next project.
3D Printer Does Homework ChatGPT Wrote!!! The craziest thing is that this was probably a thousand times harder than just straight up doing your homework. I don't judge though, because this person probably learned way more doing this. 31K subscribers in the TheOfficialPodcast community.
Decrease the printing speed - If everything above failed, then try decreasing the printing speed. The easiest way how to do it is by rotating the knob during the printing process. Anti-clockwise = decrease speed, Clockwise = increase speed. We suggest decreasing the speed to about 75% for first three layers, then return it to normal.
1. Research and describe another use of 3D printing not mentioned in today's lesson. Expect many different answers from students e.g. The 3D Printing of drugs to help with medicine. The 3D Printing of synthetic organs for medical research. The use of 3D Printing in consumer goods such as Jewellery and apparal.
Yes, the actual ChatGPT, not text-davinci or other models. I am a bot, and this action was performed automatically. Please contact the moderators of this subreddit if you have any questions or concerns. 1. Reply. MoonlightEclipse420 • 7 mo. ago. This is insane, we truly are in the future. 1. Reply.
During 3D printing of the first layer, the individual lines don't touch each other. There's small gaps where the lines of the infill don't touch the outlines of the wall. The shape of the extruding line is very round. With the proper distance, the extruded line of filament is slightly squished, and pancake-shaped.
3D Printer Does My Homework That ChatGR 3d
Nozzle Too Close. Plastic is Overheating. Over-extrusion. Warping. Elephant's foot. Snapped Filament. Printer Stops Extruding while printing. There are plenty of other reasons why your 3D printer is having a problem, but these are some of the most common causes that you will likely encounter.
Hey ! My assignment is about predicting the future within 30 years on a particular subject. I naturally chose 3d printing! I need some interviews …
This is a very common issue in 3D Printing and can be fixed very easily. Before actually taking the right steps though it is advised to heat the hotend, disassemble the individual parts completely and clean them as thoroughly as you can from leaked Filament.