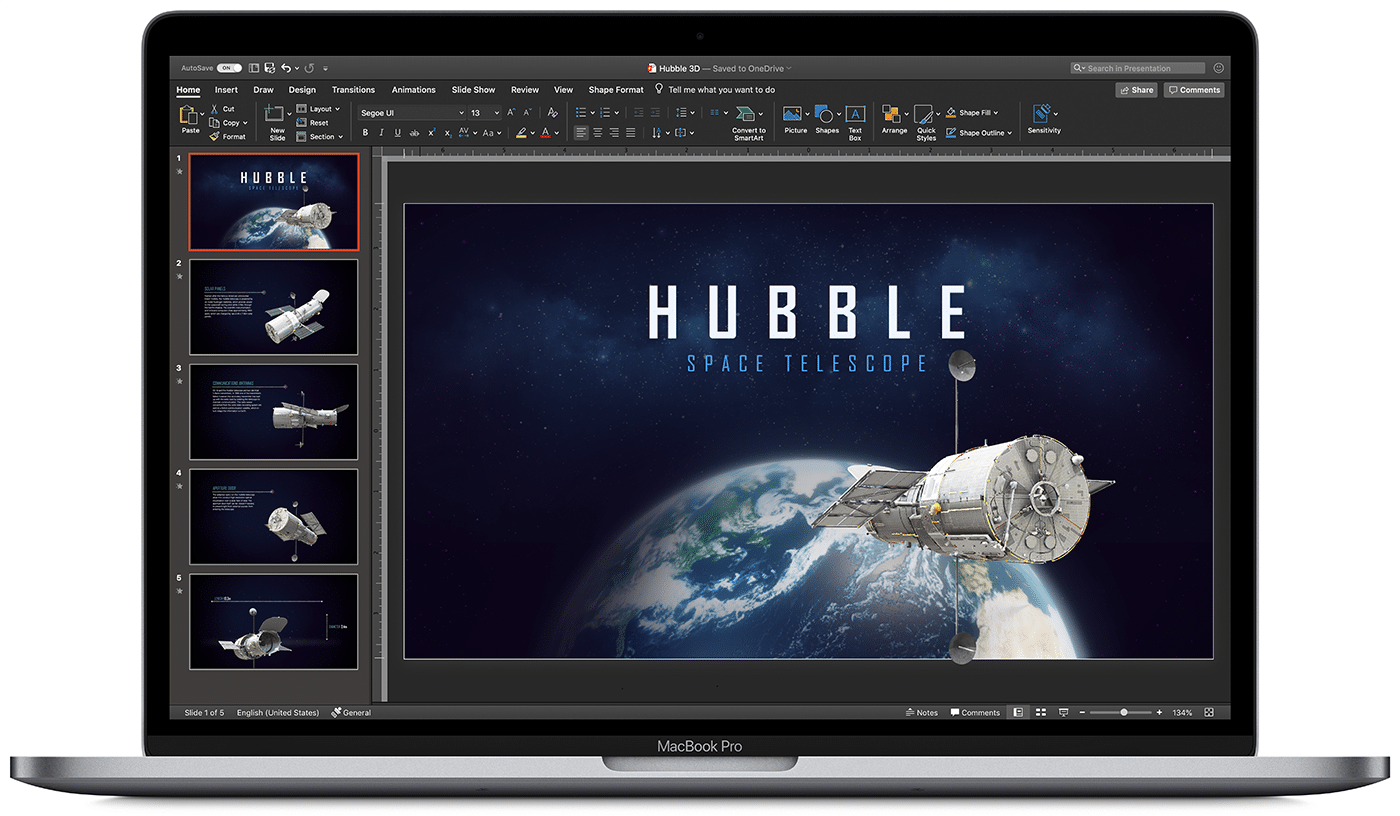
How to Make a PowerPoint on Mac? (A Step-by-Step Guide)
If you’ve ever wanted to create a professional-level PowerPoint on your Mac, you’re in luck! In this step-by-step guide, we’ll walk you through the entire process from start to finish.
By the end of this guide, you’ll be a PowerPoint pro on your Mac!

Short Answer
When you are finished, you can save your presentation and share it with others.
What is Keynote?
Keynote provides users with a wide range of tools and features, including customizable slides, themes, animations, and more.
How to Open Keynote on Mac
Opening the Keynote app on a Mac computer is quite simple.
From there, you will find the Keynote app.
You can then double-click on the Keynote icon to open the app.
You can then type in “Keynote” in the search bar and hit the “Enter” key.
You can customize your slides by adding text, images, and other media.
Once you have created your presentation, you can save it as a .pptx file and share it with others.
With the Keynote app, you can easily create a professional-looking PowerPoint on a Mac computer.
Creating a PowerPoint on a Mac
Keynote is the presentation software for Mac computers, and it makes creating a presentation simple and easy.
You can also customize the layout of your slides, allowing you to add different elements and adjust their placement.
With the Keynote app, creating a professional-looking PowerPoint on a Mac computer is easy and stress-free.
Customizing the Slides
Customizing the slides is an important part of creating a stunning PowerPoint presentation on a Mac.
To add text to your slides, simply select the text box and type in your desired text.
Additionally, Keynote offers a range of themes and animations to help you further customize your presentation.
To access the themes and animations, simply click on the Themes or Animations tabs in the upper right-hand corner of the app.
So, if youre looking to create an impressive presentation, the Keynote app is the perfect tool for the job.
Adding Text, Images, and Media
To add text, select the text box icon from the top menu, and then type in the text you want to include in the text box.
To add images, click the Add Image icon from the top menu, and then select an image from your computer, or add an image from the web.
To do this, click the Add Audio or Add Video icon from the top menu, and then select the audio or video file you want to include.
Once you have added all the elements, you can save your presentation as a .pptx file and share it with others.
Utilizing Themes and Animations
With the help of themes and animations, you can create a presentation that is visually appealing and engaging.
You can also choose from several animation styles to give your presentation a more dynamic feel.
For instance, you can use animations to draw attention to a particular slide or element in your presentation.
From there, you can customize your slides with the desired theme and animations.
With the help of themes and animations, you can create a presentation that is visually appealing and will help to emphasize certain points you want to make.
Saving and Sharing Your PowerPoint
To save your PowerPoint, click the File menu at the top of the Keynote window and then click Save.
To export your presentation to a PDF file, click the File menu and then select Export.
Here, you can enter the email addresses of the people you would like to share your presentation with.
This will open up the presentation in the Keynote app and you can make any changes that you wish.
Final Thoughts
Creating a professional-looking PowerPoint on a Mac computer doesn’t have to be difficult.
So get to it and start making your own PowerPoint today!
Recent Posts
How to Use a Mac With PowerPoint: A Step-by-Step Guide
Using a Mac with PowerPoint is simple. First, make sure you have PowerPoint installed on your Mac. You can find it at the App Store or through a Microsoft 365 subscription. Open PowerPoint, and you’ll be greeted with a range of templates to start your presentation. From here, you can add text, images, and animations to create an engaging slideshow. Once done, you can present directly from your Mac or save your presentation to share with others.
After you’ve completed your PowerPoint presentation on your Mac, you’ll have a professional and compelling visual aid to support your speech or lecture. You can also share it with others or export it into different formats such as PDF, video, or even a web page.
Introduction
Are you ready to impress your audience with a stunning presentation? If you’re a Mac user, fear not – using PowerPoint on your macOS is as smooth as on any Windows PC. Let’s be honest, presentations are a part of life: whether you’re a student, a professional, or just someone with a story to tell, at some point, you’re going to need to put some slides together. PowerPoint for Mac has all the tools you need to create a presentation that’s both visually captivating and content-rich.
Why is this important? Well, PowerPoint presentations are a staple in the professional world. They’re used for everything from business pitches to academic lectures. Knowing how to create an effective PowerPoint presentation on your Mac could be the difference between persuading your audience or leaving them unimpressed. And who is this relevant to? Everyone! Whether you’re a newbie to presentations or a seasoned speaker looking to refine your skills, this guide will help you master PowerPoint on your Mac.
Step-by-Step Tutorial: Using PowerPoint on a Mac
Before jumping in, let’s clarify what you’ll achieve by following these steps. By the end, you’ll be able to create, edit, and present a PowerPoint slideshow on your Mac.
Step 1: Install PowerPoint
Install PowerPoint on your Mac from the App Store or through a Microsoft 365 subscription.
After installing PowerPoint, you’ll need to sign in with your Microsoft account to activate the software, then you’ll be ready to start creating your presentation.
Step 2: Open PowerPoint
Open PowerPoint and choose a template or open a blank presentation.
PowerPoint offers a variety of templates to suit different presentation styles. If you choose to start with a blank slate, you’ll have complete creative freedom.
Step 3: Add Content
Add slides and content such as text, images, and shapes to your presentation.
Remember to keep your slides simple and not clutter them with too much content. Visual aids should support your speech, not replace it.
Step 4: Customize Your Slides
Customize your slides’ design with themes, colors, and animations.
This step is where you can get creative with your presentation’s look and feel. Just be sure not to go overboard with animations – they should enhance your presentation, not distract from it.
Step 5: Present Your Slideshow
Present your slideshow directly from your Mac or save it to share with others.
You can start your presentation by clicking the ‘Slide Show’ tab and then ‘Play from Start’. Make sure you practice your presentation beforehand to ensure everything runs smoothly.
| Benefit | Explanation |
|---|---|
| User-Friendly Interface | PowerPoint for Mac has a clean and intuitive interface, making it easy for users to navigate and find the necessary tools. |
| Compatibility with Windows | Files created in PowerPoint for Mac are compatible with PowerPoint on Windows, ensuring seamless sharing and collaboration. |
| Multimedia Integration | PowerPoint for Mac allows for easy integration of multimedia elements such as audio, video, and images, enhancing the presentation’s impact. |
| Drawback | Explanation |
|---|---|
| Cost | PowerPoint for Mac requires a purchase or a Microsoft 365 subscription, which may be a barrier for some users. |
| Learning Curve | While user-friendly, new users may still face a learning curve to utilize all the features effectively. |
| System Requirements | PowerPoint can be resource-intensive, potentially affecting performance on older Mac models. |
Additional Information
Now, let’s sprinkle in some extra tidbits that could elevate your PowerPoint game on a Mac. First off, did you know that PowerPoint for Mac supports real-time collaboration? Yup, you can work with your teammates on the same presentation at the same time, no matter where you are. And if you’re all about shortcuts, PowerPoint for Mac has plenty. For instance, pressing Command + Shift + N instantly creates a new slide.
Another neat feature is the Presenter View, which lets you see your notes, the upcoming slide, and a timer, all while the audience only sees the current slide. And for those who value accessibility, PowerPoint for Mac has tools to make presentations more accessible, including options for larger text and high contrast. Just remember, when using PowerPoint on a Mac, you have all the essentials at your fingertips to create presentations that are not just informational, but also memorable.
- Install PowerPoint on your Mac from the App Store or Microsoft 365.
- Open PowerPoint and select a template or start with a blank presentation.
- Add and customize your slides with text, images, and animations.
- Present directly from your Mac or save your presentation for later use.
Frequently Asked Questions
Can i use powerpoint on a mac.
Yes, PowerPoint is available for Mac users and can be downloaded from the App Store or included in a Microsoft 365 subscription.
Is PowerPoint for Mac different from Windows?
While there are some differences in design and available features, PowerPoint for Mac offers a comparable experience to the Windows version.
Can I collaborate with others using PowerPoint for Mac?
Absolutely! PowerPoint for Mac supports real-time collaboration, allowing multiple users to work on the same presentation simultaneously.
Can I open a PowerPoint presentation made on a Mac on a Windows PC?
Yes, presentations made in PowerPoint for Mac are compatible with PowerPoint for Windows, ensuring easy file sharing and collaboration.
Does PowerPoint for Mac support Presenter View?
Yes, Presenter View is available in PowerPoint for Mac, providing speakers with a private view of their notes and upcoming slides while presenting.
In conclusion, mastering the use of PowerPoint on a Mac can be a game-changer for anyone looking to create impactful and persuasive presentations. Whether you’re a student, educator, entrepreneur, or professional, the ability to present your ideas clearly and attractively is invaluable.
So, dive in, explore the features, and harness the power of PowerPoint on your Mac to captivate your audience. Remember, a well-crafted presentation can be the key to success. Happy presenting!

Matthew Burleigh has been writing tech tutorials since 2008. His writing has appeared on dozens of different websites and been read over 50 million times.
After receiving his Bachelor’s and Master’s degrees in Computer Science he spent several years working in IT management for small businesses. However, he now works full time writing content online and creating websites.
His main writing topics include iPhones, Microsoft Office, Google Apps, Android, and Photoshop, but he has also written about many other tech topics as well.
Read his full bio here.
Share this:
Related posts:.
- Can I Convert My Powerpoint to Google Slides?
- How to Save Powerpoint as PDF with Notes
- How to Drag Slides From One PowerPoint to Another: A Step-by-Step Guide
- How to Make a Powerpoint Slide Vertical in Powerpoint 2013
- How to Set Time for Slides in Powerpoint
- What Are Benefits of PowerPoint? A Comprehensive Guide
- How to Combine PowerPoint Presentations With Different Orientations
- How to Check Word Count on Powerpoint 2010
- How to Insert Slides from Another Presentation in Powerpoint 2010
- How to Change Hyperlink Color in Powerpoint 2010 (An Easy 5 Step Guide)
- How Is Microsoft PowerPoint Used in Business: A Comprehensive Guide
- How to Unhide a Slide in Powerpoint 2013
- How to Convert a PowerPoint to Word and Edit with Ease
- How to Loop a Slideshow on Powerpoint 2013
- How to: Effortlessly Create PowerPoint Looping Presentations
- How to Change the Font on All Slides in Google Slides
- How to Change Line Spacing in Powerpoint for Every Slide at Once
- How to Insert Check Mark in Powerpoint for Office 365
- How to Start PowerPoint: A Step-by-Step Guide for Beginners
- How to Email a PowerPoint Slideshow: A Step-by-Step Guide
Unsupported browser
This site was designed for modern browsers and tested with Internet Explorer version 10 and later.
It may not look or work correctly on your browser.
- Presentations
How to Create a Basic Keynote Presentation (On Your Mac)
The best apps find the sweet spot between power and ease-of-use. And that's exactly the balance that you'll find in Apple Keynote, the best tool to build a presentation on macOS and iOS.

This tutorial will serve as a Keynote how to use guide. You'll see how easy it can be to build Keynote presentations in Mac for free. Let's learn more!
Apple Keynote Explained: What Is a Keynote Presentation?
Apple Keynote is one of the most powerful tools to build a presentation on the macOS ecosystem. One advantage to the Keynote app is that it's got the feel of an Apple-designed piece of software, with a focus on design and ease-of-use.
If you've used Microsoft PowerPoint to build a presentation, you'll feel right at home in the Keynote app. But Keynote is simplified and streamlined, with the essential features that every presenter needs.

Another great part of Keynote is that it works beautifully on iOS devices. Thanks to iCloud Drive, saving your presentation in the cloud will help you pick up where you left off on your mobile device. While PowerPoint and Google Slides have mobile apps, they often feel like afterthoughts with features missing or limited.
Best of all, Keynote is free. For macOS and iOS users, the Keynote app is the least expensive way to build a presentation.
For a deeper dive into the app and how to use it, make sure to check out the Keynote tutorial below:

How to Use Apple Keynote
You might be wondering how to use Keynote to build your next presentation. While the app has an intuitive interface that lends itself to beginners, it helps to have a few pointers. Here are four steps you can take to learn how to use Keynote to make a presentation.
1. Explore the Keynote App Interface
If you're switching to the Keynote app from another piece of presentation software, my favorite tip is to spend time familiarizing yourself with the interface. If you've got a general understanding of the interface, you'll know where to go when you want to accomplish a task.

- Slide thumbnails live on the left side of Keynote by default. You can click on a slide thumbnail to switch to it, and also drag to re-order slides in the sidebar to resequence them.
- The key tools run across the top of the app and span practically every action you need to build a slide. You'll notice key actions like Add Slide, Play, and the center icons (Table, Chart, Text, Shape, Media) that help you add the corresponding content blocks to your slide.
- The center part of the Keynote app is your canvas, where you can drag and drop content blocks to build out your slide.
- The format option lives on the right side. With an object selected, click on it to open the options to adjust the style of an object, like the color, chart style, or font-face depending on the content selected.
Keynote's interface is mostly intuitive. It also is similar enough to other apps like PowerPoint that it's easy to start using. Think about how these tools fit together so that you'll always know where to look for the needed tool.
2. Learn to Add and Customize Content
Slides are ultimately made up of content. That might include text boxes, charts and graphs, images, and more. In this section, let's customize two key slides from the VERA Keynote template by adding content examples.

Advanced Keynote templates like VERA already have content on the slide that. You can simply click in the content boxes and type over the placeholder to add your text.
If you want to add additional content, you can click on the corresponding content type above the canvas. For my Keynote example, I'll click on Media, then Choose, and browse to an image stored on my computer. Then, just click and drag to reposition any of the elements.

Believe it or not, this is pretty much everything you need to know to build up a slide. Add content, reposition it, and update it with your specifics. These repeated simple steps come together to build your slide.
3. Learn How to Use Format and Style Tools
What if you want to adjust the font face? Or the color of a shape? The answer is that all of the tools live in the same menu.
With any object selected, click on the Format button near the upper right menu area in Keynote. You'll see a brand-new panel in Keynote that'll help you transform the selected object.

Another stylistic tool that you can use to capture your audience is animation. Keynote Animations are an advanced (but crucial) part of building effective slides. Check out the tutorial below
4. Learn Presenter Tools
No matter what app you use to give a presentation, you should think of your slides as support to what you're saying. Apps like Keynote help you build a presentation that'll give you confidence when presenting.
Two of my favorite features in Keynote are Presenter Notes, and the presenter view, which are complementary features that keep important information front and center.

To add presenter notes, go to the View menu and choose Show Presenter Notes. You'll see a new box open below the Keynote canvas where you can type in your notes. In the screenshot above, you can see an example.
When you're ready to present, press the Play button on Keynote's tools. One screen will show your presentation, while a second display will tee up speaking aids including the Presenter Notes you added. Keep those notes front-and-center as you present to an audience.

Also, you can use Keynote's mobile apps as a remote to advance slides on macOS. Make sure to download the Keynote Remote app for iOS to turn your mobile device into a presenting tool.
Best Keynote Presentation Template Examples
The section above covered the essentials of how to build Keynote presentations. However, one of the best resources that presentation professionals use is pre-built templates from professional designers.
This is the central value of Envato Elements . On Elements, a single subscription with simple licensing unlocks more than a million assets - including thousands of professional Keynote presentation templates.

When you source a Keynote presentation template from Envato Elements , you fast track the process of designing one of the best Keynote presentations. You don't have to know how to make presentations on Mac from scratch when you use a template as a starting point.

If you're wondering how to make presentations on Mac, a template might just be the answer. When you download a template for the Keynote app, it already includes placeholders and ideas that you can update with your content. Templates are really just a starting point for using Keynote to build a presentation.
5 Best Keynote Presentation Templates from Envato Elements
Envato Elements features a deep library of templates that help you learn how to make a presentation on macOS. There are so many options that it helps to have a guide to top Keynote presentation templates.
Let's take a look at five of the best Keynote presentations that you can build with templates from Envato Elements.

With 65 unique slide designs, Elnia is a classic example of how templates help you build Keynote presentations. Each of them serves a different purpose, like creating a welcome slide, showcasing your team, and showcasing a project timeline. This template features 16 color variants that help you build your best Keynote presentation yet.
2. Groningen

Groningen might be the right template if you want to create a Keynote presentation on Mac that highlights your business. The clean, graphical slides are the perfect way to illustrate business concepts. Download it, drop your company details in, and you'll have quickly built a Keynote presentation that stands out.

The custom, fancy image masks help you build one of the best Keynote presentations that fits with modern design trends. It's got a minimal and bold look-and-feel that'll help your audience zone in on key slide content.
4. Look Book

For the fashion-centric and forward-thinking audience, look no further than the Look Book template. Using Keynote is easier when you start with a template like Look Book that already has all of the slide designs to fit the category. You can also use this template when learning how to make a slideshow on Mac.

Mouve is a great general-purpose template for the Keynote app. It features custom animations that go beyond Keynote's built-in effects to help capture and keep an audience's attention. When you want to make a presentation on Mac with a sense of motion, make a Mouve!
If Envato Elements isn't your style, you can also source top-notch Keynote templates from Envato Market . On Envato Market, you pay for templates one-at-a-time, which can help you keep the total cost of your presentation low.
Whether you choose Elements or Market , use the round-ups below for the top Keynote presentation template selections:

Learn More About Using Apple Keynote
This tutorial is really just the start of your Keynote presentation learning path. With a Keynote template from the section above and a few extra learning resources, you're well on your way to learning how to make a presentation on Mac.
For a comprehensive look at Apple's top-notch presentation software, make sure to check out the resource How to Use Apple Keynote (Ultimate Tutorial Guide.)
Also, check out the Keynote tutorials below to continue your Keynote mastery:
Build a Keynote Presentation Today
Now that you've learned a bit about Apple's Keynote app, it's time to go build a Keynote presentation of your own! Keynote's ease-of-use and smooth learning curve can help you develop a presentation in less time than any other app.
Don't forget: using a source like Envato Elements or Envato Market is one way to save yourself hours of design work. You can build one of the best Keynote presentations by simply using one of the templates as a starting point.
Editorial Note : This Keynote tutorial was originally published in December of 2013 by Hannah Williams . It's been completely revised and updated to include new information.

PowerPoint for Mac: Best tips for a successful presentation
- 0 Shares Share

The maxim of “Death by PowerPoint” does not fit in today’s tech-savvy era. Numerous startups and corporates pitch their ideas to their clients through presentations every day. They leverage stunning templates to design them and sweep their stakeholders off their feet. Slideshows hold an enormous audio-visual appeal that helps you to hook your audience throughout.
Whether it is Keynote or PowerPoint, showcasing a slideshow on your Mac must appear seamless. Be it slide layout, design, visuals, or overall aesthetics, a collection of well-thought, pixel-perfect slides is the key to presentation success. So, how to craft splendid and eye-catching Mac presentations? This article will enlighten you perfectly. Let us begin!
Here are seven best tips for creating successful and compelling presentations on your Mac:
Minimalistic slides
Gone are the times when people assumed that designing a ppt meant overloading it with information. You’ll be doing your audience a huge favor if you opt for minimalism in your slide content. Often presenters overload the slides unnecessarily and thus, end up overwhelming the audience. Embed your decks with one topic per slide. Ensure that you build your pitch decks with less text and more graphics. Keeping the slide content simple and precise will bestow your MAC slideshow with a decluttered look. It will help you to further your brand aesthetics as well.
You may consider following the famous 10-20-30 rule of PowerPoint presentations. The rule states that your presentation should be no longer than ten slides. It must not take beyond 20 minutes to deliver the entire presentation. And at last, the slides should feature a font size of at least 30 px. The revolutionary 10-20-30 rule helps you keep your slides minimalistic, deliver a captivating presentation and engage with the audience like never before.
Engaging multimedia
Humans have a limited attention span. Keeping this in mind, you must always integrate enchanting visuals to liven up your presentation. Employ vector images, 1080p videos, infographics, and GIFs to render the slides attractive. The truth is, no one likes to read raw data right off the slides! As a presenter, you should consider transforming raw data into engaging visuals that bind the interest of the audience to the presentation.
The incorporation of audio and other media forms assists you with a seamless slideshow. You can infuse your slides with visuals corresponding to your presentation topic. It will work as a double-edged sword. First, it will garner your slides appealing. Second, it will reinforce the textual content in your audience’s minds as well. Hence, slides without dedicated multimedia contribute to the phenomenon ‘Death By PowerPoint’.
Top-notch templates
Breaking the monotony of stock templates in your Mac is essential to stay a step ahead of your competitors. Utilizing age-old templates will not impress your clients as effectively as you desire. There is a high chance that your audience is already familiar with the stock template from some other presentation. Hence, the wow factor goes for a toss!
Well, you can leverage ready-to-use PowerPoint templates from SlideModel that offer 100% customization, superior graphics, and pixel-perfect design. Users can utilize the avant-garde slide templates to boost their presentation goals. The goal here is to woo the audience with your presentations’ design! Gorgeous graphics and tailor-made slide content will save your precious time from making a presentation from scratch. This business Pitch Deck PowerPoint Template is a boon for all entrepreneurs to construct wow-worthy pitches.
Elegant color-palette
An excellent way to highlight the key points of your Mac slideshow is to create a color contrast on the slides. You can design your slides in relevance to your brand colors or choose a vibrant color scheme. A golden tip here is to blend your presentation with high-contrast colors. It will aid you and your audience in capturing the slide essence. Place the dark-toned text with a light-toned background and light-colored slide content on a dark background. It will bring out the effect of aesthetic contrast.
A great tip here is embedding your presentation with your brand colors for making it impressive beyond measure. Choose only two to three colors throughout to maintain an equilibrium. One should try not to use all the contrast colors to attract the audience. Design consistency in your slides is a key to presentation success. Rather than overwhelming the audience with different high-contrast, mismatching colors, try to include a couple of color schemes and palettes across your presentation.
Captivating data visuals
Whether you’re presenting to an assembly of investors, pitching to a client, or presenting a company’s quarterly results, always back your data with rich visuals. Rather than reading random numbers from the slides, you should introduce a wow factor to your slides by leveraging state-of-the-art data visualizations. Render your PowerPoint presentations on Mac an awe-inspiring look with data visuals such as 3D charts, diagrams, infographics & graphs.
Display your research and statistics with mind-blowing data visuals. Employ alluring charts, tables, diagrams, trend lines, shapes, and infographics. You can color-code them to show comparisons and differences. Choose data visuals for bullets to leave an indelible mark on your audience. Projecting data with these tools helps your clients to retain information and comprehend it as well. SlideModel offers innumerable templates with exemplary data visuals for influencing the audience.

Hierarchical structure
Many people do not know the fact that information displayed first captures the attention of your audience before others. Thus, visual hierarchy is a way to organize your slide content based on its importance. Every presentation is intended to initiate a call-to-action amidst the audience. Presenters can reinforce the critical subject content through rich hierarchical structures. Prioritize placing the slide content in a manner that you want your clients to see initially.
Recognize the slide elements in the order of their significance and place them accordingly. Use good contrast placements, bolder texts, and large visuals. This way, your stakeholders will view your highlighted information first and then move to the other content. Hence, with your presentations, be it remote or in-person, you can encourage your audience to close the deal with you rather than missing the opportunity.
Master the typography
Every slideshow looks tidy when crafted with good typography. Apply corporate-grade typography fonts such as Helvetica instead of unprofessional or artistic Comic Sans. It assists in keeping easy readability for your slide content, plus helps in boosting the integrity of the content. Remember to place the size of your fonts as 30 px or more for your audience in the back as well. You won’t want your audience to squint their eyes while seeing your ppt.
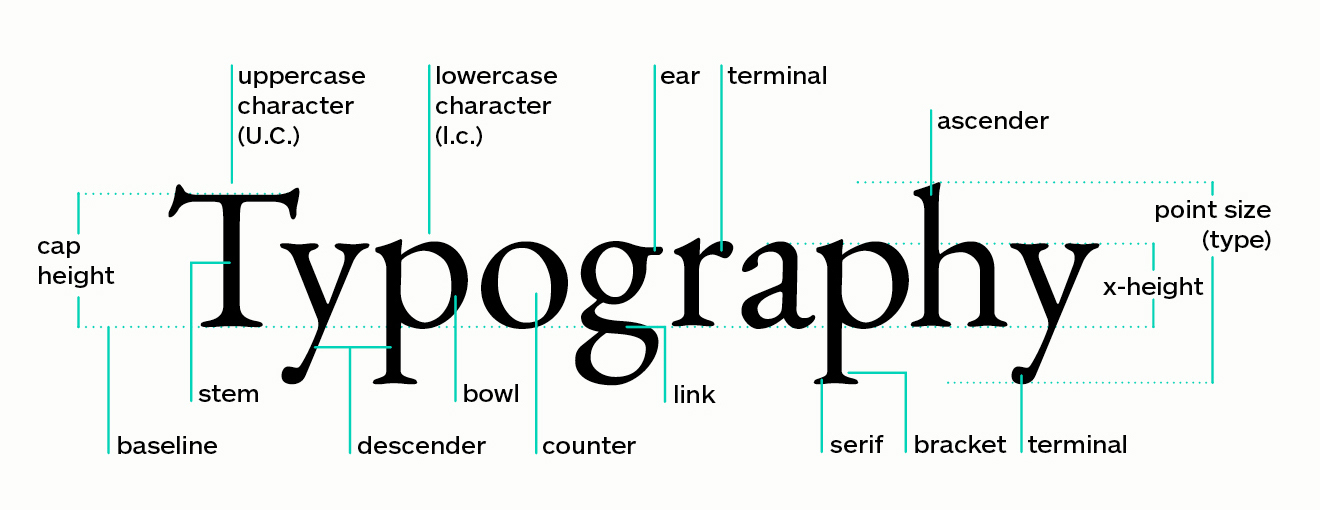
As a presenter, you should always take care of the content length. One should avoid typing hefty paragraphs. Instead, go for one-liners and bullets. You may use six bullet points in each slide. Another great tip is to position the title of your slide to a slightly bigger font than the text. While presenting, you can further elongate the one-liners and help your audience understand the crux of the subject matter without throwing them off the track.
Mac PowerPoint presentations having a beautiful style can result in having a colossal effect on your audience. A well-crafted PowerPoint presentation can be a deciding factor between a closed deal and a missed opportunity.
Keep these seven enlightening and professional tips in your mind before structuring your next ideal presentation. Integrate a pinch of style, creativity, and vigor in your slide deck to create modernistic slides. The key is to attract your audience with minimalistic, yet engaging slide content.

News content on AppleMagazine.com is produced by our editorial team and complements more in-depth editorials which you’ll find as part of our weekly publication. AppleMagazine.com provides a comprehensive daily reading experience, offering a wide view of the consumer technology landscape to ensure you're always in the know. Check back every weekday for more.
Editorial Team | Masthead – AppleMagazine Digital Publication
- @http://twitter.com/applemagazine
- Follow me on Facebook
- Send me an email!
Related Stories
Can apple become a console gaming giant, apple rolls out new features for iwork suite across mac, ipad, and iphone, the lowdown on applecare+ (is it worth buying), demystifying apple pay: your ultimate guide, security features that keep your apple devices safe, apple set to discontinue ‘my photo stream’ service in july 2023, end of an era: apple infinite loop store shuts down, apple unveils ‘vision pro’ headset & visionos, why apple devices are better for media production, apple showcases ‘scary fast’ event filming techniques with iphone 15 pro max, you may also like.

Comprehensive Guide to Telehealth Assistants

Top Business Mistakes to Avoid for Success

Creating the Ultimate Home Slot Setup: Tips & Tricks

12 Ways to Personalize Apple Watch

How Tenant Insurance Protects Your Belongings

3 Gadgets to Enhance your Gaming & Online Casino Experience
Community Member
First time visit profile message with url to edit your profile
Choose content type
Create a post from the types below.
Apple keynote: how to make an interactive presentation..
Although we have all heard of Powerpoint as a powerful tool for presentations, I believe that after using the Apple keynote, I have also learned that it can be used to create impressive and engaging presentations.
In this story I’m going to show you how we can create and Deliver a Killer Keynote Presentation using Keynote
Set it up correctly :
Start Keynote, then choose a Theme . Choosing an appropriate theme can save you time and effort in redefining styles, backgrounds, and image formatting.
Planning your content :
The Slide is the core component of Keynote, so it’s best to view your interactive piece as a series of small, slide-sized chunks. If you want to tell an interactive narrative, you’ll want to write it one slide at a time in words, images, video, or short animations.
Create your content :
The first page will be a title slide , so write a good welcome text ,Also use simplify charts and graphs to present your data,Always try to put points in further interactive way so that viewer can understand and grasp the slides veritably and fluently. it'll also helps to make the bystander always stick with the slide.
Short animations :
- On the slide, click to select the object you want to animate.
- In the Animate sidebar, click the Animate tab.
- Click Add an Effect, then select an animation.
- To set animation options such as the duration and direction of the animation, use the controls that appear.(Start Transition,Delay)
A Good Animation can help make a PowerPoint presentation more dynamic, and help make information more memorable. The most common types of animation effects include entrances and exits. You can also add sound to increase the intensity of your animation effects.
Presentation experts recommend using animations and sound effects sparingly. Animation can be useful in making a presentation more dynamic, and help to emphasize points, but too much animation can be distracting. Do not let animation and sound take the focus away from what you are saying.
Present it! :
Go ahead — press Play and test out your presentation. Everything should work as you’d expect, and you can press Escape to exit. Save your Presentation to iCloud, then open it on your iPad, and everything will work just the same there.
Attachments
You might also like

Keynote Prototype
Keynote for iPad: Animation

Animation for Immersive Learning: From Keynote to Reality Composer
All Replies
Loading page content
Page content loaded
Posted on November 16, 2023
You have some great tips. I also appreciate the paragraph about using sounds and animations sparingly. It never fails when I introduce Keynote to students, that their first presentation has sounds and animations for everything. Thank you for sharing, Keynote is one of my favorite apps.
- Copy link to this reply
Posted on November 22, 2023
There's nothing like a great, well-thought-out Keynote. Thanks for sharing your step-by-step guide.
Posted on November 30, 2023
Another great tips would be to use purposeful animation. If your an explaining how gravity work, using the anvil composition to have an object (or even the word GRAVITY) fall for the sky and land in a smoke dust deliver a message out the topic. And you are right to use is sparingly, use it to gain focus, to surprise you listener.
Great topic and explanation!
Posted on December 01, 2023
Hi Satyajit
Who doesn't love keynote? Thank you for the reminders on creating a presentation. You will have to share one you have created!
250001846020
Insert a video
Supported file types: .mov, .mp4, .mpeg. File size: up to 400MB.
Add a still image to display before your video is played. Image dimensions: 1280x720 pixels. File size: up to 5MB.
Make your video more accessible with a closed caption file (.vtt up to 5MB).
Insert an image
Add an image up to 5MB. Supported file types: .gif, .jpg, .png, .bmp, .jpeg, .pjpeg.
Add details about your image to make it more accessible.
Add a caption below your image, up to 220 characters.
This action can’t be undone.
Error message, are you sure you want to continue your changes will not be saved..
Sorry, Something went wrong, please try again
This post contains content from YouTube.
Attach up to 5 files which will be available for other members to download.
You can upload a maximum of five files.
Choose language
Accept the following legal terms to submit your content.
I acknowledge that I have the rights to post the material contained in this reply.
Review the Apple Education Community Terms of Use and Privacy Policy
Your reply includes attachments that must be reviewed.
This content won’t be publicly available until it clears moderation. Learn more
Sign in to continue.
Not a member yet? Join for free when you sign in.
This action is unavailable.
Some actions are unavailable in your country or region.
Please complete your registration.
You must complete your registration to perform this action.
This account may not publish.
This account has been restricted from publishing or editing content. If you think this is an error, please contact us.
Some actions are unavailable outside of your Apple Group.
Do you want to stay logged in?

How To Make An Impactful Presentation On Your Macbook: A Step-by-Step Guide
Do you want to make an impact when presenting your ideas or business pitches? Have you ever felt like the presentation tools available on a Macbook aren’t enough to create professional-looking slideshows? Well, look no further! Here’s a step-by-step guide that will show you how to use all of the features and resources available on your Macbook so that you can give presentations with confidence. With this guide, you’ll learn how to make powerful slides, captivate audiences and ensure that everyone remembers what they heard. So get ready: it’s time to start crafting amazing and impactful presentations!
Utilizing Mac’s Keynote for Engaging and Professional Presentations
When it comes to giving presentations, there is nothing quite as sleek and professional as utilizing Mac’s Keynote. This powerful presentation software brings a whole new level of engagement and visual appeal to your audience. With its user-friendly interface and vast array of features, you’ll be able to create captivating slideshows that will leave a lasting impact.
One of the standout features of Keynote is its ability to create stunning visuals. Whether you’re using pre-designed templates or starting from scratch, this software allows you to easily incorporate images, videos, charts, and graphs into your slides. You can even add elegant transitions between each slide for a seamless flow throughout your presentation.
Additionally, Keynote offers an extensive selection of stylish fonts and customizable text options. This means you can play around with different font sizes, colors, and styles to make sure your message stands out on every slide. Furthermore, the software allows you to animate text elements in creative ways – from fading in gradually to zooming in for emphasis – making it easier than ever before to keep your audience engaged.
Moreover (as fancy bullet list), Keynote provides ample opportunities for collaboration. Multiple users can work on the same slideshow simultaneously by sharing access through iCloud or other cloud-based platforms. This makes it ideal for team projects or when you need input from colleagues or clients who are located remotely.
In conclusion (stylistic line break), if you want your presentations to be engaging and professional-looking (bold tag), look no further than Mac’s Keynote software (bold tag). Its intuitive design tools coupled with its wide range of features make creating visually appealing slideshows a breeze (stylistic line break). So next time you have an important presentation coming up (bold tag), give Keynote a try – I guarantee that both you and your audience will be impressed!
Mastering The Art of Graphics and Images on Your MacOS For Presentation Impact
Graphics and images can be powerful tools to enhance your presentations and captivate your audience. If you’re a MacOS user, you’re in luck because the platform offers numerous features to help you master the art of graphics and images.
Firstly, let’s talk about using high-quality images. Whether you’re sourcing from stock photo libraries or taking your own pictures, make sure they are visually stunning and relevant to your topic. Bold tagsFor instance, if you’re presenting about wildlife conservation, include vibrant shots of endangered species that will instantly grab attention. Line breaksTo really make these images pop on your slides, take advantage of MacOS’ built-in editing tools such as Preview or Photos app. You can easily adjust brightness, contrast, and even apply filters to give them an artistic touch.
Next up is creating eye-catching charts and graphs using Numbers software on Mac. Bullet listsThis tool allows you to visually represent data in a clear and concise manner. Don’t just settle for plain bar charts – experiment with different chart types like pie charts or line graphs to present information dynamically.Bold tags Use contrasting colors for each element so they stand out distinctly when projected onto a screen.Line breaks And don’t forget to add titles or labels for clarity!
Lastly, let’s discuss the importance of typography in graphic design. Instead of relying on default system fonts like Arial or Times New Roman, explore MacOS’ extensive collection of pre-installed fonts.Line breaksChoose fonts that match the tone and message of your presentation – whether it’s professional and formal or playful bold tagsand creative.Line breaksDon’t go overboard with too many different font styles; stick to two complementary ones at most.Bullet listsRemember also to consider font size: choose larger sizes for headingsLine breaksand subheadings while keeping body text readable but not overpowering.Bold tagsYou want your audience focused on what’s being said rather than squinting their eyes trying to decipher tiny letters!Line breaksIn conclusion, by utilizing the various graphic and image-related features on MacOS, you can elevate your presentations to a whole new level.Bold tags Add stunning visuals, charts that are visually appealing yet informative, and typography that enhances the overall aesthetic. With these tips in mind, your audience will be left impressed and engaged throughout your entire presentation.
Leveraging Audio & Video Capabilities On Your Macbook To Enhance Your Presentation
When it comes to giving presentations, it’s always important to captivate your audience and leave a lasting impression. And what better way to do that than by leveraging the audio and video capabilities of your trusty Macbook? With its sleek design and powerful features, your Macbook can truly take your presentation game to the next level.
One great feature is the ability to add background music or sound effects to enhance your presentation. By incorporating some catchy tunes or subtle sounds, you can create a more engaging atmosphere for your audience. Just imagine their surprise when they hear a dramatic drum roll right before unveiling an important slide! To do this, simply find an audio file or track that complements your content, drag and drop it into Keynote (or any other presentation software you prefer), and adjust the settings accordingly.
Another way to leverage audio on your Macbook is through voiceovers. Instead of just reading out text-heavy slides in monotone fashion, why not record yourself narrating key points or providing additional insights? This not only adds a personal touch but also helps reinforce important information for your listeners. To do this with ease, open QuickTime Player on your Macbook (it’s pre-installed!) and select “New Audio Recording”. Hit record, speak clearly into the microphone built-in on most models, then save the recording as an mp3 file. Import it into Keynote or PowerPoint later – voila!
Now let’s talk about videos – one of the most impactful ways to grab attention during a presentation. Whether you want to showcase product demos, customer testimonials, or highlight key moments from events – adding videos will surely elevate the overall experience for everyone present in that room (or virtual space!). Simply insert video clips directly onto slides using Keynote’s “Media” button; make sure they are relevant and high-quality so as not to distract from the main message.
In conclusion: don’t be afraid to get creative with your presentations! Utilize the audio and video capabilities of your Macbook to add that wow factor, whether it’s through background music, voiceovers, or engaging videos. With these simple yet powerful tools at your disposal, you’ll be sure to leave a lasting impression on your audience.
Maximizing the Use of Interactive Features in a Macbook Powered Presentation
So you’ve got a shiny new MacBook and you want to impress your audience with a killer presentation. Well, lucky for you, MacBooks come packed with interactive features that can take your presentation to the next level. Let’s dive right into how you can make the most of these awesome tools!
First off, have you tried using Keynote? It’s Apple’s very own presentation software and it’s absolutely fantastic. With Keynote, you can create stunning slideshows that are not only visually appealing but also highly interactive. You can add animations, transitions, and even build in quizzes or polls to engage your audience. Plus, Keynote has this cool feature called Magic Move that allows objects on your slides to seamlessly transition from one location to another. Talk about smooth!
Another great way to maximize interactivity is by using AirPlay with your MacBook. By connecting wirelessly to an Apple TV or other AirPlay-enabled device, you can mirror your screen onto a bigger display for everyone to see. This is perfect for when you want to showcase videos or demonstrate how certain apps work in real-time.
Lastly, don’t forget about the power of gestures! Your MacBook trackpad supports all sorts of intuitive gestures that can enhance your presentation experience. Want to zoom in on something specific? Just pinch with two fingers and voila! Need a quick way to switch between slides? Swipe left or right with three fingers and there you go! These simple yet powerful gestures will not only save time but also give your presentation a more polished feel.
In conclusion, if you’re looking for ways to elevate your presentations on a MacBook, be sure to explore the many interactive features at your fingertips – like Keynote’s animations and Magic Move tool – as well as utilizing AirPlay for larger displays and incorporating trackpad gestures into your delivery style.

A late Apple convert, Dom has spent countless hours determining the best way to increase productivity using apps and shortcuts. When he's not on his Macbook, you can find him serving as Dungeon Master in local D&D meetups.
Read more from Dom
How To Eject a Disc From MacBook Pro: An Easy Step-by-Step Guide
How to record your macbook screen with internal audio: a step-by-step guide, leave a comment cancel reply.
Save my name, email, and website in this browser for the next time I comment.

Apps UK International House 12 Constance Street London, E16 2DQ
Privacy Policy

PowerPoint for Mac Help
Looking for something that’s not listed here? Use the Search box in the upper-right corner of this window.
Activate Office for Mac
Check for Office updates automatically
PowerPoint Essentials
|
|
Help Articles
|
|
| |
Additional Resources
|
|

Need more help?
Want more options.
Explore subscription benefits, browse training courses, learn how to secure your device, and more.

Microsoft 365 subscription benefits

Microsoft 365 training

Microsoft security

Accessibility center
Communities help you ask and answer questions, give feedback, and hear from experts with rich knowledge.

Ask the Microsoft Community

Microsoft Tech Community

Windows Insiders
Microsoft 365 Insiders
Was this information helpful?
Thank you for your feedback.
12 macOS Presentation Software to Create Awesome Slides

Whether you’re a business owner, student, or creative professional, you will need to present your ideas to a group of people. But how can you make sure that thoughts stand out and make an impact? The power of engaging presentations holds the key to the solution.
A visually stunning presentation can successfully communicate what you want to describe to your audience. With an appropriate design component and storytelling approach, you can make a presentation that impacts your audience. This is where presentation software becomes an essential tool to minimize the presentation creation effort.
However, Mac users find it complex to select an ideal presentation software that is compatible with MacOS. Luckily, you don’t have to go through that hassle since we have compiled this list of presentation Software to create awesome slides. So, are you prepared to dazzle your audience with a free Mac presentation tool? Let’s begin straight away!
Why Need Third-party Software Over Regular Mac presentation Software
There are several alternative software available when it comes to making impactful presentations on a mac. The Keynote is the default presentation software that comes with Mac. It is a good option for creating presentations with some basic features.

On the other hand, third-party software can provide several advantages over Keynote . Therefore, you should consider third-party software if you wish to take your presentation to the next level.
Here are the reasons why you should consider utilizing third-party presentation software on your MAC:
Advanced Design Features: Keynote already includes a decent amount of templates and design tools. Yet, one might hunt for extensive design possibilities in third-party software.
For instance, you could have access to more sophisticated graphic design tools or a bigger selection of typefaces to pick from. As a result, you will be creating presentations that look more polished and professional.
Customization Options: Using third-party software, you can have greater freedom to alter your presentations. This might include adding interactive features, unique animations, or transitions. Thus, you can modify your presentation to engage better and retain your target audience.
Collaboration Features: Third-party application comes with robust collaboration features compared to Keynote. While working with a team, if you need to share and amend the same document readily, this can be extremely helpful.
Analytics Features: You can monitor your engagement or conversion rates if you are sharing your presentation for commercial or marketing purposes. Some sophisticated analytics tools will provide you with indicators to make data-driven choices.
Integration Option: Modern users love to integrate an app with multiple platforms. Because it gives them opportunities to use the presentation slides in different ways. For instance, save it on Google Drive or share it on Slack.
Now let’s explore the following list of presentation software designed to create awesome slides.
Deckset
Deckset is a versatile presentation tool that offers you powerful features to design your slides. You just need to focus on your ideas and write them down in your favorite text editor. Deckset will do the rest, transforming your plain text into professional-looking presentations. So, go ahead and impress your audience using your creativity via awesome slides.

Key Features:
- Simple interface to create presentations with zero designing skills.
- Markdown support enables users to focus on idea generation rather than formatting.
- Customize the presentation using a range of templates and design styles.
- Customizable designs and layouts are available to match your branding style.
- Integrate with different tools such as Dropbox , iCloud, Git, and more.
- A live preview feature provides a real-time overview of the content and slide designs.
- Presenter mode offers tools such as a timer, speaker notes, and sneak peeks of the next slides.
- Variety of export options, such as PDF, HTML, and image formats, are available.
Adobe Express
Adbobe Express is a free presentation maker that allows you to create slides online in your browser. You will get some amazing pre-made presentation templates in this tool. Therefore, you can design your presentation slides within minutes in both macOS & Windows environments.

Key Features:
- Get easy-to-use and basic effects for editing your slides and images.
- 2000+ unique adobe fonts available to create impressive content
- Collection of adobe royalty-free stock images
- Thousands of pre-built templates and design elements available for presentation
- Up to 2 GB storage is available for saving the presentation slides
- Adobe Express app is available for creating slides on mobile
- Share presentation slides by clicking the publish button
With Adobe Express, you will get endless opportunities to express your creativity. Also, you can build and include graphs, charts, and infographics in your presentation. Furthermore, you can create logos, customize colors, typefaces, document sizes, and more.
With Canva presentations, you can transform your presentation slides into extraordinary experiences. No matter the platform or location, you can capture your audience with its cinematic visual effects. Moreover, you can effortlessly collaborate with your team, produce spectacular data visualizations, and present your idea with inspiration.

Key Features:
- Get professionally designed templates for your presentation
- 3000+ premium fonts available
- Add text, images, and graphics with an intuitive drag-and-drop interface
- Collaborate with multiple users simultaneously in the same presentation
- Visually appealing animation and transition effects are available
- Range of image editing tools to adjust color, contrast, and more
- Embed videos directly inside your presentation to engage the audience
- Customize the presentation and match your branding style
- Record video presentation to use anywhere you want
- Share your presentation slides and let multiple presenters participate
Canva Presentations is a browser-based tool that is compatible with both Windows and macOS. As a result, it has become one of the most popular image, video, and presentation crafting tools Nowadays.
iSkysoft
iSkysoft is a robust tool for Mac that allows you to create eye-catching slides with images, videos, and music. It offers a friendly user interface that allows you to create effective slideshows in no time. Moreover, you can provide a professional touch to your slides using impressive features.

- Include audio, video, and images in your presentation slide
- Personalize your slides with amazing visual effects
- Save and share your customized slides with others
- Include transitions between images and videos and add them to your slides
- Get hundreds of pre-built transitions templates
- Include pre-recorded audio tracks in your slides
- Customize, mix & match audio tracks, and then add them to your slides
- Get instant preview while creating and editing slides
Making slides with music is one of the stand-out features of iSkysoft. You can customize the slide using built-in tracks available in it. Furthermore, you can add effects and filters to your slide, convert it into a different format and also share it. Overall, you can engage the audience and make your presentation memorable.
Focusky is a free presentation software that enhances your slides on Mac OSX. This desktop and mobile-friendly software gives you a handy UI with advanced features. Thus, Your presentation will look just as good on a smartphone or tablet. Since a growing number of people are using smartphones, they will be wowed while viewing the slides.
- Zooming and panning feature for enhancing your creativity
- Make your presentation more interactive using animated objects
- Personalize slides using audio, local video, YouTube video, Vimeo video, and more
- Get auto-generated thumbnails and the progress bar on slides for flexible navigation
- Add images of different formats such as BMP, GI, JPG, GIFF, PNG, TIF, PSD, ICO
- Check the preview of your slideshow from start to finish
- Customizable templates are available to make your slides more alluring
- Enrich your slideshow using transition effects and inhouse multimedia
- Multi-language support is available so that you can share it worldwide
- Share your slideshow that contains memory, information, and more
- Include shapes, curves, formulas, and more.
Haiku Deck
Haiku Deck is an innovative presentation software that gives you the easiest way to create stunning slides. Using its intuitive interface, crafting presentations on the web, iPad, or iPhone has never been easier. The software claims to take the shortest time span to create a professional presentation slideshow.

- Create an unlimited deck for your slides
- Choose from different available fonts, layouts, and image filters
- Thousands of templates are available
- Over 40 million free creative common images are available
- Share your slides in the cloud and in any device
- Control the privacy of your presentation slides
- Integrates with Dropbox, Google Drive, Slideshare, and more.
- YouTube search and embed available
Zoho Show
Zoho Show is a presentation software that brings together distributed teams that loves to collaborate on their project. It allows you to create, edit, and share professional slides online for free on both Mac and Windows OS. You’ll get so many templates to cover all your professional necessities. Moreover, you can be offline and still create or customize your presentations.

- Clutter-free user interface that is easy to navigate.
- 20+ themes and 100+ fonts available for beautifying your slides
- 100+ eye-catching themes available which you can apply instantly
- Extensive tools available (text box, shapes, charts, and more)
- You can import PowerPoint slides without any formatting issues
- Emphasize content by adding visual effects on texts, colors, and more
- Image enhancing features to format your images
- Present your stories by animating your data
- Share, work, and get comments on your slides in real-time
- Mobile App available for Android and iOS environments
Presenting has never been simpler, thanks to the Zoho Show app for Apple TV, Android TV, and Chromecast. Control your presentation easily by connecting your device to a TV right away.
Powtoon
Turn your ideas into reality using the amazing presentation software named Powtoon . You can create animated presentations that will impress your audience every time. Moreover, Save hours of your valuable time in creating video presentations that require zero technical skills.

- 100+ pre-built & customizable templates available
- Customizable font, color, slides, and logo uploader
- 1M+ Royalty-free images available
- Custom layouts that match brand requirements
- Share, edit, customize, and get feedback simultaneously
- Record your screen to share your presentation
- Once click animation effects with loop control
- Fully customizable character-building option
- Control the timing of your transitional effects
- Export your slides on PowerPoint, Hubspot , Slack, and more
FlowVella
FlowVella is a presentation software for MAC that creates a new standard in presentation. This advanced software allows you to combine words, images, videos, links, galleries, and PDFs to create unique presentations. Thus, you will not only be transforming stories and conversations but also engaging your audience in a memorable way.

- Upload, embed, and stream Youtube videos into the presentation
- Showcase your presentation with non-editable Kiosk mode
- Embed PDF into your presentation slide or screen
- Navigations and links are available to make your presentation more interactive.
- Share your presentation with links and also make it private or public
- Add and customize images as well as GIFs
- 20+ professionally designed templates
- Analytics available with view details
Microsoft PowerPoint
Microsoft PowerPoint for Mac allows you to easily create, edit, collaborate, and share presentations. You can collaboratively edit presentations using this flexible tool on a variety of devices. So, whether you’re showing a school assignment or sharing images from a family vacation, use PowerPoint to make stunning presentations.

- Enhance your presentation with premium templates
- Wide range of design tools is available
- Powerful formatting and layout options for any device (Mac, tab, iPhone)
- Spread your ideas with lucrative design, animation, 3D models, and icons
- Activate the dark mode and focus more on creating your presentation
- Once-click sharing option available with real-time co-authoring option
- Multimedia support, including images, videos, audio files
- Built-in translator to translate your presentation
Google Slides
If you are looking for completely cloud-based presentation software, Google Slides is your solution. It includes a multitude of features that make it a well-liked option for everyone, from consumers to organizations to educational institutions. Hence, you can quickly generate, modify and share presentations on both Mac and Windows.

- Multiple users can work on a presentation in real-time
- Variety of pre-built themes and templates are available
- Addons available to enhance your presentation slides
- Mobile app is available for creating presentations on the go
- Share, publish, and embed your slides online and collaborate
- Integrate with Google Worspsace apps
Aha Slides
Aha Slides is a comprehensive presentation software for creating awesome slides. Adding poles & quizzes in Q&A is what makes it different from other presentation software. It is suitable for creating presentations for different types of meetings and audiences. Moreover, you can create professional slides using some alluring template options.
Key Features
- Real-time audience interaction using live polls, quizzes, and feedback
- Numerous templates are available for creating unique presentations
- Seamlessly integrate with PowerPoint, Google Slides, and more tools
- Supports multiple languages to engage wider audiences
- Offers analytics and reporting features to track audience engagement
- Mobile app available for controlling presentations via mobile devices
- Robust security features available to protect user’s data
Final Thoughts
Choosing the right presentation software for Mac is essential for creating effective presentations. Therefore, we’ve tried to enlist some of the best presentation software to minimize your slide creation effort.
But keep in mind that these tools are just the ways to deliver your message clearly. So, avoid getting caught down in the selection process by putting more emphasis on making memorable presentations.
However, your information has to be succinct, clear, and pleasing to the eye. Now it’s your turn to select an app and create an effective presentation that leaves a lasting impression on your audience.
More From Forbes
10 presentation techniques you can (and should) copy from apple's wwdc keynote.
- Share to Facebook
- Share to Twitter
- Share to Linkedin
I look forward to Apple keynote presentations and product launches because, as a communication specialist, it’s hard for me to find a better role model for creating, designing, and delivering a presentation. The keynote at Apple’s Worldwide Developers Conference (WWDC) 2013 offers yet another opportunity to learn fresh and effective techniques that you can and should apply to your presentations.
Stick to one theme per slide. The designers behind Apple’s presentation slides once told me they stick to one theme per slide. Don’t try to cram too much content—too many ideas—on one slide. That goes for statistics, too. For example, think about how many slides you would create if you delivered the following idea: “The developer program is incredibly vibrant. We have over six million registered developers. Demand for this show has never been greater. We sold out in just over a minute [71 seconds].” Most people would put the two statistics, 6 million and 71 seconds , on one slide. Apple CEO, Tim Cook, had two slides. The first one simply read: 6 million. The second slide read: 71 seconds. The second slide also had the words “Sold Out” in red (see below). If a statistic is important enough for you to deliver and you want your audience to recall the data point, then it deserves its own slide.
Make data visual. Early in the presentation Cook announced that Apple customers have downloaded 50 billion apps from the App Store. Instead of simply putting the number [50 billion] on the screen, as most presenters would do, Apple designers created a visual display of the data. Since the statistic had a lot of zeroes they decided it would be impressive to fill the screen with it: 50,000,000,000. But they didn't stop there. If you look closely at the slide (below) you can see that the zeroes are actually images of apps. Data is more memorable when it’s visually interesting.
Always avoid bullet points. There are no bullet points on Apple slides. There are images and text (sometimes on the same slide), but no bullet points. Bullets are the least effective way of transmitting information on a slide. It simply adds too much clutter to the screen and forces the audience to read too many words as the presenter is talking. Most people can’t listen to someone speak, read text at the same time, and expect to retain anything!
Share the stage. Tim Cook shares the stage with his executive team, designers, partners, and developers. Cook introduced five other speakers in the two-hour period and one of them, Apple senior vice president of software engineering, Craig Federighi, took the stage twice. Designer Jony Ive didn't physically join Cook on stage, but appeared on a video to explain the design philosophy behind the new iOS 7. Too many CEOs and founders think they have to carry the presentation or pitch themselves. Think of your presentation as a Broadway show complete with sets (slides), props (demos), and a cast of characters.
Stick to the 10-minute rule. Cook introduced his first “guest speaker,” the co-founder of Anki, Boris Sofman, at exactly 10 minutes into his presentation. The 10-minute rule is a technique I recommend to every presenter, but I must give credit to the person who inspired it— University of Washington researcher, John Medina. Medina once told me that no matter how engaging you are, your audience will begin to tune out of your conversation after about 10 minutes. That doesn't mean you can’t reign them back in, but if you drone on and on you will most likely lose their attention.
Watch on Forbes:
Apple does a nice job of building in “soft breaks” to maintain the attention of the audience. Cook didn't speak for much more than ten minutes at a time. He would break up his slides with another speaker or a video. All the Apple speakers stuck to the rule. During his introduction of the new operating system, OS X Mavericks, Federighi included two demonstrations, both lasting under 10 minutes and both about 10 minutes apart. Although Federighi held the stage for more than 10 minutes, he provided soft breaks and kept the flow moving nicely: Slides-demo-slides-demo-slides.
Have a chip on your shoulder every now and then. Apple vice president of worldwide marketing, Phil Schiller, may have received the loudest applause when he revealed a radical redesign of Apple’s desktop for professional users, the Mac Pro. In a clear jab to critics who say Apple has lost its innovation edge, Schiller said, “Can’t innovate anymore, my ass!” Your audience appreciates passion and emotion once in a while.
Create a Twitter-friendly headline and repeat it twice. My favorite communication technique is what I call the Twitter-friendly headline. Whenever you launch a new product or service, clearly summarize it in one short sentence, preferably under 140 characters so it’s easily tweeted. Apple executives do this for every product announcement. The new iOS 7 was no exception. Twice in the presentation Tim Cook said, “iOS 7 is the biggest change to iOS since the iPhone.” Now take a look at a few tweets from popular media brands:
@Mashable: Apple unveils iOS 7, ‘biggest change since the original iPhone.’ @HuffPostTech: A look at iOS 7, the biggest change to iOS since the introduction of the iPhone. @USATODAY: Tim Cook calls iOS7 the biggest change to iOS since the introduction of the iPhone.
The Twitter headline works every time. Create one.
Practice. A lot. A 20-minute demo and product launch can take up to 250 hours at Apple. That includes the time spent on creating the story line, designing slides, testing the demo, and on-stage rehearsals. Apple’s slides are brilliant and the presenters are smooth and ‘effortless’ because speakers and designers spend a lot of time behind the scenes to get everything just right.
Show your team some love. It always helps to acknowledge your team. Cook lavishes praise on his team in nearly every public appearance. He concluded the WWDC ’13 keynote by saying, “I’d like to thank everyone at Apple who worked so hard to create them [new products]. I get to work with the most talented and creative people on earth and it’s a joy to serve with them.” Express your heartfelt admiration for the team as much as possible.
Make your presentations public. Within two hours of the keynote Apple made the video of the entire two-hour presentation available on its website. It’s not buried on the site, either. It’s on the home page. Presentations are now part of your brand’s story and marketing message. Post the slides on your website and on a sharing site such as Slideshare.net. The slides bring your brand story to life.
Don’t let your ideas die because they were delivered poorly. I’m not suggesting that you copy everything about an Apple presentation (look, colors, style, font) to the letter. I am recommending that you copy the techniques in Apple’s keynote; techniques that are based on proven and effective presentation methods.
Carmine Gallo is the communications coach for the world’s most admired brands. He is a popular keynote speaker and author of several books, including the international bestsellers The Presentation Secrets of Steve Jobs and The Innovation Secrets of Steve Jobs . His new book, The Apple Experience , is the first book to reveal the secrets behind the stunning success of the Apple Retail Store. Carmine has recently launched an eLearning course titled, New Rules of Persuasive Presentations . Follow Carmine on Facebook or Twitter .

- Editorial Standards
- Reprints & Permissions
- Apple Pencil
- Apple Watch
- All Smart TVs
In This Article
15 software used for mac presentation, 6 online presentation software for mac, does mac have presentation software, how do you create a presentation on mac, is there a mac version of powerpoint, is powerpoint better than keynote, let your presentation talk, related articles, 15 best presentation software for mac [reviewed & ranked].
Follow on Twitter
Updated on: February 08, 2024
Presentations are integral to any design: how else would you explain your idea to your client or team? People tend to leave presentations as the last possible step of their process and don’t give them as much time and attention as they need.

If you are a designer, architect, artist, businessman, or any other person that regularly makes subpar presentations, take your game to the next level with some of the best presentation software for mac !
You don’t want to download or install any App? Then check these 6 online presentation software for mac .
Here is some of the best presentation software for Mac that you can use to make your ideas and design extraordinary:

Price: Free Best for: Mac users
Keynote is one of the top presentation software for Mac and comes included with most Apple devices.
With its stunning features and powerful tools, you can bring your slides to life and create the most effective presentations for your clients or your boss.
- Best in-built presentation software for Mac
- Simple and intuitive
- Poor compatibility with windows presentation software
- Presentations can take too much storage
- Does not have as many editing tools as PowerPoint
2. FlowVella

Price: Free (limited version) or $10/month Best for: Mac users
This presentation software is excellent to combine words, images, videos, links, PDFs, and other media into a presentation.
This way, having an interactive presentation is easy.
It’s oriented towards marketing, HR professionals, and sales teams.
- Great Drag & Drop Feature
- Dozens of free templates
- You have to buy the software to use all the features and tools
3. Prezi for Mac

Price: Free (limited version) or starting at $10/month Best for: Mac users
Prezi for Mac is another great Mac presentation software that lets you create dynamic presentations. It has a trial version of 14 days.
The bad thing about making presentations is choosing a video or image to put into it. But not with Prezi.
Prezi is a leader in the video presentation movement and allows you to make the most interactive slides for your presentation.
- Great User Interface
- Zoom and overview feature
- Integration with Zoom Software
- It takes time and practice to learn how to work on Prezi.
- Not easy for beginners.

Price: Starting at $35 Best for: Mac users
Deckset is a unique presentation software that lets you put your ideas and thoughts into it and makes the slides for you.
This is great for people that want to spend less time and energy making slides for their presentation but is only for text-based presentations.
It includes a trial version to try before purchasing the complete presentation software.
- It designs your slides for you, taking off most of the pressure of creating a presentation
- Trial Version
- It is a very costly software to buy
5. PowerPoint

Price: Free (With a Microsoft 365 subscription) Best for: Mac users
PowerPoint for Mac is old but gold.
It is one of the oldest presentation software and allows you to create beautiful slides with multiple templates of your choice.
This software has many tools and features that make the presentation process fun and easy.
- Easy and simple to use
- Multiple free templates
- Lack of creativity in the included templates
- Display Compatibility issues
6. LibreOffice’s Impress

In this software for Mac, multiple editing and viewing modes make the process of editing and creating slides versatile and interactive.
This software is great for presentations that are mostly text-based.
- Free software
- It does not put a lot of strain on your system
- Not very good user interface
- Lack of integration with other presentation software
7. iSkySoft Slideshow Maker

Price: $59.95 Lifetime Best for: Mac users
iSkyDoft Slideshow Maker has to be one of the best presentation software for Mac.
It allows the user to add text, photos, and videos to the slides and music, which makes the entire experience of watching a presentation even better.
This presentation software can be used to beautifully commemorate an event, activity, design process, or team activity in one file.
Moreover, the software also has a ton of features and aftereffects that can be added to make the presentation even better.
- Easy-to-use interface with a ton of incredible features
- It has a steep subscription fee that might not be good for beginners or one-time users
8. Focusky 3D

Price: starting at $9.9 Best for: Mac users
If you want to make a presentation on your desktop but also want it to work on other devices, such as your phone or tablet, Focusky is the perfect software for you.
Focusky is a powerful 3D presentation software for Mac with a wide range of tools that allows you to customize your presentation according to your taste.
to customize your presentation according to your taste.
- It works great offline and doesn’t require any internet
- Powerful export functionality (slides into gift/flash)
- Unexciting slide visual effects
- It requires a bit of learning before you can successfully use it
9. TouchCast Pitch

TouchCast Pitch is one of the presentation software that you automatically gravitate towards when you want to make a meaningful, impactful, and interactive presentation.
Pitch turns boring presentations into winning experiences that make it hard to forget.
- It has a huge library of tools and interesting features for your use
- A bit hard to learn and teach students

If you’re trying to make a presentation in less time with the least effort and still hoping it will come out beautiful, Canva is the perfect software to use.
With its extensive features and tools, the software allows you to edit, customize, and create your slides for presentation in record time.
- It is free, simple, and has a good user interface.
- It allows you to create stunning designs in mere minutes
- It is not a specific software for presentations.
- It does not have as many interesting features as other presentation software

Price: Free or $8/month Best for: Mac users
If the presentations that Pitch lets you make are half as interactive and fun as their website, there is no better software for Mac to do presentations.
It has multiple great tools, effects, templates, and designs available for you to use for your presentation or get inspired to create your own.
- Team Collaboration feature
- Great Support Team
- It has a bit of a learning curve, especially for a beginner
- A limited selection of templates
12. WPS Office for Mac

Price: Free (limited version) or $ 25.21 / year Best for: Mac users
WPS Office must be the essential software on your desktop, whether it is Windows or Mac.
The WPS Office for Mac has all the features and tools that let you document your process and create some of the simplest and easiest presentations for your work meetings and project discussions.
- It allows for collaboration
- Easy documentation
- It doesn’t have a lot of tools for PDF editing or grammar-check for text
13. Premast Plus

Price: Free or $5.99/month Best for: Mac users
If you are a designer, or any other creative folk, looking for beautiful graphic presentation software, there is none better than Premast Plus.
It gives you a wide range of tools, templates, illustrations, and icons to use for your presentation to make it the best you can!
- Very simple
- Wide Range of rich templates
- A lot of the tools and features of this software are available only after you purchase a subscription
- A bit unstable.
14. Movavi Slideshow Maker

Price: Free Trial or $37 Best for: Mac users
Movavi Slideshow Maker is great for unconventional presentations as it lets you add images, videos, text, music, transitions, and effects to your file.
It allows you to create a movie out of your work, making the entire presentation fun and engaging.
- It has great and simple user-interface
- It lacks a lot of features and does not have the tools for professional editing and presentation-making
15. Propresenter – Church Presentations

Price: starting at $399 Best for: Mac users
Propresenter is a church presentation software for Mac that allows you to create a beautiful presentation for a sermon.
It can include worship lyrics, sermon notes, videos, images, etc., to create an impactful and powerful presentation.
The best thing about this software is that it is excellent for beginners.
- Perfect presentation software for church
- It has all the tools that you might need to add music, lyrics, sermon, and text.
- Very expensive software and only best for professionals
1. Slidesbean

Slidesbean is an innovative online presentation software for Mac that does most of the heavy lifting while making the presentation.
It has great features and interactive tools that offer everything you need to build the perfect pitch for your presentation!
Great for entrepreneurs who want to create a beautiful pitch deck.
- Great analytics
- The templates look great
- The result looks very professional
- Videos have to be uploaded to third-party platforms
- The AI feature is not too helpful
- Export for PowerPoint only exports as image
2. Renderforest

Looking for a great online presentation software for Mac that allows you to create stunning videos, animations, branding, mockups, presentations, and more?
Renderforest is the perfect site for beginners and professionals.
- High quality & professional looking templates
- Mind-blowing animations
- Video templates look great
- Free version available
- Limited customization
- Can be a bit pricy
- No iOS or Android app
- Video render time can take long
3. Zoho Show

The great thing about this online presentation software for Mac is that it allows for a group/team to collaborate on the process of creating a presentation.
It is a clean, simple, and easy software that makes creating presentations seamless and simple.
- Includes infographics
- Supports real-time collaboration
- It has good template designs
- It has a Chrome web browser extension that makes it easier to work on the slides.
- It allows broadcasting presentations
- Easy-to-use transitions
- Interface can be a bit slow on low-end devices
- Interface could be better
- No desktop App available

Visme is a fan favorite for brands, big and small, to create stunning presentations.
It has numerous templates and color pallets to choose from that make the entire process of making a presentation easy.
- Allows you to create a brand identity with “My brand” feature
- Disk capacity and usage limit can be low on basic and free plans
- No support for collaborators
- Learning curve
- Free version is way too limited
- The interface could be better
5. Google Slides

Google Slides is the most popular online presentation software that is used by millions worldwide.
It provides the basic tools and features necessary to create a striking presentation.
- Fast and easy to use
- Includes real-time collaborative mode
- It’s free
- Connected with Google services like Google Drive
- It doesn’t support non-Google-based fonts
- Limited templates
- Limited transitions and animations
- It won’t provide support for audio imports

Slides are one of the online presentation software that makes your presentation look extremely sleek and professional.
It is a must for all designers and project managers!
If you need to bring project management to the next level, then you must check out the best project management software for Mac .
- Supports custom HTML and CSS
- Supports two directions (vertical & horizontal)
- Smooth and fast interface
- Supports LaTeX
- It doesn’t provide templates
- It doesn’t support PowerPoint exports
Mac has a presentation software already preinstalled in all Apple devices called Keynote. It is completely free and it allows you to create stunning presentations for school projects, your business, your office, etc. It is available for Mac, iPhone, iPad, and even for PCs.
Keynote includes real-time collaboration with your team, which is an essential feature now that everything is done online.
You can create a presentation on Mac with the help of Keynote. To create a keynote presentation follow these 3 steps:
- Choose a theme.
- Add your content to the placeholder images and texts.
- Create a presentation from the slides.
Yes. Microsoft PowerPoint is available for download on Mac and your phone, tablet, or PC, but you would need a Microsoft 365 subscription on your device to use it on Mac. The software isn’t identical to the Windows one but is quite similar with only a few minor differences in menu and layout.
Where PowerPoint is the most common presentation software for everyone worldwide, Keynote has been declared a better presentation software for Mac users, especially for professionals.
But if you are looking for a variety of editing tools, features, and templates for your presentation, there is nothing that trumps PowerPoint.
Creating a powerful presentation is an essential part of your strategy, whether you are a businessman, a designer, an architect, or a project manager.
It would be best if you had a presentation that doesn’t bore your audience and manages to convey all the key information in the best possible way.
All the software mentioned above are some of the most extraordinary presentation software for Mac and can help you create a memorable presentation.
- How To Create A Page Like a PowerPoint Presentation
- 9+ Best Photo Management Software For Mac
- 13 Top Landspace Design Software For Mac
- 9 Best Database Software For Mac
- Top 19 Architect Software For Mac
Juwairiah Zia
Juwairiah Zia is a seasoned professional, a full stack developer and writer in her free time. She’s deeply immersed in various tech domains such as web and mobile application development and mentorship.
Don’t Miss…

- Legal Notice
- Terms & Conditions
- Privacy Policy
A project by Alvaro Trigo
Free All-in-One Office Suite with PDF Editor
Edit Word, Excel, and PPT for FREE.
Read, edit, and convert PDFs with the powerful PDF toolkit.
Microsoft-like interface, easy to use.
Windows • MacOS • Linux • iOS • Android

- Articles of PPT
How to Use PowerPoint on Mac (Step-By-Step Guide)
PowerPoint is an indispensable tool for creating, editing, and formatting slides. It is widely used for work, study, and personal projects. However, not everyone knows how to download and use PowerPoint on Mac OS. This article will walk you through the steps of downloading and using PowerPoint on a Mac and two other free and built-in presentation editors: WPS Presentation and Keynote.
Why Do You Need PowerPoint on a Mac?
PowerPoint is a presentation software that allows you to create and deliver engaging presentations. It offers various features, including adding text, images, videos, charts, and graphs to your slides. You can also customize the look and feel of your presentations using themes, templates, and fonts.

What is PowerPoint used for?
PowerPoint is used for a variety of purposes, including:
Business presentations: PowerPoint is commonly used to deliver business presentations to clients, colleagues, and investors.
Educational presentations: PowerPoint is also used to create educational presentations for students of all ages.
Personal presentations: PowerPoint can also be used to create personal presentations, such as wedding slideshows and travel photo presentations.
Alternatives to Microsoft PowerPoint
While PowerPoint is the most popular presentation software, there are several other alternatives available, including:
WPS Presentation: WPS Presentation is a free and open-source presentation editor that is compatible with PowerPoint files.
Keynote: Keynote is a built-in presentation editor for Mac users. It offers a variety of features, including templates, themes, and transitions.
How to download WPS Presentation on Mac?
WPS Presentation is a free presentation app for Mac offered by WPS Office. With a streamlined interface and handy tools, it makes an excellent PowerPoint alternative.

Users often choose WPS Presentation to create simple slide decks quickly. The drag-and-drop flexibility when inserting charts or arranging objects helps speed up their workflow.
WPS Presentation stands out with these key features:
Intuitive editing tools similar to PowerPoint
Thousands of free templates
Ability to export PPT and PPTX files
PDF converter and editor
Cloud sync and multi-device support
To download the WPS Presentation on your Mac:
Step 1: Go to https://www.wps.com/download/
Step 2: Click on the Free Download button in WPS Office for Mac box

Step 3: Indicate the download location and click Save.

Step 4: Double-click the “.zip” installer file to extract WPS Office Installer once the download completes.

Step 5: Open WPS Office Installer, then click Open.

Step 6: Click Install Now, then follow the instructions on installing WPS Office and related apps like Presentation.

After installation, you can find WPS Presentation conveniently in your Applications folder or Launchpad. Its clean interface will be familiar to PowerPoint users, with menus for Home, Insert, Design, Transitions, and more.

How to download Microsoft PowerPoint on Mac?
Here is a step-by-step walkthrough with pictures on how to download PowerPoint for Mac using the App Store:
Step 1 : Open the App Store on your Mac.

Step 2: In the search bar at the top right, type in "PowerPoint" and press Return.

Step 3: The Microsoft PowerPoint app should appear as the first result. Click on the Get button and then Install.

Step 4: You'll see a progress bar as PowerPoint downloads. After it finishes, you'll find it in your Applications folder.

Step 5: Open PowerPoint and sign in with your Microsoft account or create a new free account to use it.

After opening PowerPoint, you can pick from a wide selection of templates to create your first presentation!
How to Use the Built-in Mac Keynote?
Mac users can also access the powerful Keynote app built into Apple's iWork suite. With its intuitive interface and gorgeous themes, Keynote makes creating beautiful slides on a Mac easy.

Image’s link: https://www.thegioididong.com/hoi-dap/keynote-la-gi-cach-su-dung-keynote-tren-iphone-macbook-chi-1359032
I like using Keynote when I want to assemble visually impressive presentations quickly. The animated builds and transitions between slides keep audiences engaged.
Standout features of Keynote:
Pre-built themes with elegant animations
Drag-and-drop image/chart insertion
Tools for flowcharts, diagrams, and shapes
Record presenter narration and timings
Easy sharing via iCloud or Apple TV
Steps to create and edit a new slide in Keynote:
Follow these steps to begin a new presentation in Keynote:
Step 1: Open Keynote from your Applications folder or Launchpad.

Step 2: Click New Document to access the Keynote homepage.

Step 3: Double-click the desired slide layout to insert a new one.

Step 4: Customize the slide by adding a title, text, images, and other media.

Step 5: To add more slides, click Add Slide.

Step 6: Click the Play button in the top toolbar to present the slides

With just a few clicks, you can create amazing-looking presentations through Keynote's simplicity and built-in Apple polish.
Practical Tips for Using Keynote on Mac
To add a slide transition effect, select the slide from the slide navigator on the left, then click on the Animate tab in the window's top-right corner. Choose the Action option and click on the Add an Effect button. You can select from over a dozen effects and customize their duration, direction, and start time.

To animate individual objects on the slides, select the objects and go to Animate > Build In > Add an Effect. You can preview the effect and change its order, timing, and delivery. You can also use the Build Out option to animate how objects disappear from the slides.
To use Magic Move, duplicate a slide and change the position of the objects on both slides. Then select the first slide and choose Magic Move from the Add an Effect menu. Keynote will automatically create a smooth animation between the two slides. You can adjust the duration and other options as well.

To edit your slide layouts, go to View > Edit Slide Layouts. You can add, delete, or modify any slide layout to suit your needs. You can also change your presentation's theme, background, and color scheme.

To customize your toolbar, go to View > Customize Toolbar. You can drag and drop any tool you want to add or remove from the toolbar. You can also choose between icon-only, text-only, or icon-and-text modes.

To use action buttons for shapes in Keynote, select a shape and go to Format > Add Link > Slide. You can choose which slide to link to or use the Next Slide or Previous Slide options. This way, you can create interactive presentations that let you jump around different slides with a click.

To access a variety of chart styles, simply click the Chart button on the toolbar or navigate to Insert > Chart in the menu bar. You'll find a wide range of styles, including 2D, 3D, and Interactive options.

What are the Differences between PowerPoint on Mac and PowerPoint on Windows?
While PowerPoint on Mac retains most core features from the Windows version, there are some critical differences in how specific tools work:
The user interface follows Mac design language instead of the Windows ribbon
Animations and transitions have fewer effects options on Mac
Saving as older PPT formats may cause formatting changes
Linked media like charts can break when moving files cross-platform
Mac menus lack certain administration tools for managing templates
Some other limitations include:
Occasional font compatibility issues
Differences in default autocorrect/styling behavior
Variation in how slide masters/layouts are handled
Mac PPT files render slightly differently in Windows
However, the web-based PowerPoint for Office 365 helps mitigate most cross-platform issues. But keeping the above differences in mind can help avoid headaches when collaborating between Mac and PC.
Practical Skills for Using PowerPoint on Mac
To start mastering PowerPoint on your Mac, try out these handy tips:
Use keyboard shortcuts like Command + M to quickly add slides from the master view
Right-click on objects like charts to open formatting options
Hide slides rather than deleting them in case you need them again later
Use section breaks in the slide sorter view to divide related slides into groups
Align or distribute objects under the Format menu to cleanly organize elements
Adjust video playback quality under Playback to optimize performance
Enable Auto Save and Auto Recover to prevent data loss from unexpected shutdowns
Use Notes Page view to add detailed presenter notes to each slide
Click the Record Slide Show button to record timings and narration for the presentation
To deliver a presentation in PowerPoint on Mac, you can also use the keyboard shortcut Command + Shift + F5 to start a slide show.
With PowerPoint's robust set of features tailored for Mac, you can create and deliver polished presentations efficiently.
Use Word, Excel, and PPT for FREE, No Ads.
Edit PDF files with the powerful PDF toolkit.
Microsoft-like interface. Easy to learn. 100% Compatibility.
Boost your productivity with WPS's abundant free Word, Excel, PPT, and CV templates.
Can I use PowerPoint on Mac for free?
Yes, you can access PowerPoint for free on a Mac through the online Office web apps or via a 30-day trial of Microsoft 365.
Does PowerPoint work the same on Windows and Mac?
PowerPoint on Mac generally provides the same core features as the Windows version. However, minor differences may exist in how specific tools, effects, fonts, and media function when moving files cross-platform. For example, the ability to create macros is unavailable in PowerPoint on Mac.
Is PowerPoint Mac compatible with PPT files from Windows?
You can usually open PPT and PPTX files created on Windows in PowerPoint on Mac without issues. But occasionally, some advanced formatting, animations, or linked media may break when transferring the file.
What are some excellent alternatives to PowerPoint on Mac?
Some good alternatives to PowerPoint on Mac include WPS Presentation and Keynote. WPS Presentation is a free and open-source presentation editor that is compatible with PowerPoint files. Keynote is a built-in presentation editor for Mac users.
PowerPoint remains the top choice for creating professional presentations on both Windows and Mac. While the Mac version has a few limitations, it provides the full PowerPoint toolset tailored for Apple devices.
Whether you choose Microsoft PowerPoint, WPS Presentation, or Keynote, you now have the tools and knowledge to create compelling presentations. Start crafting your next masterpiece and leave a lasting impression on your audience.
- 1. How to Use Zoom PowerPoint Presenter View: A Step-by-Step Guide
- 2. How To Narrate a PowerPoint on Mac – A Comprehensive Guide
- 3. How to Use a Master Slide in PowerPoint (Step-By-Step Guide)
- 4. How to Compress a Powerpoint on Mac A Comprehensive Guide
- 5. How to Export PowerPoint to Video on Mac (Step-by-Step)
- 6. How to Export PowerPoint Notes to Word Mac (Step-by-Step Guide)

15 years of office industry experience, tech lover and copywriter. Follow me for product reviews, comparisons, and recommendations for new apps and software.
- PDFelement for Windows
- PDFelement for Mac
- PDFelement on Mac App Store
- PDF Reader for Windows
- PDFelement for iPhone/iPad
- Get from App Store
- PDFelement for Android
- Get from App Google Play
- PDF Scanner for iPhone
Cloud & SDK
- Document Cloud
- PDFelement Pro DC
- PDFelement SDK
Online PDF Tools
- PDF to Word
- Compress PDF
- Word to PDF
Educational Users
- Annotate PDF
- Combine PDF
Personal Users
- Convert PDF
- Organize PDF
Professional Users
- eSign PDFs Legally
- Extract Data from PDF
- Password Protect PDF
PDF Solutions for
- Chat with PDF
- AI PDF Summarizer
- AI PDF Translator
- AI Content Detector
- AI Rewrite PDF
- Proofread PDF
- Add Bookmarks to PDF
- Explain PDF
- Mac Software
- OCR PDF Tips
- Online PDF Tips
- Edit PDF like Word
- PDF Converter Tips
- PDF Compressor Tips
Why PDFelement
- Customer Stories
- PDF Software Comparison
- Contact Support
- PDFelement for iOS
- InstaScan for iPhone
Explore More
- Reviews See what our users say.
- Free PDF Templates Edit, print, and customize free templates.
- PDF Knowledge PDF-related information you need.
- Download Center Download the most powerful and simple PDF tools.
- Download Download Pricing Pricing
How to Make a PowerPoint on Mac OS 10.15 Catalina

Elise Williams
2024-05-22 13:36:15 • Filed to: PowerPoint Tips • Proven solutions
The software that can be used to create a presentation on Mac includes, PowerPoint and keynote among others. In this case, we are going to learn how to make a PowerPoint on mac . There are a number of ways to go by on making a presentation on Mac which includes using Microsoft PowerPoint for Mac, creating a presentation using keynote, or Google docs and export as PowerPoint file (ppt or .pptx).
How to Make a PowerPoint on Mac
In this article, we will use Keynote on Mac to make a presentation and then export it to PowerPoint.
Step 1. Launch Keynote
Click on the “Keynote icon in the Launchpad to open it. A window displaying various theme templates “Theme chooser” will appear. In the case it does not appear, click the option key and on the “File” menu select “new” to open a new presentation template.
Step 2. Choose the Theme of the Presentation
Scroll to navigate in the theme chooser and choose the type of presentation you want to make then double click on it to open.

Step 3. Change the Layout
To change to a different layout, you can click on the “Layout” button, and then select your desired layout.

Step 4. Add Content
There are a number of activities you might need to perfume on the presentation which involves adding your content.
- To add a slide, click on "Add Slide" in the toolbar and then select a layout.
- To add text, there is a placeholder text on the slide which you should double click and type to replace it with your own.
- To add an image, drag and drop or copy and paste an image to the slide from your computer or webpage.
Step 5. Save the File
After you are done with adding your content to the slide and your presentation is ready, you can click on "Save" and enter the file name. Meanwhile, you need to choose the location to save your file, and finally click “Save”.
Step 6. Export to PowerPoint
It is always important to try playing your presentation by yourself before you present it to other people to familiarize with it and make any necessary changes.
- Step 1. To export the file, you can click on “Share” on the menu, and then select “export”.
- Step 2. Click on "PPT" from the menu and then click “Next”.
- Step 3. Navigate to the location you want to save your file and change name if necessary.
- Step 4. Click on “export”. Last but not least, you can open the exported PowerPoint file to confirm the content.

The Best PDF Software for Mac
Wondershare PDFelement - PDF Editor is the best PDF editor which can be described as an All-in-One PDF Editor. It is attributed to powerful features that can edit PDF text and images, convert documents to various formats, and also create fillable forms, protect and share documents. It has become one of the commonly used and preferred document software owing to its advanced features, flexible prices, and perfect performance. PDFelement offers full control of your work on editing and modifying with its custom tools without forgetting its easy-to-use interface. The following are some popular features of PDFelement.
Launch PDFelement on your Mac computer, and click "Open File" and search for the file you want to open. Then you can choose the "Edit" option, and then you can add text, crop, watermark, change font or background, add page numbers among others.

• Convert PDF
Launch PDFelement on your Mac computer and import the PDF document to this program. And you can click the "File" > "Export To" option, then you select the format in which you want to convert the file like excel, word, and image, and finally click "Save".

• Create PDF Forms
Open your PDFlelement program and click on "File" > "Create", and then choose the "Blank Document" option.

Now click on "Form" on the left column, and pick one of the displayed elements and move the cursor to the blank area of the document to execute it.

After that, you can set the properties of the form by double-clicking on it to either align, modify, adjust size or delete. Once you have drawn your forms, you can type in your text content. To open the created fields, you can double click on it, and then you can also open the properties window to set either calculation, options, or appearances. Finally, you can click “Save” when you are done.

Free Download or Buy PDFelement right now!
Buy PDFelement right now!
chief Editor
Speak Your Mind
Related articles.
- How to Add Border in PowerPoint
- How to Add Page Numbers in PowerPoint
- Quicktime Not Available in PowerPoint? Solve It.
- How to Create Video from PowerPoint
- How to Change Background in PowerPoint
PPT 2016 in presentation mode connected to HDMI skips slides on MacBook Pro M2 (Sonoma)
So my MacBook Pro M2 chip running the latest version of Sonoma has always had problems when I run a power point presentation (I am running PPT 2016 for Mac) in presentation mode connected to a HDMI screen projection output. The problems appears to be that slides are skipped even when there is content on the next slide. A blank slide will appear instead.
Secondly, if there is animated content on the first slide, it will not play this, and rather skip forwards to a slide that looks blank. If I use the back button, the animated content will then project. It is very frustrating as this represent a glitch which I have not been able to solve.
All of these problems only occur when the lap top is connected to an external projection display . It does not happen when the presentation is being played on the MacBook Pro alone, only when it is connected to a projector/screen via the USB C or HDMI cable. Can someone please advise a possible solution?
MacBook Pro 14″, macOS 14.5
Posted on Jun 28, 2024 1:02 PM
Loading page content
Page content loaded
There are no replies.
Keynote User Guide for Mac
- What’s new in Keynote 14.1
- Intro to Keynote
- Intro to images, charts, and other objects
- Create a presentation
- Choose how to navigate your presentation
- Open or close a presentation
- Save and name a presentation
- Find a presentation
- Print a presentation
- Undo or redo changes
- Show or hide sidebars
- Quick navigation
- Change the working view
- Expand and zoom your workspace
- Customize the Keynote toolbar
- Change Keynote settings on Mac
- Touch Bar for Keynote
- Create a presentation using VoiceOver
- Add or delete slides
- Add and view presenter notes
- Reorder slides
- Group or ungroup slides
- Skip or unskip a slide
- Change the slide size
- Change a slide background
- Add a border around a slide
- Show or hide text placeholders
- Show or hide slide numbers
- Apply a slide layout
- Add and edit slide layouts
- Change a theme
- Add an image
- Add an image gallery
- Edit an image
- Add and edit a shape
- Combine or break apart shapes
- Draw a shape
- Save a shape to the shapes library
- Add and align text inside a shape
- Add 3D objects
- Add lines and arrows
- Animate, share, or save drawings
- Add video and audio
- Record audio
- Edit video and audio
- Add live video
- Set movie and image formats
- Position and align objects
- Use alignment guides
- Place objects inside a text box or shape
- Layer, group, and lock objects
- Change object transparency
- Fill shapes and text boxes with color or an image
- Add a border to an object
- Add a caption or title
- Add a reflection or shadow
- Use object styles
- Resize, rotate, and flip objects
- Move and edit objects using the object list
- Add linked objects to make your presentation interactive
- Select text
- Copy and paste text
- Use dictation to enter text
- Use accents and special characters
- Format a presentation for another language
- Use phonetic guides
- Use bidirectional text
- Use vertical text
- Change the font or font size
- Add bold, italic, underline, or strikethrough to text
- Change the color of text
- Change text capitalization
- Add a shadow or outline to text
- Intro to paragraph styles
- Apply a paragraph style
- Create, rename, or delete paragraph styles
- Update or revert a paragraph style
- Use a keyboard shortcut to apply a style
- Adjust character spacing
- Add drop caps
- Raise and lower characters and text
- Format fractions automatically
- Create and use character styles
- Format dashes and quotation marks
- Format Chinese, Japanese, or Korean text
- Set tab stops
- Format text into columns
- Adjust line spacing
- Format lists
- Add a highlight effect to text
- Add mathematical equations
- Add borders and rules (lines) to separate text
- Add or delete a table
- Select tables, cells, rows, and columns
- Add or remove rows and columns
- Move rows and columns
- Resize rows and columns
- Merge or unmerge cells
- Change the look of table text
- Show, hide, or edit a table title
- Change table gridlines and colors
- Use table styles
- Resize, move, or lock a table
- Add and edit cell content
- Format dates, currency, and more
- Create a custom cell format
- Highlight cells conditionally
- Format tables for bidirectional text
- Alphabetize or sort table data
- Calculate values using data in table cells
- Use the Formulas and Functions Help
- Add or delete a chart
- Change a chart from one type to another
- Modify chart data
- Move, resize, and rotate a chart
- Change the look of data series
- Add a legend, gridlines, and other markings
- Change the look of chart text and labels
- Add a chart border and background
- Use chart styles
- Animate objects onto and off a slide
- Animate objects on a slide
- Change build order and timing
- Add transitions
- Present on your Mac
- Present on a separate display
- Present on a Mac over the internet
- Use a remote
- Make a presentation advance automatically
- Require a password to exit a presentation
- Play a slideshow with multiple presenters
- Rehearse on your Mac
- Record presentations
- Check spelling
- Look up words
- Find and replace text
- Replace text automatically
- Set author name and comment color
- Highlight text
- Add and print comments
- Send a presentation
- Intro to collaboration
- Invite others to collaborate
- Collaborate on a shared presentation
- See the latest activity in a shared presentation
- Change a shared presentation’s settings
- Stop sharing a presentation
- Shared folders and collaboration
- Use Box to collaborate
- Create an animated GIF
- Post your presentation in a blog
- Use iCloud Drive with Keynote
- Export to PowerPoint or another file format
- Reduce the presentation file size
- Save a large presentation as a package file
- Restore an earlier version of a presentation
- Move a presentation
- Delete a presentation
- Password-protect a presentation
- Lock a presentation
- Create and manage custom themes
- Transfer files with AirDrop
- Transfer presentations with Handoff
- Transfer presentations with the Finder
- Keyboard shortcuts
- Keyboard shortcut symbols
Play a presentation on a separate display in Keynote on Mac
You can connect one or more separate displays to your Mac and play your presentation on one of the connected displays, while you control the presentation using the presenter display on your Mac. You can set the presenter display to show any combination of slides, presenter notes, a clock, and a timer to aid in your presentation. You can also choose which display the slideshow plays on.

Present with one or more external displays
Connect one or more external displays to your computer.
Check the documentation that came with your displays to determine what cable or adapters you may need.
To prevent viewers from seeing the presenter display on the connected displays, turn mirroring off. Do one of the following:
On a Mac with macOS Ventura 13 or later: Choose Apple menu > System Settings, click Displays, click Arrange, then make sure the display thumbnails are not stacked on top of each other. If they are, press and hold the Option key while you drag the topmost display to either side.
On a Mac with macOS 12 or earlier: Choose Apple menu > System Preferences, click Displays, click Arrangement, then make sure Mirror Displays is not selected.
On a Windows computer: Right-click the desktop, choose Screen Resolution, click the Multiple Displays menu, then choose “Extend desktop to this display.”
In Keynote, click the slide in the slide navigator you want to play first.
By default, the slideshow appears on one of the external displays, and the presenter display appears on your Mac and any other connected displays.
Tip: To quickly change which display the slideshow and presenter display appear on, press X on the keyboard until they appear on the screens you want.
To reveal the toolbar to show the slide navigator, keyboard shortcuts, live video sources , or multipresenter slideshow controls, move the pointer anywhere on the presenter display, then click a button at the top of the screen.

To start the presentation, press the Space bar or Right Arrow key.
The timer at the top of the presenter display starts, and a red or green bar at the top of the presenter display indicates the status of the slideshow. A red bar indicates a transition or animation is playing; the bar turns green when it is done.
Note: In a side-by-side layout, when the next slide doesn’t immediately appear, it means a slide transition or build is still playing on the current slide. The next slide appears only when the presentation is ready to advance.
Do any of the following:
Go to the next slide or build: Press the Space bar or Right Arrow key.
Go to the previous slide or reset the previous build: Press the Left Arrow key.
Jump to a different slide: Click Show Navigator in the top-left corner of the presenter display, then click a slide in the slide navigator.
Jump to a specific slide number: Press any number key, then press Return.
To exit the presenter display and stop playing the presentation, press Esc.
Customize the presenter display with one connected display
While you’re presenting a presentation on a separate display, you can select which items appear on the presenter display and modify its layout.
To change the layout of items on the presenter display, click the Customize Presenter Display button at the bottom of the dialog, then do any of the following:
Move an item on the presenter display: Drag it.
When you drag a slide, its label always moves with it. To position a label independently of the slide, drag only the label. To drag multiple items simultaneously, Command-click or Shift-click to select them, then drag the items.
Resize an item on the presenter display: Click the item, then drag any selection handle.
The clock, timer, and labels are always resized proportionally from their centers.
To maintain the proportions as you resize a slide, the Presenter Notes field, or the Ready to Advance Indicator, press and hold Shift as you drag. To resize from the center, press and hold Option as you drag. To proportionally resize from the center, press and hold Shift and Option as you drag.
Automatically position the items on the presenter display: Click the Use Auto Layout button. Keynote positions the items to make optimal use of the presenter display.
Change the appearance of presenter notes: With presenter notes showing, move the pointer over the Presenter Notes field, then click a font button in the top-left corner to make the font smaller or larger. Click the Invert Colors button to show white text on a black background or vice versa (other text colors aren’t affected).
Press Esc on your keyboard to return to the presentation.
You can use rehearse slideshow mode to customize the presenter display and practice your presentation without connecting an external display. See Rehearse a Keynote presentation to learn more.
Customize the presenter display with two or more connected displays
If you have two or more external displays connected to your Mac, you can change what appears on each display.

Thumbnail images of up to six connected displays are shown. The primary presenter display has the label Primary Display with a star next to its name.
Click Configure at the bottom of a thumbnail, then do any of the following:

Show the current slide: Click Show Slideshow.
Show the presenter display: Click Show Presenter Display.
Change the items that show on a presenter display: Click Show Presenter Display, then choose any combination of options from the list. For example, you can set your presenter notes to show on the primary display, and set the current and next slides to show on a separate display.
Change the layout of items on a presenter display: Click Show Presenter Display, click Customize Presenter Display, then make changes. To learn more, see “Customize the presenter display with one connected display,” above.
Click Done.
Google Slides
How to Select Multiple Slides in Google Slides?

Table of Contents
Working with multiple slides at once in Google Slides can save you a lot of time, especially when you need to make changes to a group of them. This guide will show you a few easy ways to select several slides together. This lets you do things like formatting them all at once or deleting them in a batch, instead of having to edit them one by one.
We’ll cover how to select slides that are next to each other using the Shift key, pick individual slides you want with the Ctrl/Cmd key, and much more. This will make editing, copying, or deleting groups of slides much faster and more efficient.
Steps for Selecting Multiple Slides in Google Slides
Google Slides makes it easy to work with multiple slides at once, which can be helpful for formatting or editing. Here are two ways to select them:
- Using your mouse
- Using keyboard shortcuts
We’ll also cover how to select all slides in your presentation.
Create presentation slides with AI in Seconds in Google Slides
10M+ Installs
Works with Google Slides

How to Select Multiple Slides in Google Slides with Your Mouse?
- Open your Presentation. Find the Google Slides presentation you want to work on.
- Click and hold “Ctrl” (Windows) or “Command” (Mac). While holding this key down, proceed to the next step.
- Click Individual Slides to Select Them. Click on each slide you want to include in your selection.
- Right-click and Choose an Action. Once you’ve selected your slides, right-click on them to see a menu of options you can perform on the chosen slides.
How to Select Multiple Slides in Google Slides with Keyboard Shortcuts?
On windows:.
- Open your presentation and click on the slide you want to start with.
- Hold down the “Shift” key on your keyboard. Now, use the arrow keys to choose additional slides. For instance, pressing “Shift + Down Arrow” will add the slide below the one you selected.
- Once you’ve chosen the slides you want, right-click and pick the action you want to take from the menu.
There are two ways to select multiple slides using keyboard shortcuts on a Mac:
- Select Specific Slides: Hold down the “Command” key (⌘) and click on the individual slides you want to choose. This lets you select or deselect slides one by one.
- Select a Block of Slides: This method is helpful for picking a continuous group of slides. Click on the first slide you want. Then, hold down the “Shift” key and use the up or down arrow key to navigate to the last slide you want to include. All the slides in between will be selected.
- No design skills required
- 3 presentations/month free
- Don’t need to learn a new software

How to Select All Slides in Google Slides?
There are two ways to select all the slides in your presentation at once:
- Using the Menu:
- Click on any slide thumbnail in the slide panel on the left.
- Go to the “Edit” menu at the top of the screen.
- Select “Select all” from the dropdown menu.
- Using a Keyboard Shortcut:
- Press “Ctrl + A” on your keyboard (or “Cmd + A” on a Mac).
This will highlight all the slides in your presentation, allowing you to easily apply formatting changes or other actions to all of them at once.
Closing Thoughts
Mastering how to select multiple slides in Google Slides is a valuable skill that can significantly improve your presentation editing workflow. By using the techniques covered in this guide, you can now efficiently format multiple slides at once, delete unwanted slides in bulk, and more. Remember, these simple yet effective methods can save you time and effort, allowing you to focus on the creative aspects of crafting impactful presentations.
Frequently Asked Questions
Can i move multiple slides at once.
Yes, once you have selected multiple slides, you can click and drag any of the selected slides to move the entire group to a new position within the slide sorter pane.
How can I deselect a slide after I’ve selected it?
If you have selected multiple slides and want to deselect a specific one, hold down the Ctrl key (or Cmd key on Mac) and click on the slide you wish to deselect. This will remove it from your current selection.
Related Posts

How to Add Slide Numbers in Google Slides?
Adding slide numbers to your presentation is a neat way to keep everything organized. When you give each slide a number, it makes it easier for your audience to follow along and find a particular slide they’re interested in. In Google Slides, it’s super simple to do this—just turn on the option for slide numbers. Plus, you can even personalize the numbers to fit your style.
Need a hand with adding slide numbers in Google Slides? We’ve got you covered with an easy step-by-step guide. Let’s get started!

How to Delete a Slide on Google Slides: A Comprehensive Guide
Imagine crafting a captivating presentation that flows effortlessly, leaving your audience spellbound. But we all know that a masterpiece is not only about creation but also the power of deletion. Incorporating the relevant elements while eliminating the irrelevant ones is a significant task in maintaining a presentation’s quality. However, a large number of people still […]

How to Hide a Slide in Google Slides In Easy Steps
Have you ever had that slide you want to keep up your sleeve but are waiting to reveal at the perfect instant? Hoping to find the perfect way to utilize its elements but want to keep it hidden from your final presentation? We have the perfect solution! Google Slides empowers you to make that slide […]
Save Time and Effortlessly Create Presentations with SlidesAI

- pop Culture
- Facebook Navigation Icon
- Twitter Navigation Icon
- WhatsApp icon
- Instagram Navigation Icon
- Youtube Navigation Icon
- Snapchat Navigation Icon
- TikTok Navigation Icon
- pigeons & planes
- newsletters
- Youtube logo nav bar 0 youtube
- Instagram Navigation Icon instagram
- Twitter Navigation Icon x
- Facebook logo facebook
- TikTok Navigation Icon tiktok
- Snapchat Navigation Icon snapchat
- Apple logo apple news
- Flipboard logo nav bar 1 flipboard
- Instagram Navigation Icon google news
- WhatsApp icon whatsapp
- RSS feed icon rss feed
Complex Global
- united states
- united kingdom
- netherlands
- philippines
- complex chinese
Work with us
terms of use
privacy policy
cookie settings
california privacy
public notice
accessibility statement
COMPLEX participates in various affiliate marketing programs, which means COMPLEX gets paid commissions on purchases made through our links to retailer sites. Our editorial content is not influenced by any commissions we receive.
© Complex Media, Inc. All Rights Reserved.
Complex.com is a part of
The Best Clothing Brands of 2024 (So Far)
From luxury labels like Margiela to streetwear brands like Corteiz and Stüssy, these are Complex Style’s picks for the best brands of 2024, so far.

BY State Farm®
Brand Publisher

The year is only halfway through and it’s already been a huge one for style.
Supreme celebrated its 30th anniversary and delivered one of its best luxury collaborations ever with Margiela’s MM6 sub-label. Brands like Denim Tears and 424 opened up new retail stores on the east and west coast, respectively. Pharrell’s Louis Vuitton took us to the wild west and then surprised us with a thoughtful, pastel-colored capsule from Tyler, the Creator. Streetwear veterans like Stüssy continue to prove why they’ve been around for over 40 years, while newcomers like Corteiz keep expanding their reach across the globe.
From the finest luxury brands money can buy to the best that streetwear has to offer, these are the brands that have been doing it best for the first half of 2024.

Standout Moments: Its first collaboration with Jordan Brand, celebrating the one-year anniversary of its NYC flagship store, and racking up co-signs from Rihanna
It isn’t easy to capture the hearts of streetwear's old guard while still being able to excite the youth, but Awake NY has been able to do just that. The New York City-based streetwear label has arguably taken its largest leap forward in 2024. The biggest piece of that equation was its first major collaboration with Jordan Brand centered around an Air Ship model accented by red snakeskin. The sneakers were great, but the accompanying apparel—a bleached blue flannel and varsity jacket that even got modded into Def Jam: Fight for NY —were the real stars of the show. Its rhinestone-studded hoodies and sporty nylon sets have even piqued the interest of Rihanna. With a co-sign like that you must be doing something right. In between all of the big moments, Awake NY has delivered consistent drops highlighted by pieces like striped soccer jerseys (with the perfect NYC touch in the form of a graffiti logo on the back) or painter pants covered in a custom digi camo print.
Along the way, Awake NY has remained committed to growing its community in various ways. That has meant using its Happy Socks collaboration to host a field day in the park, or working with Marshall to execute live concerts from its New York City flagship. In the Instagram age, plenty of brands are solely focused on viral product and revenue. Awake NY is the antithesis of that. It is a brand that proves the importance of building a loyal community in real life. That’s something that can’t be manufactured by an algorithm. Awake NY isn’t simply transactional. It's for the people. — Mike DeStefano
Louis Vuitton

Standout Moments: A stellar collaboration with Tyler, the Creator, an official Timberland collab, and its western-inspired Fall/Winter 2024 runway show
Since Pharrell was appointed creative director of menswear at Louis Vuitton in 2023, each runway presentation has been its own spectacle. With guest runway appearances from friends like Pusha T and Shedeur Sanders to the expansive assembly of looks in each showcase, this new era of Louis Vuitton is worth talking about— even though we’ve argued the multi-hyphenate’s collections might be getting a bit formulaic .
Regardless, his recipe is working. This year, Pharrell brought the brand to the American West, taking inspiration from Indigenous fashion to create an 80-look campaign filled with Black cowboy staples like embossed leather, genuine turquoise embellishments, whipping fringe, and buffalo plaid. Shortly after, we were introduced to “Craggy Monogram,” a multicolored, hand drawn reinterpretation of the brand's iconic monogram established in its surprise collaboration with Tyler, the Creator. A whimsical blend of Le Fleur and LV, the unconventional collection notably featured a pistachio-colored Damier print chess set with wonky, wooden pieces, an eclair-shaped key holder, and a cereal bowl and spoon set.
Pharrell’s big and bold strategy at Louis Vuitton culminated at Paris Fashion Week in June to celebrate humanity with “Le Monde est à Vous.” In the gardens of UNESCO we saw collapsible Speedy bags made of buttery leather in baby pink, citron, and peach colorways, as well as new iterations of Damoflage created in the shapes of different continents. Pharrell’s message is clear— LV is for everyone, lovers and friends alike. — Alessandra Maldonado

Standout Moments: Celebrating its 30th anniversary, collaborating with MM6, and continuing its global expansion into Shanghai
It’s hard to make a “best of" list on this topic and not talk about Supreme. The brand celebrated its 30th anniversary this year and continued its expansion around the globe by opening a new outpost in Shanghai, something to celebrate considering all of the legal woes it has had to deal with in the Chinese market over the years.
Whether or not you think Supreme is old news at this point, you can’t tell us you don’t get excited to comb through a new lookbook and product preview when it gets revealed. Its most recent lookbook, Spring/Summer 2024, was full of hits. That said, none were better than a linkup with Margiela sub-label MM6 that was rife with great references to both brand’s archives, like the receipt wallet and split varsity jacket that Frankenstein’d together three designs from Supreme’s expansive catalog. The Supreme Timberland boots covered in a steel grate pattern, which officially released in December 2023, felt like one of the driving forces of the work boots trend that took over our social media feeds last winter. Projects with longtime collaborators like Nike and The North Face impressed as usual. They even made a street bike with Ducati—one of those collabs that really just amounts to a “look what we can do” flex that we have come to know and love from Supreme. Big projects aside, SS24 was also full of some solid pieces like the Wave varsity jacket, a grail-level work jacket covered in embroidered artwork by AOI, and an incredibly fun all-over print Gore-Tex shell jacket with Kermit the Frog on the back.
Sure, you might not be able to operate an entire reselling side hustle flipping anything you buy from a Thursday morning drop like you were able to a few years ago. By the end of 2024, we may even see the brand with a new owner . But don’t let that noise fool you. Three decades in, Supreme is still the blueprint in streetwear. — Mike DeStefano
Maison Margiela

Standout Moments: A memorable Spring 2024 couture presentation, MM6 collaborations with Supreme and Gentle Monster, and show-stealing looks at the 2024 Met Gala
It would be wrong to call 2024 Margiela’s comeback year. After all, the brand has always been a mainstay for those looking to add some macabre whimsy into their wardrobe. However, you cannot minimize what the brand has accomplished over the last six months. Let’s call it a revival? A reawakening? Label or not, there’s no doubt it’s fucking great.
Maison Margiela’s Spring/Summer 2024 couture show back in January was one of the most viral fashion moments in a long time. With a stage set to look like a moonlit walk through the underbelly of Paris, models staggered down the runway as marionettes, their skin glazed like porcelain dolls by legendary artist Pat McGrath. Waspie corsets, tea-stained tulle, and cigarette pants were abundant. Some models wore merkins (read: hand-knotted faux pubic hair) and others wore PVC neckpieces. Gwendolyn Christie even closed the show clad in a corseted-rubber dress that felt like a steampunk fever dream. The show was the kind of dramatic display only John Galliano could execute, and we’ve been well fed because of it.
And, how do you follow up a fashion history-making couture show? With a well thought-out Supreme collab, of course. At first, the idea of the MM6 Maison Margiela x Supreme capsule sounded a little trite. We’ve so often seen luxury fashion houses miss the mark when they attempt to step into the streetwear space. This however, was not the case. The collaboration was full of references to past pieces created by the fashion house, like the $11 bill wallet which was morphed into a Supreme receipt wallet for the capsule. Other notable pieces include a trompe l'oeil box logo T-shirt, blonde wig, and a patchwork faux fur coat, all crafted with that special Margiela je nai se quoi. The brand followed it up with more well-received projects with Gentle Monster and Salomon. We’re sure you’ve seen the leather-wrapped sunglasses and XT-4 mules by now.
Although the aforementioned collabs were enough to secure Margiela’s spot on this list, the brand’s Met Gala looks sealed its fate. Each style worn echoed the artisanal drama Galliano is most known for. Among the few celebs lucky enough to be dressed in Margiela that night, Zendaya’s hand painted lamé and iridescent organza gown and Kim Kardashian’s chainmail skirt both stole the show. — Alessandra Maldonado

Standout Moments: The camo in the SS24 collection, that David Beckham leather jacket, opening its new flagship store on Melrose Place
It’s good to see Guillermo Andrade’s 424 back in the mix. The brand never totally went away, but it has certainly made a grand re-emergence over the past six months that has captured our attention.
This has all been anchored by 424’s stellar Spring/Summer 2024 collection. The camouflage suede jacket and matching knee-length shorts are some of our favorite pieces we’ve seen released this year. Other standouts from the season also see Andrade recontextualizing classic workwear and sportswear through a more premium lens. Hooded bomber jackets have been crafted out of supple lambskin leather. Striped soccer sweaters have been elevated with religious imagery and a 424 logo patch done in metallic threading. The footwear is also impressive. There are derbys with an exposed steel toe and a chelsea/cowboy boot hybrid done in fun materials/colors like mint green leather. And we have to talk about the Marathon boots, 424’s take on the traditional work boot that look like they have been perfectly draped in fabric. There’s also been viral moments—an unreleased leather jacket with the graphics of a David Beckham Real Madrid jersey heat-pressed onto it that we’re still praying gets released one day.
Following the closure of his pioneering multi-brand retail shop on Fairfax Avenue in 2022, Andrade also made his return to retail with the grand opening of 424’s new flagship store on Melrose Place in Los Angeles. This time around, the basement location and its cave-like atmosphere are only selling 424. Ye and Westside Gunn were among the big names in attendance to welcome 424 back to LA’s retail scene. The strong front half of 424’s year culminated with a memorable presentation at Paris Fashion Week , which saw models dressed in the brand’s latest wares smashing wooden chairs in a courtyard. Hopefully, this is only the beginning of 424’s second act. We can’t wait to see what Andrade’s experimentation leads to next. — Mike DeStefano

Standout Moments: Growing its fanbase through denim and jersey exchange programs around the world, continuing to improve its product offering by introducing new cut and sew pieces
Corteiz has hit the ground running. You’d be hard pressed to find a figure in streetwear as hot as its founder Clint419 right now. That’s because the UK brand has capitalized on the hype it garnered in 2023 with huge co-signs from Nike and Supreme. Since then, it’s kept its fans satisfied with each passing drop, while continuing to introduce new silhouettes in the process. What started off as limited drops of logo tees and hoodies, as most brands do, has grown to introduce some cut and sew pieces worthy of adding to your closet. These additions included silky velour tracksuits that even Tony Soprano would fawn over, clean nylon sets to represent Brazil and Italy, quilted bombers, and camo mohair sweaters.
The brand has also continued to find a knack for viral marketing. We loved how the brand was able to join in on the joke about how to pronounce its name (we still aren’t entirely sure). It hosted Da Great Denim Exchange , a one-day event in New York City where the brand invited its followers to swap their jeans for some Corteiz denim. In mid-June, it held a similar activation in Germany encouraging fans to trade in their authentic German football jerseys for an unreleased Corteiz jersey. After all, there’s no better marketing than seeing a brand’s logo plastered across the chest in the wild, right? Not too long ago, Corteiz was a burgeoning UK streetwear brand trying to find its footing elsewhere. Now that it seems to have planted its flag in the US and beyond, it won’t be too long before Corteiz really rules the world. — Mike DeStefano
Joe Freshgoods

Standout Moments: The "When Things Were Pure" collection centered around the New Balance 1000, partnering with Lollapalooza, producing in-house docs to further the brand's storytelling efforts
Perhaps the man himself said it best , “1 lil shoe deal in 2019 turned into an entire lifestyle.” It wasn’t too long ago that Joe Freshgoods was a buzzy designer from Chicago infiltrating the global stage with his neck-breaking New Balance 992s. He hasn’t taken his foot off the gas since then (you can check out his archive if you need proof). Now, he’s one of the biggest names in streetwear, and for good reason. The sneaker collaborations with New Balance have remained the driving force. In 2024, he helped reintroduce the 1000, a forgotten runner from the 2000s. The two colorways and campaign that accompanied them riffed on the culture of the time period that they came from, from juking parties in Chicago to Cam’ron’s iconic pink fur coat. The apparel drop featured Joe’s takes on the wardrobe of the era like oversized football jerseys and airbrushed T-shirts.
Further proof of his strong ties and importance to his home city of Chicago, he was tapped by Lollapalooza to create a special collection celebrating the music festival’s 20th anniversary. Just last week, he made a lasting impression at Paris Fashion Week without even revealing new product or hitting a runway—instead hosting a classic American cookout that a who’s who of names flocked to. And most recently we’ve seen him tease another impressive collection of apparel that features fun all-over print button-ups for the summer, alongside graphics that pay homage to legendary house producer/DJ Frankie Knuckles. If you’re unfamiliar with the name, don’t worry. He also produced a documentary short to educate his audience about Chicago’s House culture. Joe Freshgoods is a master storyteller who keeps finding new ways to craft these authentic narratives. As long as that continues, you can expect to see his name on this list. — Mike DeStefano
Aimé Leon Dore

Standout Moments: Collaborating with Rimowa, continuing its fruitful partnerships with brands like New Balance and Porsche
Aimé Leon Dore has become an easy target. It’s the brand that a lot of people love to hate. To be fair, the jokes sort of write themselves, even if the brand isn’t necessarily to blame for some of the lame people who have latched onto the world it has created. But if you look beyond the internet’s jokes, there are few brands in the streetwear/menswear space operating as consistently as ALD is. That’s because founder Teddy Santis and his team have been able to keep offering refreshed takes on its proven formula. Its ongoing partnership with New Balance offered up new everyday sneakers for your footwear rotation (if your 550s have been cooked to a crisp), three tonal pairs of the New Balance 1000. It improved upon its LeBron James-approved Vanson leather racing jacket from the year before by adding raffia leather panels to it. Its latest chapter with Porsche included a gorgeous custom cherry red 944 Turbo, accompanied by a matching leather jacket. For the aspiring jetsetter, the brand made classy green Rimowa luggage with gold accents. But what makes ALD so great aren’t even the big collabs, it’s everything else. No matter what your personal taste is, chances are you can find something to add to your closet at ALD. Looking for classic menswear? Try some double-pleated pants or a chore jacket. Want something a bit more casual that you can toss on any day of the summer? There’s a mesh baseball jersey featuring a throwback image of Nas or a pair of colorblocked nylon running shorts with your name on it. There is a reason so many brands are still trying to replicate the look and feel of ALD. It’s perfectly tapped into the wardrobe of the modern man in a way few other brands have been able to. — Mike DeStefano
Denim Tears

Standout Moments: Opening its African Diaspora Goods flagship store in New York City, releasing a collaboration with Arthur Jafa, working on leather goods with Comme des Garçons
This time last year, it would be hard to argue that there were many streetwear brands as red hot as Tremaine Emory’s Denim Tears. Anything with its Cotton Wreath logo stamped on it, from sweatsuits to fitted caps, was a must-have. The mark became so ubiquitous that it even started to receive the bittersweet bootleg treatment. At this point, fatigue has set in for some people. The bigger the logo has gotten, the less cool it feels. But truth be told, Denim Tears was always about way more than a hyped-up logo anyway. The brand is an interesting case study on how to grow beyond your massive hit. And while it hasn’t been a perfect plan, Denim Tears has certainly succeeded. Most notably, the brand opened up its first flagship store in New York City dubbed African Diaspora Goods. Along with selling the brand’s latest wares, it also offers an extensive research library.
Sure, the Cotton Wreath is still a core offering that gets people excited—arriving this year in rhinestone-embellished and tonal all-black varieties—but we’ve also seen Emory continue to grow Denim Tears’ product offering beyond just Cotton Wreath capsules. A series of leather goods with Comme des Garçons have been some of the brand’s best drops of 2024. The “Kiss My Grits” collection looked at the Black experience through the lens of fresh produce and even spotlighted the Blackseed Brothers, a business that provides fresh fruit and vegetables to Harlem, as part of the campaign. The clothing leaned into this theme with mohair sweaters that look like watermelon rinds, and the polarizing necklaces made using real chicken bones in resin. Perhaps the biggest release from Denim Tears in 2024 was its “Systemic Racism Controls America” capsule with artist Arthur Jafa . The line featured some of Jafa’s works across T-shirts and hoodies, while also flipping a Supreme hoodie from 2007 to fire some not-so-subtle shots in the streetwear giant’s direction. Emory noted systemic racism at the company and lack of communication following a scrapped project with Jafa as reasons he stepped away from his role at Supreme’s creative director in 2023. No matter how you feel about Denim Tears’ approach, the brand is clearly not about to waver. That’s the type of raw authenticity that allowed streetwear to thrive in the first place. There’s a reason his peers like Awake NY’s Angelo Baque consider Emory one of the best storytellers in the game right now . He’s worthy of the praise. — Mike DeStefano

Standout Moments: Collaborations with Levi's and Patta, consistent seasonal collections, an impressive debut jewelry collection
We don’t often see brands as consistent as Stüssy. After all, it’s made this list countless times over the years. Although there are myriad reasons why we’re devotees to the brand, one thing is clear: Stüssy is tapped in. To its identity, consumers, and even the young kids who might not get it yet.
Lately, the brand has shown it can be on trend without feeling like it’s in the market of perpetuating microtrends. Earlier this year, Stüssy launched its first jewelry collection with pieces like an 8 ball stud earring featuring a freshwater pearl, as well as a chain link choker armed with dainty charms. Stüssy has also successfully taken part in runway trends that feel wearable, like the matching buttery leather zip-up hoodie and pants that dropped in its Spring/Summer 24 collection. The brand has even ventured into suiting, which could have been a departure from their repertoire if not for the gauze-like relaxed fit that made the pieces uniquely Stüssy.
The collabs have also impressed, but that’s no surprise. Stüssy’s ability to seamlessly join forces with their collaborators is one of the things they do best. For its venture with Dutch streetwear brand Patta, it dropped a series of tees, knitwear, and patchwork adorned denim to honor the father of Patta’s co-founder, Humprey Rietfeld Schmidt. With Levi’s, it released leather and denim pieces, as well as a western-inspired embossed leather belt. They even partnered with a Palestinian-led textile collective to produce boucherouite rugs made from their own upcycled tees and wool. Stüssy’s streak of dropping incredible pieces has yet to end, and we’re always excited to see more. — Alessandra Maldonado
SHARE THIS STORY
Sign up for the
Complex Newsletter
Your leading source for what’s now and what’s next in Music, Style, Sports, and Pop Culture.
By entering your email and clicking Sign Up, you’re agreeing to let us send you customized marketing messages about us and our advertising partners. You are also agreeing to our
Latest in Style

| BY COMPLEX STAFF
Complex Picks: Summer Grill & Chill Gear To Buy Now

| BY MIKE DESTEFANO
10 New Releases Worth Buying This Week: Awake NY, Joe Freshgoods, and More

| BY JOE PRICE
Levi's and McLaren Racing Team Up for New Collection

June's Top Five Jewelry Purchases, From Kendrick Lamar's $600,000 Cross to ASAP Rocky's Grill

| BY JAELANI TURNER-WILLIAMS
Angela Simmons Apologizes for Bringing Gun-Shaped Purse to BET Awards: ‘I Thought It Was a Fashion Moment'

| BY LEI TAKANASHI
How B.B. Simon Became the Flyest Belt in Hip-Hop

Lewis Hamilton Unveils 'Home Turf' Collection With +44

State Farm®

Complex Picks: 10 New Releases To Shop on Amazon Now

Best of Paris Fashion Week Men's Spring/Summer 2025
- Top products
- BIM Collaborate Pro
- Fusion extensions
- Flow Capture
- Flow Production Tracking
- View all products
- View Mobile Apps
- Collections
- Architecture, Engineering & Construction
- Product Design & Manufacturing
- Media & Entertainment
- Buying with Autodesk
- Pay as you go with Flex
- Special offers
- Industry solutions
- Educational access
- Product support
- System requirements
- Download your software
- File viewers
- Students and educators
- Installation
- Account management support
- Educational support
- Partner Finder
- Autodesk consulting
- Contact support
- Certification
- Autodesk University
- Conferences and events
- Success planning
- Autodesk Community
- Developer Network
- Autodesk Customer Value
- ASEAN (English)
- Canada (English)
- Canada (Français)
- Deutschland
- Europe (English)
- Hong Kong (English)
- India (English)
- Latinoamérica
- Magyarország
- Middle East (English)
- New Zealand
- Singapore (English)
- South Africa (English)
- United Kingdom
- United States

Integrated BIM tools, including Revit, AutoCAD, and Civil 3D

Professional CAD/CAM tools built on Inventor and AutoCAD

Entertainment content creation tools, including 3ds Max and Maya
- Product intro
- Capabilities
- Maya features
- M&E Collection

Autodesk Maya: Create expansive worlds, complex characters, and dazzling effects
3D animation and visual effects software
Image courtesy of Framestore
What is Maya?
Autodesk Maya is professional 3D software for creating realistic characters and blockbuster-worthy effects.
Bring believable characters to life with engaging animation tools.
Shape 3D objects and scenes with intuitive modeling tools.
Create realistic effects—from explosions to cloth simulation.
See system requirements

Maya overview (video: 7:18 min.)

Hyperrealistic model made with Maya by Youssef Abbas

Stylized character made in Maya by Alexandre Mougenot

Doctor Strange in the Multiverse of Madness VFX by Framestore

Louis & Luca and the Snow Machine by Qvisten Animation

Silhouette by VES-winning students of ArtFX School of Digital Arts

Why use Maya?
Accelerate workflows
Maya’s powerful tools help you iterate faster so you can focus on creativity and meet deadlines.
Deliver stunning visuals
Add fine details to characters and scenes, and deliver quality work that keeps clients coming back.
Scale for complexity
Top artists in the industry rely on Maya to create the most complex shots, characters, and worlds.
What you can do with Maya

Still from the film Guardians of the Galaxy Vol. 3. Image courtesy of Framestore.
Breathe life into 3D models with powerful animation tools
Whether you’re animating lifelike digi doubles or lovable cartoon characters, Maya has the animation toolset to bring your 3D assets to life.

Environment created with Bifrost for Maya. Image courtesy of Lucien Wutsh Michanol.
Create detailed effects and environments with Bifrost
From blazing explosions to luscious forests, Bifrost for Maya makes it possible to create complex simulations and worlds in a single visual programming environment.

“To create something new, unique, and never seen … we went for 3D dry brushes drawn on planes in Maya [for Teenage Mutant Ninja Turtles ].”
—Gaspard Roche, Associate Head of Characters, Mikros Animation

“Maya and our other Autodesk tools have played an essential role in allowing us to excel in our animal and creature work.”
—Amaan Akram, Head of VFX, Untold Studios

“From Maya for 3D animation to Arnold for 3D rendering, these tools enabled us to bring the extraordinary to larger-than-life.”
—Jocelyn Birsch, Director of Experience, The Mill

“We used Bifrost to scatter everything that enriched the fantastic forest sequence in Ant-Man and The Wasp: Quantumania .”
—Thomas Kutschera, Head of Groom CFX, Pixomondo
Workflows and use cases

Animating Guardians of the Galaxy Vol. 3 characters
Watch how Framestore developed stunning character animations for Guardians of the Galaxy Vol. 3 with Maya.

Streamlining teamwork: Qvisten’s OpenUSD asset pipeline
Qvisten Animation built an OpenUSD (Universal Scene Description) asset pipeline with Maya to streamline teamwork and future-proof productions.

An Inside Look at the Hogwarts Legacy Game
Discover how the team at Warner Bros. Games Avalanche created and refined characters, animations, and cinematics for the highly anticipated fantasy game using Maya.
Maya resources
STAY UP TO DATE
M&E YouTube channel
Watch talks from industry experts and discover new tools, workflows, and more.
Maya learning channel
Find modeling, rigging, animation, FX, and rendering tutorials to get you producing digital content.
Read Maya news and stories from animation, VFX, and games studios.
When to choose Maya or 3ds Max
Maya and 3ds Max are used by creative studios around the world for animation, modeling, visual effects, and rendering.

USD in Production at Animal Logic
Animal Logic shares their journey of how they integrated USD in Maya into their production pipeline.
Frequently asked questions (FAQs)
What is maya used for.
Maya is a professional 3D animation, modeling, simulation, and rendering toolset, designed for creating realistic characters and blockbuster-worthy effects. From fantastic creatures to sweeping landscapes and explosive battle sequences, top artists, modelers, and animators rely on Maya’s award-winning toolset to bring today’s most-loved animated and live-action films, TV shows, and video games to life.
Who uses Maya?
Maya is used by 3D modelers, animators, lighting artists, and FX artists across the film, TV, and games industries.
Maya vs 3ds Max
Maya and 3ds Max are used by creative studios around the world for animation, modeling, visual effects, and rendering. Learn when to choose Maya and when to choose 3ds Max .
Which operating system does Maya run on?
Maya can run on Microsoft® Windows®, Apple® macOS®, and Linux®. See Maya system requirements for details.
How do I download Maya?
Autodesk provides download and install instructions for individuals and administrators . Your available downloads appear in Autodesk Account . Find your product, select a version, platform, language, and download method. For more information, visit Autodesk support .
Can I install Maya on multiple computers?
With a subscription to Maya software, you can install it on up to three computers or other devices. However, only the named user can sign in and use that software on a single computer at any given time. Please refer to the Software License Agreement for more information.
How do I convert my Maya free trial to a paid subscription?
Launch your trial software and click Subscribe Now on the trial screen or buy Maya here . When buying your subscription, enter the same email address and password combination you used to sign in to your trial. Learn more about converting a trial to a paid subscription .
How much does a Maya subscription cost?
. If you have infrequent users and are interested in a pay-as-you-go option, please visit www.autodesk.ca/en/flex to learn more.
Do you offer subscriptions for students, educators, and educational institutions?
Students and teachers at qualified academic institutions worldwide are eligible for free access to Autodesk software for one-year through the Autodesk Education Community .
Support and problem solving
Find troubleshooting articles and resolve your issue.
Get more with the Media & Entertainment Collection
Bring breathtaking scenes and characters to life for film, TV, and games.
Media & Entertainment Collection
All of the creative tools you need to build a powerful and scalable 3D animation pipeline for complex simulations, effects, and rendering.
Media & Entertainment Collection includes:
MotionBuilder
Privacy | Do not sell or share my personal information | Cookie preferences | Report noncompliance | Terms of use | Legal | © 2024 Autodesk Inc. All rights reserved
IMAGES
VIDEO
COMMENTS
To play the presentation, click in the toolbar, then press the arrow keys to advance through the slides. To end the presentation, press the Esc (Escape) key. For more ways to show a presentation, see Play a presentation on your Mac. To close the presentation, click the red close button in the top-left corner of the window.
Making a PowerPoint on a Mac is easy. First, open up the Pages application on your Mac. Then, select the File menu and choose New from Template. From there, you can select a PowerPoint template and customize it to fit your needs. When you are finished, you can save your presentation and share it with others.
Step 2: Open PowerPoint. Open PowerPoint and choose a template or open a blank presentation. PowerPoint offers a variety of templates to suit different presentation styles. If you choose to start with a blank slate, you'll have complete creative freedom.
Learn the basics of using Apple's great presentation software, Keynote! Apple Keynote empowers you to create stunning presentations with dramatic transition...
Here are four steps you can take to learn how to use Keynote to make a presentation. 1. Explore the Keynote App Interface. If you're switching to the Keynote app from another piece of presentation software, my favorite tip is to spend time familiarizing yourself with the interface.
A great slide is obviously the foundation of any great presentation but there is more work that goes into it than most people think. We will look at the one ...
Keeping the slide content simple and precise will bestow your MAC slideshow with a decluttered look. It will help you to further your brand aesthetics as well. You may consider following the famous 10-20-30 rule of PowerPoint presentations. The rule states that your presentation should be no longer than ten slides.
There are two ways to play a Keynote presentation on your Mac: Present in full screen: Shows the current slide on your primary display while the presenter display, with your notes and controls, is hidden. Present in a window: Shows the slideshow in one window and the presenter display in another. This is useful when you don't have a secondary ...
On the slide, click to select the object you want to animate. In the Animate sidebar, click the Animate tab. Click Add an Effect, then select an animation. To set animation options such as the duration and direction of the animation, use the controls that appear. (Start Transition,Delay)
Get personalized access to solutions for your Apple products. Download the Apple Support app. Learn more about creating, editing, saving, and sharing presentations on your Mac, iPad, iPhone, iPod touch, and on the web. Learn more with these Keynote resources.
How to create a keynote presentationStep 1 : To open Keynote, click the Keynote icon in the Dock, Launchpad or the Applications folder.If the theme chooser (...
Maximizing the Use of Interactive Features in a Macbook Powered Presentation. So you've got a shiny new MacBook and you want to impress your audience with a killer presentation. Well, lucky for you, MacBooks come packed with interactive features that can take your presentation to the next level. Let's dive right into how you can make the ...
Apply or change slide layouts. Customize a slide master. Change the page orientation of your PowerPoint presentation. Create and use your own presentation template. Create your own theme in PowerPoint. Learn about SmartArt graphics. Compress the picture size. Crop a picture. Add a transparent picture (watermark) to your slides.
Why Need Third-party Software Over Regular Mac presentation Software . There are several alternative software available when it comes to making impactful presentations on a mac. The Keynote is the default presentation software that comes with Mac. It is a good option for creating presentations with some basic features.
Show your team some love. It always helps to acknowledge your team. Cook lavishes praise on his team in nearly every public appearance. He concluded the WWDC '13 keynote by saying, "I'd like ...
1. Keynote. Price: Free. Best for: Mac users. Get Software. Keynote is one of the top presentation software for Mac and comes included with most Apple devices. With its stunning features and powerful tools, you can bring your slides to life and create the most effective presentations for your clients or your boss.
Step 1: Open the App Store on your Mac. App Store Icon on Mac Launcher. Step 2: In the search bar at the top right, type in "PowerPoint" and press Return. App Store Search Bar. Step 3: The Microsoft PowerPoint app should appear as the first result. Click on the Get button and then Install.
How to Make a PowerPoint Presentation on a Mac. Part of the series: Using Apple Computers. Making a PowerPoint presentation on a Mac computer can be done usi...
If what you are describing through bullet points is "sequential" (idea 1, then idea 2…), split the slide. If the bullet points are "additive" (we did x by combining a, b, c) then find a ...
Step 2. Choose the Theme of the Presentation. Scroll to navigate in the theme chooser and choose the type of presentation you want to make then double click on it to open. Step 3. Change the Layout. To change to a different layout, you can click on the "Layout" button, and then select your desired layout. Step 4.
So my MacBook Pro M2 chip running the latest version of Sonoma has always had problems when I run a power point presentation (I am running PPT 2016 for Mac) in presentation mode connected to a HDMI screen projection output. The problems appears to be that slides are skipped even when there is content on the next slide. A blank slide will appear ...
Do any of the following: Go to the next slide or build: Press the Space bar or Right Arrow key. Go to the previous slide or reset the previous build: Press the Left Arrow key. Jump to a different slide: Click Show Navigator in the top-left corner of the presenter display, then click a slide in the slide navigator. Jump to a specific slide number: Press any number key, then press Return.
Open your Presentation. Find the Google Slides presentation you want to work on. Click and hold "Ctrl" (Windows) or "Command" (Mac). While holding this key down, proceed to the next step. Click Individual Slides to Select Them. Click on each slide you want to include in your selection. Right-click and Choose an Action.
Joe Biden and Jill Biden both praised Biden's performance at the CNN Presidential Debate against former President Donald Trump. Some Democrats criticized Biden's performance and are ...
AI startup Synthesia debuted a slew of new features including the ability to make Apple-style presentations with avatars by using just a webcam or phone.
How to create a powerpoint on Apple products of iMac or MacBook or MacBookAir
The company cut out 100 steps from its battery-making process, over 50 components from the body shop, and 500 parts from the design. Production at Rivian's Normal, IL plant (Source: Rivian)
Standout Moments: A memorable Spring 2024 couture presentation, MM6 collaborations with Supreme and Gentle Monster, and show-stealing looks at the 2024 Met Gala It would be wrong to call 2024 ...
From blazing explosions to luscious forests, Bifrost for Maya makes it possible to create complex simulations and worlds in a single visual programming environment. Learn about Bifrost . Image courtesy of Mikros Animation "To create something new, ... Apple® macOS®, and Linux®. See Maya system requirements for details.