5 Best Ways to Create PowerPoint Files Using Python
💡 Problem Formulation: Automating the creation of PowerPoint presentations is a common task for those who need to generate reports or summaries regularly. For instance, a user may wish to create a presentation summarizing sales data from a CSV file or visualize a project’s progress in a structured format. The desired output is a fully formatted PowerPoint file (.pptx) with various elements like titles, texts, images, and charts, as specified by the input data or customization requirements.

Method 1: Using python-pptx
The python-pptx library provides a comprehensive set of features for creating PowerPoint files (.pptx) in Python. It allows for adding slides, text, images, charts, and more, with a high level of customization. Manipulate slides at a granular level by accessing placeholders, creating bulleted lists, and setting properties like font size or color programmatically.
Here’s an example:
The code snippet above creates a PowerPoint file named python-pptx-presentation.pptx with one slide that includes a title and a subtitle.
In this overview, we create a presentation object, add a new slide with a predefined layout, set text for the title and subtitle placeholders, and then save the presentation. This method gives users the ability to create detailed, professional presentations through code.
Method 2: Using Pandas with python-pptx
This method combines the data manipulation power of Pandas with the presentation capabilities of python-pptx to create PowerPoint files from DataFrame contents. It’s particularly useful for automating the inclusion of tabular data or creating charts based on the DataFrame’s data.
The output is a PowerPoint file named pandas-python-pptx.pptx containing a bar chart representing the quantity of fruits.
This snippet demonstrates using a Pandas DataFrame to generate chart data, which is then used to create a chart in a PowerPoint slide. It showcases the synergy between Pandas for data handling and python-pptx for presentation creation.
Method 3: Using ReportLab with python-pptx
Those seeking to include complex graphics or generate custom visuals can harness the graphic-drawing capabilities of ReportLab with python-pptx. This method leverages ReportLab to create an image, which can then be inserted into a PowerPoint slide.
The output would be a PowerPoint file named reportlab-pptx.pptx containing a slide with a custom bar chart image.
The code above creates a bar chart using ReportLab, saves the chart as an image, and then inserts the image into a PowerPoint slide. This approach is ideal if you need to include bespoke graphics that are not directly supported by python-pptx itself.
Method 4: Using Matplotlib with python-pptx
For those familiar with Matplotlib, this method involves creating a visual plot or chart with Matplotlib, saving it as an image, and then embedding the image into a PowerPoint slide using python-pptx.
The outcome is a PowerPoint file matplotlib-pptx.pptx , with a plot on a slide created by Matplotlib.
In this case, we graph a quadratic function using Matplotlib, save it as an image, and then add that image to a slide in our PowerPoint presentation. This method offers a blend of Matplotlib’s sophisticated plotting tools with the simplicity of python-pptx.
Bonus One-Liner Method 5: Using Officegen
The Officegen package allows for rapid PowerPoint creation with simpler syntax, although with less flexibility compared to python-pptx. It provides functions to add slides, titles, and bullet points.
The outcome is a PowerPoint file officegen-presentation.pptx with a single slide containing a large title.
This snippet uses Officegen to initiate a new presentation, adds a text title to a slide, and saves the presentation. While not as detailed as python-pptx, Officegen is quick for simple presentations.
Summary/Discussion
- Method 1: python-pptx. Full-featured control over presentations. Can be verbose for simple tasks.
- Method 2: Pandas with python-pptx. Ideal for data-driven presentations. Setup can be complex if unfamiliar with data libraries.
- Method 3: ReportLab with python-pptx. Powerful combo for custom graphics. Requires separate handling of graphics and presentation stages.
- Method 4: Matplotlib with python-pptx. Best for users comfortable with Matplotlib. Less direct than using python-pptx alone.
- Bonus Method 5: Officegen. Quick and easy for simple presentations. Limited customization options.
Emily Rosemary Collins is a tech enthusiast with a strong background in computer science, always staying up-to-date with the latest trends and innovations. Apart from her love for technology, Emily enjoys exploring the great outdoors, participating in local community events, and dedicating her free time to painting and photography. Her interests and passion for personal growth make her an engaging conversationalist and a reliable source of knowledge in the ever-evolving world of technology.
- Mailing List
Practical Business Python
Taking care of business, one python script at a time
Creating Powerpoint Presentations with Python
Posted by Chris Moffitt in articles
Introduction
Love it or loathe it, PowerPoint is widely used in most business settings. This article will not debate the merits of PowerPoint but will show you how to use python to remove some of the drudgery of PowerPoint by automating the creation of PowerPoint slides using python.
Fortunately for us, there is an excellent python library for creating and updating PowerPoint files: python-pptx . The API is very well documented so it is pretty easy to use. The only tricky part is understanding the PowerPoint document structure including the various master layouts and elements. Once you understand the basics, it is relatively simple to automate the creation of your own PowerPoint slides. This article will walk through an example of reading in and analyzing some Excel data with pandas, creating tables and building a graph that can be embedded in a PowerPoint file.
PowerPoint File Basics
Python-pptx can create blank PowerPoint files but most people are going to prefer working with a predefined template that you can customize with your own content. Python-pptx’s API supports this process quite simply as long as you know a few things about your template.
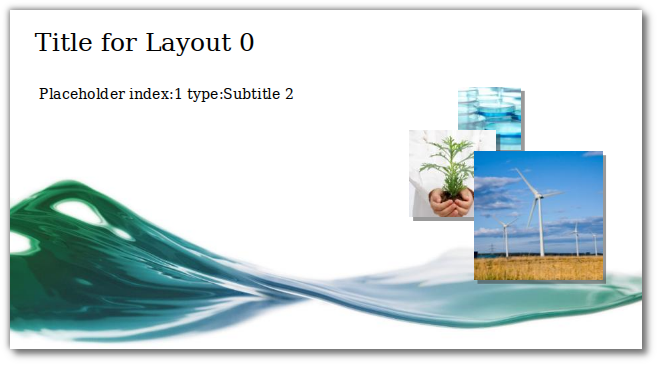
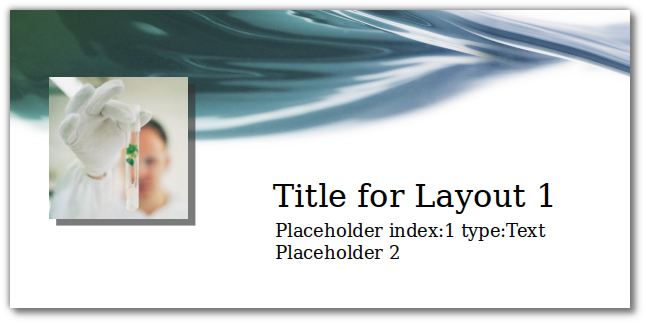
Before diving into some code samples, there are two key components you need to understand: Slide Layouts and Placeholders . In the images below you can see an example of two different layouts as well as the template’s placeholders where you can populate your content.
In the image below, you can see that we are using Layout 0 and there is one placeholder on the slide at index 1.
In this image, we use Layout 1 for a completely different look.
In order to make your life easier with your own templates, I created a simple standalone script that takes a template and marks it up with the various elements.
I won’t explain all the code line by line but you can see analyze_ppt.py on github. Here is the function that does the bulk of the work:
The basic flow of this function is to loop through and create an example of every layout included in the source PowerPoint file. Then on each slide, it will populate the title (if it exists). Finally, it will iterate through all of the placeholders included in the template and show the index of the placeholder as well as the type.
If you want to try it yourself:
Refer to the input and output files to see what you get.
Creating your own PowerPoint
For the dataset and analysis, I will be replicating the analysis in Generating Excel Reports from a Pandas Pivot Table . The article explains the pandas data manipulation in more detail so it will be helpful to make sure you are comfortable with it before going too much deeper into the code.
Let’s get things started with the inputs and basic shell of the program:
After we create our command line args, we read the source Excel file into a pandas DataFrame. Next, we use that DataFrame as an input to create the Pivot_table summary of the data:
Consult the Generating Excel Reports from a Pandas Pivot Table if this does not make sense to you.
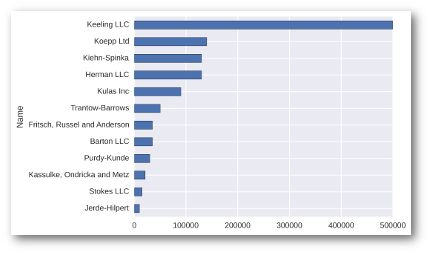
The next piece of the analysis is creating a simple bar chart of sales performance by account:
Here is a scaled down version of the image:
We have a chart and a pivot table completed. Now we are going to embed that information into a new PowerPoint file based on a given PowerPoint template file.
Before I go any farther, there are a couple of things to note. You need to know what layout you would like to use as well as where you want to populate your content. In looking at the output of analyze_ppt.py we know that the title slide is layout 0 and that it has a title attribute and a subtitle at placeholder 1.
Here is the start of the function that we use to create our output PowerPoint:
This code creates a new presentation based on our input file, adds a single slide and populates the title and subtitle on the slide. It looks like this:

Pretty cool huh?
The next step is to embed our picture into a slide.
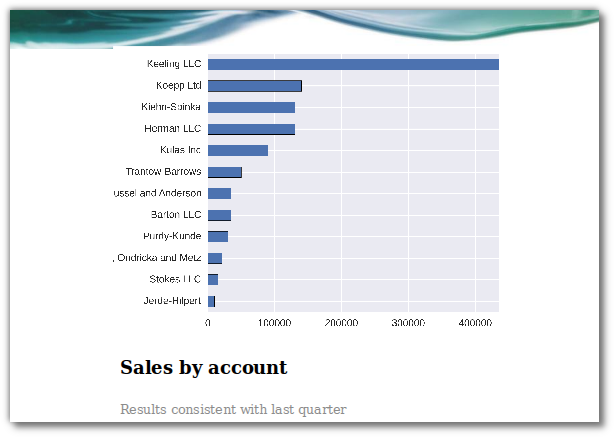
From our previous analysis, we know that the graph slide we want to use is layout index 8, so we create a new slide, add a title then add a picture into placeholder 1. The final step adds a subtitle at placeholder 2.
Here is our masterpiece:
For the final portion of the presentation, we will create a table for each manager with their sales performance.
Here is an image of what we’re going to achieve:
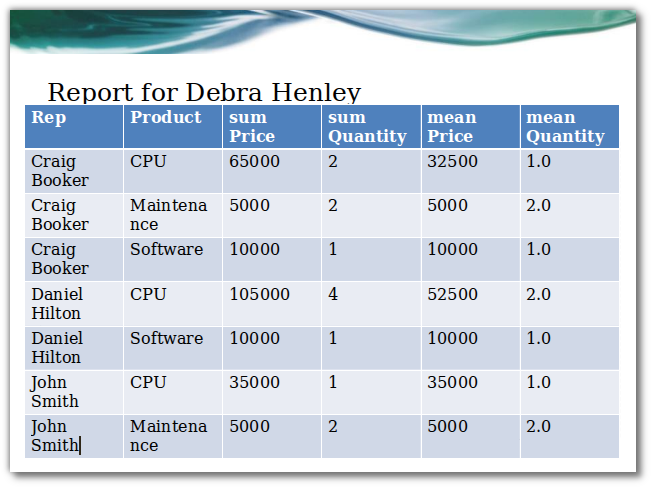
Creating tables in PowerPoint is a good news / bad news story. The good news is that there is an API to create one. The bad news is that you can’t easily convert a pandas DataFrame to a table using the built in API . However, we are very fortunate that someone has already done all the hard work for us and created PandasToPowerPoint .
This excellent piece of code takes a DataFrame and converts it to a PowerPoint compatible table. I have taken the liberty of including a portion of it in my script. The original has more functionality that I am not using so I encourage you to check out the repo and use it in your own code.
The code takes each manager out of the pivot table and builds a simple DataFrame that contains the summary data. Then uses the df_to_table to convert the DataFrame into a PowerPoint compatible table.
If you want to run this on your own, the full code would look something like this:
All of the relevant files are available in the github repository .
One of the things I really enjoy about using python to solve real world business problems is that I am frequently pleasantly surprised at the rich ecosystem of very well thought out python tools already available to help with my problems. In this specific case, PowerPoint is rarely a joy to use but it is a necessity in many environments.
After reading this article, you should know that there is some hope for you next time you are asked to create a bunch of reports in PowerPoint. Keep this article in mind and see if you can find a way to automate away some of the tedium!
- ← Best Practices for Managing Your Code Library
- Adding a Simple GUI to Your Pandas Script →
Subscribe to the mailing list
Submit a topic.
- Suggest a topic for a post
- Pandas Pivot Table Explained
- Common Excel Tasks Demonstrated in Pandas
- Overview of Python Visualization Tools
- Guide to Encoding Categorical Values in Python
- Overview of Pandas Data Types
Article Roadmap
We are a participant in the Amazon Services LLC Associates Program, an affiliate advertising program designed to provide a means for us to earn fees by linking to Amazon.com and affiliated sites.

Create interactive slides with Python in 8 Jupyter Notebook cells
Creating presentations in Jupyter Notebook is a great alternative to manually updating slides in other presentation creation software. If your data changes, you just re-execute the cell and slide chart is updated.
Jupyter Notebook is using Reveal.js (opens in a new tab) for creating slides from cells. The standard approach is to write slides code and Markdown in the Jupyter Notebook. When notebook is ready, it can be exported to standalone HTML file with presentation.
What if, you would like to update slides during the slide show? What is more, it would be fantastic to have interactive widgets in the presentation. You can do this in Mercury framework.
In this tutorial, we will create an interactive presentation in Jupyter Notebook and serve it with Mercury.
Create presentation in notebook
Please enable Slideshow toolbar in Jupyter Notebook. It can be done by clicking View -> Cell Toolbar -> Slideshow . It is presented in the screenshot below:

We will need following packages to create presentation in Python notebook:
Please make sure that they are installed in your environment.
1. Import packages and App setup
The first step is to import packages and setup Mercury App :
We setup title and description for App object.
Please note that we set Slide Type to Skip . This cell will not appear in the presentation.
2. Add title
The second cell is a Markdown with title:
The Slide Type is set to Slide . It is our first slide!
3. Add slide with Markdown
Add new Markdown cell with the following cell.
Please set Slide Type to Slide . It will be a second slide. I'm using ## as slide title ( # will produce too large title in my opinion).
4. Add Mercury Widget
Please add code cell with Text widget. We will use it, to ask users about their name.
We set Slide Type as Skip , so this cell will not appear in the presentation.
5. Display name
Let's use the name.value in the slide. Please add a code cell. We will display a Markdown text with Python variables by using Markdown function from Mercury package.
Please set the Slide Type to Slide .
You can display Markdown with Python variables by calling mr.Markdown() or mr.Md() functions. Both do the same.
The first five cells of the notebook:
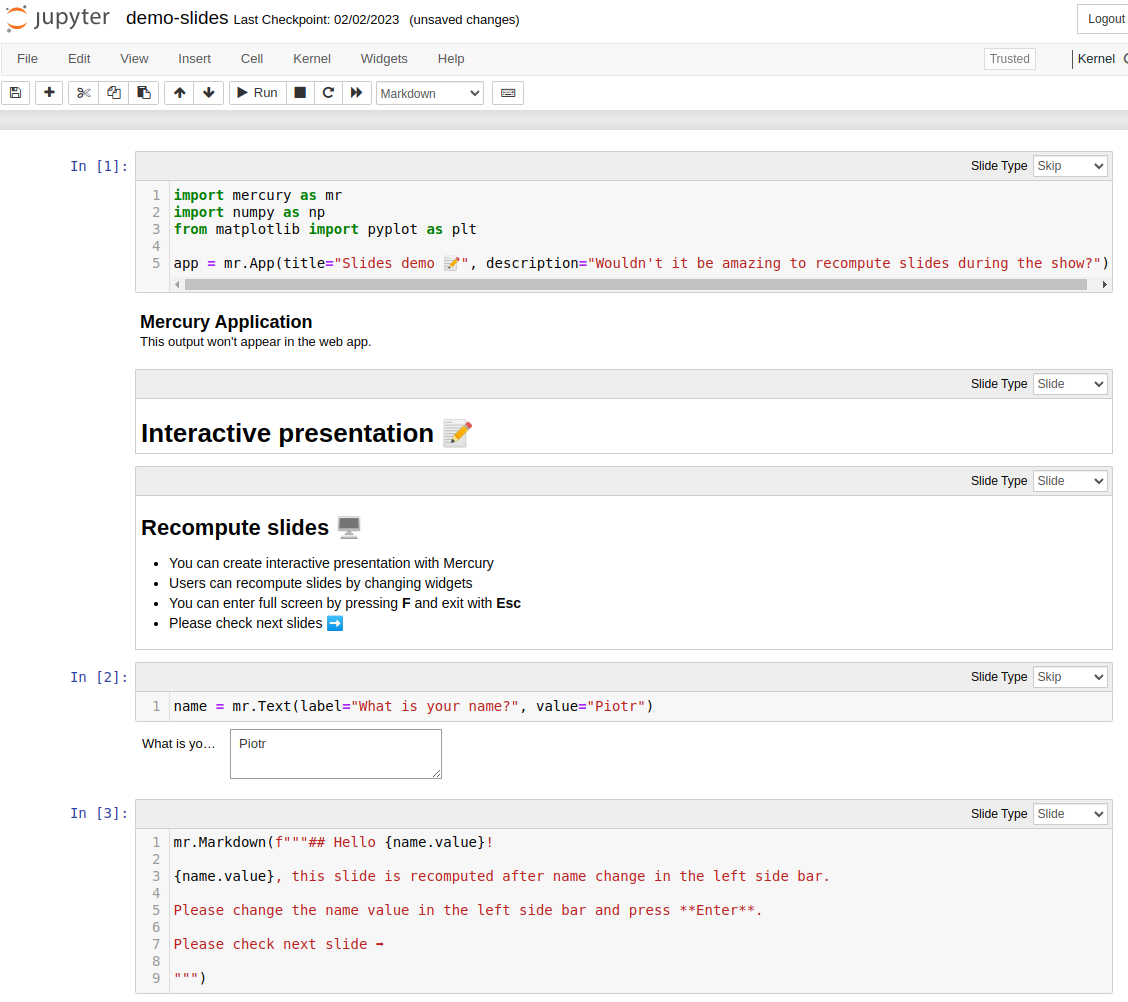
You can enter your name in the widget during the notebook development. There will be no change in other cells. If you want to update the cell with new widget value, please execute it manually.
6. More widgets
We can add more widgets to the presentation. They will be used to control chart in the next slide.
We have used Slider and Select widgets. They are displayed in the notebook. This cell will not be displayed in the presentation, so set Slide Type to Skip .
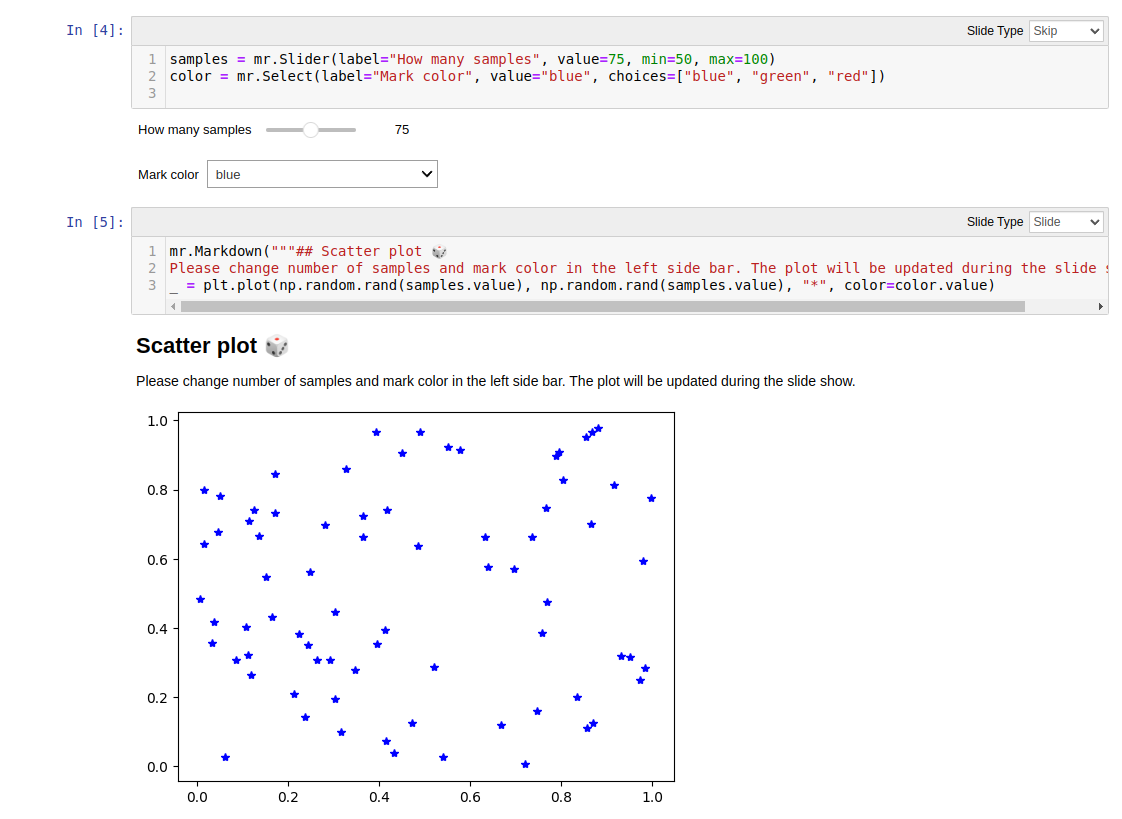
7. Scatter plot
We will add a new code cell. It will have Slide Type set to Slide .
We used widgets values by accessing them with samples.value and color.value .
Screenshot of the notebook with scatter plot:
8. Final slide
Please add a last Markdown cell. Its Slide Type will be set to Slide :
Please notice that link is added with HTML syntax. There is a target="_blank" used to open link in a new tab.
Run presentation in Mercury
Please run Mercury local server in the same directory as notebook:
The above command will open a web browser at http://127.0.0.1:8000 . Please click on a card with presentation.
You can navigate between slides with arrows in the bottom right corner. You can enter the full screen mode by pressing F on the keyboard. Please use Esc to exit full screen mode.
You can change widgets values in the sidebar and presentation slides will be automatically recomputed:
You can export your slides as PDF or HTML by clicking Download button in the sidebar.

Creating Presentations with Jupyter Notebook
Jupyter Notebook can be turned into a slide presentation that is kind of like using Microsoft Powerpoint, except that you can run the slide’s code live! It’s really neat how well it works. The only con in my book is that there isn’t a lot of theming that can be applied to your slides, so they do end up looking a bit plain.
In this article, we will look at two methods of creating a slideshow out of your Jupyter Notebook. The first method is by using Jupyter Notebook’s built-in slideshow capabilities. The second is by using a plug-in called RISE .
Let’s get started!
Note: This article assumes that you already have Jupyter Notebook installed. If you don’t, then you might want to go to their website and learn how to do so.
The first thing we need to do is to create a new Notebook. Once you have that done and running, let’s create three cells so that we can have three slides. Your Notebook should now look like the following:

Now let’s turn on the “slideshow” tools. Go to the View menu and then click on the Cell Toolbar menu option. You will find a sub-menu in there that is called Slideshow . Choose that. Now your Notebook’s cell should look like this:

There are now little comboboxes on the top right of each cell. These widgets give you the following options:
You can just create a series of Slides if you like, but you can make the slideshow a bit more interesting by adding Sub-Slides and Fragments. Sub-slides are just slides that are below the previous one while Fragments are basically fragments within the previous slide. As an aside, I have actually never used Fragments myself. Anyway you can also set a slide to Skip, which just allows you to skip a slide or Notes, which are just speaker notes.
Let’s add some text to our first cell. We will add the text “# Hello Slideshow” to it and set the cell type to Markdown. Note the pound sign at the beginning of the text. This will cause the text to be a heading.
In cell two, we can add a simple function. Let’s use the following code:
For the last cell, we will add the following text:
Make sure you set that to be a Markdown cell as well. This is what my cells ended up looking like when I was done:

To make things simple, just set each of the cell’s individual comboboxes to Slide .
Now we just need to turn it into an actual slideshow. To do that, you will need save your Notebook and shut down the Jupyter Notebook server. Next you will need to run the following command:

To navigate your slideshow, you can use your left and right arrow keys or you can use spacebar to go forward and shift_spacebar to go back. This creates a pretty nice and simple slideshow, but it doesn’t allow you to run the cells. For that, we will need to use the RISE plugin!
Getting Started with RISE
Reveal.js – Jupyter/IPython Slideshow Extension (RISE) is a plugin that uses *reveal.js* to make the slideshow run live. What that means is that you will now be able to run your code in the slideshow without exiting the slideshow. The first item that we need to learn about is how to get RISE installed.
Installing rise with conda
If you happen to be an Anaconda user, then this is the method you would use to install RISE:
This is the easiest method of installing RISE. However most people still use regular CPython, so next we will learn how to use pip!
Installing rise with pip
You can use Python’s pip installer tool to install RISE like this:
You can also do `python -m pip install RISE` is you want to. Once the package is installed, you have a second step of installing the JS and CSS in the proper places, which requires you to run the following command:
If you somehow get a version of RISE that is older than 5.3.0, then you would also need to enable the RISE extension in Jupyter. However, I recommend just using the latest version so you don’t have to worry about that.
Using RISE for a SlideShow
Now that we have RISE installed and enabled, let’s re-open the Jupyter Notebook we created earlier. Your Notebook should now look like this:

You will notice that I circled a new button that was added by RISE to your Notebook. If you mouse over that button you will see that it has a tooltip that appears that says “Enter/Exit RISE Slideshow”. Click it and you should see a slideshow that looks a lot like the previous one. The difference here is that you can actually edit and run all the cells while in the slideshow. Just double-click on the first slide and you should see it transform to the following:

After you are done editing, press SHIFT+ENTER to run the cell. Here are the primary shortcuts you will need to run the slideshow effectively:
- SPACEBAR – Goes forward a slide in the slideshow
- SHIFT+SPACEBAR – Goes back a slide in the slideshow
- SHIFT+ENTER – Runs the cell on the current slide
- DOUBLE-CLICK – To edit a Markdown cell
You can view all the Keyboard shortcuts by going to the Help menu when not in Slideshow mode and clicking the Keyboard Shortcuts option. Most if not all of these shortcuts should work inside of a RISE slideshow.
If you want to start the slideshow on a specific cell, just select that cell and then press the Enter Slideshow button.
RISE also works with Notebook widgets. Try creating a new cell with the following code:
Now start the slideshow on that cell and try running the cell (SHIFT+ENTER). You should see something like this:

You can use RISE to add neat widgets, graphs and other interactive elements to your slideshow that you can edit live to demonstrate concepts to your attendees. It’s really quite fun and I have used RISE personally for presenting intermediate level material in Python to engineers.
RISE also has several different themes that you can apply as will as minimal support for slide transitions. See the documentation for full information.
Wrapping Up
In this chapter we learned about two good methods for creating presentations out of our Jupyter Notebooks. You can use Jupyter directly via their nbconvert tooling to generate a slideshow from the cells in your Notebook. This is nice to have, but I personally like RISE better. It makes the presentations so much more interactive and fun. I highly recommend it. You will find that using Jupyter Notebook for your presentations will make the slides that much more engaging and it is so nice to be able to fix slides during the presentation too!
Related Reading
- Presenting code using Jupyter Notebook
- The RISE Github page
- Jupyter nbconvert Usage
- How to build interactive presentations with Jupyter Notebook and Reveal JS
4 thoughts on “Creating Presentations with Jupyter Notebook”
Pingback: Jupyter Notebook Extension Basics | The Mouse Vs. The Python
Pingback: Creating Jupyter Notebook Widgets with interact - The Mouse Vs. The Python
Pingback: How to Export Jupyter Notebooks into Other Formats - The Mouse Vs. The Python
Pingback: Jupyter Notebook Extension Basics - The Mouse Vs. The Python
Comments are closed.
How to Automate PowerPoint Presentations using Python
- אפריל 14, 2024
30 minutes free Consultation
Creating PowerPoint presentations can be a time-consuming task, especially when you have to update data or make repetitive changes. Fortunately, Python offers a way to automate PowerPoint presentations, saving you time and effort. In this article, we’ll explore how to use Python to automate PowerPoint presentations.
What is Python?
Python is a versatile and powerful programming language known for its simplicity and readability. It has a wide range of applications, including web development, data analysis, artificial intelligence, and automation. Python’s extensive library ecosystem makes it easy to interact with various file formats and applications, including Microsoft PowerPoint.
What is Microsoft PowerPoint?
Microsoft PowerPoint is a popular presentation software that allows users to create engaging and professional-looking slideshows. It offers a variety of features, such as templates, animations, and multimedia integration, to enhance the visual appeal and effectiveness of presentations.
Now, let’s dive into the steps to automate PowerPoint presentations using Python.
Step 1: Install the Python-pptx Library
To work with PowerPoint files in Python, we’ll use the Python-pptx library. You can install it by running the following command in your terminal or command prompt:
Step 2: Import the Required Libraries
In your Python script, import the necessary libraries:
Step 3: Create a New Presentation
To create a new PowerPoint presentation, use the Presentation() function:
Step 4: Add a New Slide
To add a new slide to the presentation, use the add_slide() method:
Step 5: Add Content to the Slide
You can now add various elements to the slide, such as text, images, and shapes. Here’s an example of adding a title and subtitle to the slide:
Step 6: Save the Presentation
Finally, save the presentation using the save() method:
Python provides a convenient way to automate PowerPoint presentations, allowing you to create and modify slides programmatically. By leveraging the Python-pptx library, you can save time and effort in creating and updating presentations. Whether you need to generate reports, create data-driven presentations, or automate repetitive tasks, Python and PowerPoint automation can greatly streamline your workflow.
Accelerate Your Career with Our Data and AI Course - Enroll Today
More from my blog, surprising benefits of working online for people with disabilities.

7 Incredible Ways Tech Education is Transforming Lives of People with Disabilities

Revolutionize Your SQL Server Data with Python
Want to become an instructor?

Automate PowerPoint Slides Creation with Python
Boost your Productivity with an Automated Tool for the Creation of Supply Chain Operational PowerPoint Reports with Python.
Boost your Productivity with an Automated Tool for the Creation of Supply Chain Operational PowerPoint Reports with Python
Article originally published on Medium .
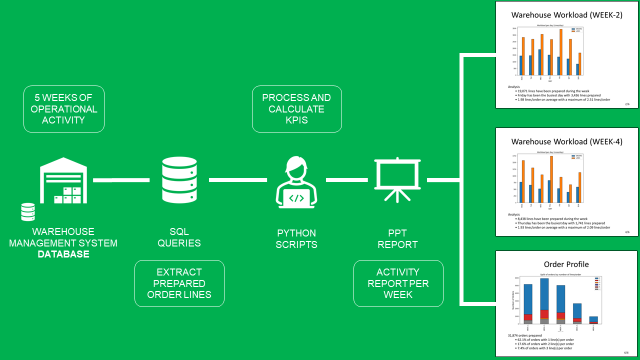
You are a distribution planning manager in the logistics department of a fashion retail company.
To perform analysis, you connect to the warehouse management system to extract and process data using an automated tool built with Python.
However, you have to spend time manually putting these visuals in slides for your weekly operational reviews.
In this article, we will build a solution to automatically create PowerPoint slides with visuals and comments.
💌 New articles straight in your inbox for free: Newsletter
Have a look at the video version of this article,
Problem Statement
You are part of the distribution planning team of an international clothing retailer with stores on all continents.
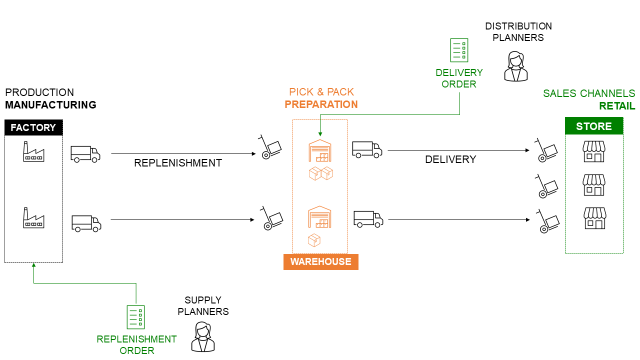
Your distribution network includes several local warehouses that replenish the stores.
Monthly Operational Reviews
At the end of the month, you organize an operational review with the store managers to assess the performance of the distribution network.
To animate the discussion you prepare some slides,
- Extract data from the Warehouse Management System (WMS)
- Process data and built visuals with Python
- Prepare a PowerPoint presentation
To be efficient, you would like to automate the process of PowerPoint deck creation.
Your solution will be fully automated
- Extract order lines of the last month from the WMS SQL database
- Process the data and compute KPIs with key insights by week
- Automatically put the visuals and insights in a PowerPoint presentation
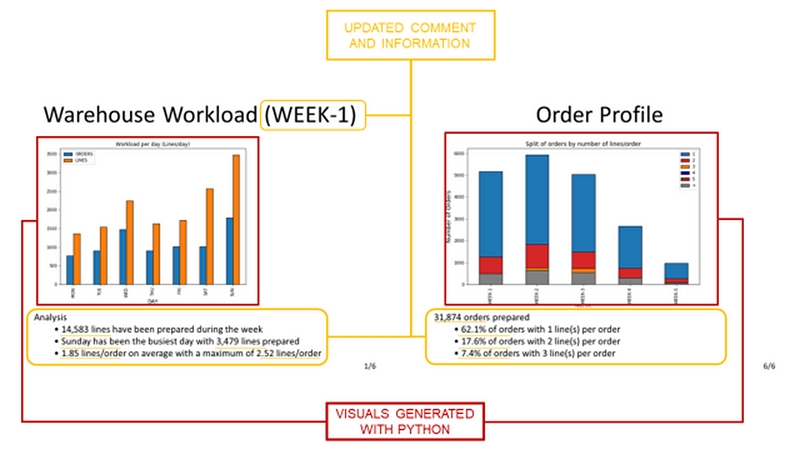
The final deck will have slides like the ones below:
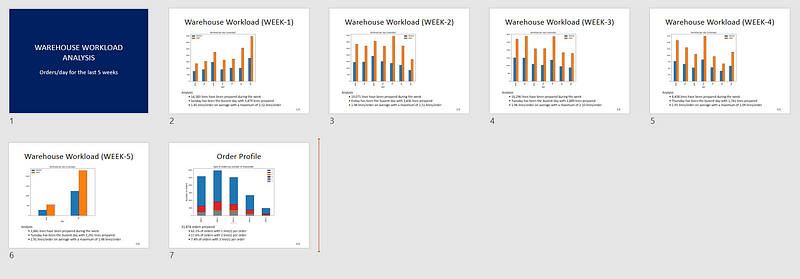
- 5 slides with visuals of the daily workload (left) and 1 slide for the monthly analysis of the order profile (right)
- A visual generated with Python
- A comment area will provide insights based on the visual
You can find the source code with dummy data here: Github
Let us explore all the steps to generate your final report with python.
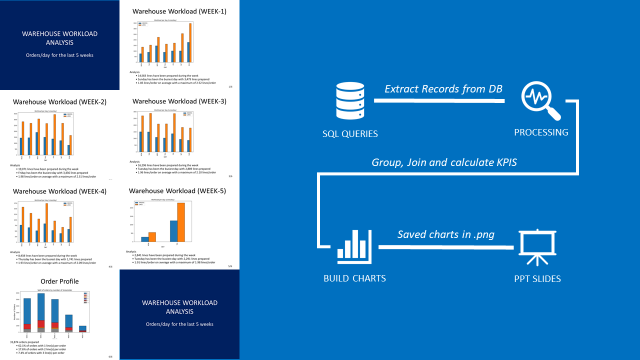

Data Extraction
Connect to your WMS and extract shipment records
- Create your SQL Query to extract shipment records
- Use pandas.read_sql_query to do the query
- Results will be a pandas data frame
If you don’t have access to a WMS database , you can use the dataset shared in the GitHub repo.
Process the data
Add a column that calculates the number of lines per order using pandas.
Create the visuals
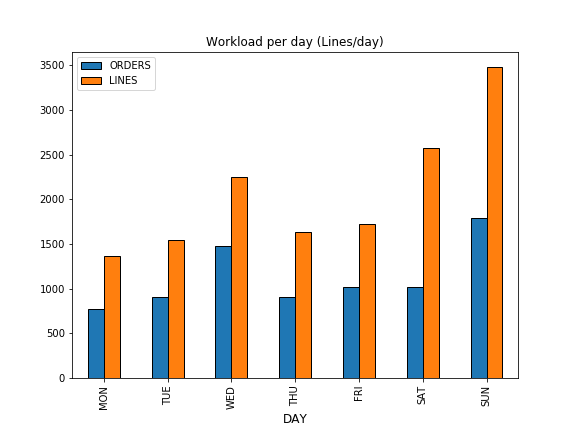
Create a simple bar plot chart that shows the number of Lines and Orders prepared per day.
Save the charts
In order to be added to the PowerPoint, you need to save it locally.
Add comments and insights
You can add comments based on the chart you share that will summarize the performance of each week.
Include these comments under the visuals for more clarity.

Create the PowerPoint Decks
We will use the open-source library python-pptx to build our PowerPoint decks.
For more details, have a look at the documentation .
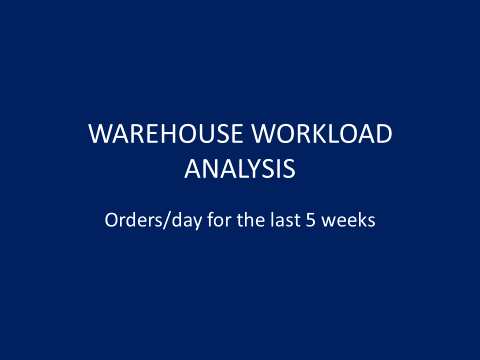
Introduction Slide
We will start with a special introduction slide at the beginning of the presentation.
Daily Analysis Slide by WEEK
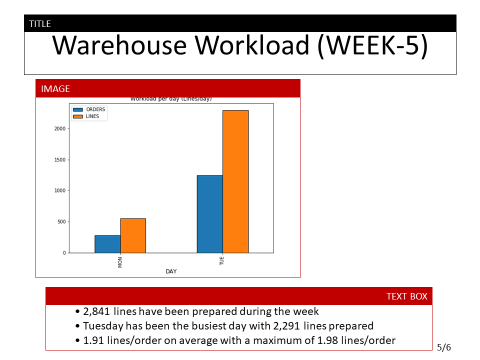
The structure of your slide will be always the same
- A title on top (e.g: Warehouse Workload (WEEK-5))
- A picture at the centre of the slide
- A text box for the comment area
💡 TIPS You can change the position of the objects by modifying the parameters of Inches() functions.
Weekly Analysis of Order Profile
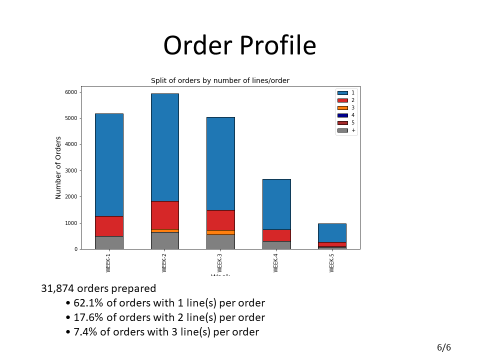
In this slide, you will use a stacked bar plot chart and the comments will be based on the full month scope.
💡 TIPS You can change the font size by modifying the parameter of the functions Pt().
Finally, you have a PowerPoint file with 7 slides ready to be used for your meetings.
Conclusion & Next Steps
With this very simple example, you have a template to build your own PowerPoint automation solution.
You can now,
- Add visuals, tables or smart visuals of PowerPoint (check the documentation)
- Bring more insights or enrich the text with conditions
This python script can be launched locally on your computer with one click.
You can also automate the report distribution by email using the SMTP library of python.
For more details, you can have a look at this article I published a few weeks ago,
Let’s connect on Linkedin and Twitter , I am a Supply Chain Engineer that is using data analytics to improve logistics operations and reduce costs.
Automate Video Editing with Python
Automate graphic design using python, automate flash cards creation for language learning with python.
- Python Basics
- Interview Questions
- Python Quiz
- Popular Packages
- Python Projects
- Practice Python
- AI With Python
- Learn Python3
- Python Automation
- Python Web Dev
- DSA with Python
- Python OOPs
- Dictionaries
Python Lists
- Get a list as input from user in Python
- Python | Create list of numbers with given range
- How to add Elements to a List in Python
Python List Access/Iteration Operations
- Iterate over a list in Python
- How to iterate through a nested List in Python?
- Python | Iterate over multiple lists simultaneously
- Iterate Over a List of Lists in Python
- Python Program to Accessing index and value in list
- Python | Accessing all elements at given list of indexes
- Check if element exists in list in Python
- Python | Check if any element in list satisfies a condition
Python List Search Operations
- How To Find the Length of a List in Python
- Python | Find elements of a list by indices
- Python program to find the String in a List
- Python | Ways to find indices of value in list
- Python | Find most frequent element in a list
Python List Remove Operations
- How to Remove an Item from the List in Python
- Python | Remove given element from the list
- Ways to remove particular List element in Python
- Remove multiple elements from a list in Python
Python List Concatenation Operations
- Python | Concatenate two lists element-wise
- Merge Two Lists in Python
- Python - Concatenate two list of lists Row-wise
- Python program to concatenate every elements across lists
- Python program to Concatenate all Elements of a List into a String
- Python | Concatenate All Records
- Python | Merge list elements
- Python | Concatenate N consecutive elements in String list
- Python | Merge two lists alternatively
- Python | Union of two or more Lists
Python List Sorting and Comparison
- Python | Sort a List according to the Length of the Elements
- Python | Element repetition in list
- Python - Repeat Alternate Elements in list
- Python | Difference between two lists
- Python | Check if two lists are identical
- Python | Combining two sorted lists
- Python | Cloning or Copying a list
- Sort the values of first list using second list in Python
Python List Comprehension Operations
- Python List Slicing
- Python - List Comprehension
- Python List Comprehension and Slicing
Python List Reverse Operations
- Python List reverse()
- Reversing a List in Python
Python Nested Lists
- Nested List Comprehensions in Python
- Python | Test for nested list
- Python | How to copy a nested list
- Python | Convert given list into nested list
- Python | Split nested list into two lists
- Python - Nested List to single value Tuple
- Python | Column wise sum of nested list
- Python | Intersection of two nested list
- Python | Check if a nested list is a subset of another nested list
Python List Flatten Operation
- Python - Flatten List to individual elements
- Python | Convert a nested list into a flat list
- Python Program to Flatten a List without using Recursion
- Python | Sort Flatten list of list
- Flatten A List of Lists in Python
- Python | Split flatten String List
- Python | Flatten given list of dictionaries
- Python | Grouped Flattening of list
- Python | Ways to flatten a 2D list
Python List Methods and Exercises
- Find size of a list in Python
- Python - Elements Lengths in List
- Python List Exercise
- Python List methods
Python Lists are just like dynamically sized arrays, declared in other languages (vector in C++ and ArrayList in Java). In simple language, a Python list is a collection of things, enclosed in [ ] and separated by commas.
The list is a sequence data type which is used to store the collection of data. Tuples and String are other types of sequence data types.
Example of list in Python
Here we are creating Python List using [].
Lists are the simplest containers that are an integral part of the Python language. Lists need not be homogeneous always which makes it the most powerful tool in Python . A single list may contain DataTypes like Integers, Strings, as well as Objects. Lists are mutable, and hence, they can be altered even after their creation.
Creating a List in Python
Lists in Python can be created by just placing the sequence inside the square brackets[]. Unlike Sets , a list doesn’t need a built-in function for its creation of a list.
Note: Unlike Sets, the list may contain mutable elements.
Example 1: Creating a list in Python
Complexities for creating lists.
Time Complexity: O(1)
Space Complexity: O(n)
Example 2: Creating a list with multiple distinct or duplicate elements
A list may contain duplicate values with their distinct positions and hence, multiple distinct or duplicate values can be passed as a sequence at the time of list creation.
Accessing elements from the List
In order to access the list items refer to the index number. Use the index operator [ ] to access an item in a list. The index must be an integer. Nested lists are accessed using nested indexing.
Example 1: Accessing elements from list
Example 2: Accessing elements from a multi-dimensional list
Negative indexing
In Python, negative sequence indexes represent positions from the end of the array. Instead of having to compute the offset as in List[len(List)-3], it is enough to just write List[-3]. Negative indexing means beginning from the end, -1 refers to the last item, -2 refers to the second-last item, etc.
Complexities for Accessing elements in a Lists:
Space Complexity: O(1)
Getting the size of Python list
Python len() is used to get the length of the list.
Taking Input of a Python List
We can take the input of a list of elements as string, integer, float, etc. But the default one is a string.
Example 1:
To know more see this .
Adding Elements to a Python List
Method 1: using append() method.
Elements can be added to the List by using the built-in append() function. Only one element at a time can be added to the list by using the append() method, for the addition of multiple elements with the append() method, loops are used. Tuples can also be added to the list with the use of the append method because tuples are immutable. Unlike Sets, Lists can also be added to the existing list with the use of the append() method.
Complexities for Adding elements in a Lists(append() method):
S pace Complexity: O(1)
Method 2: Using insert() method
append() method only works for the addition of elements at the end of the List, for the addition of elements at the desired position, insert() method is used. Unlike append() which takes only one argument, the insert() method requires two arguments(position, value).
Complexities for Adding elements in a Lists(insert() method):
Time Complexity: O(n)
Method 3: Using extend() method
Other than append() and insert() methods, there’s one more method for the Addition of elements, extend() , this method is used to add multiple elements at the same time at the end of the list.
Note: append() and extend() methods can only add elements at the end.
Complexities for Adding elements in a Lists(extend() method):
Reversing a list, method 1: a list can be reversed by using the reverse() method in python ., method 2: using the reversed() function:.
The reversed() function returns a reverse iterator, which can be converted to a list using the list() function.
Removing Elements from the List
Method 1: using remove() method.
Elements can be removed from the List by using the built-in remove() function but an Error arises if the element doesn’t exist in the list. Remove() method only removes one element at a time, to remove a range of elements, the iterator is used. The remove() method removes the specified item.
Note: Remove method in List will only remove the first occurrence of the searched element.
Complexities for Deleting elements in a Lists(remove() method):
Method 2: using pop() method.
pop() function can also be used to remove and return an element from the list, but by default it removes only the last element of the list, to remove an element from a specific position of the List, the index of the element is passed as an argument to the pop() method.
Complexities for Deleting elements in a Lists(pop() method):
Time Complexity: O(1)/O(n) (O(1) for removing the last element, O(n) for removing the first and middle elements)
Slicing of a List
We can get substrings and sublists using a slice. In Python List, there are multiple ways to print the whole list with all the elements, but to print a specific range of elements from the list, we use the Slice operation .
Slice operation is performed on Lists with the use of a colon(:).
To print elements from beginning to a range use:
To print elements from end-use:
To print elements from a specific Index till the end use
To print the whole list in reverse order, use
Note – To print elements of List from rear-end, use Negative Indexes.
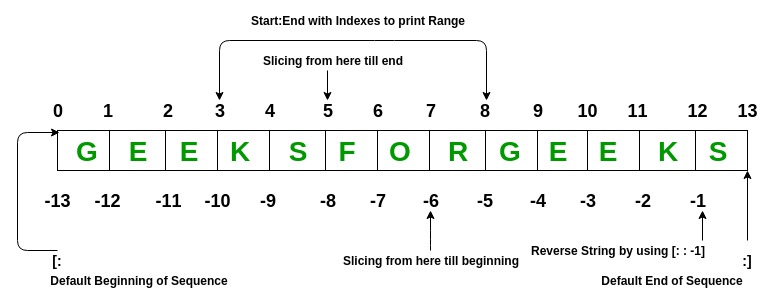
UNDERSTANDING SLICING OF LISTS:
- pr[0] accesses the first item, 2.
- pr[-4] accesses the fourth item from the end, 5.
- pr[2:] accesses [5, 7, 11, 13], a list of items from third to last.
- pr[:4] accesses [2, 3, 5, 7], a list of items from first to fourth.
- pr[2:4] accesses [5, 7], a list of items from third to fifth.
- pr[1::2] accesses [3, 7, 13], alternate items, starting from the second item.
Negative index List slicing
List comprehension.
Python List comprehensions are used for creating new lists from other iterables like tuples, strings, arrays, lists, etc. A list comprehension consists of brackets containing the expression, which is executed for each element along with the for loop to iterate over each element.
newList = [ expression(element) for element in oldList if condition ]
Example:
For better understanding, the above code is similar to as follows:
Refer to the below articles to get detailed information about List Comprehension.
- List comprehension and ord() in Python
Basic Example on Python List
- Python program to interchange first and last elements in a list
- Python program to swap two elements in a list
- Python – Swap elements in String list
- Python | Ways to find length of list
- Maximum of two numbers in Python
- Minimum of two numbers in Python
To Practice the basic list operation, please read this article – Python List of program
List Methods
To know more refer to this article – Python List methods
The operations mentioned above modify the list Itself.
Built-in functions with List
Do go through recent articles on Lists
Useful Links:
- Recent Articles on Python List
- Python Tutorials
- Multiple Choice Questions
- All articles in Python Category
Please Login to comment...
Similar reads.
- python-list
Improve your Coding Skills with Practice
What kind of Experience do you want to share?

IMAGES
VIDEO
COMMENTS
pip install python-pptx. Let's see some of its usage: Example 1: Creating new PowerPoint file with title and subtitle slide. Python3. from pptx import Presentation . root = Presentation() first_slide_layout = root.slide_layouts[0] . 0 -> title and subtitle. 5 -> Title only .
II. Process Data and Design Slides with Python. You can find the source code with dummy data here: Github. Let us explore all the steps to generate your final report. Steps to create your operational report on PowerPoint — (Image by Author) 1. Data Extraction. Connect to your WMS and extract shipment records.
Method 2: Using Pandas with python-pptx. This method combines the data manipulation power of Pandas with the presentation capabilities of python-pptx to create PowerPoint files from DataFrame contents. It's particularly useful for automating the inclusion of tabular data or creating charts based on the DataFrame's data.
At the end of the article, I am going to build a basic PowerPoint presentation page by page. Let's start with the adding slide. To do this first we need to import the pptx package. from pptx import Presentation. We are going to use Presentation() to open or create a presentation. Let's assign it to a variable.
Here is the start of the function that we use to create our output PowerPoint: def create_ppt(input, output, report_data, chart): """ Take the input powerpoint file and use it as the template for the output file. """ prs = Presentation(input) # Use the output from analyze_ppt to understand which layouts and placeholders # to use # Create a ...
Comprehensive Guide. Creating a PowerPoint document using Python allows you to automate the process of generating professional presentations with ease. By leveraging libraries such as Spire ...
Working with Presentations¶. python-pptx allows you to create new presentations as well as make changes to existing ones. Actually, it only lets you make changes to existing presentations; it's just that if you start with a presentation that doesn't have any slides, it feels at first like you're creating one from scratch.
In this tutorial I will be showing you how to create POWERPOINT PRESENTATIONS using only Python. This tutorial provides a step-by-step walk-through made to h...
Step 3 - Generate PowerPoint Slides. Navigate to the directory containing the script in your terminal and run the following command: $ python3 create_ppt.py. This command will execute the script, and generate a new PowerPoint file named " Linux_Security_Presentation.pptx " in the same directory.
Steve Canny's python-pptx is a great library for getting started using Python to create dynamic PowerPoint slides. PowerPoint presentations are often short, sweet, and full of pictures and other ...
Create interactive slides with Python in 8 Jupyter Notebook cells. Creating presentations in Jupyter Notebook is a great alternative to manually updating slides in other presentation creation software. If your data changes, you just re-execute the cell and slide chart is updated.
python-pptx¶. Release v0.6.22 (Installation)python-pptx is a Python library for creating, reading, and updating PowerPoint (.pptx) files.. A typical use would be generating a PowerPoint presentation from dynamic content such as a database query, analytics output, or a JSON payload, perhaps in response to an HTTP request and downloading the generated PPTX file in response.
Here is a list of features provided by the python-pptx library: Create Presentations: Generate new PowerPoint presentations or modify existing ones. Slide Layouts: Choose from a variety of predefined slide layouts to structure your presentation. Text Handling: Add titles, subtitles, bullet points, and various text elements to slides.
RISE also works with Notebook widgets. Try creating a new cell with the following code: from ipywidgets import interact. def my_function(x): return x. # create a slider. interact(my_function, x=20) Now start the slideshow on that cell and try running the cell (SHIFT+ENTER). You should see something like this:
Presentations. ¶. A presentation is opened using the Presentation() function, provided directly by the pptx package: from pptx import Presentation. This function returns a Presentation object which is the root of a graph containing the components that constitute a presentation, e.g. slides, shapes, etc. All existing presentation components are ...
5. You can use python-pptx library. It is a Python library for creating and updating PowerPoint (.pptx) files. This includes: Round-trip any Open XML presentation (.pptx file) including all its elements Add slides Populate text placeholders, for example to create a bullet slide Add image to slide at arbitrary position and size Add textbox to a ...
Step 3: Create a new presentation or load an existing template You can either create a new presentation or load an existing template as the base for your automated PowerPoint: python. # Create a ...
Step 5: Add Content to the Slide. You can now add various elements to the slide, such as text, images, and shapes. Here's an example of adding a title and subtitle to the slide: title = slide.shapes.title. subtitle = slide.placeholders[1] title.text = "Automating PowerPoint with Python". subtitle.text = "Making presentations easier!"
Using python-pptx. To help us automate the PowerPoint presentation report, we would use the Python package called python-pptx. It is a Python package developed to create and update PowerPoint files. To start using the package, we need to install it first with the following code. pip install python-pptx.
Create the PowerPoint Decks. We will use the open-source library python-pptx to build our PowerPoint decks. For more details, have a look at the documentation. Introduction Slide. We will start with a special introduction slide at the beginning of the presentation. First Slide — (Image by Author) Code. Daily Analysis Slide by WEEK
And later it was used by a team to create ppt from it. And for this, I was using Python. With pptx I just automate the PowerPoint creation. So every time the scheduler ran the python script to manipulate the raw data and do the calculation it starts creating the presentation itself. So the other team just needs to download the ppt and send it ...
17. Check out the python-pptx library. Its useful for creating and updating PowerPoint .pptx files. Also for some quick examples in python-pptx with screenshots, you can check this link. edited Jul 5, 2015 at 18:26. answered Jul 5, 2015 at 18:20. Rahul Gupta.
One solution for you would be to use the PowerPoint Viewer program instead. PPT Viewer is set to open a PowerPoint file straight away in Presentation mode. Alternatively, you can use the argument /s to start Powerpoint. "powerpoint.exe /s <filename>.ppt". This will be equivalent to telling PowerPoint to straight away open up in Presentation mode.
To create multimedia presentations, you need the right tools. Below are four tools to help you create engaging multimedia presentations. Software #1: Visme. The first software on the list is Visme. The varied collection of integrations in our editor is just the right combination to create a multimedia presentation that will make an impact.
Python Functions is a block of statements that return the specific task. The idea is to put some commonly or repeatedly done tasks together and make a function so that instead of writing the same code again and again for different inputs, we can do the function calls to reuse code contained in it over and over again.
Try the AI Menti Builder today! This is the first version of the AI Menti Builder, and we are committed to continually enhancing our AI-generated content to ensure it becomes more accurate. Try it out and let us know what you think! Add a prompt and watch as it instantly crafts an interactive draft of a presentation, fully customizable by you.
This function takes three arguments.1) start: integer starting from which the sequence of integers is to be returned. 2) stop: integer before which the sequence of integers is to be returned. 3) step: integer value which determines the increment between each integer in the sequence. filter_none. Python.
First of all, you used import pandas to make the library available within your code. To construct the DataFrame and read it into the sales_data variable, you used pandas' read_csv() function. The first parameter refers to the file being read, while parse_dates highlights that the order_date column's data is intended to be read as the datetime64[ns] type.
There are three basic resume formats to choose from. They are: Chronological - Lists your work history in order, starting with your most recent job first. Functional - Focuses on your skills and accomplishments instead of your work history. Hybrid - Places your skills and accomplishments at the top, before your work history.
Python also allows us to create a nested list, often known as a two-dimensional list, which is a list within a list. Here we will cover different approaches to creating a list of n-li. 2 min read. Creating a sorted merged list of two unsorted lists in Python. We need to take two lists in Python and merge them into one. Finally, we display the ...