

Lines and Landscapes
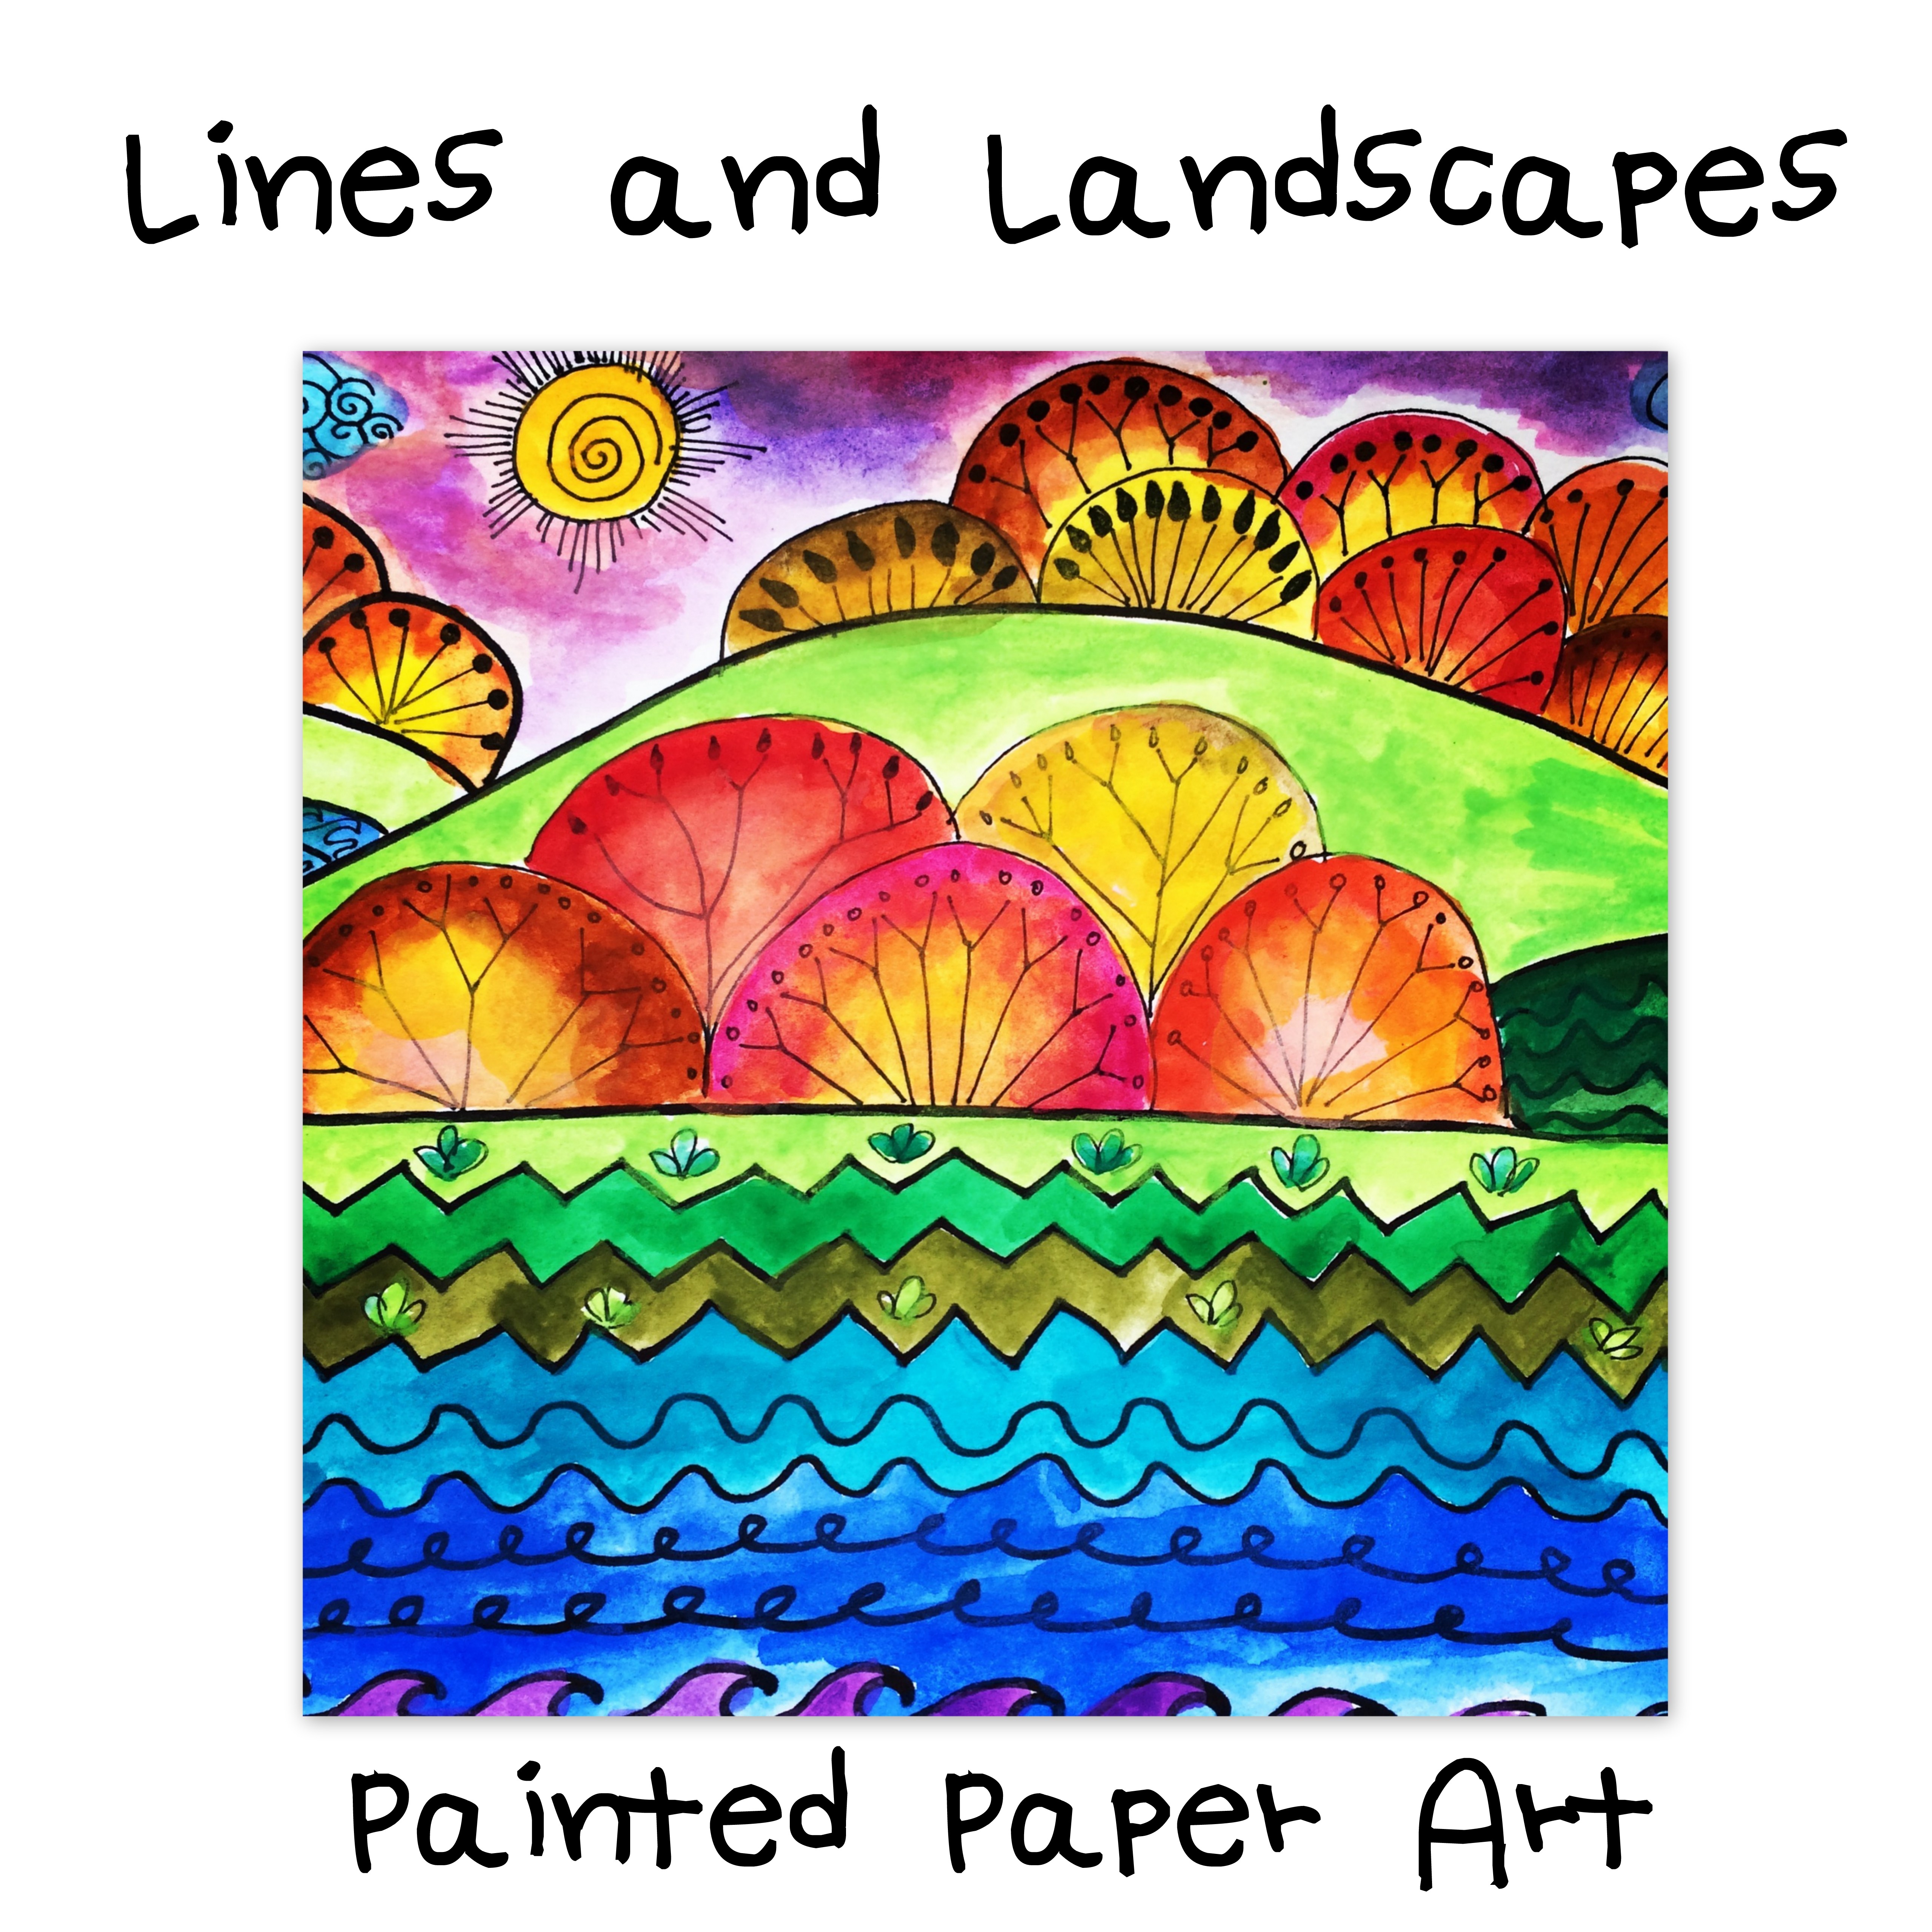
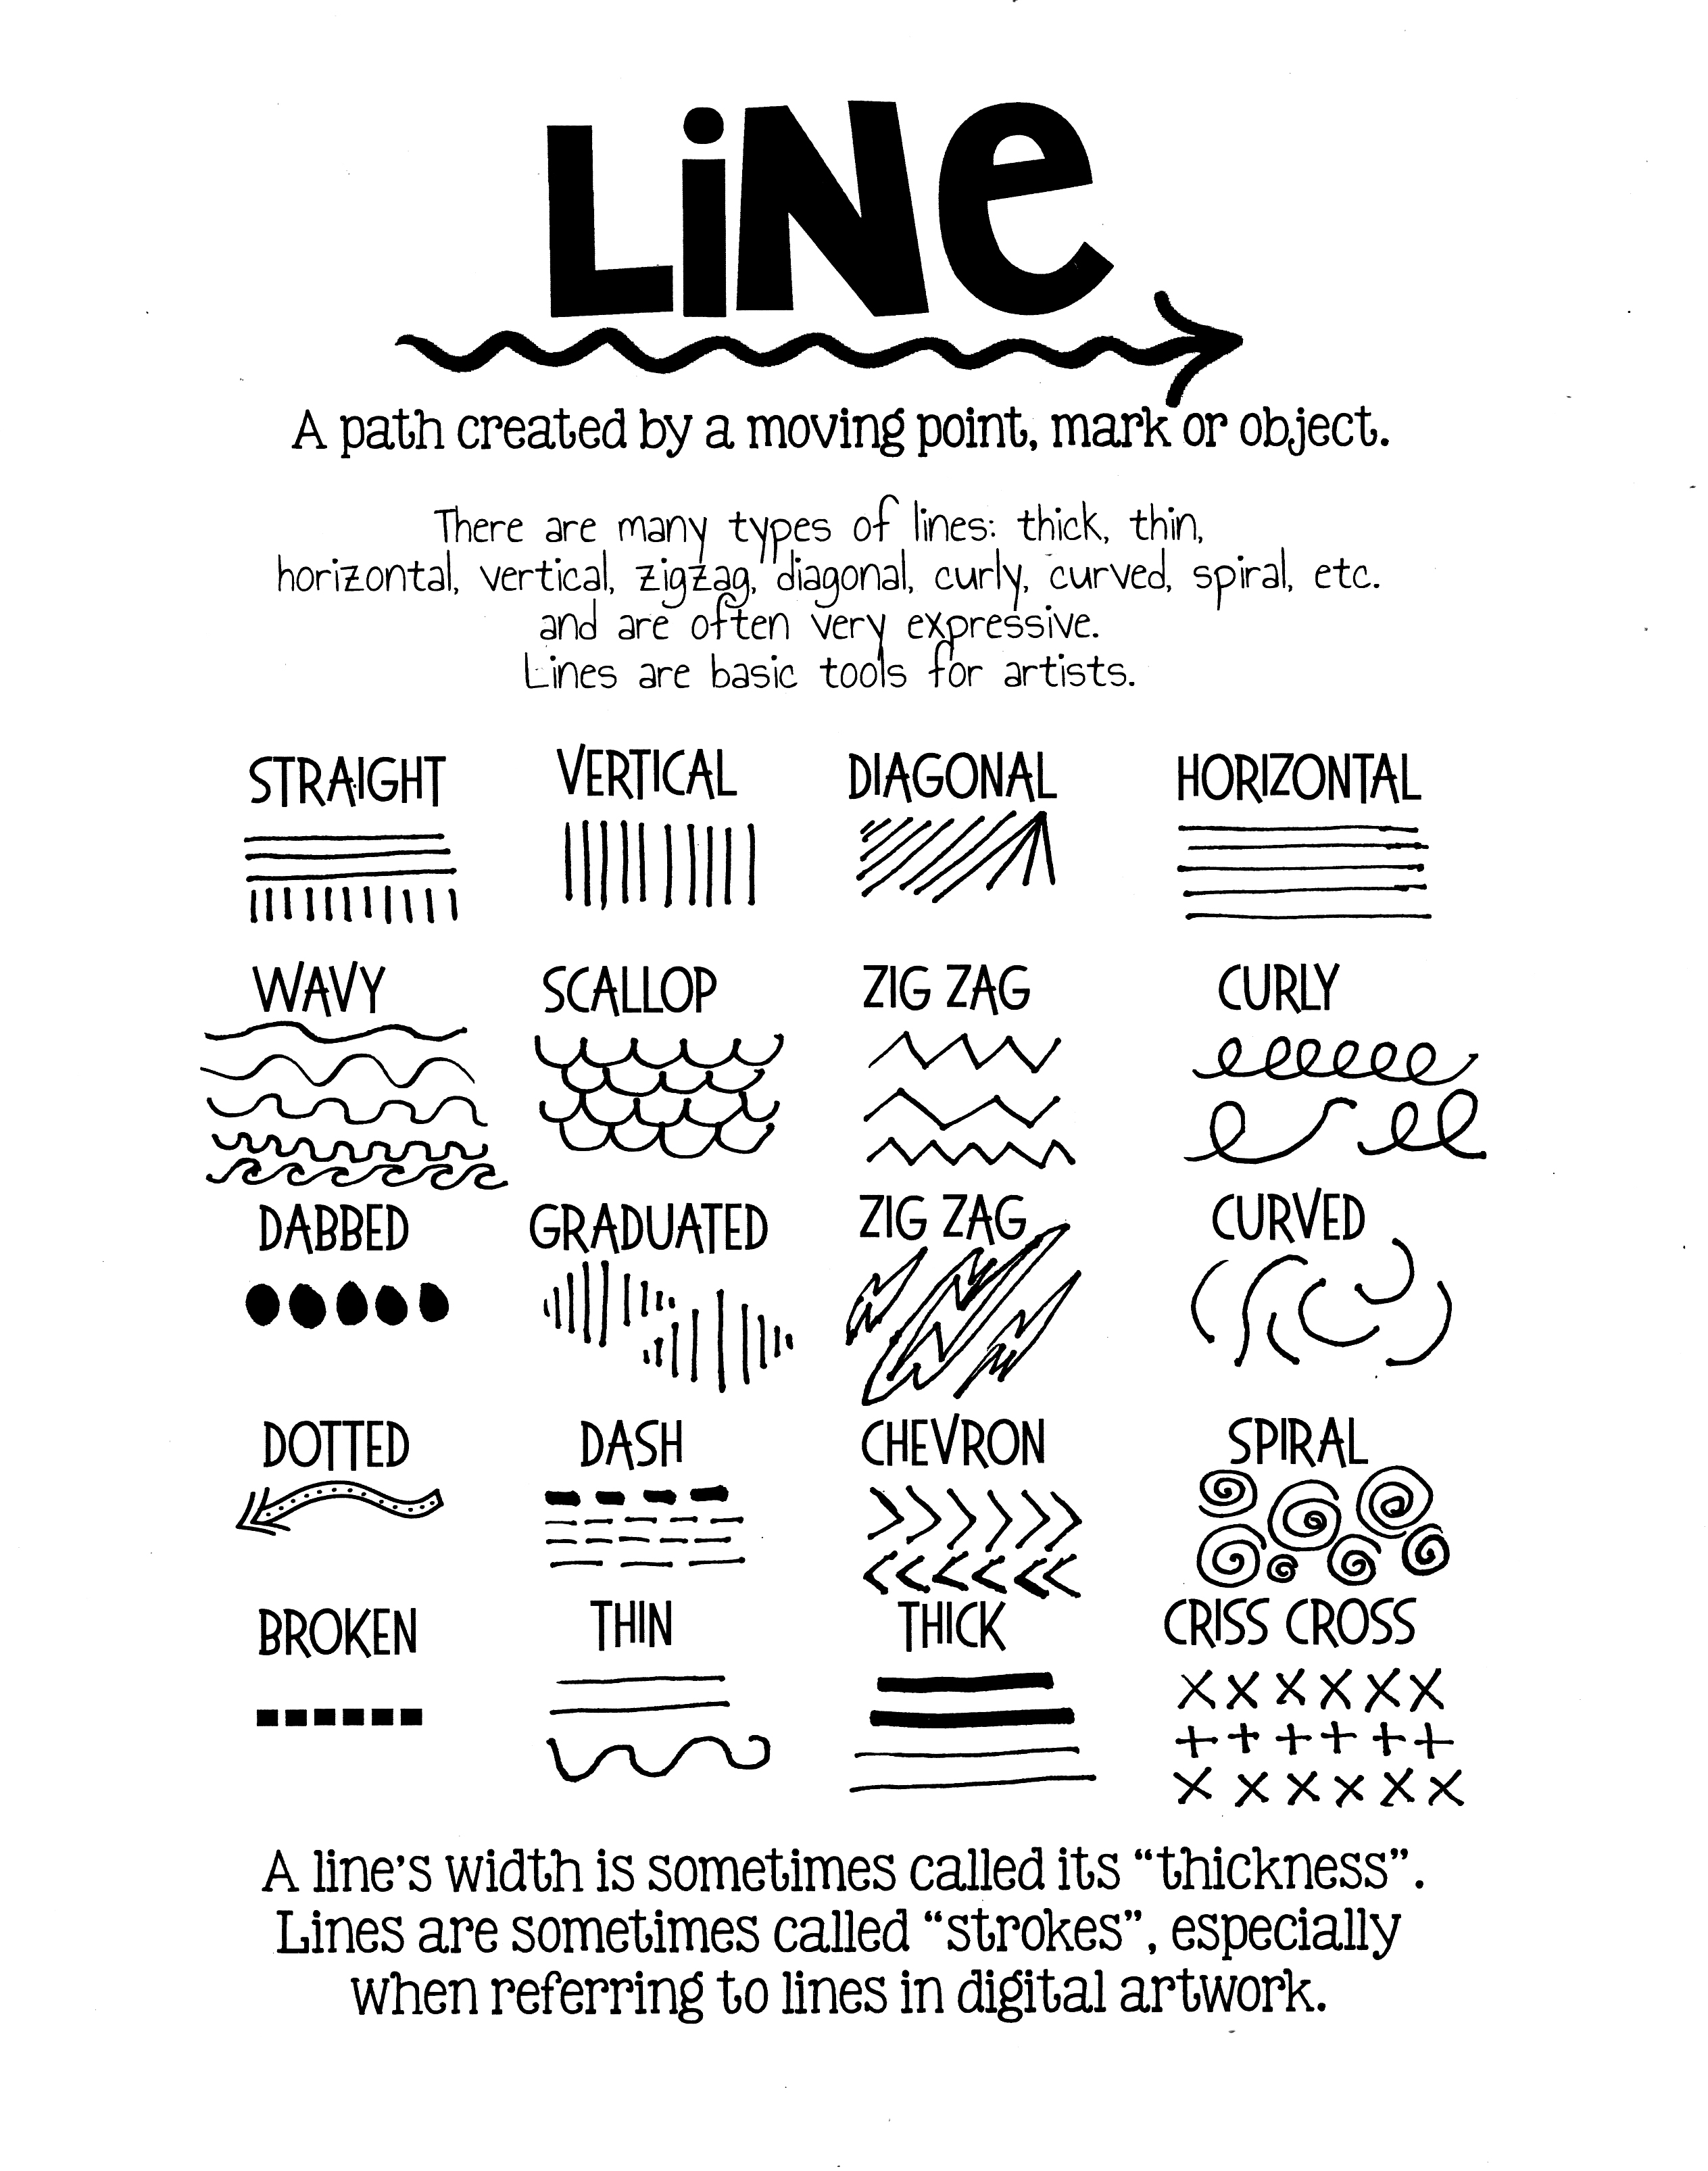
One of our learning objectives is studying Lines and the Elements of Art. I wanted a simple line project that incorporated many different types of lines while also reinforcing landscapes, the other big learning objective in art. We examined various lines, how to create them, and I created a simple handout for the students to refer to, which you can download here.
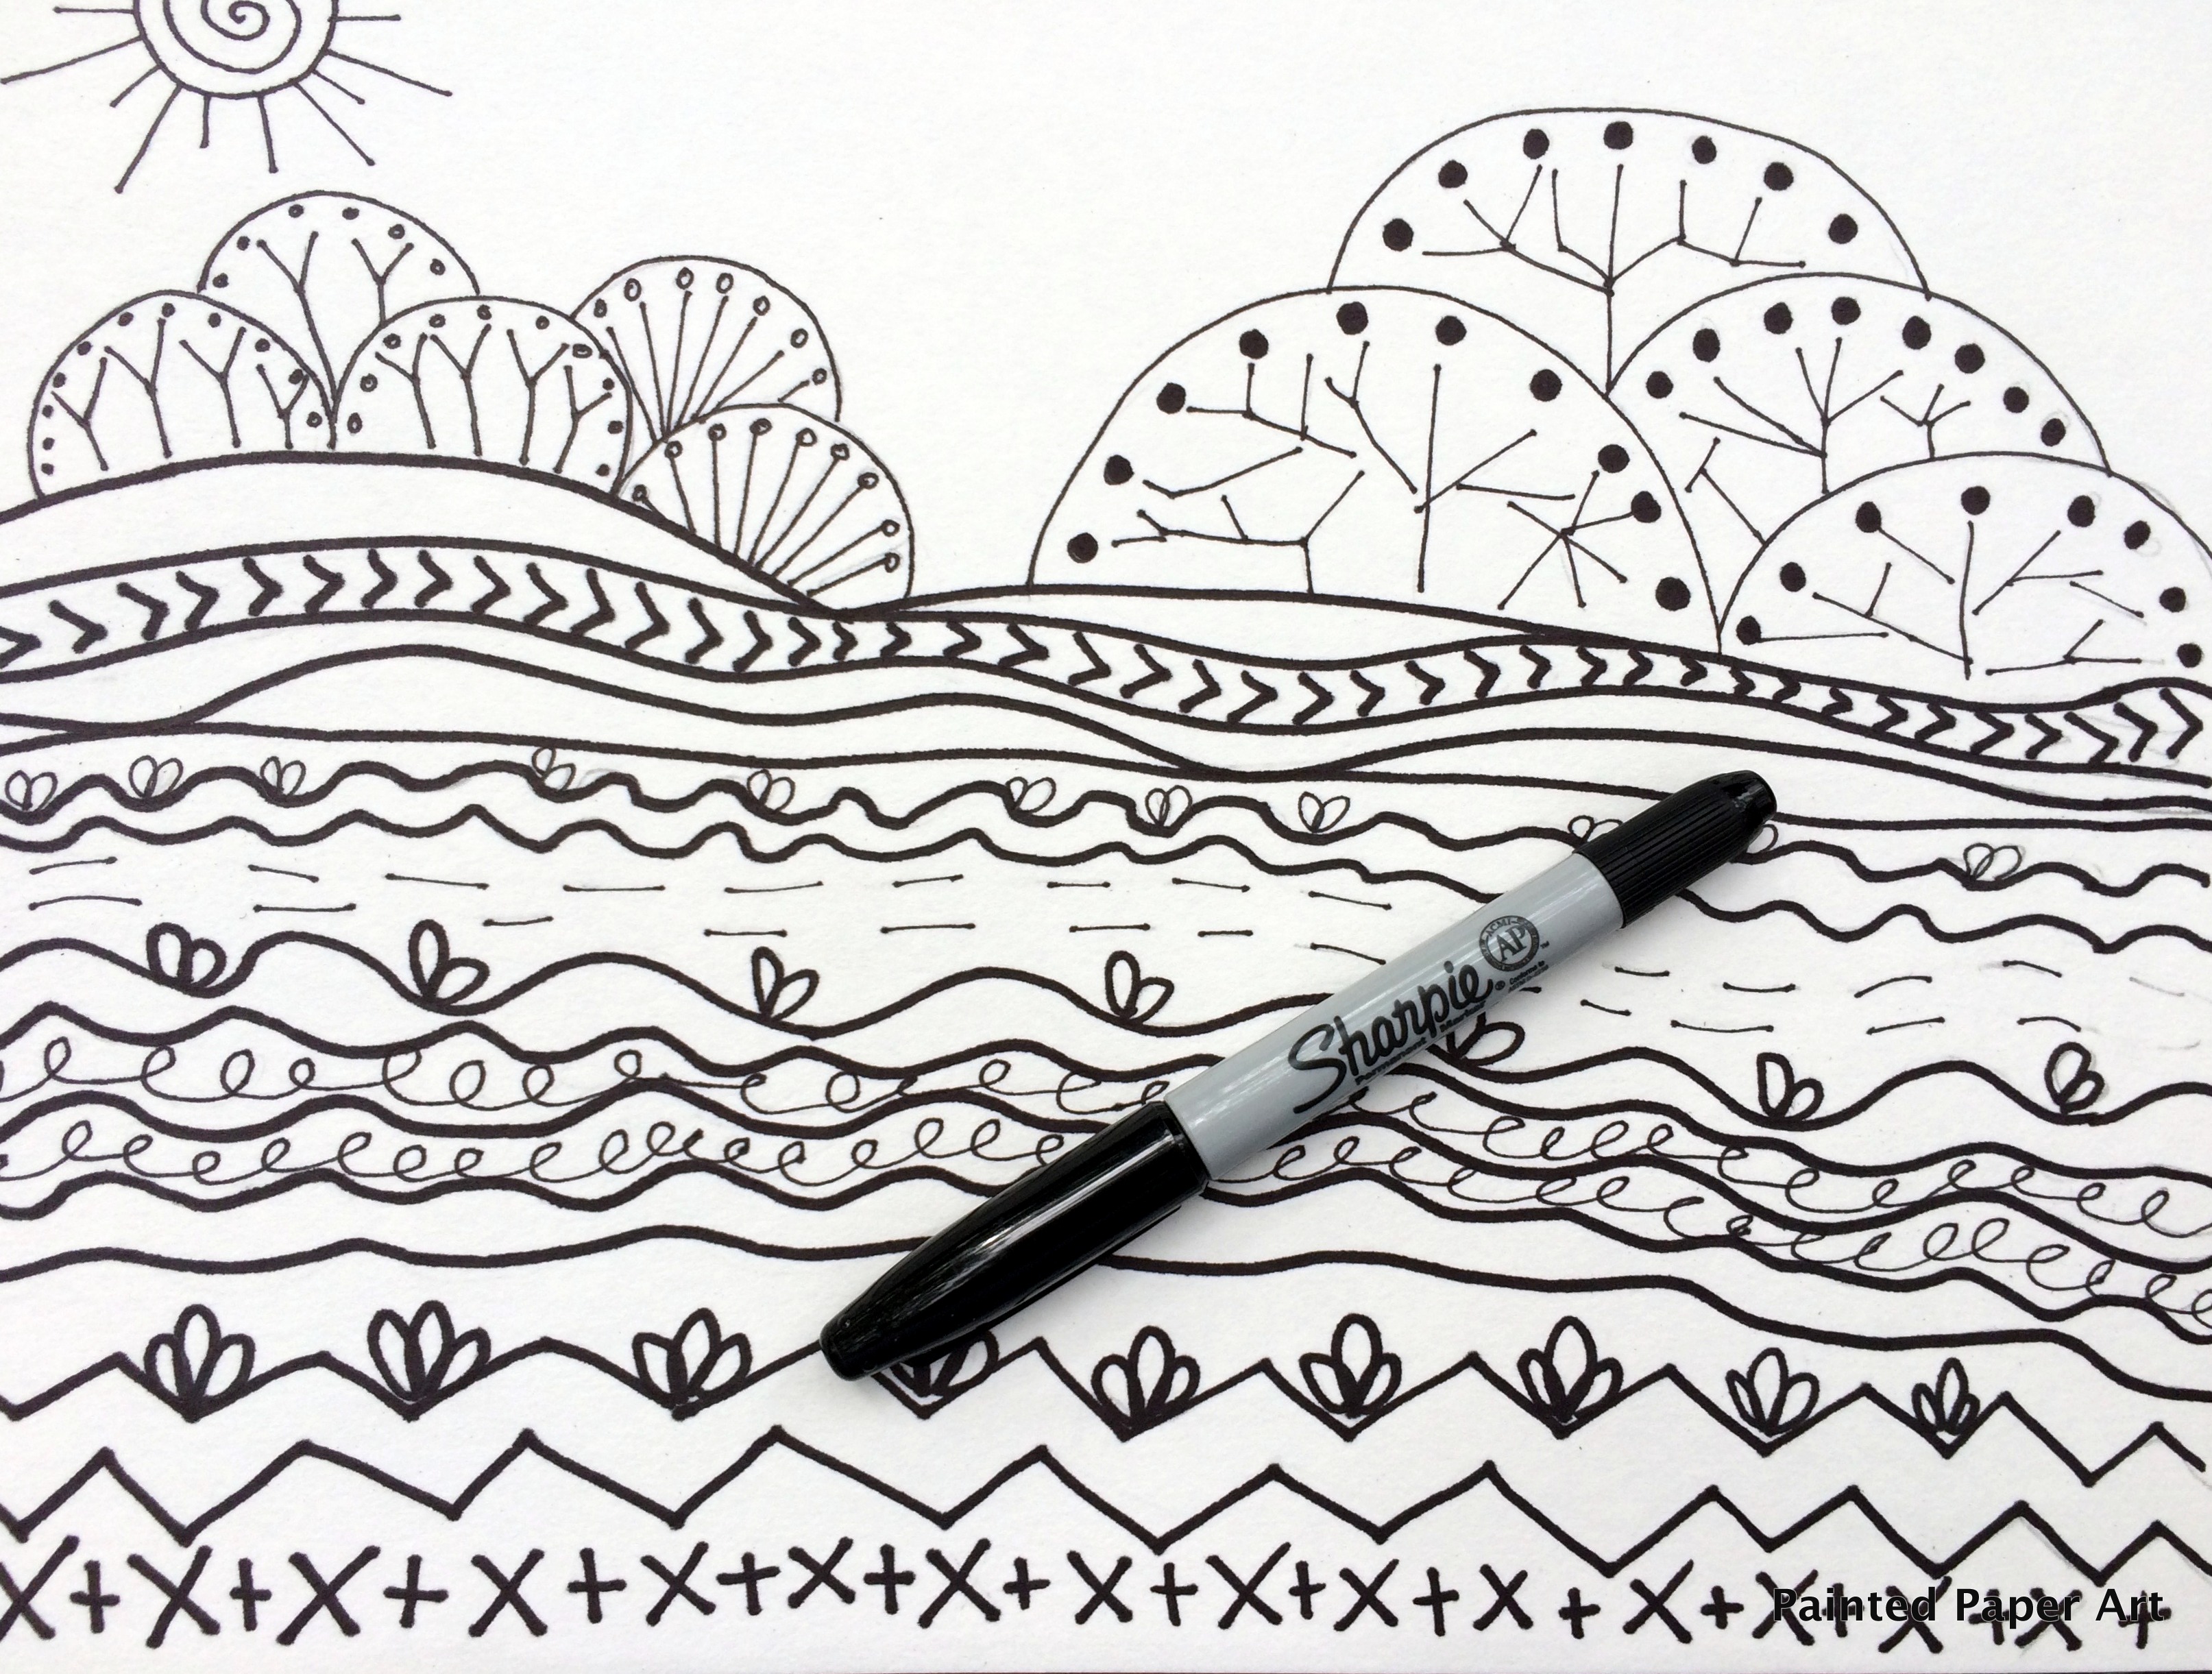
With a pencil, create various areas of landscapes, background, middle ground and foreground. Then various lines were added in those areas, especially in the foreground. After all the lines were drawn out, trace over pencil lines with a sharpie or permanent marker.
Grab some paint brushes and add color.
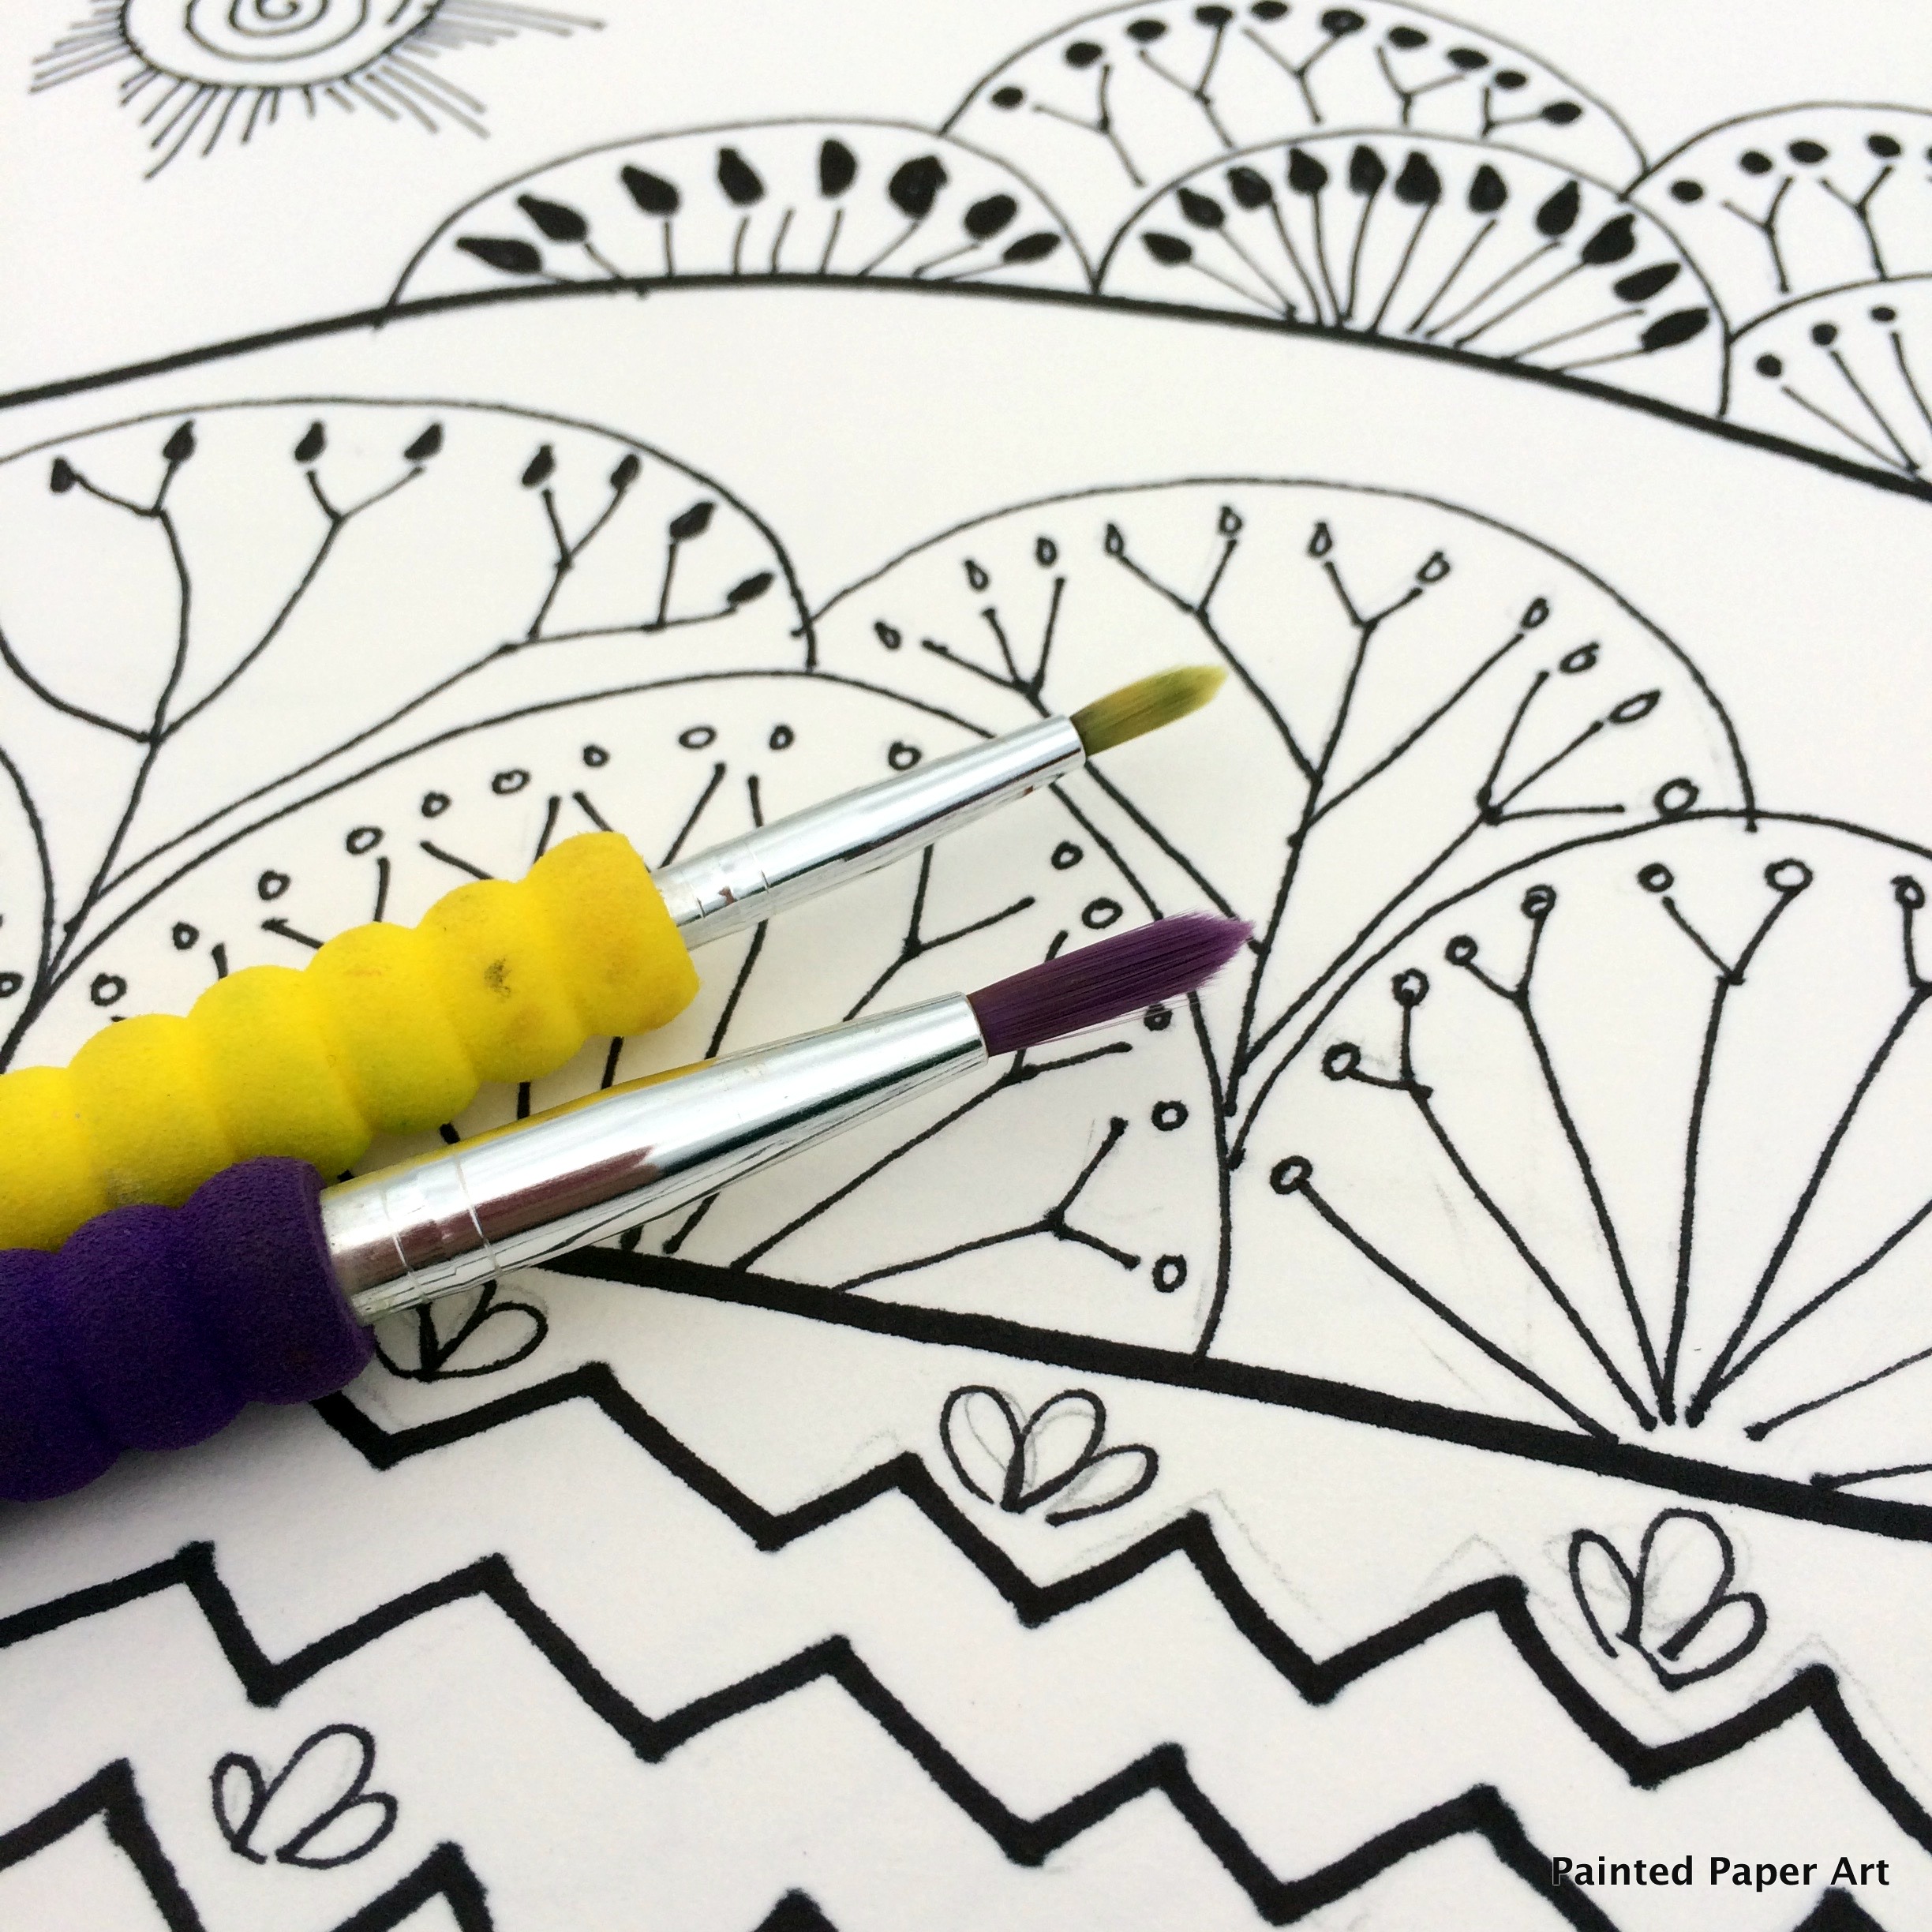
I love these connector sets from Faber Castell. So easy to use and they produce such vivid colors.
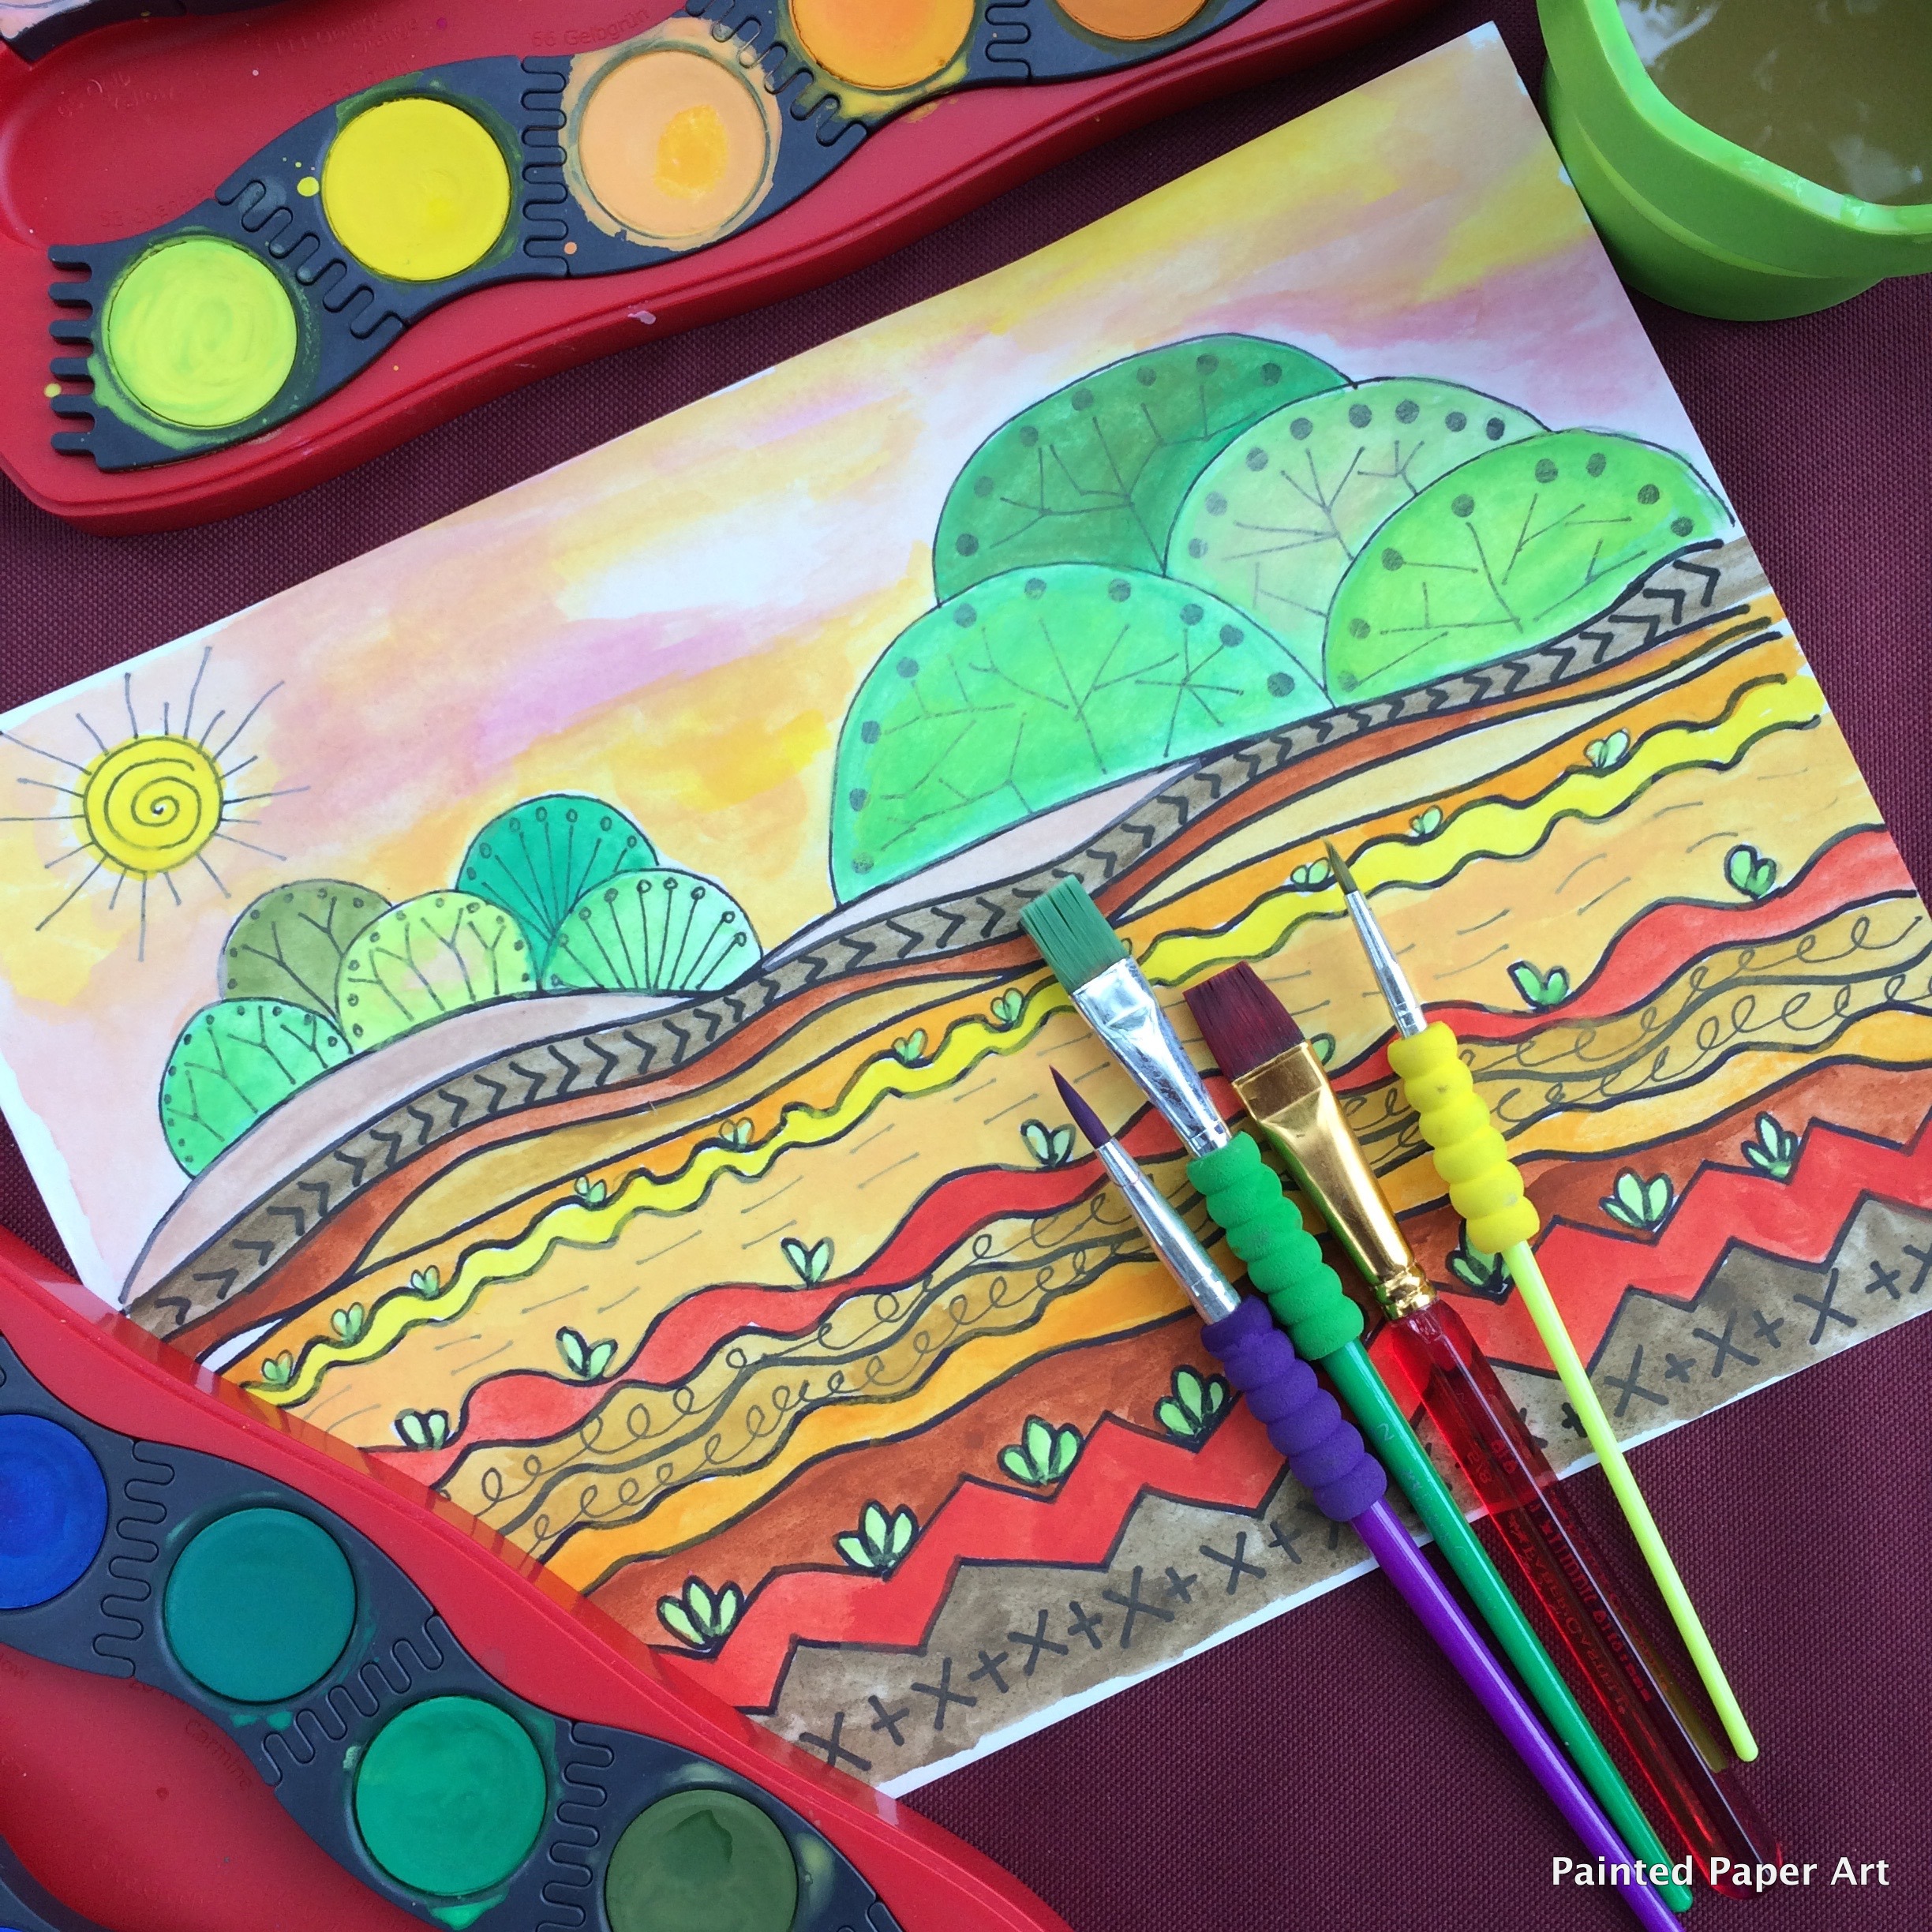
We discussed the use of various colors and blending techniques with the paints.
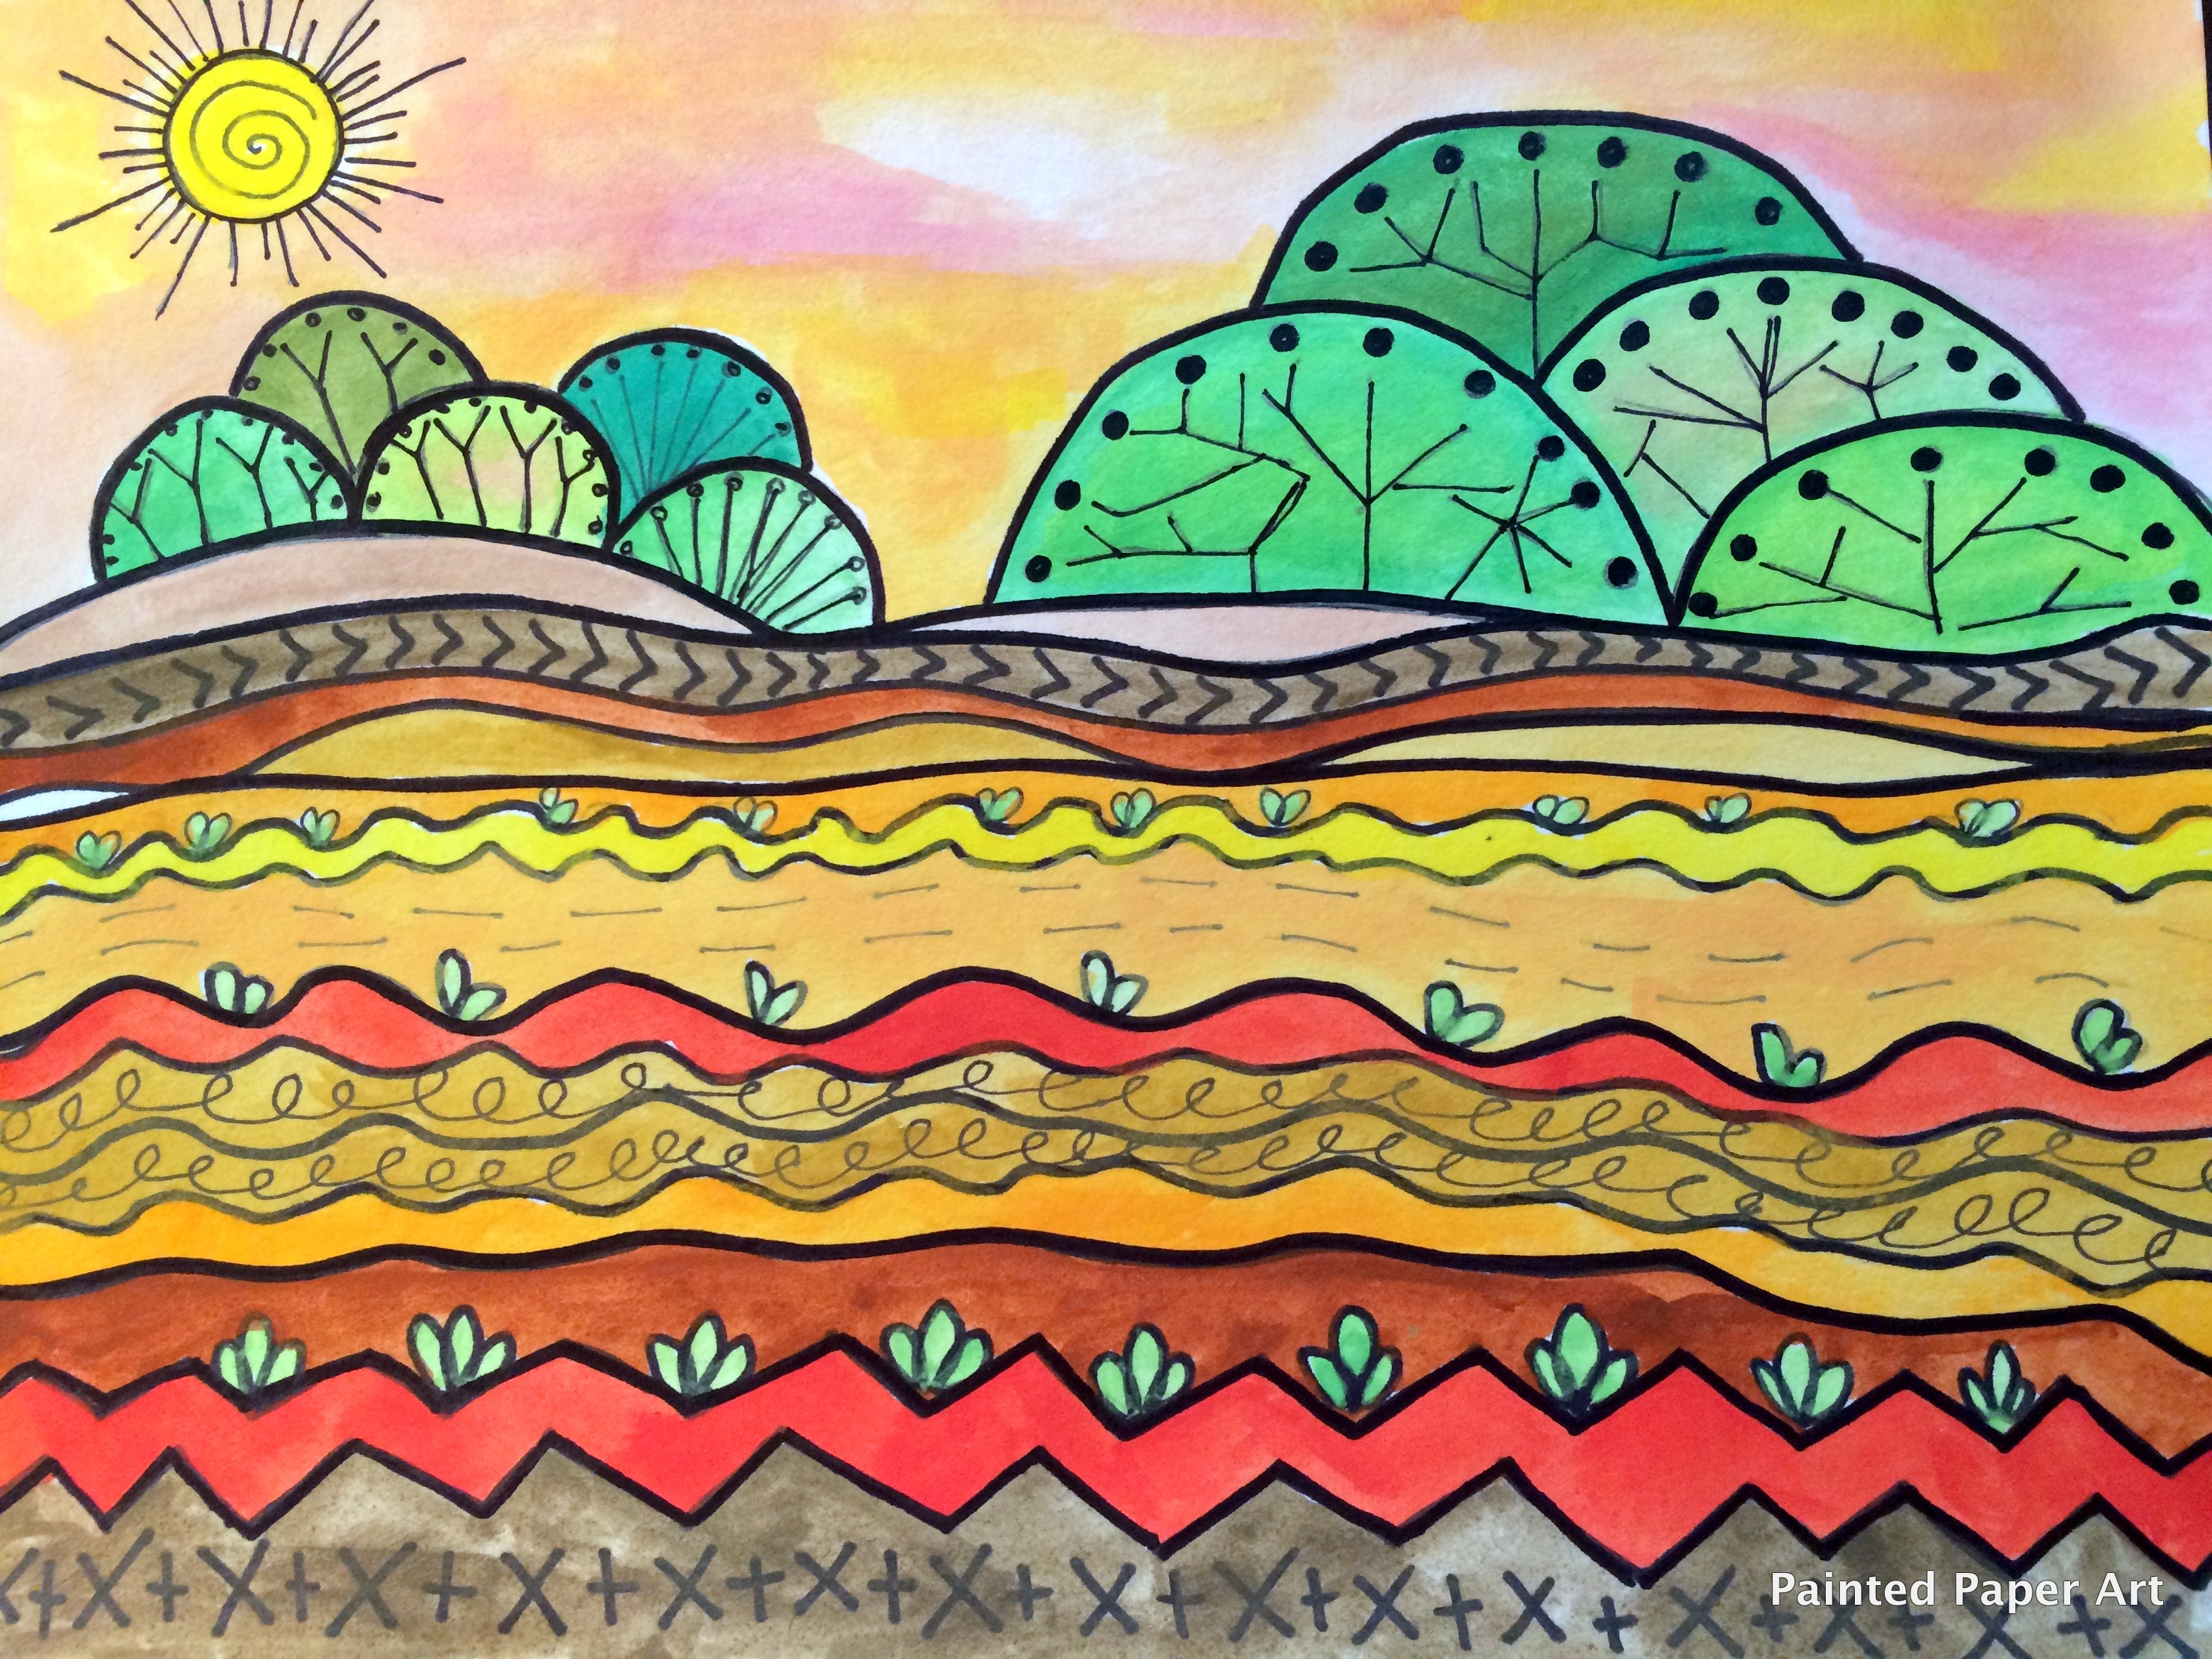
These turned out so beautiful. I can’t wait to display these colorful masterpieces.
Keep on Creating!

You may also like
Folkloric Forest Floor

Mixed Media Hearts
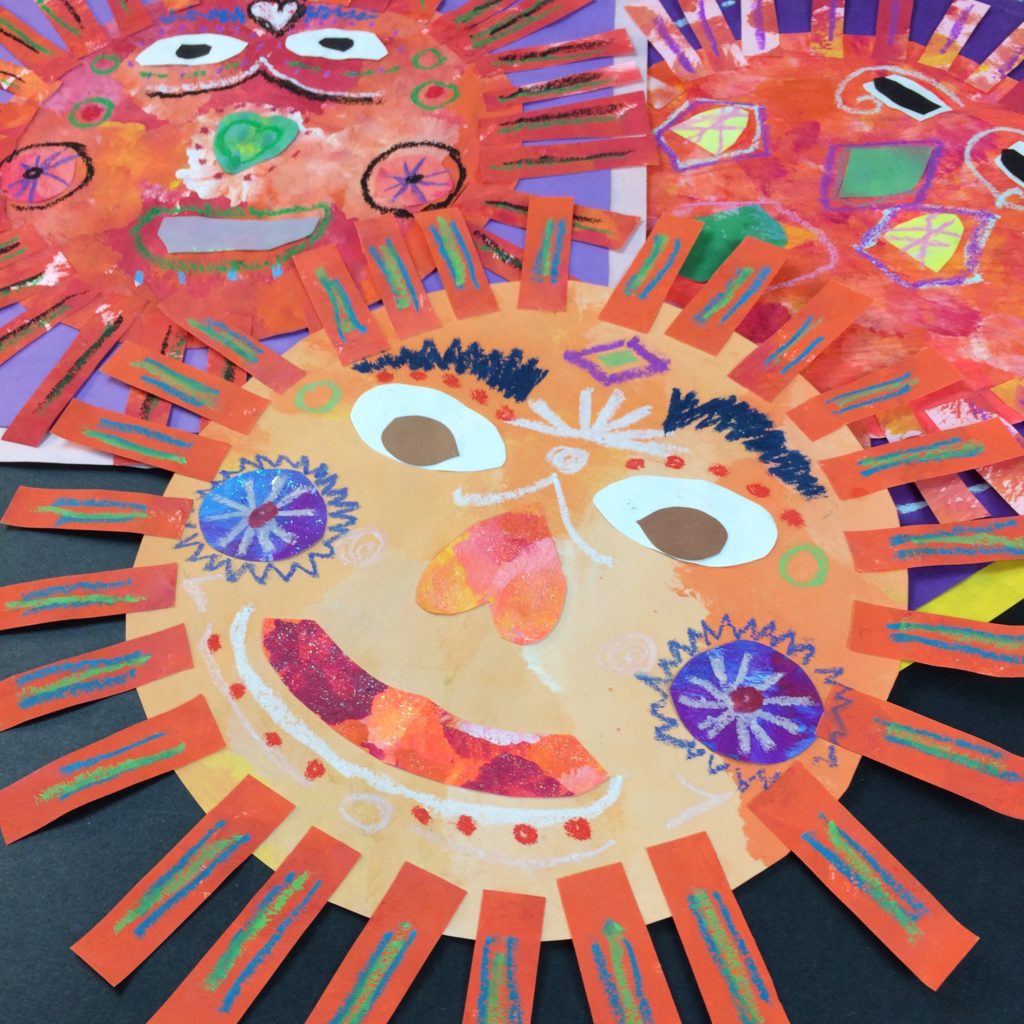
Mexican Aztec Suns
September 18, 2017 at 10:51 pm
What paints are these?
September 19, 2017 at 7:29 pm
Faber Castell Connector Sets. They are like a tempera cake paint, just add water. 🙂
September 22, 2017 at 5:53 pm
These are gorgeous.
Maarit Gunnervall
September 2, 2020 at 3:53 pm
Thank you for great inspiration and for sharing the beautiful works and ideas! Kind greetings, Maarit Gunnervall Switzerland
Leslie Hawes
July 9, 2021 at 2:10 pm
I am looking at ways to bring art projects in to my AIG middle school classroom. I am required to integrate into the the core subjects. Do you have ideas on how to weave that in, but have the activity focus on the art?
July 11, 2021 at 12:25 pm
I would start by creating an art lesson then finding literature, science and math to connect to the lessons. Once you get into the habit it becomes second nature. 🙂
jason wright
August 18, 2021 at 7:52 am
What an amazing and fun project! Thank you for much for sharing with us!
May 15, 2024 at 10:33 am
really nice projects
Leave a comment Cancel Reply
Your email address will not be published. Required fields are marked *
Previous Post

- all ART-2 lessons
- all classes
- art teacher resource
- art vocabulary
by JuliannaKunstler.com

Draw a surrealist landscape that includes:
- Depth - background, middle-ground, and foreground
- At least three trees
- All objects should look three-dimensional and realistic in appearance
- Drawing should be surrealistic in nature - dream-like subject matter
Media to use:
- Black illustration board
- Oil pastels
- Colored pencils
Visual characteristics of surrealism are:
- The element of fantasy
- Metaphysical atmosphere
- Dreamlike imagery depicting mysterious environments and landscapes
- Representation with almost photographic precision. Hyper-realistic rendering of form and volume
- A distortion of reality with contradictory elements and random associations
- Eccentric, shocking, and mysterious
- Eerie creatures and fantastical forms from everyday objects
- The use of the visual form to express and translate the unconscious
- Experimental techniques and forms such as collage, mixed media, doodling, etc.
WI State Standards:
- AA Cr11h Plan: Formulate original concepts by practice, experimentation, and revision. (planning/experimentation)
- AA Cr12h Make: Create works of art that introduce students to media, care of tools, and basic craftsmanship skills. (skills)
- AA Pr10h Develop Meaning: Curate a body of work incorporating personal, historical and contemporary art to communicate one or more points of view. (aesthetics / communication)
Learning targets:
- Use planning (sketching) to develop a unique outcome
- Create an original artwork
- C ombine multiple media to achieve an aesthetic effect.
- Learn about surrealism
- Create an art piece in surrealistic style
- Exercise drawing trees
- Learn to paint with bleach
- Learn to achieve a necessary value using bleach over a black surface
- Learn to apply highlights and shadows on a black illustration board
- Learn to use oil pastels and pencils to add depth
- Exercise and demonstrate use and mastery of the elements of art
- Exercise and demonstrate use and mastery of colored pencil drawing and shading techniques
- Demonstrate understanding of color values and chiaroscuro pattern.
in a nutshell
1. Standard AA Cr11h ( planning /experimentation) : Start with sketching. Come up with a theme that would involve trees. Draw thumbnails of multiple ideas and approaches. Consider transforming trees into something else. This is your most creative part of the assignment.
2. Standards AA Cr12h ( skills ) : Make sure you use all required media in a proper way. Practice it, experiment with it. Application of the media is important to achieve a realistic (surrealistic) feel.
3. AAPr10h (aesthetics/ communication ) : Make sure there is a "twist" in your landscape that communicates "surrealism"!
presentation

Research and sketching
Standard AA Cr11h ( planning /experimentation) :
Spend 2-3 hours sketching surrealist landscapes.
Your landscape should include:
- At least 3 trees
- Depth: FOREGROUND, MID-GROUND, and BACKGROUD)
- Landscape should be surrealist
Final sketch should look realistic, but "with a twist". Create a dream-like reality.
Research surrealists and their artwork for inspiration.

Sketch should be turned in as a part of the grade.
Standards AA Cr12h ( skills )

Draw your landscape on a black illustration board.
Your drawing should be based on your sketch.

Use HB or H pencil:
- very fine lines
Add as many details as you can at this point.
Standards AA Cr12h ( skills ) :

Use a regular household bleach to lighten up some areas, to support the light source, and to create textures.

Use a small scrap piece of the same type illustration board as your drawing to practice the bleaching technique.
Use a brush or a cotton swab to apply bleach.
Make sure you wash brush really well after you are done to prevent the bristles to deteriorate.
Give it some time for the bleach to "eat" the color. It may take up to a minute or more.
The lightness of the bleached area will depend on the amount of bleach applied.
Always let one layer (or wash) dry completely to reveal the actual color before you apply a next layer.

Make a cup of diluted bleach for the areas that you want to be lightened gently.
Start with water, then add a little of bleach.
You can control the intensity of the bleach power by adding more water or bleach.

Different manufacturer illustration boards will result in different bleached color.
It depends on the dyes that were used in the process. So always try the czme brand scrap piece as your main drawing.
Some boards are more resistant to bleach than others.
Bleach strength may vary as well. So always try first!

You can use bleach to add texture to your trees.
You can emphasize this texture later with colored pencils.
colored pencils & oil pastels

Use color pencils for coloring details and backgrounds.
You won't be able to use oil pastels for small areas and stay precise.
Leave oil pastels for the foreground textute or simple backgrounds.
Keep in mind that you can use oil pastels over colored pencils, but not the other way around.
- Use small pencil strokes
- Blend and mix multiple colors
- Strokes should not be obvious - they should support the form of the object and its texture

Apply colors, values, and textures to the trees - make them look round.
Each tree and its parts should have at least 3 values:

Treat each part of a tree as a cylinder - apply values to support the "roundness" of the tree and its parts.

Do not outline your objects - use value contrasts and shadows .

Keep the light source and light-and-dark pattern consistent throughout the drawing.
Make sure that if your light is coming from the right, all shadows should be on the left, etc.
That should be applied to all objects.
Apply colors, values, and texture to the leaves.
Remember how to draw tree? ( here )

- Tree crown should be three-dimensional, not flat.
- Tree crown can be any color

Details will make your drawing a success.
Use oil pastels to color close-up objects.
Pastels are also great for foreground or background.

- Oil pastels should create contrasts and color blending.
- Use only small strokes when working with oil pastels
- Use at least 2-3 colors for each shape
- Use oil pastels to support the forms (different values) and textures (strokes)

| standard | no evidence | beginning | emerging | proficient | advanced |
|---|---|---|---|---|---|
planning / experimentation | No preliminary sketches were made Assignment does not show enough evidence or is missing | No evidence of careful planning. A sketch was made. | Artwork is based on a sketch. Does not demonstrate effort and attention to details. | Artwork is based on multiple sketches and research; Artwork is unique and creative. Artwork demonstrates accurate planning, effort, attention to details. | Artwork demonstrates an extensive research and practice; Work represents an advanced use of elements and principles of design. Student displayed an outstanding effort in regards to application and understanding of the content. Artwork shows individual style, careful planning, multiple revisions and attention to details. |
skills | Assignment does not show enough evidence or is missing | Student somewhat followed the process. Some steps are skipped or incomplete. Work requires major improvement. | Student mostly followed the process. Work shows some skills and basic/partial understanding of the process. | Student followed the process exactly as the instructions specified. Work shows proper use of skills and techniques Objects are realistic - appear 3D Coloring and other value techniques (bleach painting) support the realistic effect | Student followed the process exactly as the instructions specified and, in addition, the piece exhibits evidence of creative experimentation beyond the required task. Craftsmanship and attention to details are flawless; |
aesthetics / communication | Assignment does not show enough evidence or is missing | The artwork communicates little effort and personal emotional involvement in the process.
| Student tried using elements and principles of art to solve the aesthetic task. Some areas need improvement. | Artwork shows individuality and effort. The artwork displays a clear meaning and style of the assignment. Artwork communicates surrealism. | Student went above and beyond in the use of Art Elements and Principles to convey a clear message, showed understanding of the task, and solved the task in the most creative way. Artwork shows individuality and emotion involvement. |

8 Ways to Teach Landscape Art
Landscapes are so beautiful to look at, which is why it is so great to teach your students how to recreate them. There are so many artistic principles that can be taught through a landscape unit. For example, you can create lessons around line, foreground & background, artistic messages, color representations and symmetry (to name a few). Landscape art also ties in really nicely with a Social Studies unit on Urban & Rural communities. Here are ways to teach landscape art.
1. Start with the sky:
In this form of landscape art, the sky is the main feature. So naturally, students plan out their landscape by first painting/coloring the sky. I like the swirl approach, it creates a mystic feel. It also gives you a chance to discuss mixing warm colors. Also, it gives the audience a nice perspective. You could ask your students to recreate what an urban/rural dweller would see if they looked up towards a night’s sky.

2. Start with the horizon:
This works great with rural landscape artwork. The basis originates from the horizon line; everything else is built around it. This strategy also makes for a good discussion about background and foreground.

3. The Four Square Approach:
Have your students divide their sheet/canvas into four equal sections and then create a landscape with accurate measurements and some symmetry. This could work for either rural or city landscapes.

4. Free Spirited Squiggles:
I love this one. It’s so Van Gogh-ish. This strategy can create a great discussion about lines. Have your students draw a series of squiggly and wavy lines starting with the horizon, and then fill in the colors appropriately. Since there are so many opportunities for color here, it would be great to introduce the concept of mood and tone in art.

5. The Torn Paper Approach:
This is such a different approach to landscapes, but it comes out fantastically. You can create a discussion about texture out of this landscape art.

6. Start With The Water:
In this method, students begin their landscape by mapping out where a stream will lead. The strategy is to to start the steam off wide, and then allow it to get more narrow as it proceeds in the illustration/painting. I also really like the waves!

7. Perspective:
In this landscape, the audience member is seeing the landscape from the view of the painter. Similar to the stream, you start off with a wide road/field, and allow it to get narrow as it goes off into the distance. I love the colors in some of these.

8. Layered Lines:
This is similar to starting with the horizon, but this time you layer many lines to create the illusion of a valley or hilly area. I love the dimensions this brings out. It’s a great way to talk about softening color palettes or shades, as well as background/foreground.

Which is your favorite way to teach landscape art?
One thought on “ 8 Ways to Teach Landscape Art ”
- Pingback: The Best Landscape Art Lessons – My Everyday Classroom
Comments are closed.
Constructed Landscape - Paula McCartney
This week’s assignment comes from artist Paula McCartney, whose work explores the boundaries between the natural and unnatural. Her assignment asks you to reexamine what those terms even mean by constructing an image of the so-called natural world.
Similar Shows

America Revealed

Rick Steves' Art of Europe

A Brief History of the Future

Wild Travels: America's Oddest Museums

The World of Wisdom and Wonder

Dream of Italy

By the River with Holly Jackson

Lives Well Lived

Egypt's Treasure Guardians
Weta passport.
Stream tens of thousands of hours of your PBS and local favorites with WETA Passport whenever and wherever you want. Catch up on a single episode or binge-watch full seasons before they air on TV.
- Get WETA Passport
Get the Latest from WETA
Nerdfighteria Wiki

Popular articles

art assignment Construct a landscape. | Paula McCartney | The Art Assignment
- Description
| YouTube: | |
| Previous: | |
| Next: |
| View count: | 38,699 |
| Likes: | 571 | 12 | -->
| Comments: | 22 |
| Duration: | 09:26 |
| Uploaded: | 2015-12-17 |
| Last sync: | 2024-05-22 14:15 |
SARAH URIST GREEN: This episode of "The Art Assignment" is brought you by Squarespace. [THEME MUSIC] We're in Minneapolis, and we're about to meet up with Paula McCartney. She makes photographs and artist books that explore the ambiguity between the natural and the unnatural. and cause us to reexamined what those terms even mean. Projects like "Bronx Zoo" saw McCartney photographing real birds and living plants in constructed landscapes, while "Bird Watching" saw her photograph fake, craft store-bought birds in real landscapes. Her most recent work, "A Field Guide to Snow and Ice," is a series of photographs in a book that explores her idea of winter, which includes images of actual snow and ice along with images of stalagmites and piles of gypsum sand that only mimic icy forms. With Paula, we're going to talk about how we look at the so-called natural world and how we go about constructing it in our minds and in the images we make. Paula: Hi, I'm Paula McCartney, and this is your "Art Assignment." I moved from San Francisco to Minneapolis, and at that time I was really surprised how much winter there was. I was used to winter for, like, three months out of the year, but I was not used to winter for six months out of the year and basically in all capitals in this really very exotic environment. Just like the landscapes in the Bronx Zoo felt very exotic, this amount of snow and ice felt very exotic. So I knew that I wanted to explore that idea. So I started the project in what I call the "safety" of the summer months, and I made a photogram of a dried, pressed Queen Ann's Lace flower. It's this beautiful flower that I remember from my childhood. And I thought pressed and made into a photogram, it looked like a snowflake. The first snow fall of the season in November of that year I went out into my backyard and I pointed my camera up into the sky and photographed snow falling down on me. And combining-- looking at those photographs next to the photograph of my Queen Ann's Lace snowflake, the Queen Ann's Lace was a snowflake, but it also kind of turned into, like, a star burst. And the photograph of the snow falling at night looking straight up looked like snow falling, but then also could be an image of the night sky, the cosmos. And I really liked how with that juxtaposition the two very specific things could be transformed or opened up, and they could be interpreted in lots of different ways. Because I was living in this environment with so much winter, I was seeing winter all the time. And what I really wanted to illustrate was the winter of my imagination again. Because I think the more abstracted things are from the larger landscape, the more they become images from my imagination as opposed to documenting the world as it is. So your assignment in creating a constructed landscape, the first thing you should do is think about what kind of landscapes you're interested in, what kind of environment you're interested in. Look about the materials that you have around your house. Are there things that you're excited by like different rocks or minerals or stones? Think do you want this to be a winter landscape? A summer landscape? You can go outside and get leave and flowers, you can get some snow if you have snow at this same. Take the elements, make your landscape, take lots of photographs. Photograph it from above and below, really experiment. Add a few more things into your landscape. Take some things out of your landscape. Make lots of pictures. Look at them. Think about which picture really transformed those elements that you combined together to make your constructed landscape. So maybe something very small looks big or something big looks small or you're transported to a different kind of environment. And share your favorite picture with us. John: So, like, one way I could approach this, Sarah, is I could make a miniature landscape and then use sort of the tricks of the camera to make it look big. Sarah: Yes. That's exactly right. And there are so many great precedents for this Art Assignment. I'm really excited about it. John: I can think of one president at every single movie made before 1990 which used the tricks of the camera to turn these miniature paintings into set backdrops. Sarah: Yes. That's very true. But there are others from the art world as well. And I'd like to bring up the fact that I have a ton of friends and colleagues that I draw upon for ideas for these precedents. Like, you could think about Henri Rousseau's jungle paintings where he visited, not the jungle to gain inspiration, but actually the Paris Zoo and the natural history museum. John: I'm also quite fond of Sugimoto's diorama photographs where he visited the Natural History Museum in New York and photographed the dioramas, but in such a way that it looks very realistic. Sarah: Or there's Thomas Demand who makes these really amazing constructions from cut paper that he than photographs in a manner that's incredibly convincing. John: All of this is supposed to make me think about the difference between what is real and what is fake, right? Sarah: Right. Especially when it comes to nature. And our precedent today actually comes from outside of the world of art history. In 1856, Scottish industrialist James Nasmyth retired from a successful business of inventing and building machine tools to pursue his interest in astronomy. A neighbor of English estate thought they kept seeing a ghost outside carrying a coffin, but it was actually Nasmyth in his nightgown moving around his telescope trying to get the best view of the night sky. He soon built his own telescope, a powerful reflecting one that allowed him to see at great magnification. He made detailed observations of the moon, and in 1874 published a book of his findings, complete with photographs of the lunar surface. However, no one had successfully taken non-blurry photographs of the moon's surface yet, so what more these images? Nasmyths' craters and mountains were actually plaster models he made from his drawings, which he then lit from a low angle and photographed from above. The images are convincingly and remarkably accurate, but they are at the same time false and fantastical images. Like Paula's photographs, Nasmyth's are derived from close observation and engage the most simple of materials to create and transport us to another fully-fledged, albeit impossible, world. Paula: I think the idea with constructed landscapes is that almost every environment that we're in nowadays is constructed in some sort of way. So your lawn is constructed, your garden is constructed, on arboretum that you go to is constructed. So all these places that we think of as natural are really constructed. So it's always sort of you're deciding the degree of something, how constructed something is. So for my constructed landscape, I decided to start with black paper, because I like a lot of black backgrounds in my work, and a photograph that I just taped here to my studio wall. So this is my foreground and my background, and the background is a photograph of birds in flight that I had used in lots of other projects. So I have a rock that I collected this summer that I really love the shape of, because I liked how it looked like a mountain. And then I got another rock out of my garden-- so I had two rocks-- that was also sort of mountain shaped. And I also got a giant bowl of sand that I took just from a sandbox that's reminding me of snow. So one thing you'll want to consider with your assignment is the idea of scale. Think about where you are in relationship to the objects in your set up, your scene, to see do you want to make something look smaller than it is? Do you want to make something look larger than it is? And really move around your set up so that you get a lot of different possibilities to find the best thing or the most exciting thing or how can you make a rock and some sand look, like, really monumental and exciting. Everyone has all these fantastic ideas in their head, all these stories that we think of all day long, and this is your way to illustrate that idea. So see if you can combine things that maybe you haven't combined before. See if you can build something that you've never built before. Experiment to sort of open up a new way of seeing the landscape. I think, you know, we're so used to seeing the landscape I think a lot of times we take it for granted. But I do want, with this exercise, and with my work in general, to have people look at the landscape in a new and different way. Take lots of pictures, because the beginning pictures you make are not probably going to be your best ones. Think of the first ones as practice. Take pictures from above your scene. Take pictures from eye-level, when you think of, like, the worm's eye view or the bird's eye view. You don't just look at a scene and know, I know the perfect perspective. You have to move around and look. So do take a lot of pictures. Like, if you're using your phone, you can delete them all afterwards except for your favorite one. But take, like, 20 pictures. Take 30 pictures, take a hundred pictures. Really experiment. Sarah: This episode of "The Art Assignment" is brought you by Squarespace. John: Squarespace is an easy way to create a website, blog, or online store for you and your ideas. Sarah: Squarespace features a user-friendly interface, custom templates, and 24/7 customer support. Try Squarespace at squarespace.com/artassignment for a special offer. John: Squarespace, build it beautiful. [MUSIC PLAYING]
Create account
An Engaging Watercolor Lesson for All Grade Levels

I love to teach my students the magic of watercolor painting! As a watercolor artist, it’s one of my favorite lessons. I believe the success of mastering this media lies in the art of learning to trust watercolor because it’s ultimately going to do what it wants to do. This is why I often call this lesson, “embracing happy accidents!”
This lesson can become as complicated or as simple as you’d like. For secondary or more advanced students, you can follow the process as it’s written here. For younger students, you may want to limit the information, techniques, and artists you present.
Here’s how to get started.
Step 1: get to know the medium.

I begin the lesson by introducing my students to watercolor terms, supplies, techniques, and artists. We learn vocabulary, discuss the different types of brushes, papers, and paints, and look at master artists. We discuss why certain paintings are so enjoyable and I demonstrate ways in which artists can creatively manipulate watercolor to play with value and color mixing.
Did you know that AOEU has a Studio: Painting – Watercolor course ? It’s true! Learn more about this exciting medium while creating your own art and finding new ideas for your classroom. See more, including a sample assignment, right here .
Let’s take a look at each of these parts in more detail.
Watercolor brushes come in many shapes, sizes, and price points, and the choices can quickly become overwhelming. I recommend starting your students out with synthetic brushes. The quality is good, and they’re much less expensive than natural brushes. A small round brush, an angled brush, and a big flat brush for washes are all your beginner students will need.
When students progress to Art II or other more advanced classes, you can begin to invest in natural bristle brushes in more shapes and sizes.
Here are 8 different brushes you might consider providing.
- Round Round brushes are the most popular for watercolor artists because they are versatile. They have a rounded ferrule (the metal part that holds the bristles) and rounded tip which allows them to create fine or thick lines. I recommend every student start out with a round brush.
- Flat Flat brushes have a flat ferrule and a straight edge. This brush can create beautiful lines and shapes.
- Bright Bright brushes are a type of flat brush. They often have shorter hairs and are good for controlled strokes.
- Filbert Filbert brushes are also a type of flat brush. Filbert brushes are oval shaped and are wonderful for painting foliage and landscape scenes.
- Mop Mop brushes have a lot of soft hair and can hold a lot of water. They are great for painting large wash areas.
- Hake Hake brushes are hand-made in Japan. They are made of goat hair and are extremely soft. These are specifically used for laying down large washes.
- Spotter Spotter brushes are good for painting details due to their short hair length. The bristles don’t bend, so these are great for dots and tiny details.
- Rigger Rigger brushes were originally designed for calligraphy and lettering. I love them because they make great grass or foliage lines.
I recommend using a watercolor paper that is at least 90lb. Best practice states that if the paper is lighter than 300lb, it should be stretched. However, I’ve found it is just as easy to mount or mat the final piece, which saves time and stress. I also recommend purchasing the highest-quality student grade watercolor paper your budget will allow because that will ensure the most successful final pieces.
When choosing paper, consider the following 3 factors.
- Quality As with many art supplies, there are two main categories of watercolor paper: artist quality and student grade. While sometimes it pays to spring for artist quality materials, I’ve found student grade watercolor paper often works great.
- Weight Watercolor paper comes in both heavy and light varieties. Heavy paper can absorb more water and is often more expensive. I buy paper in the 90-140lb range for my students and have them tape it to their drawing boards.
- Texture Watercolor paper also comes in a variety of textures. Hot press paper has a smooth, hard surface while cold press paper has semi-bumpy or rough texture. The majority of watercolor artists prefer cold press. There is also a rough paper I seldom use but is wonderful for pure washes.

Watercolor paint is made with a pigment that is then mixed with a binder. Binders are what hold the pigment together. Different types of paint use different types of binders. Watercolor paints are more vibrant and transparent because watercolor has fewer fillers and the binder, which is usually gum Arabic, is absorbed by the paper. Therefore more color can show on the surface of the paper or board.
Watercolors contain both pigment and a binder . Pigment provides the color while binders hold the pigment together. Watercolors are more vibrant and transparent because the binder in them is weaker compared to other types of paint.
3 Types of Watercolor Paint to Explore
- Pan or Cake These types tend to be the choice for most art educators. They are affordable and easy-to-use. Simply add more or less water to vary the intensity. These paints are portable and come in a variety of qualities. They are great for beginners as well as seasoned watercolor artists.
- Tube Tube watercolors are a great choice as well, although they tend to be a bit more expensive than the pan paints. I have found when using them with students; if the lids don’t get back on, they can dry out pretty quickly. Therefore, if my students choose to use tubes versus pans, I have them purchase their own set and bring them to and from class.
- Liquid Liquid watercolors are becoming more and more popular in art rooms across the nation for several reasons. First of all, they are beautiful and vibrant and make for a quick painting lesson. They can be diluted to create lovely washes, and they are easy to clean up. Plus, they have a relatively inexpensive price tag.
For even more information about watercolor paints and how to use them in the classroom, be sure to check out the following PRO Packs! Look for these Packs in PRO Learning. Connect today to learn more about how to get PRO Learning in your school or district.
- Getting Started with Watercolor Painting
- Exploring Color Theory through Watercolor
Master Artists
Watercolors have been around for ages. However, the Golden Age of Watercolor ran from the mid-1700s to the mid-1800s.
Here is a list of 20 watercolor masters through time you may want to share with your students for inspiration.
- Albrecht Durer
- William Blake
- J.M.W. Turner
- James McNeill Whistler
- Winslow Homer
- Thomas Moran
- John Singer Sargent
- Arthur Dove
- Edward Hopper
- Charles Demuth
- Georgia O’Keeffe
- Loïs Mailou Jones
- Morris Graves
- Andrew Wyeth
- Nell Blaine
- Eric Fischl
- Cecily Brown
- Eric Christensen
Step 2: Experiment

Next, I like to have students experiment with the watercolor paint to see what effects they can create. (You can find fourteen different techniques to try with your students in this article from our archives. )
Have your students fold their paper horizontally four times and vertically four times, so they have sixteen spaces to experiment and play. (Limit this number for younger students.) I give students a handout laying out several techniques, such as wet-on-dry, wet-on-wet, resist, drip, gradated values, salt, alcohol, white ink pen, saran wrap pull, paper towel prints, etc.

I have students select sixteen and practice each one in a specific rectangle on their paper. By giving students this time to experiment and play with watercolor, it frees them up for the actual art lesson. It also teaches them that watercolor “bleeds” can be very interesting and that, often, the looser they are with the paint and water the more successful and creative their final pieces will be.
Step 3: Create Final Piece

Once we complete our experimentation days, we move into the actual lesson.
Here are the 3 simple steps I use to help them complete this lesson successfully!
- Set up still-life and sketch. In my room, I set up plastic flower arrangements at each table and have students lightly sketch out a contour of what they see using a 2b graphite pencil on a 12” x 18” piece of white watercolor paper. While students work, I reiterate the importance of direct observational drawing. If you are doing this lesson with young students, you can have them draw a simple arrangement or single flower. You may also want to work on a smaller scale.
- Add grid. Once the still-life has been drawn, students add a grid on top. If using 12″ x 18″ paper, 3″ x 4″ rectangles work well. Some students like to use graphite for their grid, while others prefer thin black marker lines. I leave that choice up to them. Once again, limit the number of rectangles for young students. You may consider folding the paper in half once each way, creating four different boxes. Whatever you choose, it’s time for the real fun to begin!
- Add watercolor. Students go back and look at their experimental papers and find the techniques they enjoyed the most. Then, they use one technique per box to add color to their drawing. Students experiment with the colors they see in their still-life flower arrangements and end up with fantastic paintings combining the art of seeing with the art of watercolor!

This lesson teaches students about the power of experimenting and playing with materials as they create unique paintings. When they are all hung in a hallway exhibit, they are simply breathtaking!
How do you teach watercolor techniques in your classroom?
Do you think adding in time for experimentation with media is an important element to a successful lesson?
Magazine articles and podcasts are opinions of professional education contributors and do not necessarily represent the position of the Art of Education University (AOEU) or its academic offerings. Contributors use terms in the way they are most often talked about in the scope of their educational experiences.
Debi West is one of AOEU’s adjunct instructors and a former AOEU Writer and NBCT art educator. She loves sharing with others and enthusiastically stands behind her motto, “Together we ART better!”

How to Use Neurographic Art to Encourage a Calm and Focused Mind

Art Room All-Stars: 12 Superlatives to Lighten Up Your End-of-Year Mood

10 One-Day Photography Activities to Keep Students “Focused” Until the End of the Year

Go Big Before Going Home: Finish the Year with a Collaborative Paper Mache Sculpture
One Point Perspective Drawing Art Lesson (with a Template & Video Tutorial)

How to draw Landscapes in Perspective Tutorial Video and Landscape Coloring Page

Easy Perspective Drawing for Beginners Tutorial Video and Coloring Page

Easy How to Draw Mountains Tutorial Video and Mountains Coloring Page

How to Draw a Fall Tree: Easy Autumn Tree Drawing Tutorial for Kids

Easy How to Draw a Landscape Tutorial and Landscape Coloring Page

Easy How to Draw a Volcano Tutorial Video and Volcano Coloring Page

Easy Landscape Painting Tutorial for Children

Easy How to Draw Clouds Tutorial and Clouds Coloring Page

Easy How to Draw a Tree Tutorial Video and Tree Coloring Page

Easy How to Draw a Beach Tutorial Video and Beach Coloring Page

Easy Pop Art Landscape Drawing for Kids

Easy How to Draw a Bridge Tutorial and Bridge Coloring Page

Easy How to Draw a Landscape Lake Tutorial and Coloring Page

How to Draw a Windy Day Tutorial and Windy Day Coloring Page

Easy How to Draw Scenery Tutorial Video and Scenery Coloring Page

Easy How to Draw a Mayan Temple for Cinco de Mayo and Mayan Temple Coloring page

Easy How to Draw the Golden Gate Bridge Tutorial and Golden Gate Bridge Coloring Page

Easy How to Draw a Farm Tutorial and Farm Coloring Page

Easy How to Draw a Poppy Field Tutorial and Poppy Coloring Page
Environment
Our Landscape lesson plans are designed to expand your students’ knowledge of perspective, atmosphere, style, and design.
Expose your students to the styles of famous landscape artists like Mia Charro, Ton Schulten, and Friedensreich Hundertwasser, and give them the tools to create their own artworks emulating the style of the reference artist. Students will learn how to paint landscapes both representationally and stylistically, and will have the opportunity to expand their knowledge of different materials and techniques such as acrylic painting, drawing, collage, oil pastel, and watercolour.

Related Art Lessons

Tundra – Arctic/Antarctic
Students will have fun creating a range of Arctic and Antarctic themed artworks. We'll use stylised and realistic techniques to bring a variety of different projects from the coldest regions on Earth to life! In this unit, we'll use collage, painting, drawing, printmaking, mixed media and craft, whilst having fun learnng aobut the farthest reaches of the planet.

Students will have fun creating a range of fish themed artworks. We'll use stylised and realistic techniques to bring a variety of different fish projects to life! In this unit, students will use collage, painting, drawing, clay, mixed media and textile, whilst having fun in the watery realm.

African Animals
Students will have fun creating a range of African animal artworks. We'll use stylised and realistic techniques to bring a variety of different African animals to life! In this unit, students will use collage, painting, ink drawing, and printmaking, whilst having fun in the African savannah.
Subscribe to our newsletter to receive updates.
Creative Kids Art Lessons
Red Griffin Art Pty Ltd ABN 71 104 543 080
61 Kishorn Rd, Mt Pleasant – WA 6153 Australia
Office Hours 9.30am to 4pm AWST
FAQ | Terms and Conditions | Privacy Policy | Website Terms of use
© 2024 by Creative Kids Art Club | Website by Bloom Digital
- Community Chat
- Course Guide
- Live Classes
- My Group Coaching
- Questions? Contact Us

Introduction to Landscape Drawing
In this crash course, veteran New Masters Academy instructor Steve Huston will overview the principles of landscape drawing. You will learn how to use the concepts of gesture and structure in landscape art. You will explore the basic strategies to achieve effective compositional designs. Steve will show you how to apply the laws of light to drawing landscape scenes. After this course, you will be able to make strong design choices in your artwork.
6 Lessons 5h 27m 29s of videos

In week one, Steve will teach you a structural approach to drawing the landscape. You will learn how to apply the two crucial aspects, gesture and structure, in building your landscape art.

Week 1: Gesture and Structure With Steve Huston

In week two, Steve will lecture on how to work with gradation to strengthen landscape compositions. You will learn to apply the 3-value system in your artwork and control values to help design forms.
Week 2: The Importance of Values and Gradation With Steve Huston

In week three, Steve will focus on the elements of design for landscape drawing. Steve will show you how to organize your artwork into quadrants to build a balanced yet complex composition. You will study how to establish framing, utilize perspective, and work with symmetry and asymmetry.
Week 3: Designing Elements With Steve Huston

In week four, you will learn to apply the laws of light to your landscape drawing. Steve will show you how to simplify your forms into two value ranges: light and shadow. Then, you will discover how to introduce halftones and gradation to render simple natural forms.
Week 4: Laws of Light With Steve Huston

In week five, Steve will show you how to draw complex natural forms in the landscape by simplifying them into boxes, spheres, and other mass conceptions. You will learn to break down trees, rocks, cliffs, and other terrains while focusing on clear, readable value masses.
Week 5: Drawing Trees and Terrain With Steve Huston

In week six, Steve will create a landscape that applies many of the principles previously discussed; structure, gesture, value, gradation, perspective, framing, stylization, etc. You will watch as he develops a forest scene.
Week 6: Demonstration of a Forest Scene With Steve Huston
Common questions.
Yes! This is a great introduction to landscape art.
This course includes downloadable assignment PDFs, that help you practice the materials taught by instructor Steve Huston. Keeping up with these assignments will maximize your learning outcomes.
A material PDF list is linked in each lesson under the description. Please check the file to see what you need to prepare.
Most New Masters Academy courses are designed to be done traditionally or digitally. Software changes constantly, but the fundamentals stay the same. It will be up to you to translate the information that you are learning to your software of choice.
NEW MASTERS ACADEMY
- Instructors
- Testimonials
- Privacy Policy
- Terms and Conditions
- Video Lessons
- Reference Images
- Community Forums
- Frequently Asked Questions
- Customer Support
New Masters Academy 16182 Gothard St Huntington Beach, CA 92647 Contact US
- International
- Education Jobs
- Schools directory
- Resources Education Jobs Schools directory News Search

Drawing Landscapes Lesson Plan and Resources
Subject: Art and design
Age range: 7-11
Resource type: Lesson (complete)
Last updated
15 November 2022
- Share through email
- Share through twitter
- Share through linkedin
- Share through facebook
- Share through pinterest

Creative Commons "Sharealike"
Your rating is required to reflect your happiness.
It's good to leave some feedback.
Something went wrong, please try again later.
A fabulous resource. Thank you!
Empty reply does not make any sense for the end user
For a teacher that is by no means an accomplished artist, this is beyond a great help! Very useful indeed! Thank you. :)
Some excellent resources here, thank you. Great practice of the basic skills before building up to a final piece.
Thanks so much, lovely ideas.
Great resource, thank you
Report this resource to let us know if it violates our terms and conditions. Our customer service team will review your report and will be in touch.
Not quite what you were looking for? Search by keyword to find the right resource:
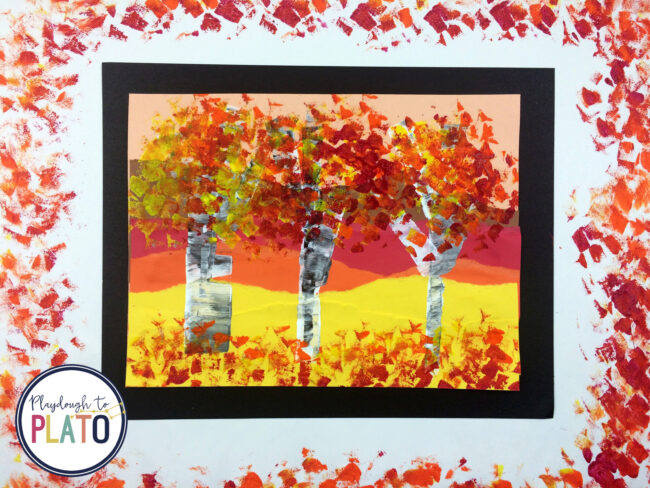
Torn Paper Landscapes Art Project
This colorful fall art project reinforces fine motor skills by showing students how to create a layered landscape using torn paper. Isn’t it gorgeous?!
Get ready for some beautiful fall art! If you’re into more crafts and learning, become a VIP Plato Pack member so you can get all of the tools, strategies and support you need to reach ALL of your learners.
This post contains an Amazon affiliate link.

Getting Ready
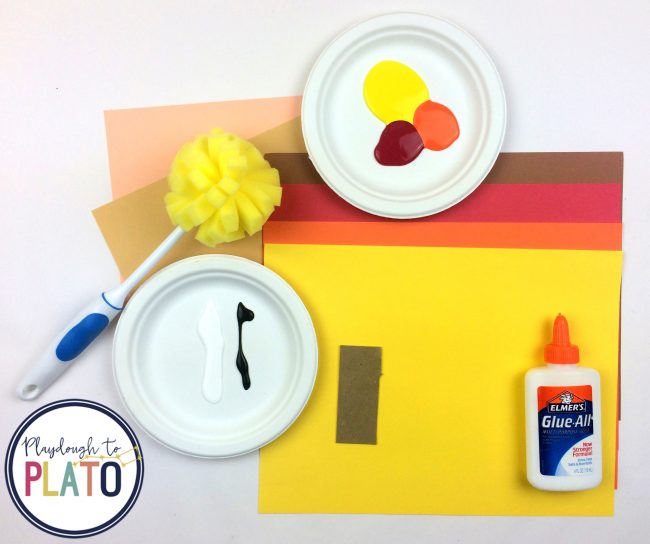
To get the art project ready, I gathered supplies for each student:
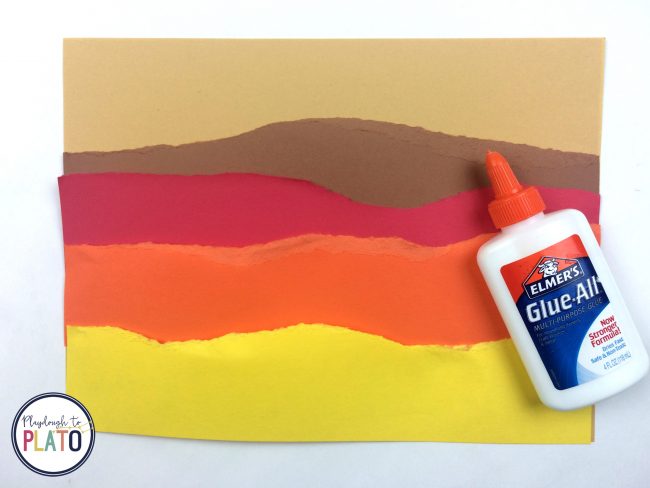
- One 9″ x 12″ piece of peach (or tan) construction paper for the background sky
- One 4″ x 12″ piece of yellow, orange, red and brown construction paper for the torn layers
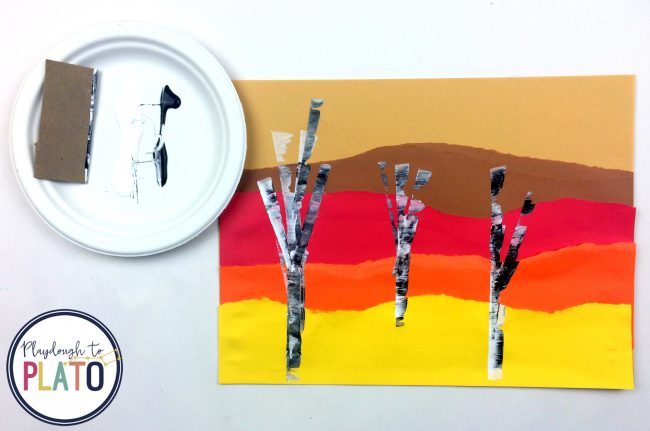
- Cardboard scraper (3″ long)
- Small plate of white and black tempera paint
- Small plate of yellow, orange, and red or magenta tempera paint
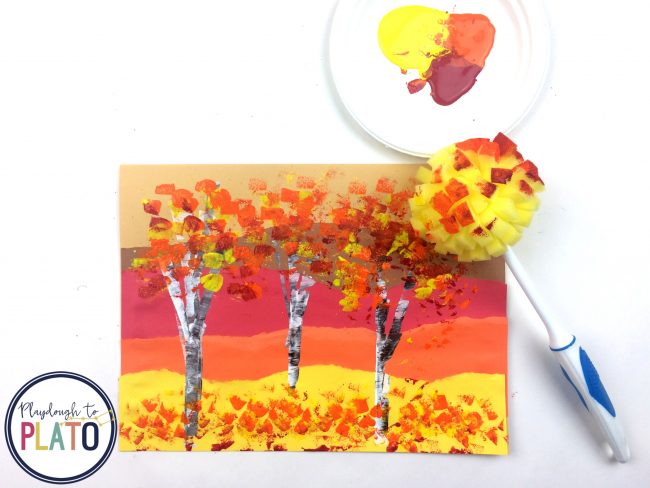
- Foam dish cleaning sponge with handle, for creating the leaves
Creating the Torn Layers
Before starting the art project, I read “Time to Sleep” by Denise Fleming to help the students get excited about the change of seasons.
Then, I displayed a couple of paintings and photos of landscapes. (A landscape is a picture of the outdoors, usually highlighting hills, rivers, trees and plants.)
I explained to the children that there are different colors in a landscape.
In our layered landscape, the yellow construction paper foreground was brighter and the brown construction paper background was darker. The middle ground was the area that would contain the orange and red torn construction paper.
I had the children begin with one piece of peach construction paper for the background sky.
Then, they tore the other pieces of construction paper into uneven strips. I showed them how to hold the paper flat in a vertical position on the work surface and then, placing one hand on the paper, start tearing at the top and slowly pull towards themselves.
I encouraged them to tear an inch at a time so that they wouldn’t accidentally tear too much into the strip.
The children glued the brown strip down first, about 3 inches (or 3 finger widths) from the top of the background paper.
Next, I demonstrated how to overlap and then glue the red strip on top of the brown strip to make a middle ground.
Children used the same steps to tear and glue the orange and yellow papers in place.
Creating the Trees
After the layers were secure, it was time to create the tree trunks on our art project!
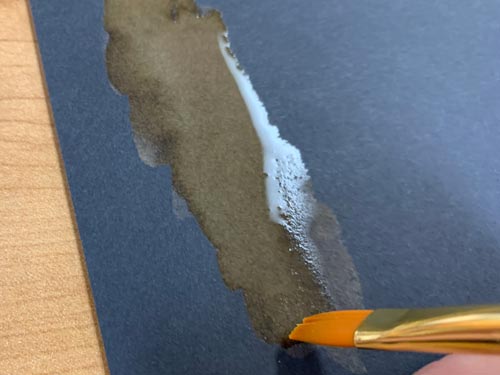
Students dipped the longer edge of the cardboard scraper into white tempera paint and then into black tempera paint.
They placed the scraper vertically on the layered strips and drug about one inch across to create tree trunks.
Children continued creating more trunks and adding branches – re-dipping the scraper in the paint as needed.
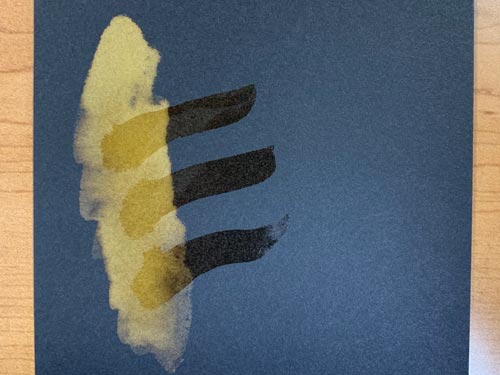
I had students make at least three trees on their papers – one small tree to represent the tree in the background, another medium-sized tree to represent the tree in the middle ground and a larger tree to represent the tree in the foreground.
Once the trees dried, kids dipped the handled sponge in the yellow, orange and red tempera paint and gently tapped the sponge on the tops of the trees to create leaves.
Several students decided to tap their sponge at the bottom of their paper too to make fallen leaves.
The result was spectacular!
Students loved exploring with paint while creating a beautiful piece of landscape art.
Continue the Fun!
Hop over and join the most valuable teaching membership for pre-K, kindergarten and first grade teachers: The Plato Pack!
Similar Posts
Diphthong puzzles.

18 EDITABLE Holiday Sight Words Games
3d shape activities, color by ten frame, monster sight word puzzles, christmas playdough recipes, leave a reply cancel reply.
Your email address will not be published. Required fields are marked *
landscape art lesson plan
All Formats
Resource types, all resource types.
- Rating Count
- Price (Ascending)
- Price (Descending)
- Most Recent
Landscape art lesson plan

Ted Harrison Winter Landscape Art Project with Activity book & Lesson Plans

High School Art Painting Project: Palette Knife Landscape Painting Lesson Plan
Perspective Landscape - Art Lesson Plan

Art Lesson Plans Chinese Landscape Thematic Unit of Study 1 Semester

- Word Document File

Landscape Art Lesson Plan , Japanese Inspired Artwork for 6th, 7th, 8th, 9th
Middle School Art Sub Lesson Plan - Impressionism, Impressionist Landscape
Art Lesson : Wander Landscape | Sub Plans , Early Finishers, No Prep
ART LESSON PLAN - BOTTLED LANDSCAPES

- Google Slides™

Landscapes Inspired by Chinese Art History Art Lesson Plan
- Google Drive™ folder

Integrated Elementary Art Sub Plan Lesson - Antartica, Antarctic Landscape

Elementary Art Sub Plan Lesson - Hundertwasser Simple Landscape

Elementary Art Sub Plan Lesson - Aerial Perspective Landscape , depth

Elementary, Middle School Art Sub Lesson Plan - Silhouette Landscape Drawing

Alma Thomas Abstract Landscapes : Acrylic Paintings: Art Lesson Plan

COLOUR VALUE Art project for Landscapes and trees lesson plan 2nd - 4th grade

Easy Art Project - Digital Lesson Plan Watercolor Landscape Collage
Elementary Art Sub Plan Lesson - Grandma Moses Folk Art Landscape

Middle School Art Sub Lesson Plan - Fauvist Landscape

Ted Harrison - Landscape Art Project - Lesson Plan

Art Lesson Plan : Vincent Van Gogh Landscapes . Classroom or Online Lesson
Landscape Painting Art Lesson Plan with Literacy Connections

Watercolor Landscape Painting Art Project Middle High School Art Lesson Activity

Doodle Landscape Middle School School Art Lesson
Kindergarten Art Book Activity Bundle, Art Lessons
- We're hiring
- Help & FAQ
- Privacy policy
- Student privacy
- Terms of service
- Tell us what you think
Price Database
- Join Artnet PRO
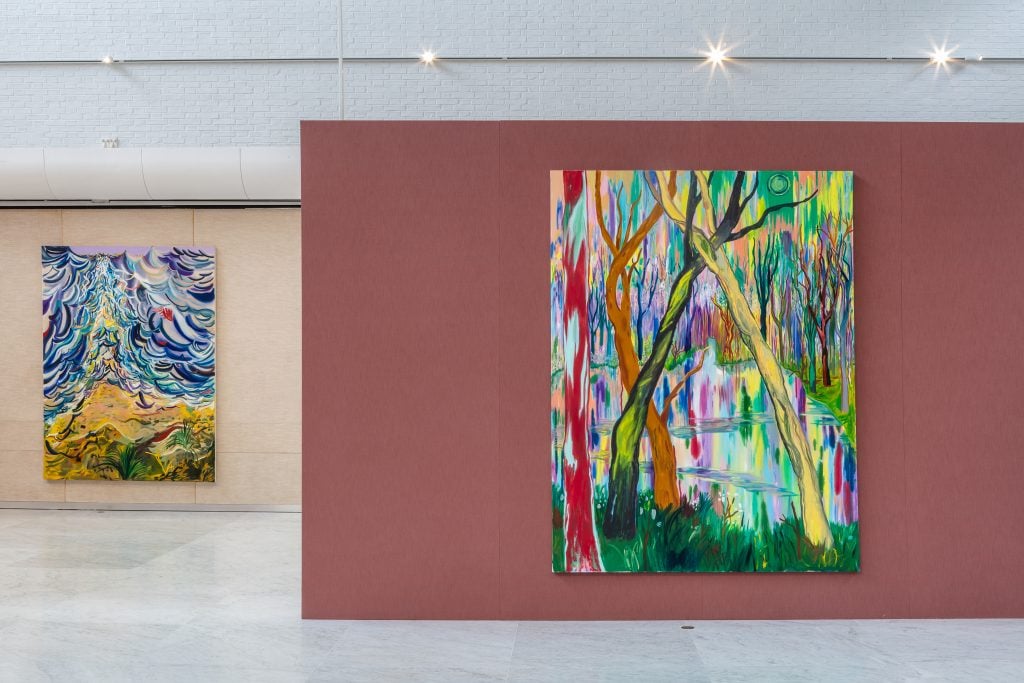
Rising Star Shara Hughes Paints the Twisted Landscapes of Her Inner Psyche
"Shara Hughes: Tree Farm" is on view at Galerie Eva Presenhuber, Waldmannstrasse, Zurich.

The plants in Shara Hughes’s mind-bending paintings export the viewer far from reality. The American artist’s forms seem to be plundered from the depths of her imagination. Towering trees are depicted in spidery strokes of yellow, green and orange ( Wits End (2024)), or with vibrant, fluffy blue dots embellishing their branches ( What Nerve (2024)). Her works are often so loaded with energetic marks and organic forms that the background and foreground converge, leading to a rich tangle of dynamic visual material.
Hughes’s natural scenes can be read as psychological renderings of her inner world. “These landscapes are my present moment,” she said in an interview ahead of her exhibition “ Tree Farm” at Galerie Eva Presenhuber in Zurich (on view until July 20, 2024). “They are very real to me. They are about relationships, reactions to the world, and other things that might be going on in my personal life.” She began to paint these extravagant pieces after moving to New York in 2014, having previously worked on highly considered interiors which housed personal objects. Her “imaginary landscapes” now are a vehicle for her to convey her own subconscious, and a means to explore color and shape. They rethink the landscape genre, reworking a well-worn creative subject with vigor.
Interest in her paintings has boomed over the last decade, following a successful inclusion in the 2017 Whitney Biennial where her work was highlighted by critic Roberta Smith. She now has a thriving market and is held in the collections of institutions such as the Metropolitan Museum of Art, Fondation Louis Vuitton, and Dallas Museum of Art. Hughes has also had solo institutional exhibitions at Kunsten Museum of Modern Art, Aalbord, Denmark (2023); Kunstmuseum Luzern (2022); and Contemporary Art Museum St. Louis (2022).

Portrait of Shara Hughes at her studio in Greenpoint, Brooklyn.
The title of the artist’s Presenhuber show follows the name of her family’s farm in southwest Georgia. She would visit frequently with her father, brothers, and friends while growing up, and describes it as remote, surrounded by dirt roads, inhabited by snakes, deer, and a host of pine trees. “Without much outside stimulation or access to TV or internet, we all learned to be creative and independent, to make do without much else besides ourselves,” she said. “It inspired me to rely on what I already have instead of looking elsewhere. It really shaped me into who I am today. The whole show isn’t based geographically on the tree farm, it is more about that act of reliance on the internal self.”

Shara Hughes, What Nerve (2024). © Shara Hughes. Courtesy of Galerie Eva Presenhuber.
While she has warm memories of this childhood farm, in some paintings, its emotional resonance has led to conflicted results. “What’s funny is that I associate our tree farm as a place of freedom and happiness and stillness, yet some of these tree paintings are individually somewhat troubled,” she said. “ Harder Core and What Nerve were the first paintings I made in the series, and they were both about recovering from stress and having debilitating back pain. ‘Come and Get It’ also has a provocative title as if I’m asking for a fight. Maybe there’s some push and pull trying to subconsciously connect me back to that stillness that I used to feel at my family tree farm.”

Installation view, “Shara Hughes: Tree Farm” at Galerie Eva Presenhuber, Waldmannstrasse, Zurich, 2024.
The exhibition also features a selection of paintings created by the artist’s father, Joe Hughes. These will be displayed in a cabinet adjacent to the main gallery. He has returned to painting on and off for almost seven decades, and his daughter notes the personal meaning these pieces have for him, portraying the story of his life with humor and thoughtfulness. “I love that his paintings are genuine and raw,” she considered. “They are not attached to any outside reason why he needs to make a painting. Formally I’m not sure we have parallels, but I admire his work because the approach is completely free from expectations.”
This also marks the first time that Hughes will be showing her ceramics in an exhibition. The small scale of these tabletop sculptures invites the viewer to move around and observe them from multiple vantage points. They evoke the organic, plant-inspired shapes in her paintings; some have branch-like prongs covered in spherical forms, others are cocooned by petal-like borders. Each were glazed and fired without searching for a specific outcome. She has only recently begun to work with clay and has been intrigued by the strict process and timings involved in its creation. This has been an experimental play with patience for the artist, who describes an immediacy that’s possible in painting, as opposed to the long wait for results when working in ceramics.
Installation view, “Shara Hughes: Right This Way” at Kunsten Museum of Modern Art, Aalbord, Denmark, 2023.
“There were a lot of surprises,” she said. “One hard thing was the shift from making environments to making objects. With painting, you can only see it in one direction so there can be many illusions inside it that suggest context, feeling, or mood. I think these sculptures can do that too, but it was a shift in thinking for me.” This exhibition marks a return to the places of her childhood in many ways, from the locational, to emotional and experiential. “The ceramics gave me a different kind of freedom,” she said. “They brought me back to being a kid and exploring and letting myself make mistakes.”
- Access the data behind the headlines with the artnet Price Database. GET STARTED

Emily Steer
The best of artnet news in your inbox., more trending stories.

The Hunt: A Vincent van Gogh Masterpiece That Was Lost to Conflict

Director Maike Cruse on What to Expect at Art Basel

Land Artist Jim Denevan Crafts a Monumental Testament to Adventure

7 Women Land Art Pioneers (and Where to Find Their Work)
Project sWARM brings awareness to extreme heat in Western Mass schools

Carolina Aragon was joined by Uli Nagel from Cooler Communities and Mary Kay Brown from the Duggan Academy to introduce sWARM to the public.
Schools across Western Mass are feeling the effects of extreme heat in the classroom. UMass Amherst Associate Professor , Climate Artist, and Art for Public Good Founder Carolina Aragón teamed up with Cooler Communities and the Duggan Academy in Springfield to co-create “sWARM,” a participatory art project that aims to raise awareness and helps find solutions to this problem.
This spring, over 500 Duggan Academy middle school students and their teachers worked together to make hundreds of Origami butterflies, using an educational kit created by Aragón. The kit included Origami folding instructions, daily lessons about climate change, and pre and post activity surveys to reflect on what the students were learning each day. The project also asked students to decorate their butterflies with personal messages about what to do when it’s too hot inside and what the students’ hopes are for the future. For example:
“Next time there is a heat wave I am going too...” “keep my grandmother safe from the heat.” “stay in the shade.” And “In the future, I hope...” “to plant more trees.” “it gets less hot.”
Students then painted each butterfly with a special thermochromic paint that changes color in response to temperature. When temperatures rise above 77 degrees, the paint changes from pink to clear, revealing the personal messages and yellow paper beneath. Aragón’s team of UMass Landscape Architecture students with Art for Public Good assembled the butterflies into a public art installation that acts as a visual thermometer of extreme heat and its health impacts in schools and other buildings.

Earlier this year, Duggan Academy students gained experience making climate art with thermochromic paints when they teamed up with Art for Public Good, UMass, and Cooler Communities for "ThermoQuilts." For six weeks, the students worked with their teachers to create a thermal quilt whose squares measure temperate changes within its environment. Similar to sWARM, ThermoQuilts created an opportunity for students learn how warm environments can impact them. For example, students studied heat islands, environments like parking lots and brick buildings that hold more heat than others.
On Saturday, June 1st, sWARM premiered at the Springfield Science Museum where it will live for the next three months until being moved to the Duggan Academy as a display in the school’s main hallway. As Saturday's visitors interacted with the art installation, they also had the opportunity to participate in quizzes, raffles, and science and art activities held by project collaborators. These engagement activities provided valuable information about how to protect yourself, your home, and your community from rising heat.
During the event ceremony, Aragón, Cooler Communities Director Uli Nagel, and Duggan Academy Director of Partnerships Mary Kay Brown shared the story behind project sWARM and thanked the many students and teachers who played an integral role in its success.
“All the work really was students and the teachers,” said Aragón, “You opened the doors to us and Cooler Communities and worked with us to make this project happen. It’s heartfelt and we’re all here with good intentions. It’s important to remember there are people who want to do what’s right," said Aragón.
After a round of applause, Aragón, Nagel, and Brown invited several Duggan Academy students in-attendance to introduce themselves and tell visitors what they gained from the experience. One 8th grader shared that he liked being part of sWARM because it was something he could connect with as he feels the heat in our world just about every day.
Many classrooms at the Duggan Academy lack air conditioning; as a result, rooms can reach as high as 90 degrees on a hot day. Mary Kay Brown recounted that when one middle school class tried to paint the butterflies for the first time, students were astonished to see no pink on their paint brushes. The thermochromic paint immediately turned clear because the classroom was too hot.
A 7th grader told visitors that being part of sWARM helped her understand how heat affects the planet and why it is so important to take care of the earth for one another.

Back at Duggan, students and teachers are supporting one another by discovering innovating ways to reduce heat in their classrooms. Mary Seid, a 7th grade science teacher, shared on Saturday that she and her students are measuring their classroom windows so they can order window films that reflect 95% of incoming light. After installing the films, students will collect data on heat gain reduction. If the experiment proves successful, the class plans to bring this solution to other second floor, south-facing classrooms.
At UMass Amherst, Carolina Aragón is now working with UMass Prof. Ezra Markowitz to study the impact that project sWARM may have on the knowledge and perception of extreme heat by its participating students. Aragón and Markowitz look forward to sharing their results with students and teachers of the Duggan Academy community in the coming months.
Education is the first step to ensuring our environment and communities do not suffer. Art can be a transformational tool for students to learn about the effects of climate change and advocate for the health and wellbeing of their communities. With its educational kit, the leaders of sWARM believe their project has the potential to be replicated in other schools throughout Western Mass, especially those suffering from extreme heat.
SWARM will be open at the Springfield Science Museum this summer through August 31st.
See sWARM in the news!

Watch this video to learn more about project sWARM.
Come see sWARM at the Springfield Science Museum on view until late August.
210 Design Building University of Massachusetts 551 North Pleasant Street Amherst, MA 01003-2901
tel 413-545-2255
- Games & Quizzes
- History & Society
- Science & Tech
- Biographies
- Animals & Nature
- Geography & Travel
- Arts & Culture
- On This Day
- One Good Fact
- New Articles
- Lifestyles & Social Issues
- Philosophy & Religion
- Politics, Law & Government
- World History
- Health & Medicine
- Browse Biographies
- Birds, Reptiles & Other Vertebrates
- Bugs, Mollusks & Other Invertebrates
- Environment
- Fossils & Geologic Time
- Entertainment & Pop Culture
- Sports & Recreation
- Visual Arts
- Demystified
- Image Galleries
- Infographics
- Top Questions
- Britannica Kids
- Saving Earth
- Space Next 50
- Student Center

Rostov-on-Don
Our editors will review what you’ve submitted and determine whether to revise the article.
- Lonely Planet - Rostov-on-Don, Russia
- Fact Monster - World - Rostov-na-Donu, Russia
Recent News

Rostov-on-Don , city and administrative centre of Rostov oblast (province), southwestern Russia . It lies along the lower Don River , 30 miles (50 km) above the latter’s mouth on the Sea of Azov .

The city was founded in 1749 as the customs post of Temernika, when the river mouth was still in Turkish hands. It then became a flourishing trade centre. Between 1761 and 1763 the fortress of St. Dmitry of Rostov was built there, and a town developed around it, near the Armenian settlement of Nakhichevan-na-Donu, which later merged with Rostov. In 1797 town status was granted, and in 1806 it was named Rostov-on-Don. Because of its key position as a transport centre and port, the town grew steadily with the 19th-century Russian colonization and development of the north Caucasus region and conquest of the Transcaucasia .
These functions remain of great importance. The Don River route to the interior was improved by the opening of the Volga-Don Shipping Canal in 1952, linking the town to the entire Volga basin; a dredged channel gives access to the sea. Rostov lies on road, rail, and oil and natural-gas pipeline connections between central European Russia and the Caucasus region. This nodal location and the nearness of the great Donets Coal Basin have led to major industrial development, especially in engineering. Two huge plants make Rostov the largest producer of agricultural machinery in Russia. Other engineering products include ball bearings, electrical and heating equipment, wire, self-propelled barges, road-construction equipment, and industrial machinery. There are ship and locomotive repair yards and a range of consumer-goods industries. Rostov State University was founded in 1917, and there are numerous other institutions of higher education and scientific-research. Pop. (2002) 1,068,267; (2006 est.) 1,054,865.

- Visit Our Blog about Russia to know more about Russian sights, history
- Check out our Russian cities and regions guides
- Follow us on Twitter and Facebook to better understand Russia
- Info about getting Russian visa , the main airports , how to rent an apartment
- Our Expert answers your questions about Russia, some tips about sending flowers

Russian regions
- Adygeya republic
- Astrakhan oblast
- Kalmykia republic
- Krasnodar krai
- Rostov oblast
- Volgograd oblast
- Map of Russia
- All cities and regions
- Blog about Russia
- News from Russia
- How to get a visa
- Flights to Russia
- Russian hotels
- Renting apartments
- Russian currency
- FIFA World Cup 2018
- Submit an article
- Flowers to Russia
- Ask our Expert
Rostov Oblast, Russia
The capital city of Rostov oblast: Rostov-on-Don .
Rostov Oblast - Overview
Rostov Oblast is a federal subject of Russia located in the south of the European part of the country, part of the Southern Federal District. Rostov-on-Don is the capital city of the region.
The population of Rostov Oblast is about 4,154,000 (2022), the area - 100,967 sq. km.
Rostov oblast flag
Rostov oblast coat of arms.

Rostov oblast map, Russia
Rostov oblast latest news and posts from our blog:.
4 December, 2017 / Stadiums and Matches of the World Cup 2018 in Russia .
2 July, 2017 / Rostov-on-Don - the view from above .
13 March, 2016 / Official Look of Host Cities of World Cup 2018 in Russia .
1 February, 2014 / Snow apocalypse in Rostov region .
12 January, 2011 / The most beautiful staircase of Rostov-on-Don city .
History of Rostov Oblast
In ancient times, the territory around the Don River was part of the region called Scythia (the Greeks), Stsitiya or Tanais named after the Tanais River, the present Don River (the Romans), Sarmatia (the Roman historians of the 1st century). In Russian chronicles of the 14th and 15th centuries, this land was called “Field” or “Wild Field”. Since the second half of the 16th century, the Moscow tsars, starting with Ivan the Terrible, already called all Cossack land simply “Don”.
The ancient people settled in the lands along the Don River since the Stone Age. In the 8th-7th centuries B.C., the Scythians began to settle in the steppes to the north of the Black Sea, between the Don and the Danube. Settlements on the territory of the present Rostov region were first mentioned by Herodotus. A lot of archaeological finds were found in numerous Scythian burial mounds: iron swords, daggers, special items of horse decoration, golden and silver items.
In the 6th-5th centuries B.C., the Greeks began colonization of coastal areas of the Black Sea. In 480 B.C., their largest towns (Olvia, Tira, Hersonissos) united in the kingdom of Bosporus with the capital in Panticapaeum (present Kerch). It was engaged in active trade with the Mediterranean towns.
After long and turbulent history with periods of prosperity and decline, the Greek towns fell under the blows of nomadic peoples migrating through the Don steppes from East to West. For several centuries, this flourishing region turned into a wasteland.
More Historical Facts…
In the 4th century, the Avars settled on the Don land. After them the Khazars came here, who founded their settlements and built a fortress called Sarkel. Constantly raiding the southern lands of Kievan Rus, they were a serious threat to the Old Russian state.
Later, the Pechenegs came here and the Polovtsian tribes after them. The Polovtsi captured the steppe areas of the Don, Kuban, the Azov Sea and ravaged the outskirts of Kievan Rus for decades reaching Pereyaslavl, Chernihiv and even Kiev.
In the early 13th century, the first wave of the Mongol invasion reached the Russian land. In 1223, the combined forces of the Russian princes and the Polovtsi clashed with the Mongols in the Battle of the Kalka River (the tributary of the Kalmius, which flows into the Azov Sea to the north of the Don). Due to poor coordination Russian and Polovtsian troops suffered a complete defeat.
It was the beginning of the period of Russian history known as the Mongol yoke, which lasted until 1480. In the 1470s, the Azov steppes were occupied by the Turks of the Ottoman Empire and became a constant threat on the south-eastern borders of Russia.
In the mid-16th century, runaway serfs began to settle in the area of the Don River. Later, they became known as the Don Cossacks. In 1560, the Cossack town of Cherkassk was founded. Gradually, from the late 16th - early 17th centuries, the Cossacks began to cooperate with the Russian military, economic and political systems.
In the 18th century, the land of the Don Cossacks became part of the Russian Empire and lost its autonomy. The Cossacks actively opposed this fact, which led to the peasant wars and uprisings headed by Stepan Razin, Kondrat Bulavin, Emelyan Pugachev. The Cossacks were included in the Russian army as irregular troops. They had special rights and privileges. The Cossacks were good soldiers and participated in all military campaigns conducted by the Russian Empire.
By the end of the 18th century, about 225 thousand people lived in the Don region, half a century later - 775 thousand. By the middle of the 19th century, two centers formed on the Don: Novocherkassk (military and administrative center) and Rostov-on-Don (industrial and commercial center). In 1859, the population of the region was about 900 thousand.
During the Russian Civil War, this region was one of the centers of the White movement and became the scene of bloody battles. The final blow to the Don Cossacks, who survived in the Soviet Union after the Civil War, was decossackization, dispossession and famine of 1932-1933. Rostov Oblast was established in 1937.
The shooting of a peaceful demonstration in Novocherkassk became the blackest page in the history of the 1960s. On June 2, 1962, employees of the local electric locomotive plant with their families came to the rally with demands for higher wages. In response, the troops were deployed in the city. When people tried to break through to the building of the city executive committee, the troops opened fire. According to official figures, 26 people were killed and 87 wounded.
Pictures of Rostov Oblast

Rostov Oblast - the land of the Cossacks
Author: Igor Tartanov

Paved road in the Rostov region
Author: Eugeny Gromenko

Rostov Oblast landscape
Author: Poluyan Sergey
Rostov Oblast - Features
Rostov Oblast is located in the southern part of the East European Plain and partly in the North Caucasus region, occupying a vast area in the river basin of the Lower Don. The region stretches for 470 km from north to south and 455 km from west to east.
The climate is temperate continental. The average temperature in January is minus 3 degrees Celsius, in July - plus 23.4 degrees Celsius. The nature of the region is diverse. Steppes, forests, the Don River, the coast of the Azov Sea are inhabited by more than 100 species of animals and fish.
Rostov Oblast lies mainly in the steppe zone with semi-deserts in the south-east. About 6% of the territory is covered by forests and bushes, most part of the region is occupied by farms engaged in agriculture on the fertile black soil. The largest cities are Rostov-on-Don (1,135,000), Taganrog (245,600), Shahty (226,300), Volgodonsk (168,200), Novocherkassk (163,700), Bataisk (126,800), Novoshahtinsk (103,400).
Rostov Oblast is rich in various mineral resources. The most important among them are fuel resources. Coal deposits of eastern Donbass are well-known. About 90% of coal is anthracite, which has the highest calorific content of all types of coal except for graphite. There are deposits of natural gas and oil, phosphorites.
Development of the region’s economy is based on such factors as favorable economic and geographical position (connecting the center of Russia with the North Caucasus and Transcaucasia), the availability of natural resources, high availability of labor resources, well-developed transport infrastructure.
Rostov Oblast is one of the leading regions of Russia in the level of development and variety of industries. The region’s economy is based on agricultural industry, food-processing industry, heavy and agricultural machinery, coal mining, automotive industry. Rostov Nuclear Power Plant is located about 12 km from the city of Volgodonsk.
The main treasure of the region is its fertile black soil occupying almost 65% of the territory, the fertile layer can be up to 1.5 meters. Rostov Oblast is the second largest producer of agricultural products in Russia (wheat, maize, rice, millet, buckwheat, soybeans, vegetables, fruits, and berries).
Sunflower is the main industrial crop. This region produces more than 20% of all sunflower seeds in Russia. Milk producing, cattle-breeding, sheep-breeding, horse-breeding and poultry farming are the most developed.
The federal highways E115 - M4 “Moscow - Novorossiysk”, E50 - M19, E58 - M23 “Kishinev - Rostov”, E40 - M21 “Volgograd - Kishinev” pass through the territory of the Rostov region. The railway routes to the south of Russia pass through the province - to Krasnodar krai (the Azov and Black Seas) and Ukraine. The main waterways are the Don and Seversky Donets. Taganrog, Azov and Rostov-on-Don are large sea ports.
Tourism in Rostov Oblast
Rostov Oblast attracts tourists by its rich history, charming nature, unique Cossack culture. The Don River, one of the largest rivers in Europe, with its branches and tributaries; Taganrog Bay of the Azov Sea; Tsimlyansk reservoir; Don and Azov steppes create a memorable image of the Rostov region.
In total, there are more than 8,000 objects of archaeological heritage of federal importance in this region. The cities of Rostov-on-Don, Taganrog, Azov, Novocherkassk are the main tourist centers.
Unique collections of Scythian gold are exhibited in regional museums as well as excellent ethnographic collections representing variety of national cultures of the Don region, items of everyday life of the Cossacks, pictures made by famous painters of the 18th-20th centuries.
The history of the region is closely linked to the famous Don Cossacks of the 16th-18th centuries (Yermak Timofeyevich, Stepan Razin, Kondraty Bulavin, Yemelyan Pugachev, Matvey Platov), as well as Emperors Peter I and Alexander I. Anton Chekhov, one of the greatest writers of short fiction in history, was born here. The Don River area is described in the works of Alexander Pushkin and Mikhail Sholokhov.
Numerous Orthodox churches and monasteries are visited by thousands of pilgrims every year. The climatic conditions of Taganrog Bay create favorable conditions for the development of sanatorium and resort industry.
The main places of interest located outside Rostov-on-Don and Taganrog include:
- Azov Historical-Archaeological and Paleontological Museum-Reserve,
- Azov Museum of Local Lore,
- Gunpowder Cellar in Azov,
- Archaeological Museum-Reserve Tanais with the excavation of an ancient town and necropolis,
- Aksai Museum of Military History,
- Museum of the History of the Don Cossacks and the monument to Yermak in Novocherkassk,
- State Natural Reserve “Rostovsky”,
- Manych-Gudilo - the largest lake in the Rostov region.
Rostov oblast of Russia photos
Rostov Oblast scenery

Stud farm named after Kirov in Rostov Oblast
Author: Alena Amplieva

Traveling on the roads of the Rostov region
Author: Nikolay Sevastyanov
Churches in Rostov Oblast

Church of the Don Icon of Mother of God in Novoshakhtinsk

Church in Rostov Oblast
Author: Vlad Rost
The comments of our visitors
- Currently 2.77/5
Rating: 2.8 /5 (168 votes cast)
Take Part in the Project Titan Collaborative Art Jam
- Share Share on Facebook
- Pin it Pin it
- Tweet Tweet
- Share Share on LinkedIn
- Post Submit to Reddit

Ready to get your art jam on? Sign up for Project Titan, taking place March 28 – June 7.
A unique opportunity to hone your Unreal Engine skills—or for newbies, to learn the engine from scratch—Project Titan is a two-and-a-half-month collaborative art jam that provides a fantastic opportunity to learn and sharpen your open world game dev skills.
We’ve created a base open world landscape ready for you to fill with your own assets and characters. You’ll have 10 weeks to contribute to the game, collaborate with others, and receive support from Epic and other game industry experts.
The final result will be released as a free open world sample project for everyone to download and explore.
Be part of a unique experience to create something incredible. We made the map—you’ll make it Unreal.
Who Can Take Part?
This challenge is open to everybody, regardless of prior knowledge of Unreal Engine, skill level, or area of expertise. It’s an experimental, collaborative, and community-driven project, intended to provide a fun learning opportunity for all.
Whether you’re a total Unreal noob, student, experienced UE dev, or someone who’s coming across from another engine, this challenge is a great way to learn Unreal Engine, improve your skills and show off your work.
What Will You Get Out of It?
Project Titan offers a unique learning opportunity that will immerse you in open world game development. You’ll gain experience in working on large open world projects, setting up your own remote Unreal Engine studio, and learning how open world games are set up and made.
The project offers the chance to work directly with Unreal Engine and game industry experts, and get feedback and help throughout—ideal for anyone new to game development or looking to hone their artistic or technical skills.
It’s also an opportunity to contribute to a sample project in a fun and collaborative way, join forces with fellow artists, and make connections around the world.
And by participating in the challenge, you’ll receive a free 6-month subscription to Adobe Substance 3D Painter and Modeler, enabling you to easily create and texture 3D models for the project. Painter is the go-to tool for texturing used by beginners and seasoned professionals alike, integrating with Unreal Engine and UEFN to simplify the process of bringing high-quality 3D assets from concept to game.
How to Apply (and Other Important Information)
Here’s everything you need to know about taking part in Project Titan.
- The project is in Unreal Engine 5.
- The challenge is open from March 28 – June 7.
- Environment/Level Design
- Mark your calendars for March 28—the project will kick off with an Inside Unreal Takeover livestream.
- Every Friday from April 5 to June 7, there will be a weekly livestream providing feedback, highlighting great work from the week, and talking about development.
Register for Project Titan Today
- Share this article

About the author ArtStation Team

- Inspiration
Ubisoft Avatar: Frontiers of Pandora

Digital Extremes Warframe

Ubisoft Prince of Persia: The Lost Crown

Join Us At GDC 2024

Ubisoft Assassin’s Creed Nexus VR Art Blast

ROCKFISH Games EVERSPACE 2 Art Blast

Remedy Entertainment Alan Wake 2 Art Blast

Guerrilla Horizon Call of the Mountain Art Blast

Ascendant Studios Immortals of Aveum Art Blast

Insomniac Games Marvel’s Spider-Man 2 Art Blast

- Artstation Updates
Neo Tokyo: Exponential Reality Challenge Winners & Honourable Mentions

Join ArtStation Game Week 2023

CI Games Lords of the Fallen Art Blast

- Development Updates
New Community Wall: A Homepage Experience Built for You

Get Your 2023 ArtStation Glow Up

3…2…1…Action! Join Film & TV Week From August 28 to September 1

- Artist Profiles
Meet the artist: Shaddy Safadi

- 3D Modeling & Sculpting
- Visual Effects & Animation
Above and Beyond: The Blizzard Cinematics Team Lends a Helping Hand

Art of the Game: Naughty Dog artists show off Nathan Drake for UNCHARTED 4
Join the thousands of artists with a head start.
Get free tutorials, tips, motivational articles, news and resources delivered to your inbox.
- Advertising
Shine Bright Mural Completed • Artist Signing Happening June 12th!

Arts & entertainment

Celebrated Artist Okuda San Miguel to Sign the Masterpiece at 5:30 PM
- Robert E Martin

Okuda San Miguel • Shine Bright Mural Project
Photo by mike kolleth • kolleth photography, comments (0), todays events.

Movies on Main • Midland
13th June, 2024

Sarah McLachlan & Feist
Current issue.

Friday Night Live • Summer Music Festival Spans the Distance of Time

Midland Center Showcases the Grit, Fire & Passion of NEWSIES • The Broadway Musical June 26-29th
Popular articles.

Experience Great Art in the Great Outdoors with the Public Art Passport
31st May, 2024

Biden & Granholm Drain Entire Northeast Gas Reserve in Bid to Lower Prices Over 4th of July Holiday
24th May, 2024

Dillon Clark • The Voice of the Saginaw Spirit
14th May, 2024

Saginaw Spirit Cap Cinderella Season Winning the Memorial Cup!
4th June, 2024
Upcoming Events

Frankenmuth Funtown Chow Down Food Truck
Thursdays at uptown • live music at 'the fountain'.
- No item found
Don’t have an account?
Create an account
Already have an account?
Forgot Password
IMAGES
VIDEO
COMMENTS
Her assignment asks you to reexamine what those terms even mean by constructing an image of the so-called natural world. Instructions. 1. Gather materials to make a constructed landscape of your choosing 2. Combine natural elements with things that reference natural landscape 3. Take lots of photos, but only upload your favorite one using # ...
Pre-order our book YOU ARE AN ARTIST (which includes new assignments!) here: http://bit.ly/2kplj2hThis week's assignment comes from artist Paula McCartney, w...
One of our learning objectives is studying Lines and the Elements of Art. I wanted a simple line project that incorporated many different types of lines while also reinforcing landscapes, the other big learning objective in art. ... create various areas of landscapes, background, middle ground and foreground. Then various lines were added in ...
The artwork displays a clear meaning and style of the assignment. Artwork communicates surrealism. Student went above and beyond in the use of Art Elements and Principles to convey a clear message, showed understanding of the task, and solved the task in the most creative way. Artwork shows individuality and emotion involvement.
Here are ways to teach landscape art. 1. Start with the sky: In this form of landscape art, the sky is the main feature. So naturally, students plan out their landscape by first painting/coloring the sky. I like the swirl approach, it creates a mystic feel. It also gives you a chance to discuss mixing warm colors.
Explain that the landscapes they create should have a clear foreground, middle ground, and background (like their models), and that they should use both overlapping and scale, or relative size, to create spatial depth as they saw in Landscape with a Calm. 11. Pass out art supplies for the landscape painting activity—tempera paints, brushes ...
EARTHWORKS. LAND ART. EARTH ART. Whatever you call it, we look at what it means to make art out in nature and in the world from the 1960s to today. To suppo...
Over 30 lessons and 5+ hours of content uploaded! New sections include; Color - master various color techniques such as warm & cool, mixing perfect greens, color vibrations and more. Design & composition - a key to painting successful landscapes is design & composition. This section delivers the goods!
The Art Assignment Constructed Landscape - Paula McCartney. This week's assignment comes from artist Paula McCartney, whose work explores the boundaries between the natural and unnatural. Her assignment asks you to reexamine what those terms even mean by constructing an image of the so-called natural world.
This week's assignment comes from artist Paula McCartney, whose work explores the boundaries between the natural and unnatural. Her assignment asks you to reexamine what those terms even mean by constructing an image of the so-called natural world. INSTRUCTIONS 1. Gather materials to make a constructed landscape of your choosing 2.
Explore LearningMedia Resources by Subject. This week's assignment comes from artist Paula McCartney, whose work explores the boundaries between the natural and unnatural. Her assignment asks you to reexamine what those terms even mean by constructing an image of the so-called natural world.
Step 1: Get to Know the Medium. I begin the lesson by introducing my students to watercolor terms, supplies, techniques, and artists. We learn vocabulary, discuss the different types of brushes, papers, and paints, and look at master artists.
Easy How to Draw a Farm Tutorial and Farm Coloring Page. 1 2. STOP THE SUNDAY SEARCH. Drawing Landscapes is fun and easy when you have step by step instructions. Free PDF downloads are available for each and every project.
Landscapes. Our Landscape lesson plans are designed to expand your students' knowledge of perspective, atmosphere, style, and design. Expose your students to the styles of famous landscape artists like Mia Charro, Ton Schulten, and Friedensreich Hundertwasser, and give them the tools to create their own artworks emulating the style of the ...
4.9. (53) $7.00. Zip. This is an in-depth look at creating a watercolor landscape painting including a lesson and activities on practicing watercolor painting techniques. Perfect for an Intro to Painting class in middle school art or high school art classes. Through this lesson students learn various watercolor techniques and how to apply them ...
In week one, Steve will teach you a structural approach to drawing the landscape. You will learn how to apply the two crucial aspects, gesture and structure, in building your landscape art. 1h 9m 26s. Week 2: The Importance of Values and Gradation With Steve Huston. In week two, Steve will lecture on how to work with gradation to strengthen ...
Drawing Landscapes Lesson Plan and Resources. Subject: Art and design. Age range: 7-11. Resource type: Lesson (complete) File previews. zip, 21.38 MB. Aimed at year 4 but could be easily adapted. Looking at a variety of famous landscape artists. L.O's include developing perspective, texture, line and tone.
One 9″ x 12″ piece of peach (or tan) construction paper for the background sky. One 4″ x 12″ piece of yellow, orange, red and brown construction paper for the torn layers. Glue. Cardboard scraper (3″ long) Small plate of white and black tempera paint. Small plate of yellow, orange, and red or magenta tempera paint.
Ted Harrison Winter Landscape Art Project with Activity book & Lesson Plans. 1st to 4th graders will learn about color theory and landscape features in this Ted Harrison 3 lesson art unit. There are 2 low prep project ideas with instructions in the teacher's guide.This 3 Lesson Activity book includes:2 levels of activity books (Differentiated ...
"These landscapes are my present moment," she said in an interview ahead of her exhibition "Tree Farm" at Galerie Eva Presenhuber in Zurich (on view until July 20, 2024). "They are very ...
Schools across Western Mass are feeling the effects of extreme heat in the classroom. UMass Amherst Associate Professor, Climate Artist, and Art for Public Good Founder Carolina Aragón teamed up with Cooler Communities and the Duggan Academy in Springfield to co-create "sWARM," a participatory art project that aims to raise awareness and helps find solutions to this problem.
Rostov-on-Don, city and administrative centre of Rostov oblast (province), southwestern Russia. It lies along the lower Don River, 30 miles (50 km) above the latter's mouth on the Sea of Azov. The city was founded in 1749 as the customs post of Temernika, when the river mouth was still in Turkish hands. It then became a flourishing trade centre.
Rostov Oblast is the second largest producer of agricultural products in Russia (wheat, maize, rice, millet, buckwheat, soybeans, vegetables, fruits, and berries). Sunflower is the main industrial crop. This region produces more than 20% of all sunflower seeds in Russia. Milk producing, cattle-breeding, sheep-breeding, horse-breeding and ...
Ready to get your art jam on? Sign up for Project Titan, taking place March 28 - June 7. A unique opportunity to hone your Unreal Engine skills—or for newbies, to learn the engine from scratch—Project Titan is a two-and-a-half-month collaborative art jam that provides a fantastic opportunity to learn and sharpen your open world game dev skills.
The Shine Bright Mural Project is thrilled to announce the completion of the vibrant and inspiring Shine Bright Mural, a stunning new public art installation by internationally acclaimed artist Okuda San Miguel. This mural, located in Old Town Saginaw, is a breathtaking addition to our city's cultural landscape, and it stands as a testament to the power of art to transform and uplift communities.
Rostov-on-Don is a port city and the administrative centre of Rostov Oblast and the Southern Federal District of Russia.It lies in the southeastern part of the East European Plain on the Don River, 32 kilometers (20 mi) from the Sea of Azov, directly north of the North Caucasus.The southwestern suburbs of the city lie above the Don river delta.Rostov-on-Don has a population of over one million ...
Platov South Russian state polytechnic university (NPI) was established on October 18, 1907 with the greatest approval of Nicholas II as Don Polytechnic Institute. DPI was the first higher educational institution in the south of Russia. The university is the only higher educational institution in Russia created at the initiative of the Cossacks ...