Unsupported browser
This site was designed for modern browsers and tested with Internet Explorer version 10 and later.
It may not look or work correctly on your browser.
- Presentations

How to Print Your PowerPoint Slides (The Complete Guide)
- Bahasa Indonesia
PowerPoint presentations are often shared on a projector or display. But sometimes, you might need to create a printed copy for your audience. It's great to have a physical copy of your presentation for reference.

When it comes to printing slides in PowerPoint, there are three key formats that you can print your slides:
- Full-Page Slides . This is basically the same view as the standard view in PowerPoint, simply printing each slide on its own page.
- Notes Pages . If you use the important Speaker Notes feature to add reminders on what to say, you can print Notes Pages to keep them nearby. Imagine keeping these on the podium while speaking.
- Handouts . You can save paper and ink by printing Handouts, which include many slides on the same page with space to write notes.
In this tutorial, I'll teach you how to print a PowerPoint. When it's crunch time, and you need to create a physical copy of your presentation, use this complete guide.
Why Print Your PowerPoint Slides?
Because PowerPoint often lives in digital format, you might be wondering why you might want to print the slides. Here are some situations when you should consider printing your PowerPoint slides:
- Printing your presentation can help you spot errors or typos in your presentation. I always find something in a printed copy that I miss on-screen.
- Hand out copies of your presentation for the audience to keep after the meeting or to review beforehand.
- Maybe you don't use PowerPoint for sharing presentations on screen. Maybe instead, you use it as a simple tool to design handouts or posters.
Need Help? Download Our New eBook on Making Great Presentations (Free)
We also have a useful compliment to this tutorial. Before reading on, download our FREE eBook: The Complete Guide to Making Great Presentations . It'll help you write, design, and deliver the perfect presentation.

Now, we'll look step-by-step at how to print your PowerPoint slides in a variety of formats and styles, first in a quick tutorial video, then in written format.
How to Quickly Print PowerPoint Slides (Watch & Learn)
Let's jump straight into these tips in the screencast below. I'll walk you through how to print your slides in a variety of styles. I'll show you how to print a PowerPoint presentation in each of the formats discussed above and create PDF versions.

Now, let's dive into a written walkthrough of how to print slides.
The Basics of Printing Your PPT Slides (From Within PowerPoint)

The tutorial features the Botany PowerPoint Presentation from Envato Elements. This template has over 50 unique slides where you can put your information. Plus, it comes with icons, charts, graphics, and picture placeholders. The modern and stylish design makes the template suitable for any presentation theme.
Before we tackle working with many print formats, let's learn the basic choices you should make before you print any presentation. To get started, go to the File > Print menu option:
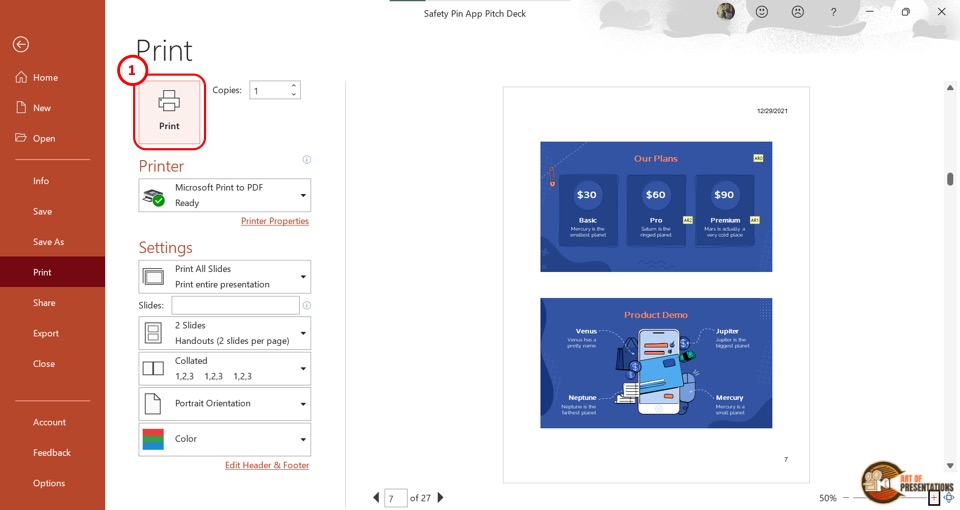
1. Choose Your Printer

Above all, you should choose the printer that you want to send your presentation to. If you work in an office environment with many network printers, always double-check this setting to ensure that the file won't land on a co-worker's desk!

Click on File in the toolbar at the top of your screen. When you click on this option, there's a Print… When you click on this option, a window appears. In the window, click on the Show Details button. Once the Show Details button is selected, you’ll be able to see more options to the right of the window.

At the top right, you’ll see the Printer: field. Click on the arrow in this field to choose a printer.
2. Choose the Pages to Print
You may not want to print every slide in your presentation. The good news is that PowerPoint makes it easy to choose a selection of pages to print.

In the window, you’ll see a Slides: section. In this section, there are different options you can choose to print your slides. The default is the All option.
To choose a specific slide or slides, choose the Custom Range: option and type the slide numbers in the field. When typing the numbers, put a comma in between the slide numbers. For example, you should type the slide numbers like this 2,5,6,7.
3. Choose Orientation and Color Settings
Orientation describes the direction that your content prints. You can choose between Portrait and Landscape orientation. Portrait orientation means the paper is taller than it is wide, while landscape orientation is wide.

The Orientation: section is where you can choose portrait or landscape printing options. There are two buttons in this section. Choose the right one for you.
Output: this is where you can choose what color you want your slide printed in. in this field, there's an arrow. Click on the arrow to get more options.
You may want to learn more about working with PowerPoint multimedia before continuing on:

Once you've set up those choices, you can move on to other settings for how your printed slides appear. Let's move on from the basics to learn how to print a PowerPoint in many different formats.
How to Print Full-Page PPT Slides in PowerPoint
Have you ever wondered why PowerPoint won't print a full page? This section should help.
Full-page slides are simply printed copies of your slides, one per page. This is a great choice when you need to review the slide before presenting.

As I mentioned earlier, sometimes, seeing the slide away from your computer can help you catch errors or rethink the content.
Print PowerPoint Slide Handouts
What are handouts in PowerPoint? Slide handouts are an ideal choice for printed copies. It's a great way to fit many slides on the same page and conserve paper in the process.

Use PowerPoint slide handouts for reference copies to keep your place in the presentation or to review your PowerPoint for typos and misspellings.
There's a Layout: field in the print window, and there are arrows. Click on the arrows. When you click on the arrows, you’ll see many options. Choose the right option for you. In this menu, you’ll see the Notes option. Select this option to print your notes with your slides.
How to Print Your PowerPoint as a PDF
One of the most popular questions for exporting and " virtually printing " a presentation is to print a presentation as a PDF.

To save your PowerPoint as a PDF, click on the File option in the toolbar at the very top of your screen. When you click on File , a menu drops down. Choose the Save As… option.
After clicking on this option, a window appears. Next, in the File Format: field, choose the PDF option. Finally, click on the Export option to save.
Recap and Learn More PowerPoint Skills
This tutorial can serve as your reference guide when it's time to take your presentation from screen to hard copy. Whether it's notes pages, handouts, or another view, printing your slides is a necessary skill for many presentations.
If you were interested in this tutorial, don't miss out on these other tutorials to help you build your PowerPoint skills :

Or download one of our professional PowerPoint templates to help you design a great presentation quickly:

Download Our New eBook on Making Great Presentations (Free PDF)
We have the perfect complement to this tutorial, which will walk you through the complete presentation process. Learn how to write your presentation, design it like a pro, and prepare it to present powerfully.
Download our new eBook: The Complete Guide to Making Great Presentations . It's available for FREE with a subscription to the Tuts+ Business Newsletter.

The Best Source for PowerPoint Templates (With Unlimited Use)
Envato Elements is the top source for digital elements. If you frequently make presentations, then it’s the best deal for you. So, what's Envato Elements? It’s a subscription service where you pay a low monthly fee, and you have access to unlimited digital elements .
Explore Envato Elements

These digital elements included premium PowerPoint presentation templates, fonts, audio, images, and more. All the elements are high quality and made by professionals. So, this subscription can save you time if you’re in a creative field. Instead of making your own, you’ll be using professional elements.
Print Your Premium PowerPoint Template Today!
After reading this guide on how to print PowerPoint slides, try following it for your next presentation. Also, consider saving time using a premium Envato Elements template when working on your next project.
Editorial note : This post was originally published in October of 2017. The written content has been comprehensively updated by Sarah Joy .

How to Print a PowerPoint Presentation? [A Complete Guide!]
By: Author Shrot Katewa
If you use Microsoft PowerPoint to create your presentations, there will be a point in time when you will need to print the presentation that you have created! Regardless of whether you print a physical copy or a PDF version of your presentation, you need to know the steps required to print a PowerPoint presentation!
To print a PowerPoint presentation, click on the “File” tab. Then, click on the “Print” tab in the “Backstage View”. Choose the slides that you need to print, adjust the settings, select the printer, and click on the “Print” button.
In this article, we shall understand the process to print a PowerPoint presentation in further detail. We will look at things like how to print your presentation with notes, how to create handouts, and how to print multiple slides on a single page!
That, and much more in this detailed article on printing a PowerPoint presentation!
So, let’s get started, shall we?
1. How to Print a PowerPoint Presentation?
Let’s get straight to the important part of this article! How exactly does printing in PowerPoint work?
Microsoft PowerPoint offers a simple and quick printing feature. By default, one slide will print on a single sheet of paper. However, there are options provided that can help you save paper by printing multiple slides on a single sheet of paper. We shall take a look at all these settings in a little while.
You can also choose to print notes along with the slides. This can be super helpful when you want to prepare for your presentation and you don’t have access to the soft copy of the presentation file!
But, how exactly does the process to print a presentation work? Let’s explore the step involved for both Windows and Mac in the below sections –
1a. How to Print a PowerPoint File on PC
In a Windows PC connected to a printer, you can print a PowerPoint file very easily. All you have to do is follow the 3 simple steps.
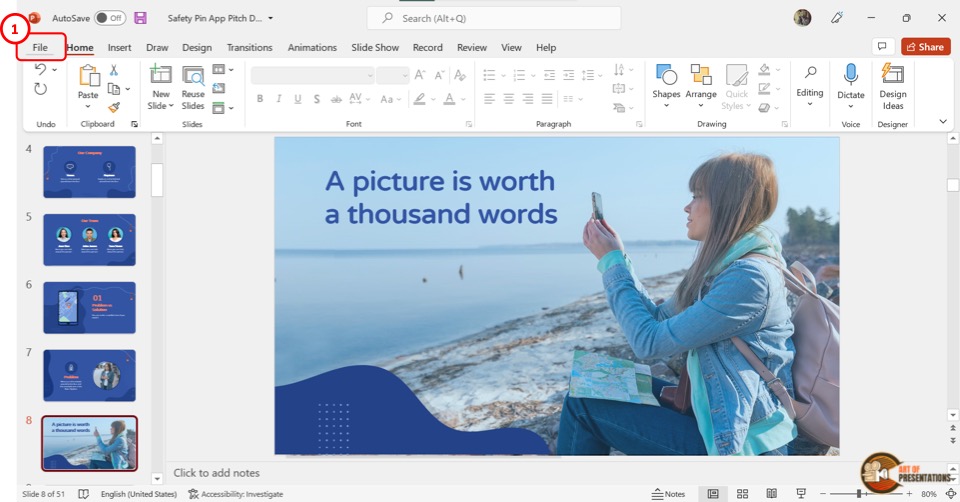
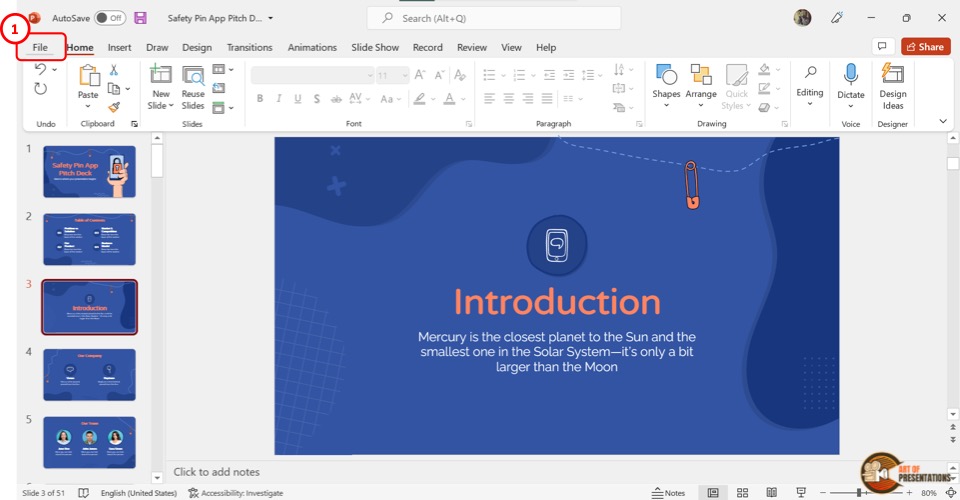
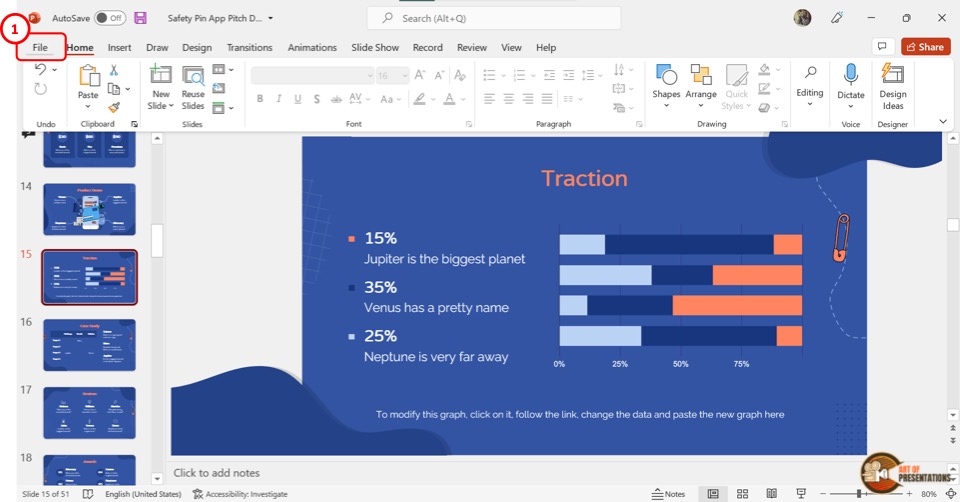
Step-1: Click on the “File” tab
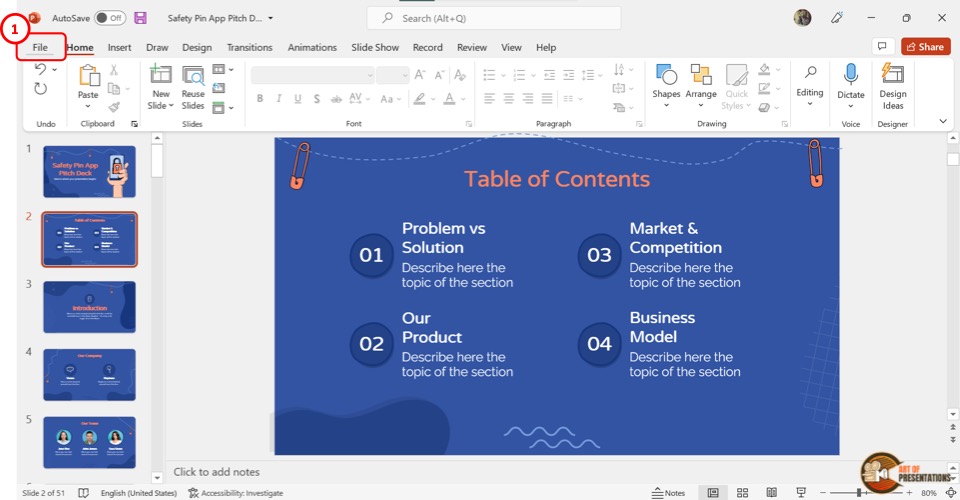
In the Microsoft PowerPoint document, click on the “File” tab. It is located on the left side of the menu bar at the top of the screen.
In the “File” menu, click on the “Print” option from the sidebar on the left side of the screen.
Step-2: Select preferred settings
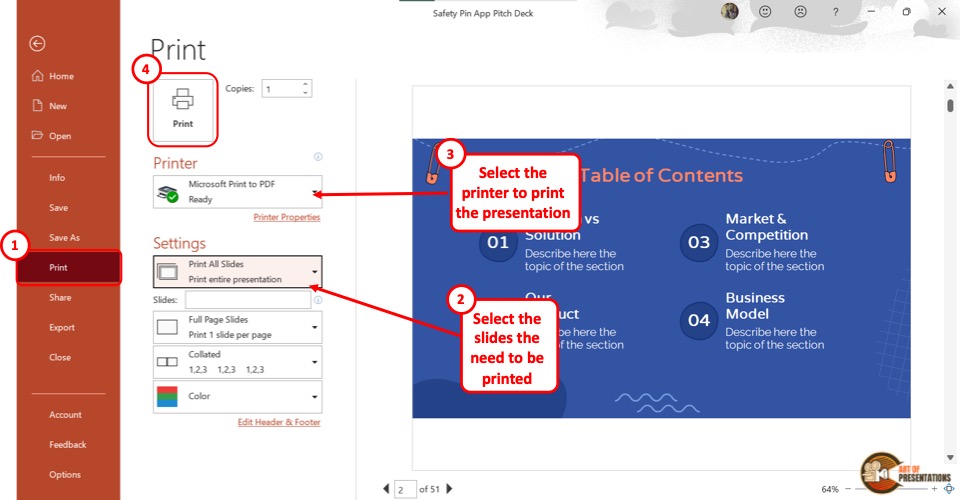
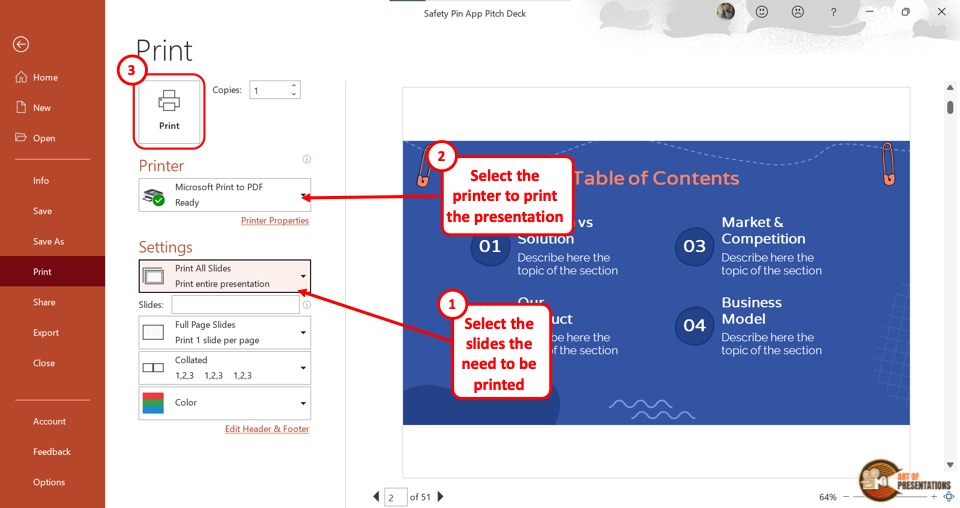
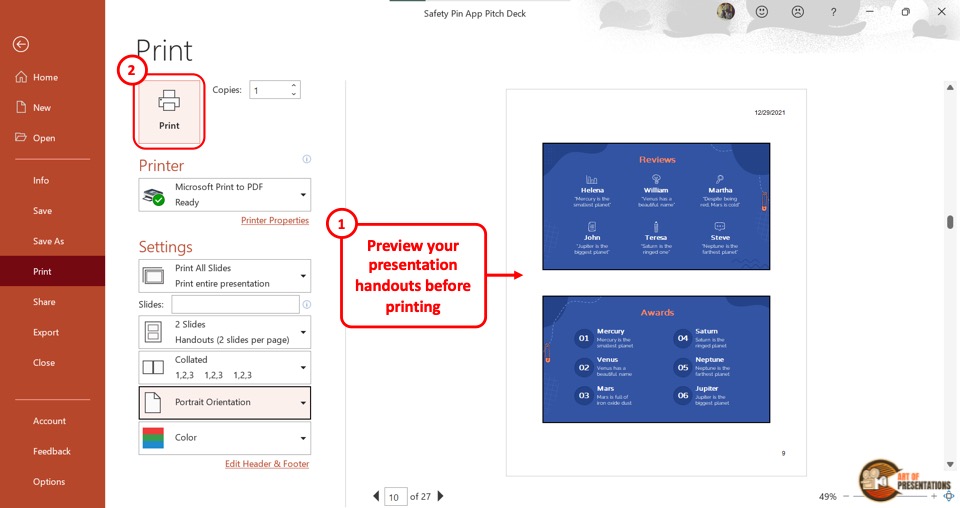
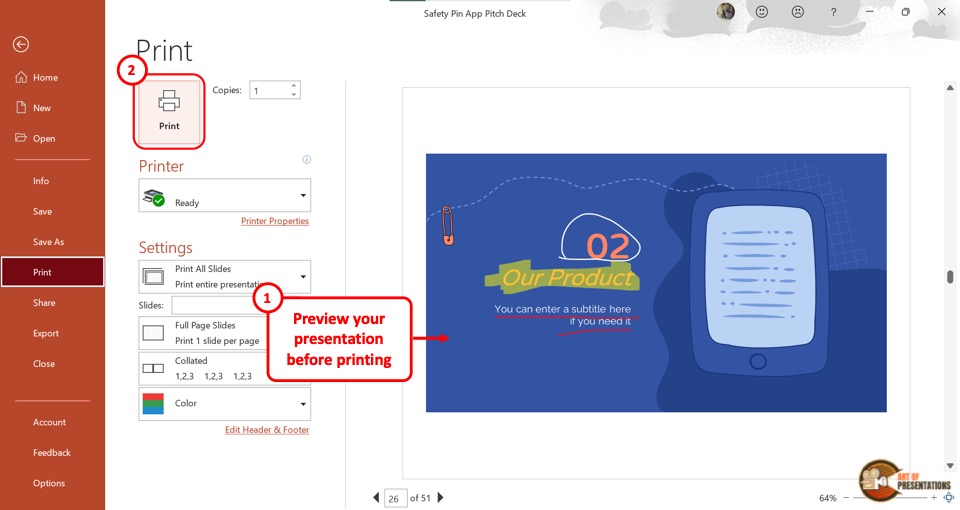
The “Print” option will show you a print preview as well as print settings on the screen. Under the “Settings” option, you can select your preferred settings.
If you don’t have a printer connected to your computer, you may need to first set it up. If you don’t know how to do that, check out this article on how to set up your printer .
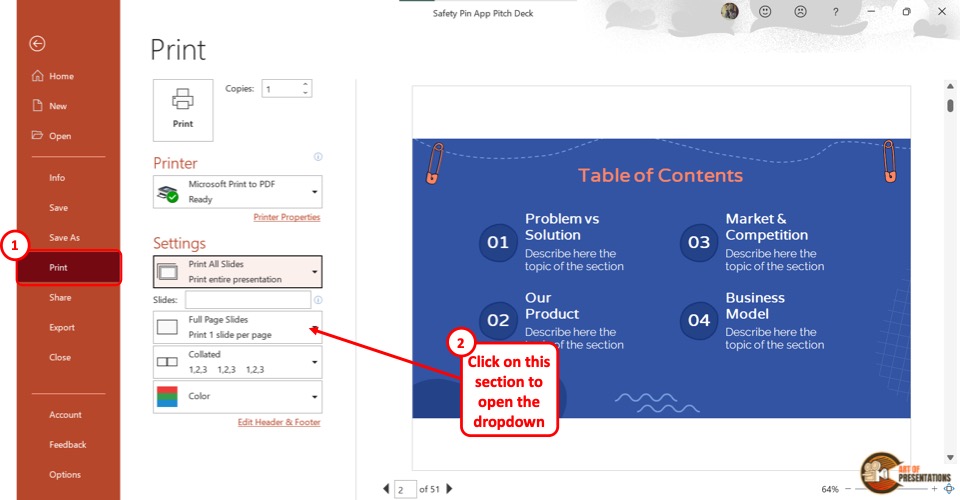
Click on the “Print All Slides” box to select the specific slides that you want to print. You can also click on the “Full Page Slides” button to select the number of slides you want to print on each page.
Step-3: Click on the “Print” button
Now all you have to do is click on the “Print” button at the top of the screen to print a copy of your PowerPoint presentation (as shown in step 2).
1b. How to Print a PowerPoint Presentation on Mac?
Microsoft PowerPoint has a quite simple process for printing a presentation on Mac. Follow the 4 easy steps.
Step-1: Click on “File”
In the menu bar located at the top of the screen, click on the “File” tab to access the dropdown menu. Select the “Print” option from the dropdown menu. This will open a “Print” dialog box.
Step-2: Click on the “Show Details” option
The next step is to click on the “Show Details” option located at the bottom of the “Print” dialog box.
Step-3: Select your preferred settings
Now all you have to do is change the settings according to your preference. You can select how many copies to print by clicking on the “Copies” box.
There are also other settings that you can change like “Paper Size” , “Layout” and “Orientation” . You can also click on the “Slides” option to select which slides to print.
Step-4: Click on the “Print” option
The final step is to click on the “Print” option in the right corner at the bottom of the “Print” dialogue box.
2. Shortcut to Print a PowerPoint Presentation
For printing out a PowerPoint presentation very quickly, you can use the shortcut keys. All you have to do is follow the 2 easy steps.
Step-1: Press the “Ctrl+P” keys
The first step is to open the PowerPoint presentation that you want to print. Then press the “Ctrl+P” keys on your keyboard to open the “Print Preview” screen.
Alternatively, you can press the “Ctrl+Shift+F12” keys on your keyboard to access the print option.
Step-2: Click on “Print”
Now all you have to do is click on the “Print” button at the top of the “Print Preview” screen. This will print the presentation slides with the default settings.
3. How to Print Multiple Slides Per Page?
Using the “Handouts” feature in Microsoft PowerPoint, you can print multiple slides per page. All you have to do is follow the 3 quick steps.
Step-1: Click on the “File” menu
The first step is to click on the “File” option in the menu bar located at the top of the screen. In the “File” menu, click on the “Print” option from the sidebar on the left side of the screen.
This will open the “Print Preview” screen.
Step-2: Click on the “Full Page Slides” box
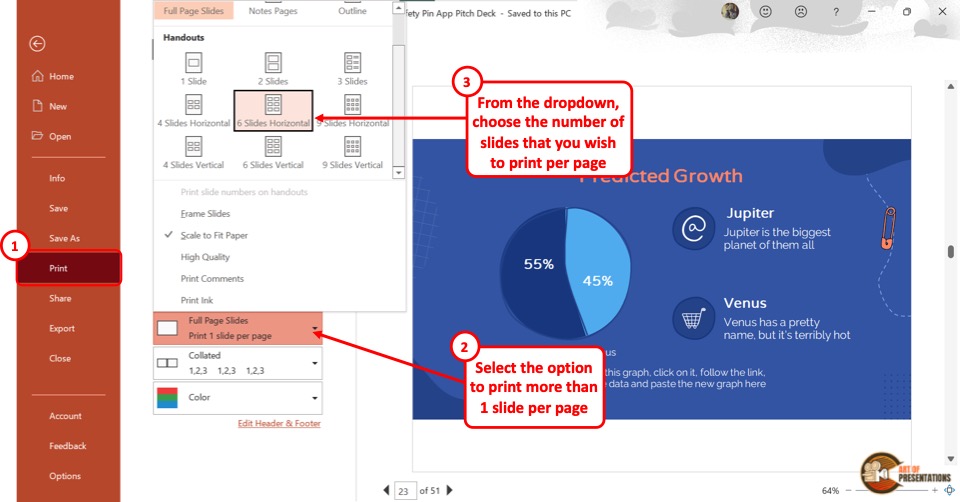
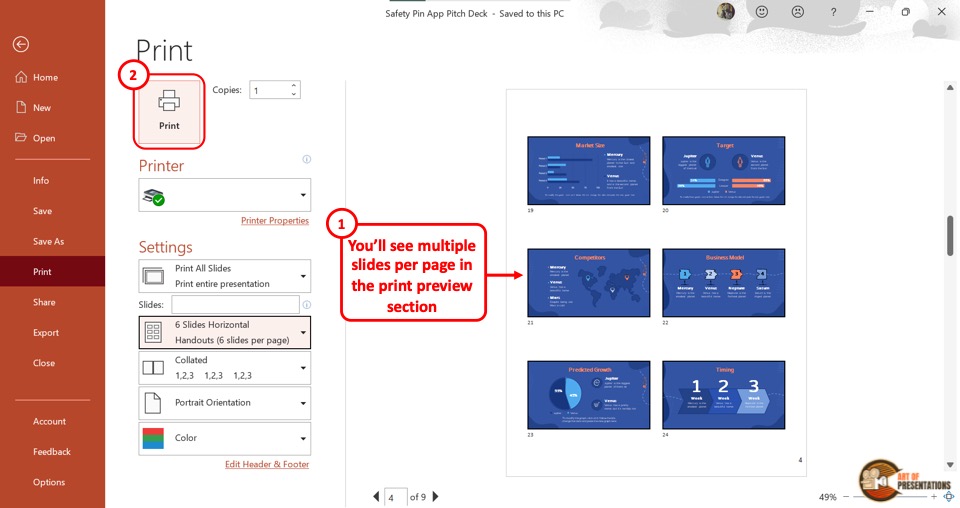
Now you have to click on the “Full Page Slides” box under the “Settings” option in the “Print Preview” screen. This will open a dropdown menu. Click on any option under “Handouts” that you prefer. There are nine different options to choose from.
You can print from one to nine slides per page.
Step-3: Click on “Print”
After selecting your preferred number of slides per page, all you have to do is click on the “Print” button at the top of the screen to print the PowerPoint presentation.
4. How to Print PowerPoint Slides with Notes?
Microsoft PowerPoint offers the feature to take notes for each slide. These notes can be helpful for both the presenter and the audience.
The steps for printing PowerPoint slides with notes are slightly different on PC and Mac.
To print PowerPoint slides with notes on PC, follow the 3 easy steps.
Step-1: Click on the “Print” option
In the Microsoft Powerpoint presentation, click on the “File” tab from the menu bar. Then click on the “Print” option to access the print settings.
Step-2: Click on the “Notes Pages” option
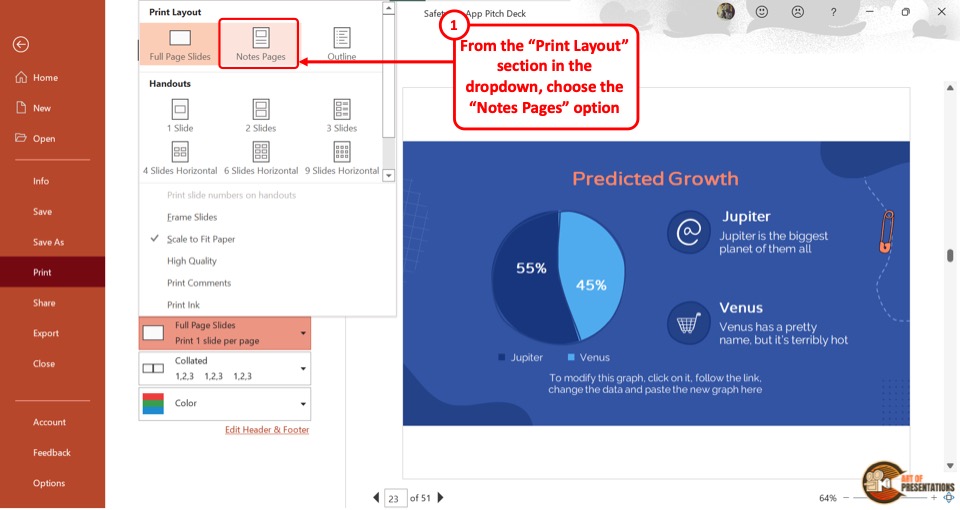
Under the settings option, click on the “Full Page Slides” box to open a dropdown menu. Under the “Print Layout” option, click on the “Notes Pages” button.
You can see the slide as well as the notes on the “Print Preview” screen.
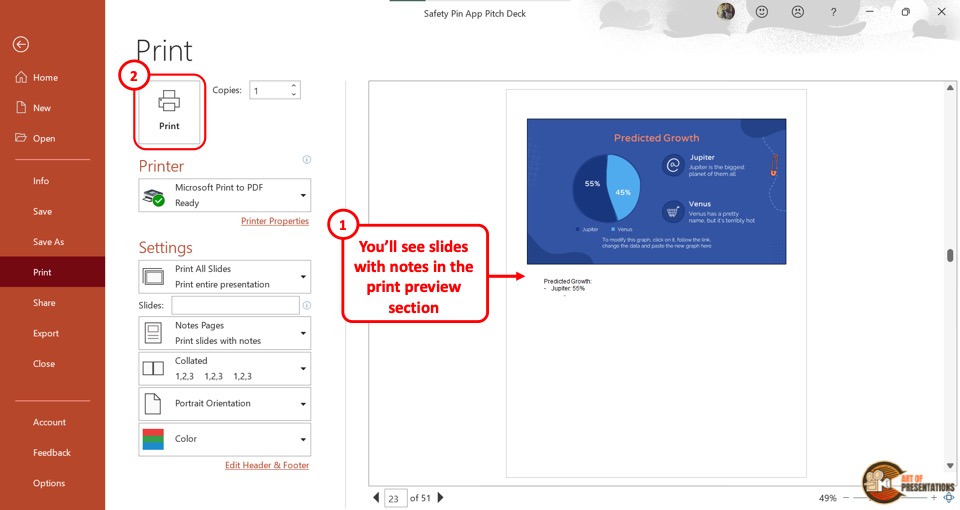
The final step is to click on the “Print” button at the top of the screen to print the slide along with the notes.
To print PowerPoint slides with notes on Mac, follow the 4 simple steps.
On a Mac device, you have to first open the PowerPoint presentation. Then click on the “File” tab located at the top left corner of the screen. From the dropdown menu, click on the “Print” option.
This will open a dialog box.
In the dialog box, click on the “Show Details” option located at the bottom. You will now be able to see the settings for printing the PowerPoint presentation slides.
Step-3: Click on the “Notes” option
The next step is to click on the “Layout” option in the dialog box to open a dropdown menu. Click on the “Notes” option from the dropdown menu to include the notes with the slides.
Step-4: Click on “Print”
Now all you have to do is click on the “Print” button located at the bottom right corner of the dialog box to print the slides with notes.
5. Printing Multiple Slides Per Page with Notes
Microsoft PowerPoint provides a “Create Handouts” option which you can use to fit notes with multiple slides on a single page.
Here’s a step-by-step process to print multiple slides per page with notes –
The first step is to click on the “File” menu in the menu bar located at the top of the screen. In the “File” menu, click on the “Export” option in the sidebar located on the left side of the screen.
Step-2: Click on the “Create Handouts” option
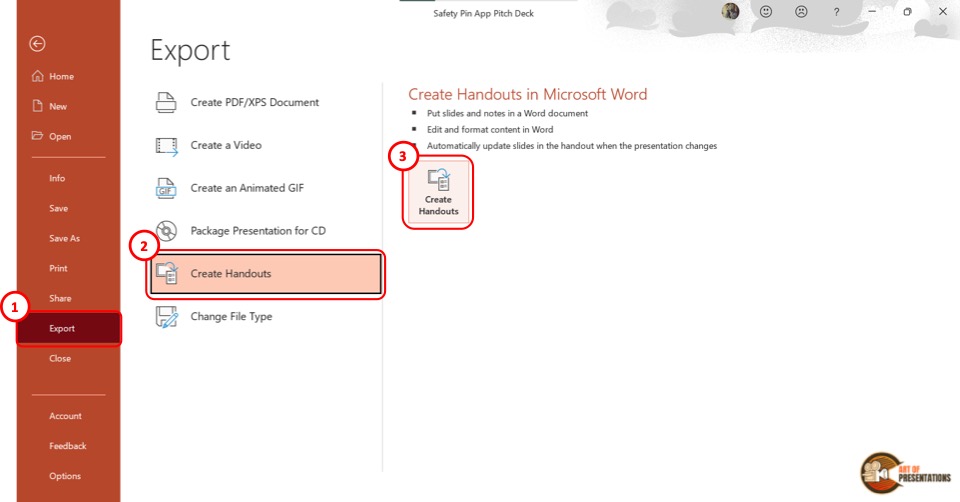
In the “Export” screen, click on the “Create Handouts” option at the secondary sidebar on the left side. Then you have to click on the “Create Handouts” button located in the middle of the screen.
This will prompt a dialog box.
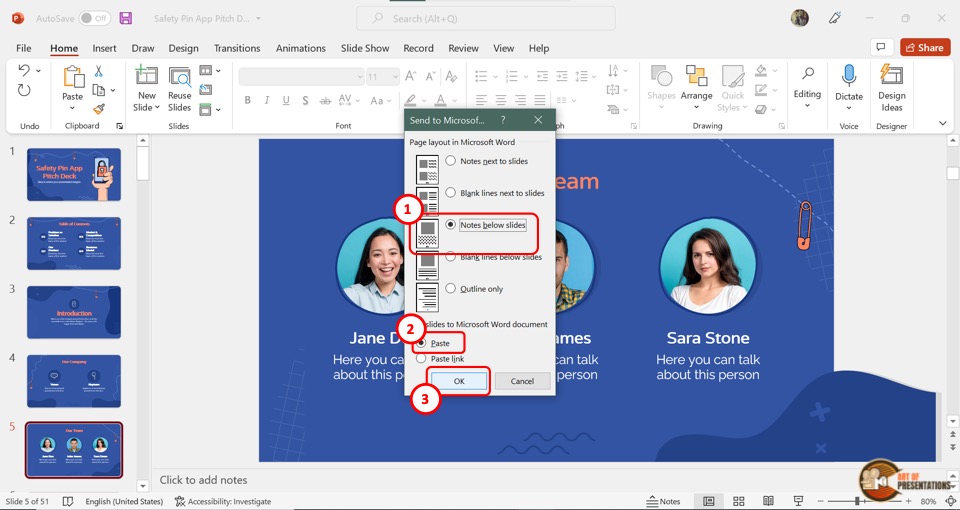
Step-3: Select the “Notes next to slides” option
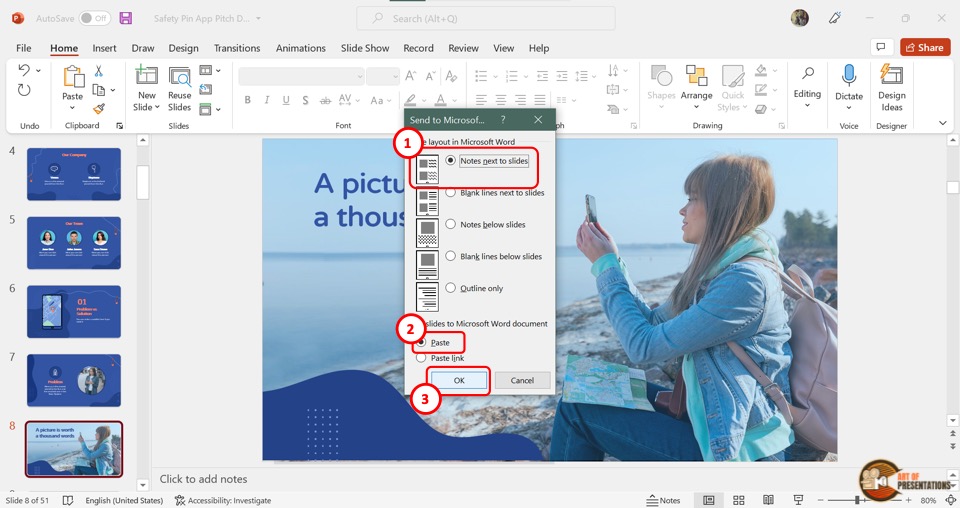
In the “Send to Microsoft Word” dialog box, you have to select two options. First, click on the “Notes next to slides” option under the “Page layout in Microsoft Word” settings.
Then click on the “Paste” option under the “Add slides to Microsoft Word document” settings.
Step-4: Click on the “OK” button
Now all you have to do is click on the “OK” button at the bottom of the dialog box (as shown in the image in step 3).
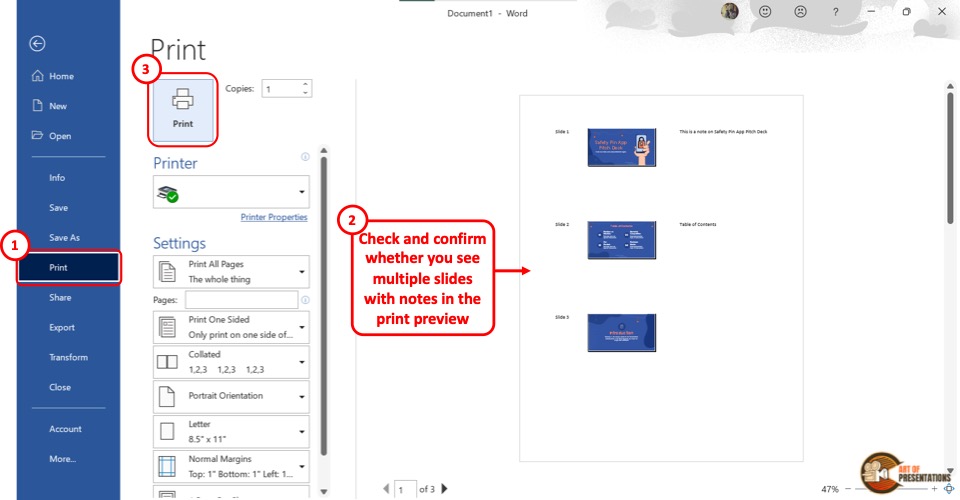
This will open a new Microsoft Word Document containing multiple slides per page along with notes.
Step-5: Click on “File”
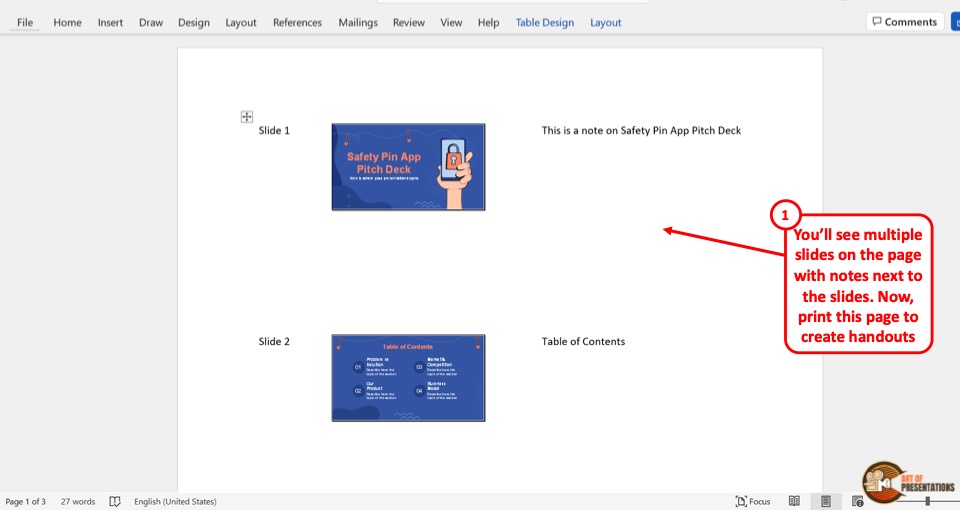
In the Microsoft Word document, you can preview the slides as well as the motes. You can also edit the notes and the slide arrangement.
Then click on the “File” tab in the menu bar at the top of the screen and click on the “Print” option.
Step-6: Click on the “Print” button
In the “Print” screen, you can change the settings options according to your preference. Now all you have to do is click on the “Print” button to print the multiple slides per page with notes.
6. Can You Print Just Slide Notes in PowerPoint?
In Microsoft PowerPoint, there is currently no feature that allows you to print just slide notes without the slides. However, you can remove the slide thumbnails manually before printing the notes pages.
Here’s how to do it –
In the menu ribbon at the top of the screen, click on the “File” tab. Then click on the “Export” option in the sidebar located at the left side of the screen.
The next step is to click on the “Create Handouts” option from the sidebar in the “Export” screen. Then click on the “Create Handouts” button under the “Create Handouts in Microsoft Word” option.
Step-3: Click on the “Notes below slides” option
In the “Send to Microsoft Word” dialog box, click on the “Notes below slides” option under “Page Layout in Microsoft Word” .
Then select the “Paste” option under “Add slides to Microsoft Word document” .
This will open a new Microsoft Word document containing all the slides and the notes below each slide.
Step-5: Delete the slide thumbnails

In the Microsoft Word document, you have to delete each slide thumbnail manually. To do so, click on each image and press the “Delete” key on your keyboard.
Alternatively, you can press the “backspace” key on your keyboard. Repeat the process until you have deleted all the slide thumbnails.
Step-6: Click on the “Print” option
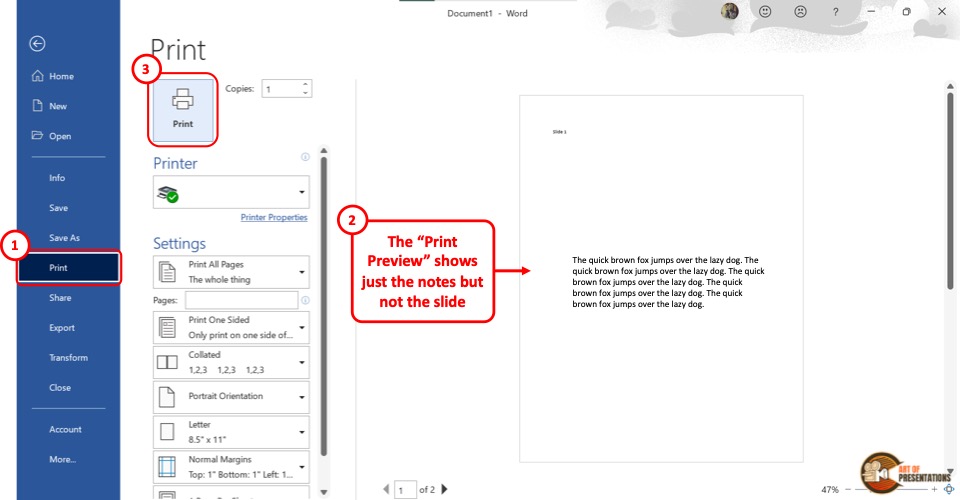
The final step is to click on the “File” tab and select the “Print” option from the sidebar on the left side of the screen in the “File” menu.
Now all you have to do is click on the “Print” button at the top of the screen to print just the notes without the presentation slides.
7. How to Print PowerPoint as an Outline?
Microsoft PowerPoint allows you to print only the slide outline of a presentation without printing the slide itself. To print the PowerPoint presentation as an outline, follow the 3 simple steps.
The first step is to click on the “File” tab in the menu ribbon located at the top of the screen. In the “File” menu click on the “Print” option to open the “Print Preview” screen.
Step-2: Click on the “Outline” option

The next step is to click on the “Full Page Slides” box under the settings. From the popup menu, click on the “Outline” option under the “Print Layout” section.
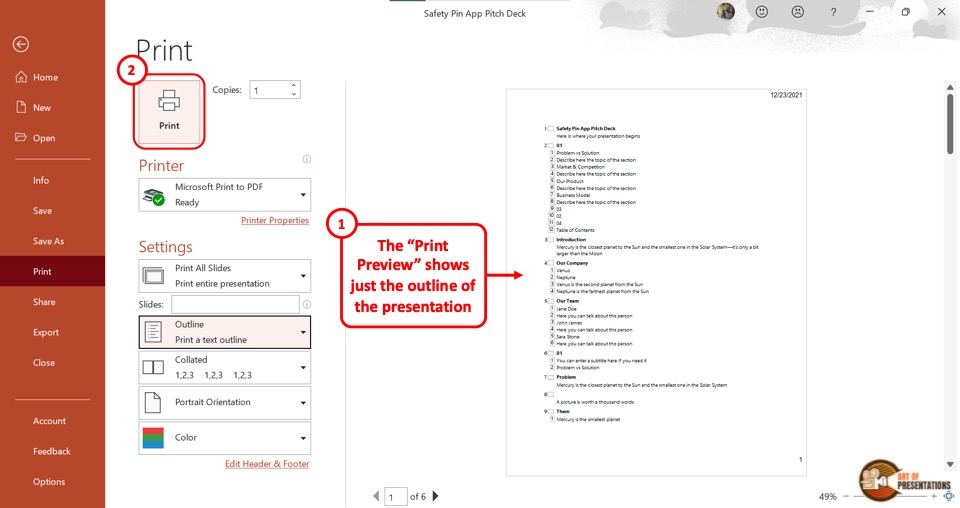
In the “Print Preview” screen, you can see the slide outline. Now all you have to do is click on the “Print” button at the top of the screen to print the presentation as an outline.
8. How to Print PowerPoint as a Handout?
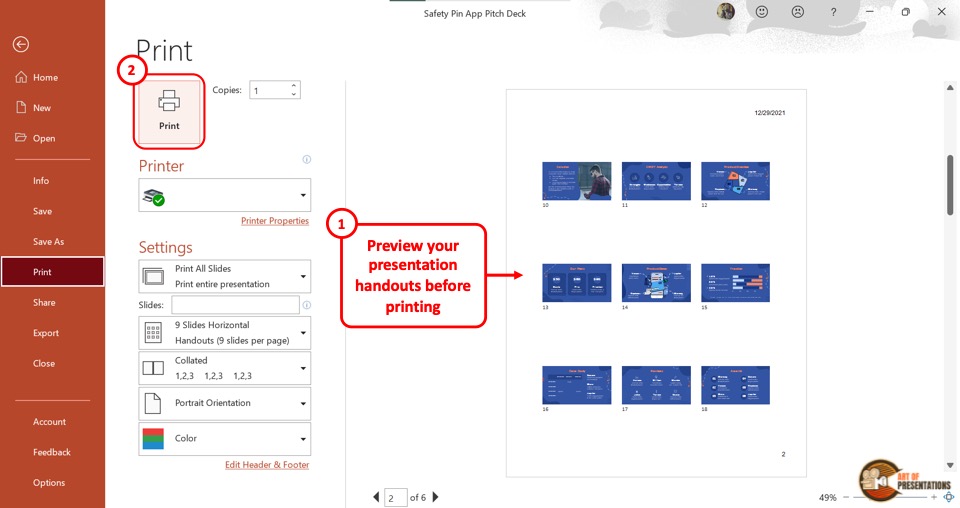
Printing a PowerPoint presentation as a handout helps you compile multiple slides on a single sheet of paper. This is helpful when you have to distribute paper copies of your presentation among the audience.
To print a presentation as a handout, follow the steps mentioned below –
The first step is to click on the “File” tab in the menu ribbon located at the top of the screen. In the “File” menu, click on the “Print” option.
Step-2: Click on the “Print Layout” option
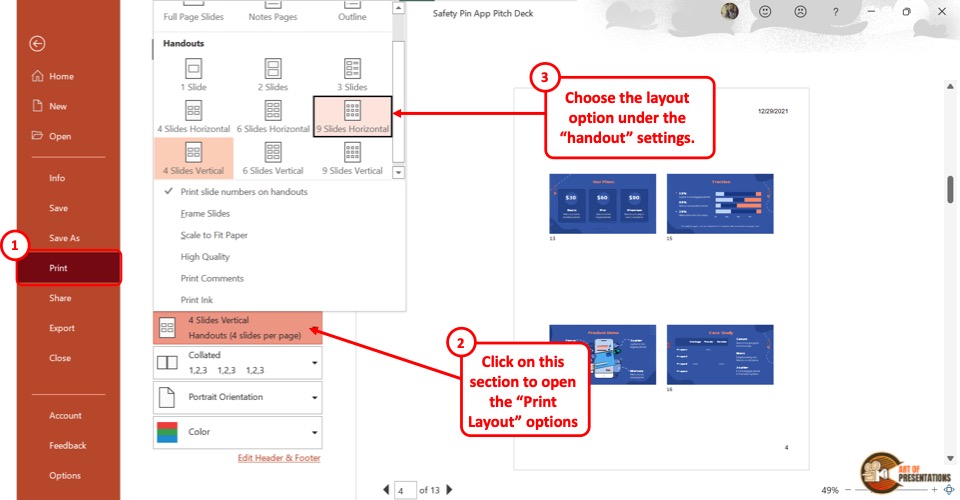
The next step is to click on the “Print Layout” option. It is the second box in the “Settings” section of the “Print” menu.
In the “Print Layout” pop-up menu, you will see 9 different layouts under the “Handouts” section. Click on your preferred handout layout.
The final step is to click on the “Print” button at the top of the screen. Make sure that you are connected to a printer to print the PowerPoint as a handout.
8a. Adding Slide Numbers on Handouts
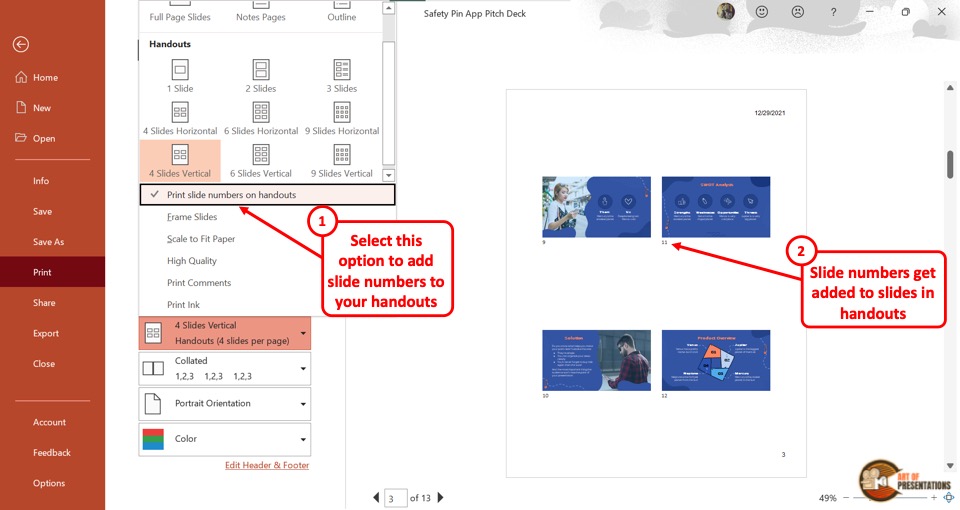
After selecting a handout layout, you can add the slide numbers on the handouts. All you have to do is click on the “Print slide numbers on the handouts” option under the layouts in the “Print Layout” pop-up menu.
A checkmark will appear on the left side of the option. You can also see the slide number showing under each slide on the preview screen.
8b. How to Frame Handout Slides
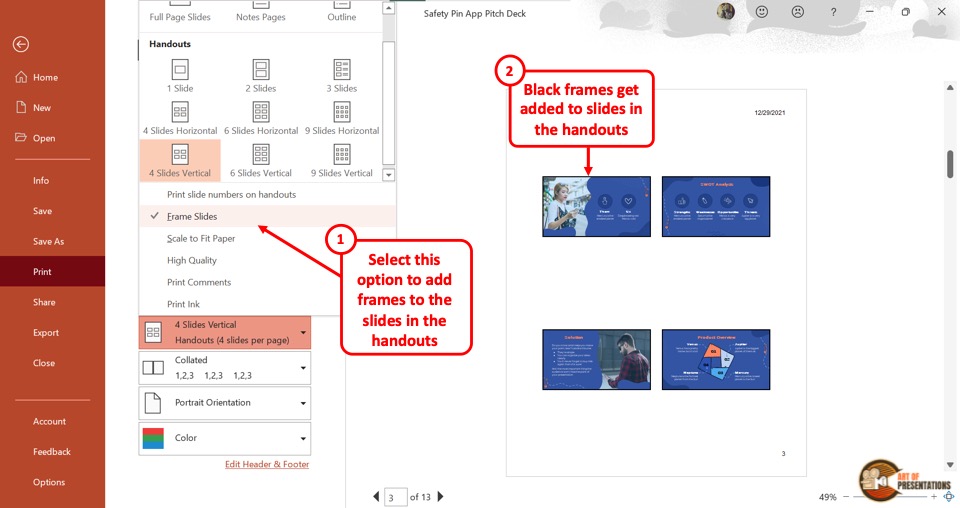
To frame handout slides, you have to first select a handout layout from the “Print Layout” option. Then click on the “Frame Slides” option under the layouts.
You will notice a checkmark showing on the left side of the “Frame Slides” option. Black frames will appear around each slide on the preview screen.
9. How to Print PowerPoint Full Page?
Microsoft PowerPoint offers various layouts for printing the presentation slides. You can print the presentation using the “Full Page Slides” option, where each paper will be printed with single slides on them.
Here’s what you need to do to print full-page slides –
Step-1: Click on the “File”
First, you have to open the “Print” screen. To do so, click on the “File” tab in the menu ribbon. Then click on the “Print” option from the sidebar in the “File” menu.
Step-2: Click on the “Full Page Slides” option
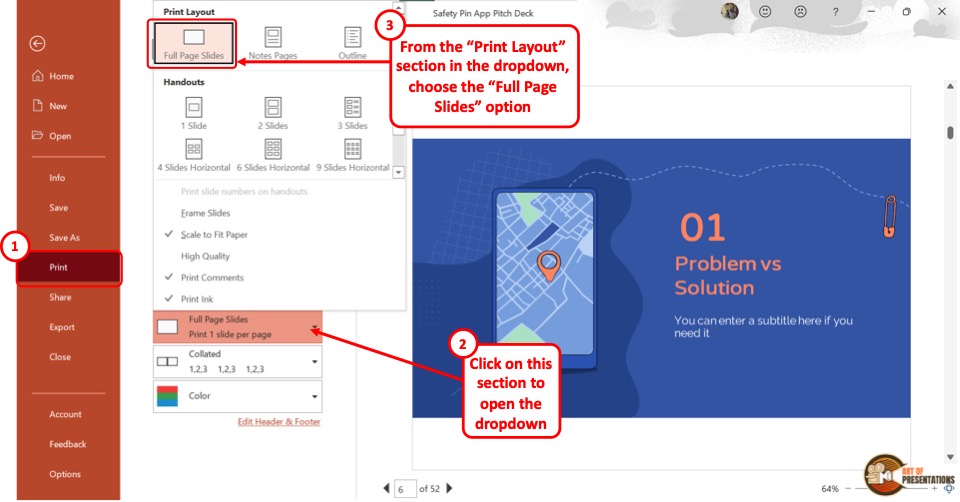
In the “Print” screen, click on the “Print Layout” option which is the second option under the “Settings” section. In the pop-up menu, click on the “Full Page Slides” option.
You can see the full page on the preview screen on the right side.
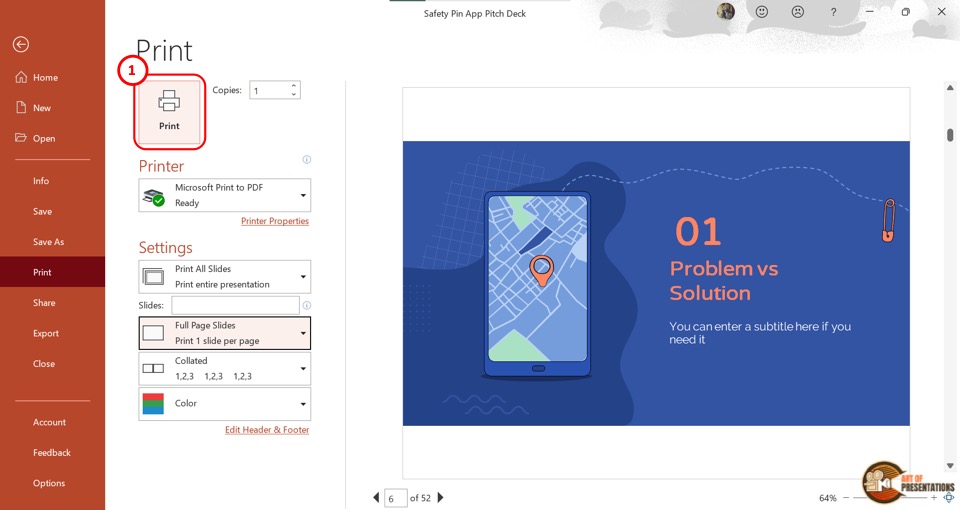
Finally, you have to ensure that the device is connected to a printer. Then click on the “Print” button at the top of the screen to print the full page slides.
Shortcut Method
In the “Print” option of Microsoft PowerPoint, the default setting for printing the slides is to print the full page. So all you have to do is press the “Ctrl+P” keys on your keyboard to open the “Print” screen.
Then click on the “Print” button at the top of the screen.
10. How to Print PowerPoint with Comments?
In Microsoft PowerPoint, the editor as well as other reviewers can leave comments on the objects in a slide. To print a PowerPoint presentation with the comments alongside the slides, follow the 3 simple steps.
Step-1: Open the “Backstage View” using the “File” Tab
In the open PowerPoint presentation, click on the “File” tab from the menu ribbon. Then you have to click on the “Print” option in the “File” menu.
Step-2: Click on the “Print Comments” option
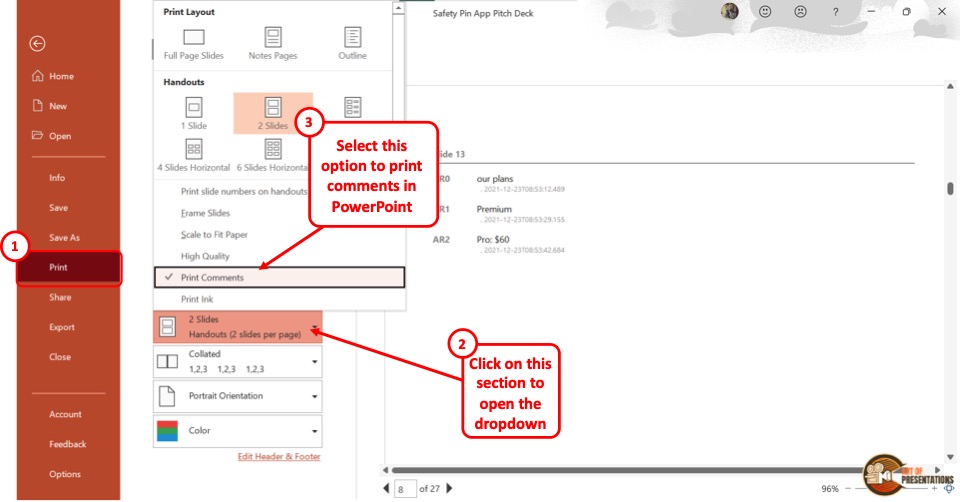
In the “Print” menu, click on the “Print Layout” option which is the second option in the “Settings” section. This will open a pop-up menu. Click on the “Print Comments” option from the pop-up menu.
On the preview screen, the comments in a slide will show on a separate page after that slide. Now all you have to do is click on the “Print” button to print the presentation slides with comments.
11. How to Print PowerPoint Slides as a Booklet?
Sometimes, printing a presentation as a booklet may be more convenient. Unfortunately, Microsoft PowerPoint currently does not have any feature that allows you to print the PowerPoint slides as a booklet.
However, you can commonly find this feature in your printer device. All you have to do is click on the “Printer Properties” option in the “Printer” section of the “Print” screen and look for any booklet feature.
If the printer does not have any feature to print booklets, you can save the PowerPoint document as a PDF file. Follow the steps in section 14 to print the PowerPoint as PDF. Then use the “Print as Booklet” option in the PDF viewer.
12. How to Print PowerPoint Presentation in Portrait?
In Microsoft PowerPoint, you can change the orientation of the slides to print them in “Landscape” or “Portrait” .
To print a PowerPoint presentation in portrait orientation, here’s what you need to do –
In the menu bar at the top of the screen, click on the “File” tab located in the left corner. In the “File” menu, click on the “Print” option. Alternatively, you can press the “Ctrl+P” keys on your keyboard.
Step-2: Click on the “Portrait Orientation” option
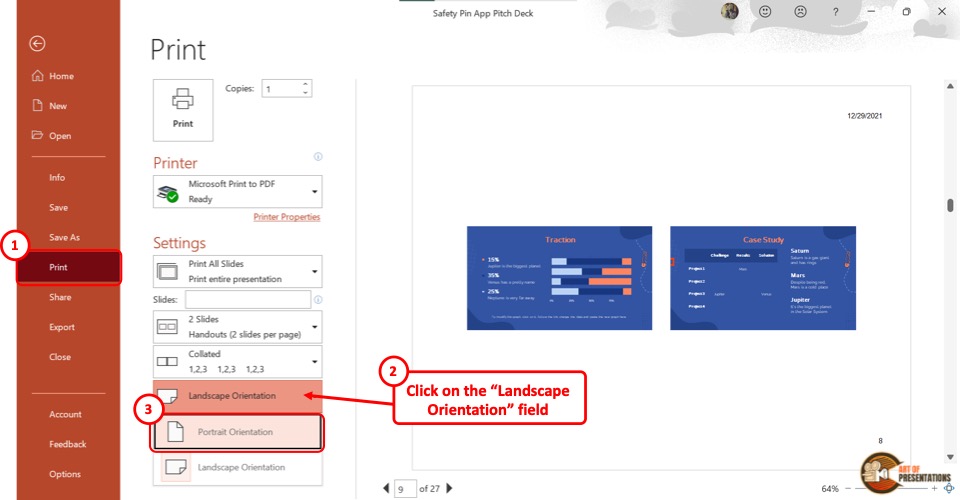
In the “Print” menu, click on the “Orientation” box. It is the fourth option in the “Settings” section. Then click on the “Portrait Orientation” option from the dropdown menu.
In PowerPoint, the “Portrait Orientation” is the default orientation.
You can now see the slides in portrait orientation on the preview screen on the right side. All you have to do is click on the “Print” button. This will print the slides in portrait orientation.
13. How to Print PowerPoint Presentation with Ink Annotations?
Ink Annotations are drawings or handwritten notes on slides. You can show or hide the ink annotations in a PowerPoint presentation using the “Draw” tab.
You can also print your presentation along with ink annotations. Here’s how to do that –
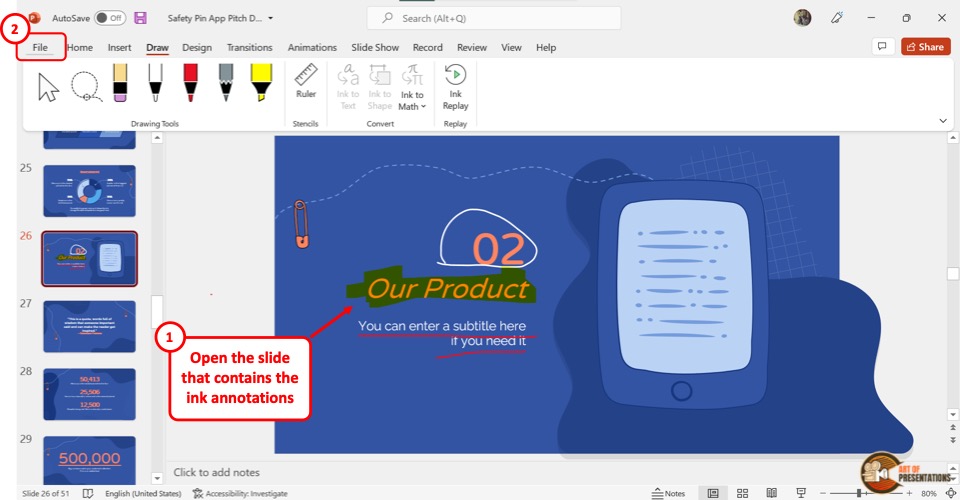
The first step is to open the “Print” screen. To do so, press the “Ctrl+P” keys on the keyboard. You can also click on the “File” tab from the menu ribbon and then click on the “Print” option from the sidebar of the “File” menu.
Step-2: Click on the “Print Ink” option

The next step is to click on the “Print Layout” option. In the “Settings” section, the “Print Layout” option in the box that shows “Full Page Slides” .
In the “Print Layout” pop-up menu, click on the “Print Ink” option at the bottom. A checkmark will appear on the left side of the “Print Ink” option and the ink annotations will show on the preview screen.
Finally, you have to ensure the device is connected to a printer. Then click on the “Print” button to print the slides with ink annotations.
14. How to Print PowerPoint as a PDF?
In Microsoft PowerPoint, you can use the “Microsoft Print to PDF” option to save your presentation as a printable PDF document. To do so, follow the 4 easy steps mentioned below –
You have to first click on the “File” tab located at the left corner of the menu ribbon. This will open the “File” menu. Click on the “Print” option in the sidebar on the left side of the “File” menu.
Alternatively, you can press the “Ctrl+P” keys on your keyboard.
Step-2: Click on the “Microsoft Print to PDF” option
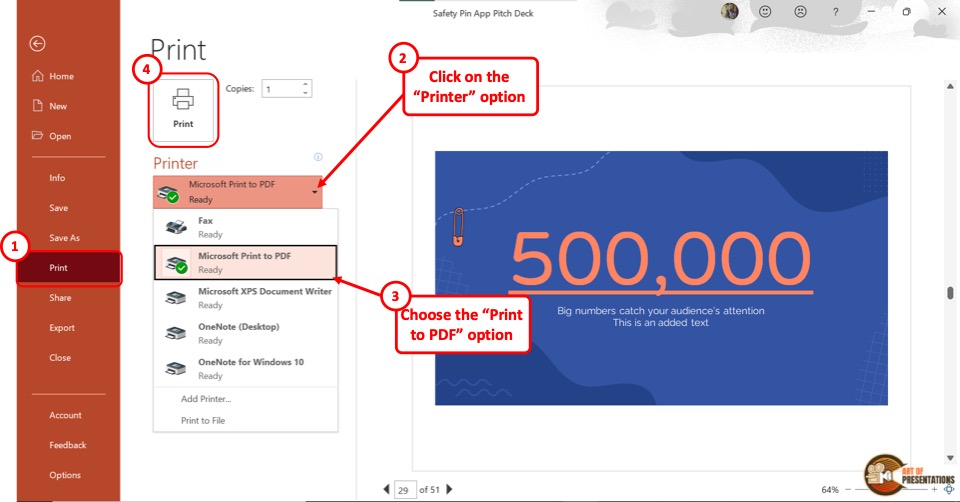
Now you have to click on the box under the “Printer” option. This will open a dropdown menu. Click on the “Microsoft Print to PDF” option from the dropdown menu.
Now all you have to do is click on the “Print” button at the top of the “Print” screen (as shown in the image in step 2). This will prompt a dialog box.
Step-4: Click on the “Save” option
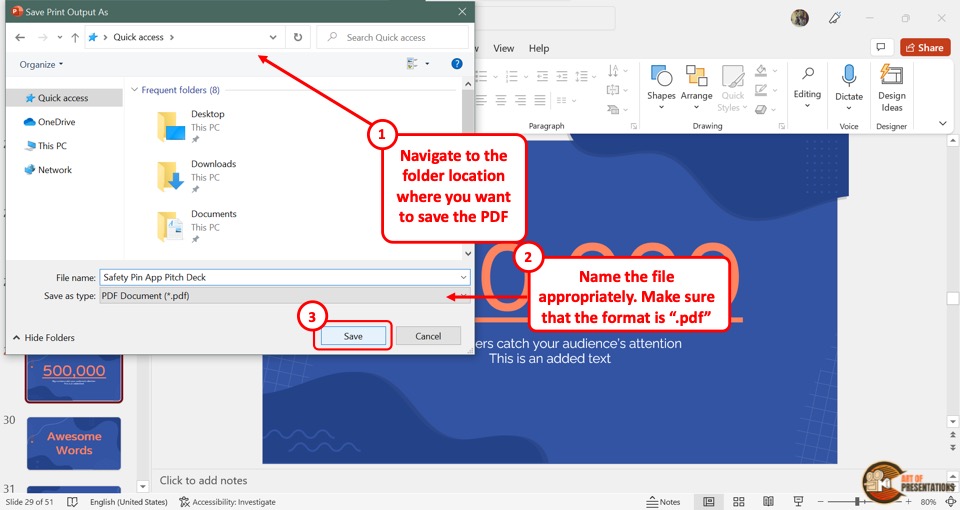
In the “Save Print Output As” dialog box, select the preferred file location for the PDF. Then click on the “Save” option at the bottom of the dialog box to save the PowerPoint presentation as a PDF file.
- Shop Early Amazon Prime Day Deals
- I Tried Both: Ring vs Nest Doorbell
- How to Print PowerPoint Slides
- Brock University
In This Article
Jump to a Section
- Choosing Print Settings
- Selecting Which Slides to Print
- Framing Slides for Handouts
- Print Color Options
- Step-by-Step: Print Full Page Slides
- Print Notes Pages for the Speaker
- Print in Outline View
- Print Handouts
- Print Handouts for Note Taking
Print your PowerPoint presentation when you need a copy to help you deliver your presentation or to help your audience follow along. You have several choices from printing an entire slideshow to printing handouts and notes pages. Learn the various ways to print PowerPoint slides and select the best option for your needs.
Instructions in this article apply to PowerPoint 2019, 2016, 2013, 2010; PowerPoint for Mac, and PowerPoint for Microsoft 365.
Choose Your Print Settings
The print options and settings for PowerPoint are found by choosing File > Print .
The following settings are displayed in the print window by default. Modify these settings as needed.
Print Copies : Select the number of copies to print.
Printer : If more than one printer is installed on your computer or network, select the printer you want to use. Select the Printer drop-down arrow and make your choice.
Settings : Print all slides is the default setting. Select the drop-down arrow to make an alternate choice.
Full Page Slides : Select the drop-down arrow to make an alternate choice. More details about all of these options will follow.
Collated : Pages will be collated as pages 1,2,3; 1,2,3; 1,2,3 and so on, unless you choose to print uncollated pages as 1,1,1; 2,2,2; 3,3,3 and so on.
Color : The default selection is to print in color. If the selected printer is a color printer, slides will print in color. On a black and white printer, the slides print in grayscale . More details about this printing selection will follow.
Select Which Slides to Print
In the Settings section, the default selection is to print all slides. To make an alternate choice, select the drop-down arrow.
Other choices are:
Print Selection : To use this option, first select only the slides you wish to print. Select these slides either from the Slide pane in Normal view or from the Slide Sorter view. These views show thumbnail versions of your slides so it is easy to make a group selection.
Print Current Slide : The active slide is printed.
Custom Range : You may choose to print out only a few of your slides. These selections can be made by entering the slide numbers in the text box as follows:
- Enter specific slide numbers separated by commas, such as 2,6,7.
- Enter a contiguous group of slide numbers as 3-7
Print Hidden Slides : This option is available only if you have slides in your presentation that have been marked as hidden. Hidden slides do not show during a slideshow but are available to view in the editing stage.
Frame PowerPoint Slides When Printing Handouts
There are four options available when you make printouts of your PowerPoint slides.
These options are:
Frame Slides : This is a nice finishing touch for your printed handouts.
Scale to Fit Paper : Printable areas of the margins vary with each printer. Make sure that complete slides print out on your handouts by selecting this option.
High Quality : Select this option only if you need exceptional looking printouts, such as a brochure. This option uses extra toner or ink in your printer, so don't choose this for regular printouts.
Print Comments and Ink Markup : This option is available only when the presentation has been reviewed by another person who made written comments in the file.
Print PowerPoint Slides in Color, Grayscale or Pure Black and White
There are three different options for color or non-color printouts.
Choose from the following:
Color : Color printouts are the default option. However, not all printers have this capability. If you choose the Color option but do not have a color printer, the printout will be similar to, but not of the same quality as, printing in grayscale.
Grayscale : If you do not have a color printer or do not require a color printout, choose Grayscale to print all objects on the page in shades of gray. Objects appear crisper and cleaner if Grayscale is selected for non-color printers rather than printing using the default Color option.
Pure Black and White : This option prints slides in black and white. There are no shades of gray. As a result, several objects on the design theme of the slide, such as embossing and drop shadows do not print. Text prints as black, even if you chose gray as the original color of the text.
Print Full Page Slides in PowerPoint
Go to File .
Select Print .
Choose the number of copies to print if you wish to print more than one copy.
Select the printer if you wish to print to a different printer than the default selection.
By default, PowerPoint prints all slides. Select only the specific slides to print, if necessary.
Select other options, such as Frame Slides if you wish.
Select Print . Full page slides print, as this is the default printing selection.
Print PowerPoint Notes Pages for the Speaker
Print speaker notes with each slide as an aid when giving a PowerPoint presentation. Each slide is printed in miniature (called a thumbnail) on a single page, with the speaker notes below. These notes do not show on the screen during the slide show.
Speaker notes can also be exported for use in Microsoft Word documents. Learn how to convert PowerPoint presentations to Word documents .
Choose the pages to print.
Select the Full Page Slides drop-down arrow and choose Notes Pages .
Select any other options.
Print PowerPoint in Outline View
Outline view in PowerPoint shows only the text content of the slides. This view is useful when only the text is required for quick editing.
Select File > Print .
Select the Full Page Slides drop-down arrow.
In the Print Layout section, choose Outline .
Choose other options if desired.
Print PowerPoint Handouts
Print handouts in PowerPoint to create a take-home package of the presentation for the audience. Choose to print one full-size slide to nine miniature slides per page.
In the Handouts section, select the number of slides to print on each page.
Choose any other settings, such as the number of copies. It is a nice touch to frame the slides on the handout and it is always a good idea to choose to Scale to fit Paper .
Print PowerPoint Handouts for Note Taking
Presenters often give out the handouts prior to the presentation so that the audience may take notes during the slideshow. If that is the case, there is one option for handouts that prints three thumbnail slides per page along with lines next to the slides for note taking.
In the Handouts sections, choose 3 Slides .
Select any other options you wish.
Get the Latest Tech News Delivered Every Day
- How to Print PowerPoint Slides With Notes
- Hide Background Images for Cleaner Printed PowerPoint Slides
- Print a PowerPoint Handout in PDF Format Without a Date
- Converting PowerPoint Slides to Word Documents
- How to Make a Poster in PowerPoint
- How to Print Multiple Slides on One Page in PowerPoint
- 9 PowerPoint Presentation Tips for Students
- Different Ways to View Slides in PowerPoint
- How to Use Speaker Notes in PowerPoint
- How to Print Part of a Word Document
- Outline View in PowerPoint or OpenOffice
- How to Add Page Numbers in PowerPoint
- Converting PowerPoint Presentations to Word Documents
- How to Hide and Unhide a Slide in PowerPoint
- Grayscale and Color Picture Effect in PowerPoint
- Slidesgo School
- PowerPoint Tutorials
How to Print Presentations in PowerPoint

Printings made with PowerPoint can be useful for you or your public in some cases. We thus prepared this tutorial where you will learn step by step how to print your PowerPoint presentations to have a physical copy of the whole document or only a few slides.
PowerPoint offers an easy, user-friendly printing panel with multiple options that can be configured according to your preferences. Let's see how to use it:
Printing Your Presentation
Selecting which slides to print, printing hidden slides, printing with notes, printing as an outline, printing two or more slides per page, printing on both sides, printing in black and white.
- Open your presentation in PowerPoint.
- Click File → Print.
- Click the Printer drop-down arrow to select a printer from the list.
- In case no printer appears on the list, you will have to add one following these steps:
- Windows 10 : Click Start → Settings → Devices → Printers and scanners.
- Windows 7 or 8 : On the Control Panel, click Hardware and Sound → Add printer → Add network, wireless or Bluetooth printer → Next.
- If you cannot find the device, check if your computer is connected to the equipment through some network (cable or wireless). Consult the printer manual for more details on how to connect the equipment.
- Settings → Print all slides.
- Settings → Print selection.
- Settings → Print current slide.
- Settings → Custom range.
- Click the Print button.
- Settings → Select the option according to the number of slides → click Print hidden slides.
- Click the Print button at the top to complete printing your presentation in PowerPoint.
- Settings → Notes pages.
- Type the number of copies you need and click the button Print at the top of the window.
- Settings → Outline. The presentation will be printed as a schematic overview.
You can select the number of slides you want to print per page (2, 4, 6…), and whether you want them to be printed horizontally or vertically and with or without notes.
- Settings → Full page slides → Documents.
- Type the number of copies and click the Print button.
- Settings → Print one sided.
- Settings → Print on both sides.
- Open your PowerPoint presentation.
- Settings → Color.
- Settings → Grayscale.
- Settings → Pure black and white.
- If you want to print more than one copy of your presentations, type the number of copies and click the Print button.
Do you find this article useful?
Related tutorials.

How to Download Google Slides Templates
When preparing a presentation, many people start panicking because they realize how much time it will take to edit each and every slide. Creating them from scratch, filling them in, looking for pictures, moving the elements...How stressful! But there is a solution that saves you a lot of time. We're sure that you've browsed the internet for templates, or basically, pre-established designs and elements, that can be downloaded for free and can be edited to your liking. Are we right? Then, we have some good news for you!

Discover our collection of printable templates
With the advance of technology, printing has become something that is no longer a necessity. Smartphones have made the paper format less and less frequent, but there are still certain cases in which having physical resources is much more convenient. Whether it's for taking notes, handing out assignments, making worksheets or handing out business cards or invitations, it's necessary to print your customized designs.From now on, in every Slidesgo printable presentation that you download, you will find the instructions for printing on the third slide. Depending on the style, colors or format of each presentation, we will tell you if you can...

How to Add Superscript and Subscript in Google Slides
Let’s take the most famous formula: E=mc^2, Einstein’s relativity equation. It wouldn’t be the same if it was E=mc2, right? Okay, yes, some people write it like that because it’s very famous and it won’t be misunderstood. But technically… It can! This is where the sophistication of superscript or subscript enters the room! Do you know how to write them in equations, copyright brands or even footnotes in your presentations? Let’s figure out how.

How to Add Superscript and Subscript in PPT
It can be a registered brand, a footnote or a math formula that you need to properly write. “2^2+2” is not the same as “22+2”, is it? Using superscript or subscript in a proper way makes a whole difference in texts. If it’s for your mathematical or physics complex formulas or just an anecdotic footnote, let’s figure out how to write them in a powerpoint presentation!
How-To Geek
How to print a powerpoint with notes.

Your changes have been saved
Email Is sent
Please verify your email address.
You’ve reached your account maximum for followed topics.
7 Ways I Get the Most Out of My KDE Plasma Linux Desktop
I made an android auto display for my bike (to keep my phone safe), are dual-sim phones worth it, quick links, how to add notes to powerpoint, how to print slides with notes on windows, printing powerpoint with notes on mac, key takeaways.
To print a PowerPoint with notes on Windows, click File > Print and "Notes Pages" in the Layout drop-down box. Then, select "Print." On Mac, go to File > Print. In the Layout drop-down box, choose "Notes" then "Print" to finish.
Do you want a hard copy of your PowerPoint slideshow that includes your speaker notes ? Maybe you want a physical copy to review on your own or with others. We'll show you how to print your PowerPoint with the notes attached.
As a refresher, you can add speaker notes to PowerPoint to help you through your presentation. Your audience won't see these notes during the show, so it's helpful to include your talking points or additional details you want to share to expand on your slides.
Related: How to Use Speaker Notes in PowerPoint
You can add speaker notes to your slides easily in PowerPoint on Windows or Mac one of these three ways.
- Click the Notes button in the Status Bar at the bottom of the PowerPoint window.
- Drag up from the area below the slide near the bottom of the window.
- Go to the View tab and select "Notes" in the Show section of the ribbon.

Then, type your text in the Notes section below the slide. You can use the font formatting tools on the Home tab to bold or color your text, add bullet points, or change the font size.

Open your PowerPoint presentation and go to File > Print. In the Layout drop-down box below the Slides text box, pick "Notes Pages."

You'll see the preview on the right with the slide at the top of the page and your notes below. You can use the arrows at the bottom to review each page if you like. This is a good way to see if any slides are missing speaker notes.
Adjust any other print options, such as the printer you want to use, the slides you want to print , and the color. Then, click "Print" when you're ready.
Open your slideshow in PowerPoint on Mac and head to File > Print. When the print window opens, select "Show Details" on the bottom left if you see a condensed view of the print options.

On the right side, below Paper Size, you'll see a drop-down box. Make sure that "PowerPoint" is selected here. Next to Slides, choose the slides you want to print.
Click the Layout drop-down box and choose "Notes."

On the left, you'll see the print preview which displays the slide at the top of the page and the notes beneath it. You can use the arrows at the top to preview each page if you like.

Adjust any other print options you'd like and click "Print" when finished.
Related: How to Print Just the Speaker Notes for a PowerPoint Presentation
Printing a PowerPoint with notes is worth a few minutes if you want to review the presentation on paper. If you're wondering how to print notes in PowerPoint without the slides , check out our tutorial.
- Microsoft Office
- Microsoft PowerPoint
- Skill Assessments
- AI Course Builder
- Free Courses
- PowerPoint 2019 Basic
How to Print PowerPoint Slides

Start Free Trial
Or log in with:

Once you have created a presentation, and your computer is connected to a printer, you can print a copy. Before you do this, it’s a good idea to preview how it’s going to look.

Press Ctrl + P .
- Examine the print preview on the right side of the screen, making sure that the preview looks the way you want it.
- Select the correct printer by clicking the Printer list arrow and selecting it from the list.
- Adjust the printer settings using the options below the printer, described in the table below.
- Choose the number of copies in the Copies text field.

| Print Settings | |||
|---|---|---|---|
| Print the whole presentation, a selection, a certain slide range, a single slide, or a custom range. | |||
| Determine what you want to print on each page. You can print a single slide, multiple sides, slide notes, handouts, and more. | |||
| Collating prints multiple copies of the presentation all the way through (1, 2, 3; 1, 2, 3), while printing uncollated prints multiple copies of each slide together (1, 1; 2, 2; 3, 3). | |||
| Changes the page orientation of the printed page, portrait or landscape. | |||
| Select whether to print the presentation in full color, grayscale, or pure black and white. | |||

FREE Quick Reference
Free to distribute with our compliments; we hope you will consider our paid training.
- LinkedIn-ready certificate
- Skill assessments
- Bite-sized, interactive lessons
- Saved progress
Validate Email Name * Email * Phone number * Message GDPR Agreement * I accept Acuity Training’s privacy policy
- Dates & Prices
- News & Tips
- Southampton
- Basingstoke
- 01483 688488

4 Different ways to Print your PowerPoint Presentation
- Date: 1st October 2021
- Read Time 5 mins
When creating a PowerPoint presentation it can be tempting to just select print slides and get your hands on a real copy of your work.
However, PowerPoint printing has several different layouts and settings for printing presentations.
This guide will go through all your printing options in PowerPoint and how and when to use them in order to get the most from your PowerPoint presentations!
Good use of different print settings will make your slides in PowerPoint stand out more, and better communicate your information.
If you want a clear and thorough understanding of everything PowerPoint we run PowerPoint training to help people.
Navigating The Print Menu In PowerPoint
To get through to the Print Menu you have to select the File tab, then click Print – and all of the printing options in PowerPoint will be shown to you.

Here we can see several key elements. The Print button is big and clear, and below it you can select the printer you want to use as well as several different printing options including layout, Collated or Uncollated and Color. T hese print settings are concerned with the different layouts you can use when printing Powerpoint.
Print Layout In PowerPoint
PowerPoint has a variety of different print layouts for you to select when you print your presentation. Each layout has it’s own strengths and weaknesses, and it is ultimately up to the user to pick between them. We will provide some situations where we believe a certain type of printing in powerpoint would be useful. Shown below is the drop down where you can pick whichever Print layout you want.

1) Full Page Slides:
All your powerpoint slides will be printed. This looks like a whole page of paper for each and every slide in the presentation. This method is great if you want to print and lookover your presentation and inspect its changes coming onto paper.

2) Notes Pages:
This prints each slide as before, as well as all of the speaker notes. Notes Pages is a great choice if you have lots of notes you want to read through as you present your work. You can print these special notes for yourself. Additionally if there is extra information you want to print on the speaker notes you can print them for everyone to read.

3) Outline:
This only prints an outline of your slide show. This can be used if you want to look over or show the organization of your slide show. Having this around when giving a presentation can be helpful to know what is coming up next. You can view the outline within powerpoint using this comprehensive guide.

4) Handouts:
This prints small images of each slide, with space for people to take notes. This is great in a setting where you need your audience to take lots of notes as it keeps them in a place where they make sense contextually. I also often use this as a way to write speaker notes when I’m making a presentation . It even keeps the slide number below for clarity.
A great example of this would be a teacher in school using printed handouts for students (you would want to make many copies in this case).
When you print handouts you can choose how many slides per page you want to print.
I would recommend using three slides per page so they have breathing room, but there’s space to make notes on each copy of your presentation.

Once you are happy with your format choice just click print and PowerPoint will send it off in the correct format!
Additional Handouts Settings
You will notice when you select any type of Handouts, some extra options will be come available at the bottom of the tab. These options will help you to further distinguish your handouts. Making proper use of these settings when you print handouts is key.

Frame Slides:
Framing Slides gives a clearer line between where the slides end and the empty space in the handout begins.
Scale To Fit Paper:
The amount of space you can print on the margin is different for every printer. Scaling to Fit paper will ensure that the entire slide is visible.
High Quality:
For very high standard handouts. This option will use extra toner and ink from your printer, making the appearance resemble something like a high class brochure. Don’t use this option for an everyday handout!
The Print Comments and Print Ink settings are made available when the presentation is peer reviewed and commented on.
Want to see how people are using PowerPoint today? Check out our PowerPoint statistics here!
Print Specific Slides
Using the Slide Range tool allows you to customise exactly which slides you want to print out rather than just print all slides. You can type a custom range of slides into the following box in the print range (we have used 1-2) and click Print and PowerPoint will only print those slides! You can also simpy write the slide numbers as 1,2,3,4 etc instead of a range.

This is a great tool as it lets you choose to print specific slides without having to create another file for another version of the presentation! Additionally if you have lots of slides to print but just want to view the appearance, you can just print out one or two to see how they appear on paper. You can also learn how to insert slides from other presentations with this step-by-step guide
Related Articles

Top 10 Public Speakers (Worldwide!)
Powerpoint statistics 2024, 10 tips for delivering professional presentations.

- Tips & Tricks
- PowerPoint Templates
- Training Programs
- Free E-Courses
Printing PowerPoint in the Right Format
Home > All Tutorials > PowerPoint Tips > Printing PowerPoint
Printing your PowerPoint presentation is not the same as printing a word document. But, most presenters don’t realize this simple fact and end up printing full page slides. In this article, we will share with you the right format to use while printing your presentations.
Know your Printing options before you press the OK button:
Most presenters print their PowerPoint presentations even before looking at the various options available for them to print.
Before you hit that OK button to print, realize that PowerPoint provides you four options to print Slides, Handouts, Notes pages and Outline view. You can print them in color, gray scale and in pure black and white.
Use the default option to print your screenshots:
The default option in printing PowerPoint is – Full page slides. These are not only unwieldy but are also a big waste of paper and printing ink. But, if you want to print a screenshot image pasted on a slide, use the default printing option. Since most screenshot images are difficult to view in a slideshow mode, it helps to distribute printouts of the slides before you explain the details to your audience.
You can print detailed images like circuit diagrams, maps, blue prints etc. for the same reason mentioned above.
Related: Using Print Screen ( OR Screenshot) Option effectively
Use Handouts with 3 slides per page for your training presentations:
Print Handouts option is quite useful for training related presentations. When you print handouts with 3 slides per page you get blank lines along the sides.
Print 6 slides per page to jog your memory during delivery:
Sometimes when you deliver long presentations, it is not always easy to know the slides that follow your current slide. It helps to have a reference material to jog your memory. You can use the option of printing 6 slides per page for quick visual reference.
Print Notes pages to distribute presentation to those who missed your presentation:
Sometimes you may be required to distribute your presentation to those who have not attended your presentation. In such cases, it helps to write your notes in the notes column of PowerPoint and give printouts of notes pages to the absentees.
Print slides with Dark Background using Pure Black and White option:
Sometimes you may create slides with dark background for visual appeal. When you end up printing PowerPoint slides in their original form, you may end up wasting a lot of printing ink. PowerPoint helps you save your ink by providing an option to print your slides in pure black and white. The software is intelligent enough to reverse the colors where needed, to provide you neat printouts without guzzling ink unnecessarily.
So, the next time before you hit the print button take a moment to decide the results you need based on your specific situation.
Related: How Slide Design differs from Print Design
Related: 3 BIG PowerPoint Rules to Break
See Main Page for more PowerPoint Tips
Return to Top of Printing PowerPoint Page
Share these tips & tutorials
Get 25 creative powerpoint ideas mini course & members-only tips & offers. sign up for free below:.

Margie Beilharz
Freelance editor and writer in science, environment, education, health
A better way to print out your PowerPoint presentation
I recently found something better than PowerPoint’s usual ‘print Notes Pages’ format for printing out a presentation’s slides and notes together. As far as I can see, however, it seems to be only available in the PC version.
I don’t use PowerPoint often, but did a couple of months ago for my presentation at the 2019 IPEd conference . Because my talk had some visual aspects – showing various website features – I actually wrote it in PowerPoint. That is, I prepared my images and then added the accompanying text in the notes field. Then, of course, I wanted to print out my slides and talking notes so I could refer to my notes while at the lectern.
The usual way to do this (PowerPoint seems to think) is to print the Notes Pages. This is the only print layout option that includes both the slides and text.
With 30-something slides, I didn’t want to print out over 30 pages. Setting my printer to print, say, two pages to an A4 might give me something I could still read, but would still mean flipping over a lot of pages during the talk.
Luckily I found a better solution: the Create Handouts function.
In my old PC version of PowerPoint (I’m hanging on grimly to Office 2010), I go to File > Save & Send > Create handouts, and then click the Create Handouts button (circled).
August 2020 UPDATE: In Powerpoint 365 (PC) you’ll find this at File > Export > Create Handouts, and then click the Create Handouts button.

In the dialogue box, choose the layout you want in Microsoft Word.

I used the top option (Notes next to slides), which produces a Word document with a three-column table; column 1 has the slide number; column 2 has the slide; column 3 has the notes text. With a bit of tweaking, you can format a nice paper to refer to during your presentation.
This option of printing to Word is also available in PowerPoint 2016 for PC , but seems not to be available in my Office 365 Mac version (or for other Mac PowerPoints).
This was originally published in the Editors Victoria July 2019 newsletter (updated to IPEd archive, members only)
See more tips & tricks .
Share this:
- Click to share on Facebook (Opens in new window)
- Click to share on Twitter (Opens in new window)
- Click to share on LinkedIn (Opens in new window)
- Click to print (Opens in new window)
- Click to email a link to a friend (Opens in new window)
- Click to share on Tumblr (Opens in new window)
- Click to share on Pinterest (Opens in new window)
- Click to share on Pocket (Opens in new window)
- Click to share on Reddit (Opens in new window)
Leave a comment Cancel reply

- Already have a WordPress.com account? Log in now.
- Subscribe Subscribed
- Copy shortlink
- Report this content
- View post in Reader
- Manage subscriptions
- Collapse this bar
Critical PowerPoint Shortcuts – Claim Your FREE Training Module and Get Your Time Back!
How to Print Multiple Slides on One Page (Step-by-Step)
- PowerPoint Tutorials
- Shortcuts & Hacks
- September 22, 2019
In this article, you’ll learn how to print multiple slides on one page in Microsoft PowerPoint. This cool feature works in all versions of PowerPoint.
On top of that, you’ll learn some PowerPoint printing tricks, including how to print multiple slides on one page PDF.
But before you print your presentation, an important question to answer first is:
Are you printing multiple slides because you want to distribute them out as handouts?
If so, I recommend formatting your Handout Master (as discussed below) with your company logo, contact information, etc., before you print your slides. Adding just a few simple things will vastly improve the professional quality of your handouts.
Table of Contents
[watch] printing multiple slides on one page.
You are currently viewing a placeholder content from Youtube . To access the actual content, click the button below. Please note that doing so will share data with third-party providers.
Follow these steps to print 4 slides per page in PowerPoint as handouts.
Take your PPT skills to the next level
1. click the file tab.

Within your PowerPoint presentation, click the File tab to open the backstage view.
2. Select Print

In the backstage view, click the Print group to get at all of the printing options.
3. Open the Layout Options

Open the Layout Options dropdown menu to see all of your different handout options.
4. Select an option with the Handouts area

In the Handouts section, you can choose how many slides per page you want. In this case, I’ll select ‘4 Slides Horizontal’.
As you select the different handout options, you get a live preview of what your handouts will look like on the right. This is a good time to double-check that everything looks right.
5. Click on Print

After you’ve made all your printing option selections, including how many copies you want to print, click on Print .
If you print lots of files and documents like this, I recommend learning the Print shortcut:
- Ctrl + P to print on a PC
- Cmd + P to print on a Mac
This universal keyboard shortcut works in Microsoft Word, Excel, and PowerPoint (and almost any other software program you will ever use).
It saves you from having to use your mouse to navigate to the printing options every time you want to print a document.
To learn other useful time-saving PowerPoint shortcuts, see our shortcut guide here .
In the same way, you can choose to print 6 slides per page (horizontal or vertical) or 9 slides per page (horizontal or vertical) as pictured below.

As you make your printing option selections (see the next section below), you will see a live preview of your handouts on the right of the dialog box. This live preview includes any formatting you add on the Handout Master as discussed above.
If you don’t like the look of your handouts in the live preview, either select a different handout layout, adjust your print settings, or reformat your Handout Master .
Pro-Tip: Make sure your handouts are legible.

Although you can save trees by increasing the number of slides you print per page, keep in mind that it also decreases the size of your slide thumbnails.
The smaller your thumbnails, the harder your content is to read, as you can see in the picture below. For examples of how legible your handouts will be using the different handout layouts, see the next section.
Handout Printing Options

There are six printing options to be aware of.
That’s because these printing options influence the look and feel of your PowerPoint handouts. Below I’ve detailed each option and included recommended printing options for each.
To change any of the following options in the Print dialog box, simply open the Layout Options and check or uncheck the selections.

A check mark means the option is selected, and you will see the result (although sometimes subtle) in the live preview on the right.
1. Print slide numbers on handouts

This option determines whether PowerPoint includes the slide numbers beneath the thumbnails of your slides.
If you are walking people through your handouts in a small meeting or conference call, I recommend including the slide numbers. That way when you reference slide number 3, everyone will know which one you are talking about.
2. Frame Slides

This determines whether or not PowerPoint includes a black outline around each slide thumbnail.
If your slides are mostly black and white (as pictured above), I recommend including the outline around your slide thumbnails. That will make the thumbnails stand out better on the page, making them easier to read.
3. Scale to Fit Paper

This determines whether PowerPoint maximizes your handout space by increasing the size of your thumbnails.
In other words, if you choose Scale to Fit Paper, PowerPoint will scale your slide thumbnails to fit your paper size. If you choose not to do so, it simply prints the thumbnails (regardless of size) on your selected paper size.
As shown in the picture above, although the difference is slight, you can see that:
- The orange border on the left is narrower
- The slide thumbnails are slightly smaller
- The company logo is slightly smaller
My recommendation is to always use the Scale to Fit Paper option. That way you don’t have to become an expert in all the different paper sizes to make your handouts look legible and nice.
4. High Quality
This determines how much ink PowerPoint puts into printing your slides and the resulting crispness of your thumbnails.
My recommendation is simple. If you are printing on non-glossy pieces of paper, unselect High Quality (as it will just run out your ink cartridge without any discernible effect). If you are printing on glossy pieces of paper, select High Quality.
5. Print Comments

This determines whether PowerPoint marks your slides with comments and prints them individually on a backup page.
Comments are easiest to review and fix in PowerPoint. Trying to review comments in small thumbnail images is not only difficult, but on top of that you still need to go back into PowerPoint to fix them.
When you print comments, the thumbnails will always be marked with a number and the comments for each slide will be printed as a backup page (even if you only have a comment that says “good job”).
I generally avoid printing comments unless I know that I need them. Why? Simply because the comments are SO SMALL on your printed handouts, it’s hard to review them.
On top of that, since you will need to update your slides based on those comments, I believe it’s better (and faster) to review the comments and update your deck at the same time on your computer (not on your handouts).
6. Print Ink

This determines if PowerPoint includes any ink annotations you’ve added to your presentation.
For example, during your presentation you might mark it up with ink as you explain things. You can choose whether or not you want those markings to display in print or not.
Printing Multiple Slides on One PDF Page
Besides printing your slides on normal 8.5 x 11 pieces of paper, you can also use Microsoft Print to PDF to create PDF handouts. It’s the same steps as printing on paper, and you just need to change the printer.
To print multiple slides on one PDF page in PowerPoint, simply:
- Navigate to the File menu
- Select Print
- Open the Handout options
- Select how many slides you want to print per page
- Open the Printer dropdown menu
- Select the Microsoft Print to PDF printer
- Click Print
- Choose a location to save your PDF
- Name your file
Doing so turns your slides in PDF handouts that you can then distribute to your audience.
NOTE: This is slightly different than ‘converting’ your PowerPoint into the PDF file format. To expand your knowledge and learn how to convert your slides into a PDF document (and objects that will not properly convert), read our article here .
Printing Speaker Notes Next to Your Handouts
One last thing you might want to do is print your speaker notes next to multiple slides on a single page. You can do this by converting PowerPoint to Word.
To convert PowerPoint to Word as handouts, simply:
- Navigate to the File tab
- Select Export on the left
- Choose Create Handouts
- Click the Create Handouts command
- Select Notes next to slides
Your PowerPoint slides and speaker notes are then pushed into a table in Microsoft Word.
The length of your individual speaker notes is what determines how many slides you can have on a single page.
Once you are in Microsoft Word, you can select and format your speaker notes or resize the table in any way you like.
If you need additional help converting PowerPoint to Word, read our guide here .
Formatting Your Handout Master
If you plan to print your slides as handouts for your event, I recommend formatting the Handout Master. This allows you to add your company logo, contact information, etc.
In short, this is your chance to make your handouts look professional. To do this, simply follow these steps.
1. Navigate to the View tab

In the PowerPoint Ribbon, click the View tab.
2. Select the Handout Master command

Inside the View tab, click the Handout Master command (in the Master Views group).
3. Format your Handout Master

You can edit the Handout Master just like you would normally edit your PowerPoint slides.
You can add company logos, your contact details, design elements, etc. Just make sure that you pay attention to the Page Layout and Placeholders sections in regards to how many slides you want to print per page.
Also, if you want to save the changes you made to your Handout Master, you will have to save a local copy of your presentation to your computer. The online version of PowerPoint currently does not allow you to save changes to the Handout Master in PowerPoint.
So that’s how to print multiples slides on one page in PowerPoint. In addition, you learned some formatting options to be aware of when printing your presentations.
Again, if you are distributing your slides as handouts in a professional setting, I highly recommend formatting your Handout Master first (described above).
That will not only make your handouts look more polished, it will make it easier for your audience to follow along and get in touch with you in the future.
If you enjoyed the depth of this tutorial and want to learn more about our PowerPoint training courses and other free resources, visit us here .
🔒 Unlock the PowerPoint Shortcuts Trusted by Industry Leaders KKR, American Express, HSBC, and More!
Join over 114,880 professionals from diverse fields including consulting, investment banking, advertising, marketing, sales, and business development who have supercharged their PowerPoint game with our proven methods.
✅ Customize compelling presentations effortlessly.
✅ Master time-saving techniques for faster deck creation.
✅ Boost your career prospects with top-notch PowerPoint skills.
Get FREE access to the Critical PowerPoint Shortcuts module of our premium training course by entering your name and email below.
DISCLAIMER: PC Users Only!
We respect your privacy and will keep your info safe and confidential.
Related Articles
About the author.

Popular Tutorials
- How to Strikethrough Text (l̶i̶k̶e̶ ̶t̶h̶i̶s̶) in Word, Excel & PowerPoint
- How to Make Animated Fireworks in PowerPoint (Step-by-Step)
- Strikethrough Shortcut (l̶i̶k̶e̶ ̶t̶h̶i̶s̶) for Word, Excel & PowerPoint
- How to Create a Flash Card Memory Game in PowerPoint (Like Jeopardy)
- Keyboard Shortcuts Not Working: Solved
PowerPoint Tutorial Categories
- Strategies & Opinions
- Presentation Design
- Pictures, Icons, Videos, Etc.
- New Features
- Miscellaneous
- Charts & Data Viz
We help busy professionals save hours and gain peace of mind, with corporate workshops, self-paced courses and tutorials for PowerPoint and Word.
Work With Us
- Corporate Training
- Presentation & Template Design
- Courses & Downloads
- PowerPoint Articles
- Word Articles
- Productivity Resources
Find a Tutorial
- Free Training
- For Businesses
We help busy office workers save hours and gain peace of mind, with tips, training and tutorials for Microsoft PowerPoint and Word.
Master Critical PowerPoint Shortcuts – Secure Your FREE Training Module and Save Valuable Time!
⌛ Master time-saving expert techniques.
🔥 Create powerful presentations.
🚀 Propel your career to new heights.
We value your privacy – we keep your info safe.
Discover PowerPoint Hacks Loved by Industry Giants - KKR, AmEx, HSBC!
Over 114,880 professionals in finance, marketing and sales have revolutionized their PPT skills with our proven methods.
Gain FREE access to a full module of our premium PowerPoint training program – Get started today!
We hate spam too and promise to keep your information safe.
You are currently viewing a placeholder content from Facebook . To access the actual content, click the button below. Please note that doing so will share data with third-party providers.
In order to continue enjoying our site, we ask that you confirm your identity as a human. Thank you very much for your cooperation.
How to Print Out in PowerPoint With Comments On: A Step-by-Step Guide
Printing out a PowerPoint presentation with comments is a handy feature for reviewing feedback or preparing for meetings. To accomplish this, you’ll need to access the ‘Print’ settings in PowerPoint and adjust the layout to include comments. It’s a straightforward process that can be completed in a few clicks.
After completing this action, you’ll have a physical copy of your presentation that includes all the comments made by you or others. This can serve as a valuable resource for making revisions or as a reference during discussions.
Introduction
PowerPoint presentations are a staple in the business and academic worlds. They serve as visual aids, help to convey information clearly, and can be a powerful tool for persuasion. But what happens when you need to share the feedback on your presentation with others, or you want to have a hard copy to review offline? That’s where printing your PowerPoint with comments comes in handy.
Being able to print out PowerPoint slides with comments is crucial for various reasons. For one, it allows you to see the feedback in the context of the slide they’re referring to, making it easier to understand and implement changes. It’s also essential for meetings and presentations where you might need to discuss the comments with colleagues or clients. Essentially, anyone who uses PowerPoint and receives feedback on their presentations can benefit from knowing how to print their slides with comments.
Step by Step Tutorial: How to Print Out in PowerPoint With Comments On
Before diving into the steps, let’s clarify what we’ll achieve. By following these steps, you’ll be able to print your PowerPoint slides along with any comments that have been added. This is perfect for reviewing feedback or preparing for a meeting where you might need to discuss the comments.
Step 1: Open your presentation in PowerPoint
Open the PowerPoint presentation that includes the comments you want to print.
This step is pretty self-explanatory, but it’s crucial. Make sure you have the correct presentation open and that all the comments you want to include are saved.
Step 2: Click on ‘File’ and then ‘Print’
Navigate to the ‘File’ tab in the top-left corner of PowerPoint and click on ‘Print’.
The ‘Print’ menu is where you’ll find all the settings needed to include comments in your printout.
Step 3: Under ‘Settings’, click on ‘Full Page Slides’
In the ‘Print’ menu, you’ll see a ‘Settings’ section. Click on the dropdown that usually says ‘Full Page Slides’.
This will open up more printing options for your presentation.
Step 4: Choose the ‘Print Layout’
In the dropdown menu, select ‘Notes Pages’ to print the slides with the comments on the side.
When you select ‘Notes Pages’, you’re telling PowerPoint that you want to include the notes pane, which is where the comments are displayed, in your printout.
Step 5: Click ‘Print’
After selecting ‘Notes Pages’, just click on ‘Print’, and your presentation, along with the comments, will begin printing.
Make sure your printer is set up correctly before clicking ‘Print’ to avoid any mishaps.
| Benefit | Explanation |
|---|---|
| Clarity | Printing with comments provides clarity for revisions. |
| Reference for Discussions | Helpful during meetings to discuss feedback. |
| Physical Record | Creates a physical record of feedback for future reference. |
| Drawback | Explanation |
|---|---|
| Consumes More Paper | Printing comments uses more paper than printing slides alone. |
| Time-Consuming | Reviewing and printing comments can be time-consuming. |
| Potentially Confusing Layout | Comments may not always print in a clear or organized manner. |
Additional Information
When printing out PowerPoint slides with comments, there are a few things to keep in mind. Firstly, the comments will print out on the notes pages, which means each slide will be accompanied by a full page of notes. This can consume a lot of paper, so it’s a good idea to review and consolidate comments before printing.
Another tip is to make sure that the comments are properly formatted and easy to read. You can adjust the font size and style of the comments in the ‘Notes Master’ to make them more print-friendly. Additionally, keep in mind that not all printers are created equal, so you may need to adjust your printer settings to ensure the best quality printout.
Lastly, if you’re printing comments for a meeting or presentation, consider organizing them in a way that makes them easy to refer to during the discussion. This might mean printing out a separate copy for each participant or creating a summary of the most critical comments to focus on.
- Open your presentation in PowerPoint.
- Navigate to ‘File’ and click on ‘Print’.
- Click on the dropdown under ‘Settings’ and select ‘Full Page Slides’.
- Choose the ‘Print Layout’ by selecting ‘Notes Pages’.
- Click ‘Print’ to print your presentation with comments.
Frequently Asked Questions
Can i print comments from powerpoint online.
Yes, you can print comments from the online version of PowerPoint by accessing the ‘Print’ menu and following similar steps.
Can I customize the way comments are printed?
Yes, you can customize the printout by adjusting settings in the ‘Notes Master’ section.
Can I print comments without the slides?
No, comments are printed on the notes pages alongside the slides.
What if my comments don’t print correctly?
Ensure your printer settings are correct and that the comments are formatted properly in PowerPoint.
Can I save the presentation with comments as a PDF instead?
Yes, you can save your presentation as a PDF with comments by choosing ‘Save As’ and selecting ‘PDF’.
Knowing how to print out in PowerPoint with comments on can significantly enhance your ability to review and share feedback efficiently. Whether you’re preparing for a big meeting, collaborating on a group project, or just need a clear way to see all the suggestions for your presentation, this feature is incredibly useful.
Remember, it’s not just about printing; it’s about creating a tangible record of the valuable input you’ve received. So next time you get feedback on a PowerPoint presentation, don’t just skim through it on your computer screen—print it out, mark it up, and make those comments count!

Matthew Burleigh has been writing tech tutorials since 2008. His writing has appeared on dozens of different websites and been read over 50 million times.
After receiving his Bachelor’s and Master’s degrees in Computer Science he spent several years working in IT management for small businesses. However, he now works full time writing content online and creating websites.
His main writing topics include iPhones, Microsoft Office, Google Apps, Android, and Photoshop, but he has also written about many other tech topics as well.
Read his full bio here.
Share this:
Join our free newsletter.
Featured guides and deals
You may opt out at any time. Read our Privacy Policy
Related posts:
- How to Save Powerpoint as PDF with Notes
- Can I Convert My Powerpoint to Google Slides?
- How to Print Comments Only in MS Word: A Step-by-Step Guide
- How Do I Print Just the Notes in Powerpoint 2010?
- How to Show Speaker Notes in Google Slides
- How to Drag Slides From One PowerPoint to Another: A Step-by-Step Guide
- How to Set Time for Slides in Powerpoint
- How to Check Word Count on Powerpoint 2010
- How to Make a Powerpoint Slide Vertical in Powerpoint 2013
- How to See Notes on PowerPoint on the Laptop: A Step-by-Step Guide
- How to Print an Outline of the Presentation in Powerpoint
- How to Print Powerpoint with Comments
- How to Remove Markup Notes in a Microsoft Word Document Easily
- How to Unhide a Slide in Powerpoint 2013
- How to Change the Font on All Slides in Google Slides
- How to Loop a Slideshow on Powerpoint 2013
- How to Print Comments in Excel 2010
- How to Insert Slides from Another Presentation in Powerpoint 2010
- How to Convert a PowerPoint to Word and Edit with Ease
- How to Change Hyperlink Color in Powerpoint 2010 (An Easy 5 Step Guide)
- Skip to main content
- Skip to secondary menu
- Skip to primary sidebar
- Skip to footer
Erin Wright Writing
Writing-Related Software Tutorials
How to Create Handouts in PowerPoint (Printable & Editable)
By Erin Wright

Quick Links:
How to Create Printable PowerPoint Handouts
How to create editable powerpoint handouts with microsoft word.
This tutorial is also available as a YouTube video showing all the steps in real time.
Watch more than 100 other writing-related software tutorials on my YouTube channel .
The images below are from PowerPoint for Microsoft 365 and Word for Microsoft 365. These steps also apply to PowerPoint 2019, PowerPoint 2016, and PowerPoint 2013.
- Select the File tab in the ribbon.

- Select Print in the Backstage view.

- (Optional) If you don’t want include all your slides, enter specific slide numbers separated by commas or a number range (e.g., 3,5,7,9-14) into the Slides text box.

- Select the Full Page Slides menu.

- Select an option from the Handout section in the menu. (You may need to use the scrollbar on the right side of the menu to see all the options shown here.)
- One slide per page
- Two slides per page
- Three slides per page with lines for notes
- Four horizontal slides per page
- Six horizontal slides per page
- Nine horizontal slides per page
- Four vertical slides per page
- Six vertical slides per page
- Nine vertical slides per page

- (Optional in PowerPoint for Microsoft 365 only) Uncheck Print slide numbers on handouts if you don’t want to include slide numbers.

- (Optional) Enter the number of copies into the Copies text box.

- Select the Print button.

PowerPoint doesn’t provide a way to save the handout options you just chose. So, repeat these steps if you need to print additional handouts in the future.
Important Note: Some users may have difficulty exporting large PowerPoint files into Microsoft Word. If you encounter problems, please see the Microsoft Support website for two possible solutions .
- Select the File tab in the ribbon (see figure 1).
- Select Export in the Backstage view.

- Select Create Handouts in the Export screen.

- Select the Create Handouts button.

- Select a page layout option from the Send to Microsoft Word dialog box. (The dialog box label may be abbreviated to “Send to Microsoft…”)
- Note next to slides
- Blank lines next to slides
- Notes below slides
- Blank lines below slides
- Outline only (This option only pastes the text from your slides, not the slides themselves.)

- Select the Paste or Paste link option. (These options won’t be available if you selected “Outline only” in step 5.)
- Paste duplicates your slides and notes (if applicable) into a Word document.
- Paste link duplicates your slides and notes (if applicable) into a Word document and creates a link between the files. Therefore, if you update your PowerPoint slides, the Word file will update also. (Unfortunately, the links don’t apply to PowerPoint notes.)

- Select the OK button.

Your PowerPoint file will be pasted into a Word document. This process may take several moments if your PowerPoint file is large.
- If Microsoft Word doesn’t open automatically, select the Word icon in the Windows taskbar.
- Within Word, your slides and notes (if applicable) are placed in a table. Select the table selector to see the table rows and columns, which you can adjust or delete.

For more information about working with tables in Word, please see “ Three Ways to Insert Tables in Microsoft Word .”
How to Update the Link between Your PowerPoint Slides and Your Word Handouts
If you selected Paste Link in step 6 but don’t see updates in your Word handouts after updating the PowerPoint slides, right-click the slide in the Word file and then select Update Link from the shortcut menu.

Continue to add content to your new Word file, and then save and print it as you normally would.
Related Resources
How to Save Shapes and Objects as Images in PowerPoint
How to Convert PDFs to PowerPoint Slides in Adobe Acrobat
How to Insert a Linked PowerPoint Slide in Microsoft Word
Updated November 02, 2021
- Microsoft Word Tutorials
- Adobe Acrobat Tutorials
- PowerPoint Tutorials
- Writing Tips
- Editing Tips
- Writing-Related Resources
Byte Bite Bit
How to Print Handouts in PowerPoint: A Step-by-Step Guide
Navigating the ins and outs of PowerPoint can sometimes feel like steering a ship through a stormy sea. Yet, when it comes to printing handouts, there’s a tried-and-true method to ensure your audience stays engaged without you feeling lost at sea. Printing handouts in PowerPoint is as simple as selecting your desired layout and adjusting your printer settings to produce the perfect companion for your presentation.

I remember my first time creating handouts for a big presentation; I was nervous about whether it would all come together smoothly. The process seemed daunting, but once I got the hang of it, it became second nature. Your handouts can be one, two, or even nine slides per page, making it a versatile tool for different types of presentations. Depending on the information density, you can choose a layout that ensures readability without overwhelming your audience.
Make sure you experiment with details like headers, footers, and even the color scheme. By doing so, you create handouts that not only reflect your presentation but also provide a handy reference. Exporting handouts to Word can further enhance their editability and help keep your audience’s attention both during and after your presentation. So, let’s dive in and get those handouts ready to shine!
- 1.1 Optimizing Slide Layout and Content
- 1.2 Incorporating Visuals and Charts
- 2.1 Selecting the Right Print Options
- 2.2 Customizing Printouts for Various Audiences
- 3.1 Utilizing Master Views for Consistency
- 3.2 Adding Speaker Notes and References
- 4 Exporting and Sharing PowerPoint Handouts
Creating Impactful PowerPoint Handouts
Creating impactful handouts involves optimizing the layout and content of your slides, while incorporating visuals and charts to make them engaging and informative for your audience.
Optimizing Slide Layout and Content
When it comes to handouts , organizing your slides effectively is crucial. I recommend starting with an outline view in PowerPoint to map out the key points. Keeping content concise avoids overwhelming your audience. Less is more—short, clear sentences work best.
To structure your content, use PowerPoint templates . They offer predefined layouts that ensure consistency. Also, consider the print layout . Choose a layout that suits your presentation style—common options include 3 slides per page with notes or 6 slides without notes. This helps balance readability with content without cramping the page.
| 3 Slides with Notes | Includes lines for audience to take notes. |
| 6 Slides | More slides per page without notes. |
Formatting the background can also enhance readability. A simple, light-colored background with dark text often works best. Avoid overly bright colors that can distract from the main content.
Incorporating Visuals and Charts
Incorporating images , charts , and other visuals is essential for making your handouts engaging. I always suggest using high-quality visuals that are directly relevant to the content. This not only makes the handout visually appealing but also aids in understanding complex data.
Charts and graphs are particularly useful when presenting statistical data. Use simple charts like bar, pie, or line charts to convey your message. Ensure they are labeled clearly and avoid cluttering them with too much information.
Check the format of each visual element. They should be large enough to be readable when printed but not so large that they dominate the page. Use the “Insert” menu in PowerPoint to add these elements and adjust their size accordingly.
Remember, the goal is to make your handouts as useful and engaging as possible. Balancing text with visuals provides a more digestible and enjoyable experience for your audience, like adding the right amount of seasoning to a dish.
Effective Printing Techniques for Handouts
When printing handouts in PowerPoint, choosing the right options and tailoring printouts to different audiences is key. It can make presentations more engaging and easier to follow, whether in schools or business meetings.
Selecting the Right Print Options
Picking the correct print settings impacts both presentation quality and material usage. To start, go to File > Print . In the dropdown for Settings , select Handouts . Options include:
- Full Page Slides : One slide per page. Great for details.
- 2/3/4/6/9 Slides per Page : Ideal for saving paper and summarizing.
Handouts with multiple slides per page often work best in a classroom or meeting setting, where notes can be taken next to each slide. If you’re presenting to an audience that likes comprehensive details, choose fewer slides per page.
Customizing Printouts for Various Audiences
Customizing your handouts ensures they match your audience’s needs. Education professionals might prefer handouts with space for notes. Business professionals might opt for fewer slides per page, focusing on key points.
- For educators, use 3 slides per page with note-taking sections.
- For business meetings, consider 6 slides per page for concise overviews.
To customize slide ranges, use the Slides box. Enter specific slide numbers separated by commas or a range (e.g., 1,3,5-8). This method allows tailoring content, ensuring relevance without unnecessary information.
Enhancing Handouts with Additional Features
Mastering handout customization in PowerPoint can elevate the clarity and professionalism of your presentations. Let’s look at how to use Master Views for consistency and enrich your handouts with speaker notes and references.
Utilizing Master Views for Consistency
The Handout Master view is a powerful tool for ensuring uniformity across your printed handouts. By accessing it through the “View” tab and selecting “Handout Master,” you can modify layouts, adjust headers and footers, and include page numbers in just a few clicks.
| Add custom text | Branding and additional info | |
| Auto-number slides | Easy navigation | |
| Auto-number pages | Professional look |
Think of this as setting a foundation where every page follows the same structure. Much like a well-crafted recipe, the Handout Master ensures that your ingredients are consistent throughout.
Adding Speaker Notes and References
Integrating speaker notes and references adds depth to your handouts. By including speaker notes, you provide additional context and insights that might not fit on the slide itself. This is particularly useful when the handout is intended for an audience review later.
To add these:
- Go to Notes Page View: Under the “View” tab, select “Notes Page”.
- Edit Notes Section: Type directly in the notes pane below the slide.
- Print Options: Select “File” > “Print” > “Notes Pages” to include notes in the printout.
Adding references can be as simple as a list of sources at the end of your handout or footer notes. This approach not only adds credibility but also provides additional reading material for those interested in diving deeper into your topic.
By utilizing these features, your handouts become more than just a hardcopy of slides; they transform into comprehensive guides that capture the essence of your presentation.
Remember, consistency and added information in your handouts will make you look like the pro you are. 👌
Exporting and Sharing PowerPoint Handouts
Creating handouts in PowerPoint makes presentations more engaging and easier to follow along. I love using handouts not just for printing, but also for sharing electronically. You can export to various formats like PDF files or Word documents .
To export handouts:
- Open your PowerPoint presentation.
- Go to the File menu.
- Choose Export .
- Select Create Handouts .
- Pick your desired page layout.
You can choose between different layouts: single slides per page for fewer notes, or the 3-slide layout that includes note lines for your audience to jot down their thoughts.
For those on macOS, the steps are quite similar. You still go through the File menu, but navigating to the print settings might involve slight differences in options.
Choosing between Portrait or Landscape Orientation for your handouts depends on your content and audience preferences.
One cool trick: exporting to a Word document allows you to edit and format handouts extensively. This flexibility is useful for adding additional data or tweaking the layout to better fit your presentation style.
If you prefer video tutorials, platforms like Envato Elements offer detailed guides. Videos explain not just the steps, but also best practices for effective handouts.
When it comes to printing, heading to the Print tab in the File menu displays a preview. You can select specific slides or the entire deck. This is super handy, especially when you only need certain sections.
Sharing has never been easier. Once exported, emails or cloud storage options let you distribute the handouts seamlessly. This isn’t just about printing; it’s about enhancing the learning experience and ensuring everyone has the information they need.
Who knew creating handouts could be this versatile? 🍏
Related posts:
- How to Save PowerPoint as Video: Step-by-Step Guide for Beginners
- How to Embed Excel into PowerPoint: A Step-by-Step Guide
- How to Add Notes to PowerPoint: A Step-by-Step Guide for Enhanced Presentations
- How to Edit Background Graphics in PowerPoint: Step-by-Step Guide for Effective Presentations
- How to Track Changes in PowerPoint: A Step-by-Step Guide
- How to Create Master Slides in PowerPoint: Easy Guide for Professionals
- How to Compress Media in PowerPoint: Enhancing Performance and Quality
- How to Make a Shape Transparent in PowerPoint: Step-by-Step Guide
- How to Change Footer in PowerPoint: A Step-by-Step Guide
- How to Save a Template in PowerPoint: A Step-by-Step Guide
- How to Add Multiple Animations to One Object in PowerPoint: Step-by-Step Guide
- Click the Part of the PowerPoint Interface Where You Would Add Content to Slides: A Simple Guide
Leave a Comment Cancel reply
Save my name, email, and website in this browser for the next time I comment.
60 Effective PowerPoint Presentation Tips & Tricks (Giant List)
Here's a PowerPoint presentation tips and tricks guide that takes you through how to make a good PowerPoint presentation.

The best PowerPoint presentations shouldn’t be remembered. Instead, they should fall into the background to support you and the message you’re trying to get across.
Unlike good PowerPoint presentations , bad PowerPoint presentations are a distraction. You may remember them, but not in a good way.
You’ve seen them before. They might have millions of lines of text. Or a disjointed flow to the slides. Even worse, some slides feature ugly photos and poor design that detract from the message you’re trying to get across. That can even hurt your credibility as a professional or speaker.

This article will take you from finding your initial topic to learning how to make a great PowerPoint presentation. Our guide covers everything in between so that you learn how to present a PowerPoint like a pro.
These Microsoft PowerPoint presentation tips and guidelines are organized into sections. So cut straight to the advice you need and come back when you’re ready for the next steps.
Guide to Making Great Presentations (Free eBook Download)

Also, download our Free eBook: The Complete Guide to Making Great Presentations . It’s the deepest resource for learning effective presentation skills for a PPT.
This eBook covers the complete presentation process. It takes the PowerPoint tips and tricks you learn in this article further. Learn how to write your presentation, design it like a pro, and prepare it to present powerfully. It’s another great source for presentation design tips.
Master PowerPoint (Free Course): 15 Essential Tips
This article is full of helpful tips so you can build a powerful presentation. You can also find more PowerPoint tips in this video lesson:
To learn even more about how to make a PowerPoint look good, review the huge list of tips below.
What Makes a PowerPoint Presentation Effective?
Knowing how to use PowerPoint and work within it quickly is helpful. But more important is making a good presentation that hits all your goals. A great PowerPoint presentation is:
- Prepared to Win . Research, plan, and prepare your presentation professionally. It helps you deliver an effective message to your target audience.
- Designed Correctly . Your visual points should stand out without overwhelming your audience. A good PowerPoint visual shouldn’t complicate your message.
- Practiced to Perfection . Rehearse your timing and delivery so that your points land as practiced with a live audience.
- Delivered With Poise . Present with a relaxed inner calm and confident outward projection. Give your audience warmth, excitement, and energy.
- Free From Mistakes . Avoid typos, cheesy clip art, and mistakes like reading directly from your slides.
Consider this your all-inclusive guide to how to make a good presentation. We’ll look at preparing your presentation and explore how to design it in PowerPoint. Plus, we’ll cover how to practice and nail your delivery successfully come presentation time.
We’ll also address what not to do in these tips for PowerPoint presentations—so you can sidestep any big mistakes. Now let’s dig into these tips for effective PowerPoint presentations.
Killer Presentation Preparation Tips to Get Started Right
Before even opening PowerPoint, start by addressing these things. These Microsoft PowerPoint tips and tricks will ensure that you’re prepared for your presentation:
1. Know Your Stuff
Your presentation isn’t about your slides alone. It’s about the message you want to get across. Before filling in stats, facts and figures, think about the narrative that’ll be discussed, why, and in what order.
2. Write It Out
Start in a Word or Google doc, and storyboard or script the entire presentation. This will give you an idea of how the information presented will flow and how viewers will see it in sequence. Learn the complete writing process .
3. Highlight What’s Most Important
A presentation covers the most crucial pieces only. Whatever you’ve been working on that led to this—a paper, a work project, a new product design—doesn’t need to be shared in its entirety. Pick key points and put the rest in an “Appendix” to refer to during the Q&A session at the end.
4. Know Your Audience
How you talk to a room full of medical professionals should be different from the way you address a room full of young entrepreneurs. Everything, in fact, is different: your topic selection, the language you use, the examples you give to illustrate points. The little bits of humor you include should be tailored specifically with your target audience in mind.
Understand your audience’s needs to create a successful PowerPoint presentation. Customize your content to meet their specific requirements.
5. Rehearse! (Yes, Already)
It’s never too early to get used to the rhythm of your presentation and take note of points you want to emphasize. While saying it out loud, you’ll start to develop a “feel” for the material. You’ll notice that some things work well, while others don’t and might need to be worked around.
6. Rewrite After You Rehearse
As you’re rehearsing your presentation, you’re bound to stumble over sections that don’t quite flow naturally. Instead of reworking your delivery, it might be time to consider the content and rewrite the areas that served as stumbling blocks.
“Editing is hard. ‘It’s good enough,’ is a phrase wannabes use. Leaders take editing seriously.” – Anthony Trendl
The most important part of creating a great presentation is the writing stage. The second most important stage is rewriting.
7. Share With a Friend
If the stakes are high for your presentation, it’s never too early to get feedback from those that you trust. Here’s an article that helps you collaborate as a team on a PowerPoint presentation. Get PowerPoint design tips from those that you trust when you collaborate.
Simple Tips to Design Your PowerPoint Presentation Better
Second only to you (the information you bring and how you present it) is your PowerPoint slides. If not designed well, a PowerPoint can be disengaging or distracting (regardless of the content quality). Here are some presentation design tips to make sure this doesn’t happen to you:
8. Keep Your Slides Simple
This is one of the most important PowerPoint presentation tips to follow when designing your slides. Keep in mind that less is more (effective.) A cluttered slide is distracting. It causes confusion for an audience: Which part of the slide should I focus on? Should I read the slide or pay attention to the presenter?
A simple, visually appealing slide will engage your audience, keeping them on track with your main points. Here’s an example of a simple slide that serves its purpose perfectly:

Minimalist slide templates like Nook can help you resist the urge to clutter your slides.
9. Limit Words on Your Slides
Piggybacking on the last point, less is more effective. If possible, avoid bullets altogether. Otherwise cut them to just a few simple words. The audience should be listening, not reading.
10. Use High-Quality Photos and Graphics
One of the most important tips for quality PowerPoint presentations is to use high-quality photos and graphics.
Earlier in this tutorial, you saw Envato Elements, an all-you-can-download service with PPT tips inside of templates. Those pre-built designs are a beginner’s best friend. They’re even better when paired with Elements’ unlimited library of stock photos .
People are more likely to take you seriously if your presentation is visually appealing. Users view attractive design as more usable. Similarly, they’ll view a more attractive PowerPoint as more effective.
11. Use Accurate and Relevant Charts and Graphs
Charts and graphs can also be distracting if they’re not used right. Make sure your information design is simple and clean so that the audience doesn’t spend the entire time trying to decipher what your X axis says. Learn more about PPT data presentation .
12. Use High-Quality, Fresh Templates
Have you seen the old PowerPoint template that looks like worn paper and uses ink splashes? Yeah, so has your audience. Templates can be distracting if they’re too basic or if the design feels dated. You need one with great design options.
Costs are always a concern. But when you use Envato Elements, you’ve got everything you need to create a great PowerPoint presentation . That’s thanks to the incredible all-you-can-download subscription package.
The best PowerPoint tips and tricks can hardly compare to the value of using a template while building your presentation.
On Envato Elements, there are thousands of PowerPoint design templates that are ready to use. Instead of designing a presentation from scratch, start with a template! Just add your specifics to the placeholders.

Templates like Galaxi are impressively designed and waiting for your slide specifics.
The best PowerPoint design tips save you time. And there’s no tip more powerful than this one: use a pre-built template . It helps you master how to present a PowerPoint without spending all your time in the app.
13. Choose Appropriate Fonts
Fonts are an important part of engaging your audience. Fonts and typography choices have a subconscious effect on viewers. They can characterize your company’s presentation and brand either positively or negatively. Make sure that you’re choosing fonts that are professional and modern.
14. Choose Color Well
Like font choice, colors cause specific subconscious reactions from viewers. Choosing an outdated color combination for your presentation will render it ineffective.
Below is an example of the Popsicle PowerPoint template , which has a modern presentation color choice:

The Popsicle PowerPoint template highlights how harmonized color palettes can create beautiful slides.
15. Clean + Simple Formatting Makes All the Difference!
We’ve got a full tutorial on how to make a good presentation slide . Give it a read through and review the accompanying video. Just remember, less is more. The focus is you and your message , not your slides.
16. Make Sure All Objects Are Aligned
A simple way to create a well-designed presentation is to make sure all items on a slide are intentionally aligned. To do this, hold down Shift and select all the objects you want to include. Then choose Arrange in the options bar and apply Alignment Type .
17. Limit Punctuation
This isn’t the place for exclamation points. Emphasize your points (while speaking). Don’t enlist punctuation to do this for you. (Leave these at home!!!)
18. Avoid Over-Formatting Your Points
This PowerPoint presentation tip is simple. There’s no need to have every word of every bullet point capitalized, or to have all your bullet points in title case. If possible, drop bullets altogether. Again, the simpler, the better!
Limit your text formatting, including reducing the use of bullets, underline, and other effects. Compare the before example on the left to the revised version on the right.

19. Combine Information With Graphics in PowerPoint
One of the most powerful presentation skills for PPT is using infographics. With the right type of visuals, slides come to life and reduce the text in favor of graphics.
Infographics help combine information with graphics. It’s easier to explain complex ideas when you use visual formats that are intuitive.
Practice Presentation Tips: Rehearse, Rehearse, Rehearse!
Delivery is probably more important than the actual content. Here’s how to become more aware of your own unique ticks, and how to present like a polished pro:
20. I’ll Say It Again, Rehearse!
Just do it. Again and again. Experiment with pauses, gestures, and body language. Practice around one hour for every minute of your speech.
21. Practice With a Timer
Consistency is key to an effective PowerPoint presentation. The timing should be similar (ideally the same) each time you rehearse. This one will especially pay off when it’s time to present in front of your audience.
22. Slow It Down
Many of the best speakers today intentionally speak slowly. You’ll have the chance to emphasize, appear more thoughtful, and make your information easier to digest.
23. Pause More Often
Like the prior tip, pausing more often allows your main points to be emphasized and gives time for information to sink in. You need to let key points breathe a little before rushing into the next section.
24. Record Yourself
Use your phone’s voice recorder. Assess and critique yourself. Consider:
- Are your pauses too short or too long?
- Are you speaking slowly enough? Too slow?
- When you’re nervous, does your voice get high like the mice in Cinderella?

It’s always weird to hear your own voice recorded; don’t stress it. Use this as a time to adjust.
25. Choose Three Focal Points in the Room
If you stare at the same spot (or even creepier, the same person) the entire time, your presentation will be ineffective (and awkward.) People will be distracted by you, wondering what you’re staring at.
Try this: pick three points in the room (typically: left, center, right). Take time to direct your delivery toward each physical focal point in the room. Also, focus on the center when making your primary points.
26. Vary Your Sentence Length
This makes you sound more interesting, and it’s easier for your audience to follow. Think short and punchy. Or go long and complex for dramatic effect.
27. Modulate!
Don’t speak in monotone for your whole presentation. Be conscious of raising and lowering your voice tone. Otherwise, people will tune you out, and you’ll come across like the teacher in Charlie Brown.
28. Practice in Front of a Mirror
What you look like is as important as how you sound. Pretend you’re having a normal conversation, and allow your hands to move with your speech to emphasize your points. Just don’t get carried away! (I’m thinking Brene Brown or President Obama , not your Aunt Jamie after a few gin and tonics.)
29. Use “Present Mode” When Rehearsing
When you finally are ready to hit the Present button in PowerPoint, make sure you use the Present Mode option. This allows you (and only you) to view extra notes about each slide—just in case you forget something!
30. Practice With New Audiences
If possible, try doing a few real live test runs as a webinar or even at a local Toastmasters organization to get some feedback from a live audience.
31. Engage the Audience by Asking Questions
There’s no reason that a presentation should be one-sided. Why not invert the format and ask your audience a question?
To learn how to create a slide that kicks off a Q&A, use this article . These PowerPoint design tips help you create an engaging and exciting discussion.
Helpful Tips to Step Up and Deliver Come Presentation Time
When the actual day arrives, there are only a few last PowerPoint presentation tips and guidelines to keep in mind:
32. Take a Deep Breath
Deep breathing is proven to relieve stress. It’s simple, and it’ll help you remain calm and in the moment, even up to the last minute before starting.
33. Lighten Up Your Mood
Tell yourself a joke or watch a funny video clip. Do this before the presentation, of course. Research concludes that happy people are more productive. More productive is more focused and able to perform better.
34. Remind Yourself to Take It Slow
When we’re stressed or nervous (or both), we tend to speak faster. Consciously, take yet another deep breath and remind yourself to take it slow!
35. Read the Room
Every presentation room has a temperature. It’s your job as a speaker to gauge it and tailor your presentation to it.
Here’s a great example. Layoffs are coming at a company, and you’re asked to speak to an audience. Even if the audience isn’t personally affected by the actions, you’ve got to consider the morale of the workforce.

Skilled speakers have a knack for reading the energy of the room and adjusting their presentation on the fly.
The last thing that group will want to hear is how strong the economy is and why the company is the best place to work. That doesn’t mean that you’ve got to align to their uncertainty, but don’t go too far against the grain while presenting.
Robert Kennedy III is a master of bringing energy and aligning a speech to the audience. Here’s his advice for adjusting:
“It can be hard to wake up a “dead” crowd but go for it. Most of all, don’t take their energy personally. Focus on serving them with every bit of your fiber then leave empty.”
36. Fake It ‘Til You Make It!
Go forward with confidence. If you act confident, you’ll start to feel more confident. Move slowly with grace, speak clearly, smile, wear something nice. You’ll appear confident to all attendees (no matter how you feel internally).
PowerPoint Presentation Tips and Tricks to Help Avoid Mistakes (What Not to Do)
Most importantly, focus on what you can do to make your presentation better. There are a few important things not to do that we’ve got to address. Here are a handful of PowerPoint presentation tips and tricks to help you avoid missteps.
37. Stop With the Sound Effects
Sound effects are distracting and outdated. In most cases, avoid them. Add audio or music to your presentation to inject interest or highlight an important point, but it’s something to take extra care with. If you insert audio, then make sure your use really connects with your audience and has a fresh approach. Otherwise, it’s best to leave it out.
38. Don’t Use Flashy Slide Transitions
Again, this is distracting and outdated. Use transitions and subtle animations in your PowerPoint presentation. But you need to take care and do it right .
39. Beware of Clip Art
This PowerPoint presentation tip shouldn’t even have to be said. But please, please don’t use clip art. Use professional graphics instead.
40. Don’t Be Afraid to Be Afraid
The fear of public speaking is a real one. Many beginners think that if they’re feeling nervous that a presentation won’t go well or succeed. That might lead them to cancel the presentation.
Here’s a tip from expert Sandra Zimmer, who leads The Self-Expression Center on conquering your fears before you take the stage:
“Get out of your head and into your body. I do this through a grounding exercise that really works to calm nerves and bring you present in the moment.”
If you think that public speaking fears aren’t normal, you might never give your award-winning presentation. So don’t be afraid to be afraid, and acknowledge it’s part of the process!
41. Don’t Read Directly During Your PowerPoint Presentation
If you spend your entire presentation looking at the screen or your note cards, you’re sure to lose your audience’s attention. They’ll disengage from what you’re saying, and your presentation will fall flat.
Reading from your paper or screen also makes it look like you’re not prepared. Many people do it, but no one should. As a general rule, only present something you know well and have, at least mostly, memorized the main points of.
42. Don’t Miss Out on PowerPoint Customizations
Many new PowerPoint users often make significant mistakes when using Envato Elements designs.
The best way to see how to make a good presentation PPT is to start with designs from others. That means using a template, but that doesn’t mean you can’t customize them!

Don’t forget that PowerPoint templates are infinitely customizable. Think of them as guides with built-in presentation design tips.
To see more presentation tips that show you what not to do, make sure to check out our guide .
Work in PowerPoint More Effectively (Tips & Tricks to Level Up Your PPT Skills)
These PowerPoint tips will help you get the most out of the application to level up your next presentation. Let’s dive in.
43. Use the Visual Guides
When you’re designing your next PowerPoint presentation, it helps to create a sense of visual rhythm. Slides that have objects aligned and centered are more likely to resonate with an audience.
44. Use a Few Animations (Tastefully)
Animations in effective PowerPoint presentations are a slippery slope. We’ve all sat through presentations where there were so many objects in motion that it was easy to lose focus on the key ideas in the presentation.
But that’s why animations get an unfairly bad reputation. Use animations to create motion and hold an audience’s attention. Use them sparingly and on key elements on your slide, and you’ll capture that attention properly.
45. Stage Key Content With Animations
You just learned that animations should avoid being distracting. But there’s an important principle to using animations properly. It’s called staging content.
Staging content means that the content appears step by step. There’s nothing worse than overwhelming an audience with all your content at once. But when you stage content, bring it on step by step.
Take it from presentation pro Suzannah Baum :
“If you’re sharing a slide with lots of different points on it, using the animation to reveal those points one at a time is a way to keep the presenter’s content flowing smoothly.”
For more animation presentation tips and tricks, follow our guide .
46. Add a Video to Your PowerPoint
When you’re sharing a big idea in your presentation, it helps to share your perspective from a few different angles. Adding a video to supplement your content can do just that. Luckily, it’s easy to add and embed a YouTube video in your next PowerPoint presentation.
47. Add Charts & Graphs
Charts and graphs can help you tell stories with data. It’s easy for an audience to zone out when you throw a big data table or set of statistics at them.
instead, convert those to charts and graphs. Try out our tutorial to learn how to edit those graphs.
48. Build Your Own Infographics With SmartArt
Earlier in this tutorial, we gave you one of my favorite PowerPoint design tips: use infographic templates.
Here’s another. One of my favorite PowerPoint features is SmartArt, which allows you to build infographics right inside the app.
You don’t have to use another graphic design app like Photoshop or Illustrator to add visuals. Instead, try out SmartArt to help you build graphics that are easy to update.
49. Use Presenter View
Remember that when you use the PowerPoint, you’ re the presentation. The slides are just there to reinforce what you’ve got to say and support your speaking points.
That’s why I always recommend using Presenter view. More often than not, you’re going to have several displays. Presenter view shows your content on your screen, while your presentation is displayed on another screen.
50. Track Your PowerPoint Changes
One of my favorite PowerPoint design tips is to collaborate. Those who know you best will suggest compelling changes that are sure to help you succeed.
As you start collaborating on your presentation, it helps to keep track of proposed and included PowerPoint changes. Use this article to track changes made by others.
10 More Advanced PowerPoint Tips & Tricks
Really need to wow an audience with a good PowerPoint presentation? Give these tips a try to make an unforgettable impression:
51. Engage With an Interactive Quiz
A good PowerPoint presentation gets your audience involved. One of the best PowerPoint tricks is to do that with a quiz. By engaging audiences, a quiz makes your slides memorable.

By adding trivia, you’ll see how to present a PowerPoint in a way that people will love. Channel your inner game-show host today. MIDTEST is a good PowerPoint presentation with quiz slides.
52. Illustrate With Custom Image Masks
One of the top PowerPoint tips is to illustrate your slides. But you can go beyond simple, rectangular images on each slide.

The Burte template is full of PowerPoint tricks , including custom image masks. Image masks shape photos into unique works of art. And thanks to premium templates, you can style photos just like this. Masks overlay your photos onto geometric shapes, instantly elevating your style.
53. Print Handouts With Extra Notes
Wonder how to give a good presentation PPT that audiences will remember? Give them a piece of it to take home.
PowerPoint makes it easy to print handouts with room for notes on the page. This way, audiences can keep copies of your slides, along with their own notes. This is the perfect way to ensure everyone engages with and retains your content.
54. Make Bulk Edits With Master Slides
When you think about how to present a PowerPoint, consider your branding. That means keeping your logo front and center in the eyes of an audience. But if you’re working with a lengthy slide deck, this could seem daunting.
That’s where master slides come in. They’re common in premium layouts, and they’re a leading example of presentation skills for PPT. Master slides let you make bulk edits fast.
55. Shrink File Sizes for Sharing
Many of the top presentation tips involve making your slides more accessible. Often, that involves sharing them with audiences online.
You’ll often find that email clients and cloud services limit the size of files that you share. This can be a problem with large PPT slide decks. But there are a few quick steps you can take to reduce PPT file size. Cut graphics, scale down photos, and more.
56. Map Processes With Flowcharts
As you consider how to do a good PowerPoint presentation, think of ease of understanding. After all, you’re trying to explain something to your audience.

The Flowcharts in Infographics template seamlessly illustrates ideas and processes. A flowchart maps out a process in a visual way. Instead of resorting to endless narration, try a quick illustration like this. It saves you time and effort, and your audience is sure to thank you.
57. Use Brand-Specific Colors
Using presentation skills for PPT helps form an association between your message and branding. There’s no better way to do that than with your brand colors.
PowerPoint makes it easy to change color themes, adding your brand colors and logo to each slide. This is one of the top PowerPoint tricks for marketing presentations.
58. Build Social Media Posts in PPT
A good PowerPoint presentation doesn’t have to be shared through a projector. Use the app and templates to build amazing illustrations to use anywhere.

A template like Soffee helps you learn how to present a PowerPoint easily with a pre-built design.
Try using PowerPoint to create social media posts. It helps you engage with your audience, with no need to design custom layouts from scratch.
59. Be Industry-Specific
One of the top presentation tips in 2024 is to be industry-specific. That means avoiding generic layouts and choosing something more customized.
This offers two key advantages. First, you save time by having layouts built for you. Second, you gain design inspiration for your specific topic. Themed templates are truly the best of both worlds.

The Medical and Health template is a good PowerPoint presentation with a set theme.
60. Design for Online (Virtual) Sharing
Last but not least in our list of PowerPoint tips comes virtual presenting. More and more often, slides will be shared with online audiences around the globe.
Why not design your slides for that very purpose? And then learn how to share flawlessly with a global team? It’s one of the top presentation tips for 2024. Embrace it today.
More Great PowerPoint Tutorial Resources
We’ve built a resource for Microsoft PowerPoint that you’re sure to want to try. It includes countless PowerPoint tips and tricks. It’s called How to Use PowerPoint (Ultimate Tutorial Guide) and has all the PowerPoint design tips you need.
Discover More Top PowerPoint Template Designs From Envato Elements for 2024
You’ve just seen our favorite powerful PowerPoint presentation tips and guidelines to help you improve your speaking. We’ve also mentioned Envato Elements, an incredible all-you-can-download source for top PowerPoint designs .
Here are five of the best PowerPoint templates that you can use to create your best presentation yet:
1. Galaxi PowerPoint Template
Blast off to success with the help of this PowerPoint template! Think of the pre-built slide designs as pro PowerPoint design tips. They’re built by professional graphic designers. All the popular and modern slide styles that are perfect for your next presentation. Use Galaxi’s five styles and 30 designs to create a great presentation.
2. Masmax PowerPoint Template

We selected templates for this article that match the PowerPoint tips and tricks provided. Masmax fits the bill perfectly across its 234 unique slide designs. These slide designs are sure to align with the latest in design expectations.
3. STYLE Multipurpose PowerPoint Template V50

Style is subjective, but we can all agree that this template is stunning! The light and airy slide designs are built with fashion-focused designs in mind. But that doesn’t mean that it’s not perfect for most presentations. When learning to present a PowerPoint, remember that templates can be customized to suit your purpose.
4. Peachme Creative PowerPoint Template

Peachme has image-focused slides with splashy designs. The slides are colorful and perfect for a modern presentation. Don’t worry about remembering all the PowerPoint design tips because they’re included in the pre-built slides. Use Peachme’s designs for your presentation today.
5. Buizi Office Building Rent PowerPoint Template

Buizi markets itself as a real estate focused template. It’s ideal for that purpose because of the minimal, image-focused slide designs. But that also makes it a perfect choice for presentations in many fields.
We’ve just scratched the surface of PowerPoint design tips with these five options. Here are many more, bundled inside of the best roundups on Envato Tuts+:
How to Build a Good PowerPoint Presentation Quickly (In 2024)
You’ve already seen effective presentation skills PPT techniques. But you may be wondering exactly how to do a good PowerPoint presentation. It only takes a few clicks. Let’s learn how in just five steps.
For this mini-tutorial, we’ll use the Enjoy PowerPoint Template from Envato Elements. You’ll see that it’s a beautiful template that helps you learn how to present a PowerPoint by giving you every object and layout you need.

Let’s get started:
1. Choose Your Slides
As you can see, a template like Enjoy has dozens of unique slides inside. The key to how to give a good presentation PPT is to choose only the slides that you need.

One of the best PowerPoint tricks is to start by selecting slides you wish to use from your template.
In PowerPoint, scroll through the sidebar on the left to view different slide layouts. Right-click and choose Delete to remove unwanted designs. Plus, you can click and drag slide thumbnails to reorder them in the deck.
2. Add Text
Consider how to do a good PowerPoint presentation without investing a ton of time. That’s where premium templates come in.

One of our top presentation tips when working with a PPT is to lean on the pre-built text boxes for your content.
To add custom text, simply click and select the contents of any text box on your slide. Then, type in your own words. Repeat as needed throughout your slide deck.
3. Customize Fonts
With text selected, it’s easy to customize fonts on each slide. Find the Font section on PowerPoint’s Home tab. From there, you’ve got a variety of dropdown options.

Another of our top tips for presentation tricks is to use a custom font setting in your template.
Click to change the font, font size, and more. You can also use the buttons on the left to add bolds, italics, and more.
Need more custom font styles? As an Envato Elements subscriber, you’ve got instant access to thousands of custom fonts . Use them in your presentation with ease.
4. Insert Images
Slides like this one contain an image placeholder. That’s another advantage found only with premium templates. These make adding images a breeze.

Add images to your PPTX template for more visually interesting slides.
To get started, find an image file stored on your computer. Then, drag and drop it over the placeholder. PowerPoint will import it, sized and scaled for a perfect fit.
5. Change Colors
One of the top effective presentation skills is changing shape colors. This helps you control the look and feel of each slide.

With a shape selected, find the Shape Format tab on PowerPoint’s ribbon. Then, click on the Shape Fill dropdown. You’ll see a color chooser menu appear. Click on any thumbnail to apply it to the shape or browse through the Gradient and Texture options.
Start Putting These PowerPoint Presentation Tips & Tricks Into Use Today!
Learning to write, design, and present a PowerPoint presentation is an invaluable skill, no matter where you use it. If you’re a good communicator of important messages, you’ll never go hungry.
Luckily, improving PowerPoint presentations isn’t as hard as it seems. Follow these tips for PowerPoint presentations to design and deliver with greater confidence.
Remember: Less is more (effective) . Use PowerPoint presentation templates for better design and more effective visual impact. And you can customize a PPT template quickly , with the right workflow.
Related Articles


PowerPoint Options (Advanced)
Many less commonly used PowerPoint options are located in the Advanced pane in the PowerPoint Options dialog box.
Editing options
When selecting, automatically select entire word Select this check box to select the entire word when you click a word, or clear this check box to select an individual letter in a word when you click a word.
Allow text to be dragged and dropped Select this check box to move or copy text within a presentation or from PowerPoint to another Microsoft Office program by dragging the text, or clear this check box to prevent dragging text to move or copy it.
Automatically switch keyboard to match language of surrounding text Select this check box when you are working with text in different languages. PowerPoint automatically detects the language in which the insertion point is placed, and switches to the correct keyboard language.
Do not automatically hyperlink screenshot When you use Insert > Screenshot and capture an image from the Internet Explorer web browser, PowerPoint can make the image a hyperlink that points to the web page that you take the screenshot of. Select this option if you don't want such images hyperlinked.
Maximum number of undos On the Quick Access Toolbar , the Undo command allows you to undo one or more of the recent changes that you made to your presentation. In this box, enter the number of times that you can click Undo to undo your changes at any particular time.
Cut, copy, and paste
Use smart cut and paste Select this check box if you want PowerPoint to adjust the spacing of words and objects that you paste into your presentation. Smart cut and paste ensures that pasted content does not run up against other words or objects that appear before or after the content that you paste. Clear this check box if you do not want PowerPoint to automatically adjust the spacing of words or objects.
Show Paste Options buttons Select this check box to show the Paste Options buttons, or clear this check box to hide the Paste Options buttons. The Paste Options buttons appear alongside text that you paste. By using these buttons, you can quickly choose between keeping the source formatting or pasting text only.
Note: When you clear the Show Paste Options buttons check box, you turn off this feature in all Office programs in which it is an option.
Use pen to select and interact with content by default If you don't want to automatically be in inking mode when Office detects your active pen or stylus, select this check box to use your pen to select objects by default.
Image size and quality
Options that you set in this section are only applicable to the presentation file that you have open at the time.
Discard editing data If you have cropped a picture or made other changes to the picture, such as applying an artistic effect or changing the brightness, contrast, or sharpness of a picture , information to reverse those changes is stored in your file. You can reduce the size of your file by deleting this editing data. Checking this option will reduce your document size, but if you want to undo your edits, you will need to reinsert the picture into your document if you want to undo any changes you have made. For more information, see Reduce the file size of a picture .
Do not compress images in file Compressing images in a file saves space, but it reduces the picture quality. If picture quality is more important to you than file size, select this check box. . To compress an individual picture or set other picture quality or resolution options, see Reduce the file size of a picture .
Default resolution / Set default target output to PPI (pixels per inch) is a measure of image resolution. The higher the PPI value, the richer the image. High fidelity resolution preserves picture quality but may increase the file size of your presentation.
Chart options
Properties follow chart data point for all new presentations Select this check box to have custom formatting and chart data labels follow data points as they move or change in the chart. This setting applies to all presentations created hereafter.
Properties follow chart data point for current presentation Select this check box to have custom formatting and chart data labels follow data points as they move or change in the chart. This setting only applies to the current presentation.
Show this number of recent documents/presentations Enter the number of recently opened or edited presentations that you want to appear in the Recent Documents list.
To view the Recent Presentations list, click File > Open .
Quickly access this number of Recent Presentations A quick-access list of recent presentations appears at the bottom left of the window, after the Options command, as shown in the following image, labeled 1.
Show this number of unpinned Recent Folders A quick-access list of recent folders appears on the Recent tab in the Open dialog, as shown in the following image, labeled 2. Specify the number of folders you want listed there, when you select a particular source, such as OneDrive or This PC. .

Show shortcut keys in ScreenTips Select this check box to show the keyboard shortcuts in all ScreenTips , or clear this check box to hide the keyboard shortcuts in all ScreenTips.
Show vertical ruler Select this check box to show the vertical ruler, or clear this check box to hide the vertical ruler. The vertical ruler is a bar that appears alongside your PowerPoint presentation and that you can use to measure and align objects.
Note: If you select the Show vertical ruler check box, and on the View tab, in the Show/Hide group, you select the Ruler check box, the vertical and horizontal rulers appear. If you clear the Show vertical ruler check box, and then on the View tab, in the Show/Hide group, you select the Ruler check box, only the horizontal ruler appears.
Disable hardware graphics acceleration Using hardware graphics acceleration increases the performance speed when you are playing your presentation. Selecting this check box turns off the use of that graphics acceleration. For more information, see Tips for improving audio and video playback and compatibility .
Disable Slide Show hardware graphics acceleration If you are using transitions between slides and they are not behaving as expected (that is, you see flashing black screens instead of the transitions you've chosen) try selecting this check box.
Automatically extend display when presenting on a laptop or tablet To turn off using presenter view, clear this check box. By default, PowerPoint uses presenter view for slide shows. This mode "extends" the computer's desktop, creating two separate monitors on the presenter's computer. One monitor is the built-in screen on the presenter's laptop or tablet. The other monitor is the display device, or projector, attached to the presenter's laptop or tablet.
Show presence flags for selected items This option takes effect when you are working on a shared presentation with others. If you select an item that someone else is editing a small flag appears indicating who is currently editing that item.
Open all documents using this view Select an option from the list to specify that all presentations open in a specific view each time that you start PowerPoint.
Show menu on right mouse click Select this check box to show a shortcut menu when you right-click a slide in Slide Show view , or clear this check box to prevent the shortcut menu from showing.
Show popup toolbar Select this check box to show a toolbar at the bottom of a full screen presentation that allows you to navigate between slides and apply annotations to your presentation, or clear this check box to hide the toolbar.
Prompt to keep ink annotations when exiting Select this check box to be prompted to save your changes when you draw on or highlight slides during a presentation , or clear this check box to exit without being prompted to save your ink annotations.
End with black slide Select this check box to insert a black slide at the end of your presentation, or clear this check box to end your presentation without a black slide. If you clear this check box, the last thing your audience sees is the last slide in your presentation, rather than a black slide.
Print in background Select this check box to work in PowerPoint while you print your presentation (printing can slow the response time in PowerPoint), or clear this check box to turn off background printing when you want rapid response time while you work in PowerPoint.
Print TrueType fonts as graphics Select this check box to turn your fonts into vector graphics so that your fonts will be printed clearly and at any size (or scale), or clear this check box if the print quality or scalability is not important to you.
Print inserted objects at printer resolution Select this check box when you want quality printouts of inserted objects, such as pie charts or tables, or clear this check box to ignore distorted or vertically stretched objects when printing.
High quality Select this check box when you want to see improvements in your print jobs such as increased resolution, blended transparent graphics, or printed soft shadows. By selecting this option, you get the best possible output, but printing may take longer.
Align transparent graphics at printer resolution Select this check box to ensure that your transparent content lines up properly with all other content. By selecting this option, PowerPoint uses the printer's resolution to print, which can slow down performance if the printer has a very high resolution.
Print slide numbers on handouts (Only in PowerPoint for Microsoft 365, beginning with version 1810) By default, slide numbers appear below slide thumbnail images on printed handout pages. Turn this feature on or off by selecting or clearing this check box.
When printing this document
When printing this document In this list, select the presentation that you want to apply settings to, and then click one of the following:
Use the most recently used print settings To print the presentation according to the options that you used previously in the Print dialog box, click this button.
Use the following print settings To choose new print settings for the presentation, click this button, and then do the following:
Print what In this list, select what you want to print.
Color/grayscale In this list, select the setting that you want. For information about printing in color, grayscale, or black and white, see Print your handouts, notes, or slides .
Print hidden slides Select this check box to print slides that you have previously hidden, or clear this check box to print only slides that are not hidden. For information about why you would want to hide a slide and how to hide a slide, see Hide or show a slide .
Scale to fit paper Select this check box to scale the contents of a slide, handout, or notes page to fit the paper size that you are printing on, or clear this check box to print the default font and object sizes on the default paper size.
Frame slides Select this check box to add a border-like frame around each slide, or clear this check box if you do not want a frame around each slide.
Provide feedback with sound (PowerPoint 2016) Select this check box to make a sound when an error appears or clear this check box if you do not want to hear a sound when an error appears.
Note: To use this feature, your computer must have a sound card, microphone, and speakers.
Show add-in user interface errors If you are a developer, select this check box to show errors in your user interface customization code, or clear this check box to hide the errors.

Need more help?
Want more options.
Explore subscription benefits, browse training courses, learn how to secure your device, and more.

Microsoft 365 subscription benefits

Microsoft 365 training

Microsoft security

Accessibility center
Communities help you ask and answer questions, give feedback, and hear from experts with rich knowledge.

Ask the Microsoft Community

Microsoft Tech Community

Windows Insiders
Microsoft 365 Insiders
Was this information helpful?
Thank you for your feedback.
IMAGES
COMMENTS
Print your presentation. Select File > Print. For Printer, select the printer you want to print to. For Settings, select the options you want: Print All Slides: To print each slide on a single sheet or change to just print a range of slides. Slides: From the drop-down, choose to print all slides, selected slides, or the current slide.
Print your presentation. Select the File > Print. For Printer, select the printer you want to print to. For Settings, select the options you want: Slides - from the drop-down, choose to print all slides, selected slides, or the current slide. Or, in the Slides box, type which slide numbers to print, separated by a comma.
Choose which slides you want to print: Under Settings, click the first rectangle's down arrow and choose an option: If you choose Custom Range, then enter the specific slides or range of slides in the Slides box. For example, 1,3,5-12. If you have any hidden slides in the presentation, the Print Hidden Slides option is active, and you may ...
To save your PowerPoint as a PDF, click on the File option in the toolbar at the very top of your screen. When you click on File, a menu drops down. Choose the Save As… option. After clicking on this option, a window appears. Next, in the File Format: field, choose the PDF option.
Step-1: Click on the "Print" option. In the Microsoft Powerpoint presentation, click on the "File" tab from the menu bar. Then click on the "Print" option to access the print settings. Step-2: Click on the "Notes Pages" option. Under the settings option, click on the "Full Page Slides" box to open a dropdown menu.
Print your PowerPoint presentation when you need a copy to help you deliver your presentation or to help your audience follow along. You have several choices from printing an entire slideshow to printing handouts and notes pages. Learn the various ways to print PowerPoint slides and select the best option for your needs.
Open your PowerPoint presentation. Click File → Print. Printing options. In Settings you can select if you want to print your presentation in colour or black and white. Click the icon at the bottom of the window to the right to select among the options: To print in color: Settings → Color. To print in grayscale: Settings → Grayscale.
The most common way to print PowerPoint notes is with the thumbnail image of the slide at the top of the page, and the notes directly beneath (as pictured above). To print your notes like this, simply: Hit Ctrl+P for Print (or click File then Print) Open the Print Layout options. Select the Notes Page layout.
Key Takeaways. To print a PowerPoint with notes on Windows, click File > Print and "Notes Pages" in the Layout drop-down box. Then, select "Print." On Mac, go to File > Print. In the Layout drop-down box, choose "Notes" then "Print" to finish. Do you want a hard copy of your PowerPoint slideshow that includes your speaker notes? Maybe you want ...
Choose the number of copies in the Copies text field. Click Print . Print Settings. Print Range. Print the whole presentation, a selection, a certain slide range, a single slide, or a custom range. Print Layout. Determine what you want to print on each page. You can print a single slide, multiple sides, slide notes, handouts, and more.
Navigating The Print Menu In PowerPoint. To get through to the Print Menu you have to select the File tab, then click Print - and all of the printing options in PowerPoint will be shown to you. Here we can see several key elements. The Print button is big and clear, and below it you can select the printer you want to use as well as several ...
Most presenters print their PowerPoint presentations even before looking at the various options available for them to print. Before you hit that OK button to print, realize that PowerPoint provides you four options to print Slides, Handouts, Notes pages and Outline view. You can print them in color, gray scale and in pure black and white.
Then, of course, I wanted to print out my slides and talking notes so I could refer to my notes while at the lectern. The usual way to do this (PowerPoint seems to think) is to print the Notes Pages. This is the only print layout option that includes both the slides and text. With 30-something slides, I didn't want to print out over 30 pages.
In the backstage view, click the Print group to get at all of the printing options. 3. Open the Layout Options. Open the Layout Options dropdown menu to see all of your different handout options. 4. Select an option with the Handouts area. In the Handouts section, you can choose how many slides per page you want.
Select the Slides to Print. If you click on the Print command, you will see a group of options called Settings. The first option is to select what slides to print, and although most of the time ...
Click File > Print. Under Settings, click the second box (which defaults to say Full Page Slides ), then under Print Layout, click Notes Pages. Notes Pages prints one slide per page, with speaker notes below. The Preview Pane shows you what each layout option looks like. Put in the other settings, such as which slides you want, how many copies ...
Open your presentation in PowerPoint. Navigate to 'File' and click on 'Print'. Click on the dropdown under 'Settings' and select 'Full Page Slides'. Choose the 'Print Layout' by selecting 'Notes Pages'. Click 'Print' to print your presentation with comments.
Use the shortcut Ctrl + P to open the print dialog instantly. This brings up the Backstage View where you can adjust various printer settings and select your desired print layout. In the print settings, you can choose to print multiple slides on one page, print comments, or print the ink annotations.
How to Create Printable PowerPoint Handouts. Select the File tab in the ribbon. Figure 1. File tab. Select Print in the Backstage view. Figure 2. Print option. (Optional) If you don't want include all your slides, enter specific slide numbers separated by commas or a number range (e.g., 3,5,7,9-14) into the Slides text box. Figure 3.
When printing handouts in PowerPoint, choosing the right options and tailoring printouts to different audiences is key. It can make presentations more engaging and easier to follow, whether in schools or business meetings. Selecting the Right Print Options. Picking the correct print settings impacts both presentation quality and material usage.
Here's a PowerPoint presentation tips and tricks guide that takes you through how to make a good PowerPoint presentation. ... Then choose Arrange in the options bar and apply Alignment Type. 17. Limit Punctuation ... PowerPoint makes it easy to print handouts with room for notes on the page. This way, audiences can keep copies of your slides ...
Before printing the PowerPoint slides, you can customize the printing settings. You can change the layout by clicking the Slides option. To make sure that your print will not cut off the edge, make sure that the Scale to Fit Paper option is checked. Visit this link for more information about printing your PowerPoint slides, handouts, or notes.
Hello, everytime I try to "Print Notes Pages" so the slide only takes up half the page, when I go to print it the layout on my printer shows the slide takes up the whole page leaving no room for Print Notes Pages option not working-printing as full slides on the whole page instead.
Editing options. When selecting, automatically select entire word Select this check box to select the entire word when you click a word, or clear this check box to select an individual letter in a word when you click a word. Allow text to be dragged and dropped Select this check box to move or copy text within a presentation or from PowerPoint ...
Check that Notes Page view is enabled for the presentation. Go to View > Notes Page to display notes. When printing, go to the More menu (three dots) and look for Print Options. Select Layout and see if Notes Layout is an option. It used to work until the latest app update from Microsoft. In the past, when you click the three dots, print, look ...