LaTeX-Tutorial.com
Create beautiful code listings with minted, learn how to make code listings in latex look very aesthetic using minted package.
- Getting started with Minted package

Code Highlighting in LaTeX
- Minted environment options
- Floating Lists in LaTeX
- Code highlight styles in LaTeX
It is very common having to write code listings in LaTeX, in order to illustrate a given algorithm., especially with computer science-related manuals. For this purpose, LaTeX offers the environment verbatim that lets you write code listings like this:

which is obtained by the following code:
which are literal and therefore insensible to control sequences, environments, etc. It also has an in-line equivalent \verb , which lets you enclose in any kind of delimiters the text inside.

Installation
In this section, we are going to see quickly how to install minted . Please note If you can load minted package via \usepackage{minted} and compile without any errors, then you should skip to the next section. The main difference between minted and similar packages is that the former makes use of the additional software Pygments , which provides much better syntax highlighting.
minted also requires a series of LaTeX packages to be installed and up to date in your system: keyval, ifthen, kvoptions, calc, fancyvrb, ifplatform, fvextra, pdftexcmds, upquote, etoolbox, float, xstring 2.3, xcolor lineno, framed, shellesc (for luatex 0.87+) .
All of them come with the usual LaTeX distributions, so probably you don’t have to worry about it. Once you have all of this, you can install minted as any other package, from you LaTeX package manager or from CTAN .
Since minted needs to call Pygments, which is an external program, you need to allow the LaTeX processor to do so by passing it the -shell-escape option. So you need to call the processor like this:
The same is true for other compilers if you are using them.
This is an example of minted basic usage. We use the minted environment to write some Python code:
Compiling the first code yields the following result:
So we see that the use of minted package is straightforward: we only have to start a minted environment and put inside braces the language highlighting we want.
Code listing of a File in LaTeX
Instead of going smaller, we can go bigger, printing and highlighting whole files. For this purpose there is the \inputminted{tex}{filename.tex} command, where you pass the language highlighting and the file you want to input, and this file is written as a block of minted code.
where ex1.tex file contains the following code:
Compiling the previous code, we get the following result:
Inline Code listing in LaTeX
To typeset code inline, the command \mintinline{c}|int i| is provided. Again, the delimiters can be changed, according the listed code. Here is an example:
Compiling this code yields:

Minted command and environment options
All the above mentioned minted code highlighting commands accept the same set of options, as a comma-separated list of key=value pairs. Here is a list of the most remarkable ones:
- autogobble (boolean): Automatically remove all common leading whitespace from code. If you don’t like the work done, you can always use gobble (integer) and pass an integer to it, so that the amount of characters passed is deleted from the start of all lines.
- bgcolor (string): Sets the background color of the listing. The string must be the name of a previously-defined color.
- codetagify (list of strings): Highlight special code tags in comments and docstrings. The default list of code tags is: XXX, TODO, BUG, and NOTE .
- curlyquotes (boolean): When your keyboard doesn’t have left and right quotes, the backtick ` and the single quotation mark ‘ are used as left and right quotes in most places (for example, in LaTeX). minted writes them literally by default, but if this option is set to true, they are substituted by the curly left and right quotes.
- escapeinside (string): This makes minted escape to LaTeX between the two characters specified in the string. All code between the two characters will be interpreted as LaTeX and typeset accordingly. The escape characters need not be identical. This has a few exceptions, however: escaping does not work inside strings and comments (in the later case, you may want to use the texcomments option).
- fontfamily, fontseries, fontsize, fontshape : These self-descriptive options let you customize the font used inside the minted environment.
- linenos (boolean): Enables line numbers. It can be accompanied with numberblanklines (boolean), which enables or disables the numbering of blank lines.
- mathescape (boolean): Enables the usual math mode inside comments.
- samepage (boolean): Forces the whole listing to appear in the same page, even if it doesn’t fit.
- showspaces (boolean): Enables visible spaces with a small horizontal line . You can redefine the invisible space character passing a new macro to the option space (macro); by default, the \textvisiblespace macro is passed.
- stripall (boolean): This option strips all leading and trailing whitespace from the input.
- tabsize (integer): This is the number of spaces a tab will be converted to, unless obeytabs (boolean) is active, in which case tabs will be preserved. If you are decided to use tabs, similar options for showing tabs and setting the invisible tabs character are available.
In every boolean option, you can omit the =true part, and just write the option name.
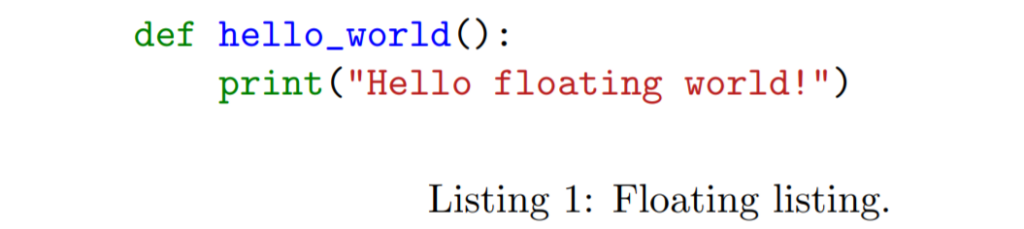
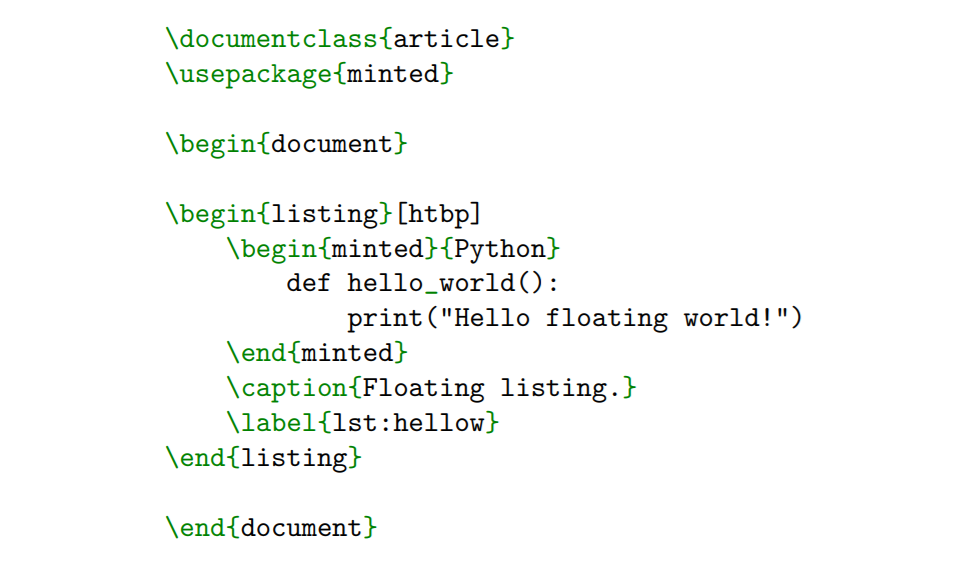
Floating listings
In certain situations, or for certain tastes, it is better to treat the code listings as floating objects. For this matter, minted provides the listing environment that you can wrap around any source code block. As it is usual for floating objects, you can provide a \label{} and a \caption{} , and also the usual placement specifiers, check the first example.
As happens with figures and tables, you can create an index of all of the floating listings in the document using \listoflistings . In case you are going to use floating listings and reference them within the text, you may want to change how \LaTeX counts them: you can choose whether the chapter or the section should be used. In order to do that, you have to load the package with the chapter or section option:
Customizing the syntax highlight
If you are reading this you probably like programming, and in that case you almost sure like to customize the color schemes of your code editors, and the appearance of the minted listings shouldn’t be less.
And that’s all for the minted package. I’m sure from now on your listings in LaTeX will look very aesthetic, which will make reading your documents even more pleasing.
Recent Posts
Typesetting Multiple Choice Questions in LaTeX
n this tutorial, we will see how to write a multiple-choice exam in LaTeX, using the exam document class. This document class provides multiple tools to easily typeset exams in LaTeX, and we have...
How to Write a Minimalistic CV in LaTeX: Step-by-step Guide
In this step by step tutorial, we will learn how to typeset a professional CV, and gain some more insight into how LaTeX works with a practical example.
Syntax Highlighting in LaTeX with minted
This post serves as an introduction to minted, a pygments-based syntax highlighter for LaTeX. The post provides a few examples of things you can do with minted, details the installation process, and covers some basic security.

Read more posts by this author.
This post serves as an introduction to minted , a pygments -based syntax highlighter for LaTeX. Adding pygments to LaTeX streamlines so many things. The post provides a few examples of things you can do with minted , details the installation process, and covers some basic security.
TeX Dependencies
-shell-escape, useful features, what's next.
You can view the code related to this post under the post-01-overview tag .
The easiest way to present code in LaTeX is to use the verbatim environment . It's quick, it preserves formatting, and it requires no set up. It's also very bland. Its ease of use comes at the cost of basically all the context clues well-formatted and styled code can provide.
The next step up (or rather many steps up) is the listings package . Out the box, it supports a broad range of languages. It's eminently configurable. You can define new languages yourself, add different keywords, and style to your heart's content. It's very good at being straightforward. Moving beyond its predefined scopes (or easily discoverable internet styles ) is a challenge, though, because parsing and tokenizing code in LaTeX is just about as hard and ridiculous as it sounds.
minted has become a solid competitor . It uses the pygments project to parse and highlight. You've probably seen pygments in action already . It's a beast of an application that can do just about anything you want re: syntax highlighting. minted isn't quite as flexible, but it does have access to most of the pygments features. Recognizable styles, a massive library of lexers, and simple customization through Python make minted , by way of pygments , a veritable utility knife.

There's a bit more to the listings vs. minted debate . Essentially it boils down to where you want to customize. Personally, I feel like a general-purpose scripting language used in all areas of tech is a stronger contender than a typesetting system many of my peers have struggled to learn. I don't know, though (and if I'm wrong, I'd love to hear about it). At its core, TeX tokenizes everything. I'm just not sure that it can achieve the same level of regex wizardry that goes into some of the pygments code.
minted requires a few things to get up and running.
You'll need Python to get started. Pygments needs >=2.6 or >=3.3 , depending on your version of Python. You can lazily install both with any trouble. For example, via dnf ,
Next you'll need pip , a wonderful package manager for Python. It's ridiculously easy to install . Rather than install it globally (i.e. to /usr/bin ), we're going to install it locally via the --user flag.
However, this doesn't put pip on our path.
The --user flag installed pip to our user site packages . We can check the base directory, which should have the desired bin , via
Since we have an easy way to discover the directory, we have an easy way to add it to our .whateverrc :
You can also manually add it, which might be a good idea if you're doing other PATH manipulations.
With pip installed, we can quickly install pygments .
minted provides a list of its dependencies . If you've got access to something like tlmgr , it should be pretty easy to update them.
If you don't (e.g. modern RHEL derivatives, I think), you'll have to get creative. This is the easiest route:
If, like me, you're running an SSD on a budget, the easiest isn't very convenient. Maybe you just don't feel like warehousing all of TeX Live to snag 16 dependencies. If you're not going to install everything, you need to figure out what you have to install. dnf / yum makes this somewhat trivial. If you're stuck with dpkg / dpkg-query , the discovery will be much more involved (but also I think you can run tlmgr so there's that).
Convoluted dependency resolution aside, minted itself is a breeze to install (like pygments ; we've already done all the hard work).
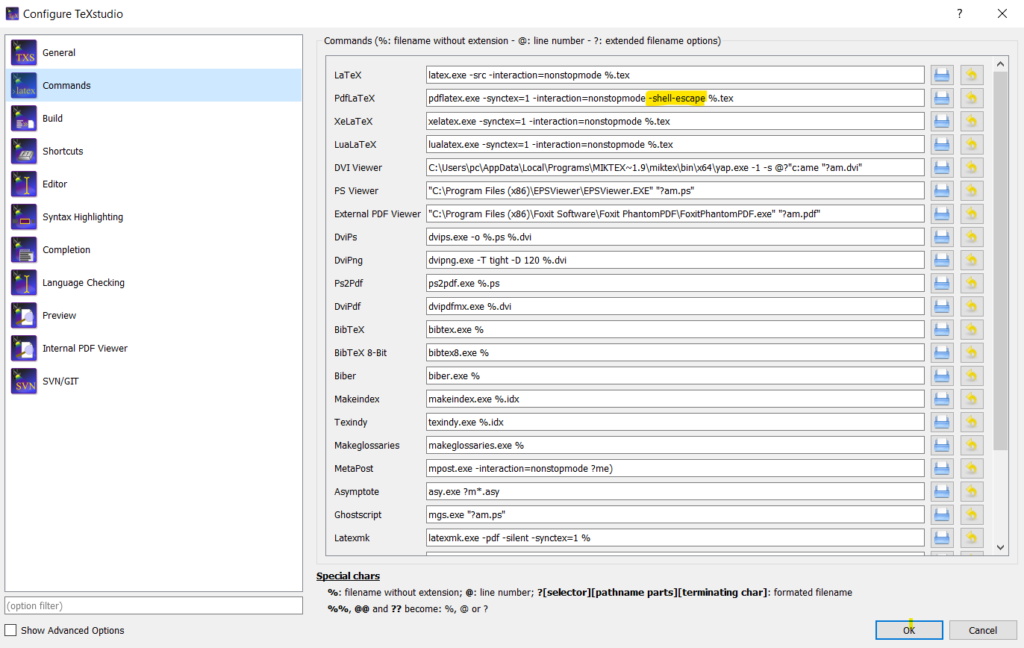
Because minted relies on an external application ( pygments ) to highlight, it can't just run in a tiny, neatly contained environment. TeX essentially exposes streams but, by default, access to the operating system is locked down. -shell-escape neatly sidesteps those restrictions, but it doesn't come without risk. Just like anything else, it's probably not a great idea to provide shell access until you understand what's going on. Don't download random things off the internet and execute them blindly. Don't run in superuser mode all the time. You know, basic stuff.
This is what happens when you try to run minted without -shell-escape . Notice at the beginning that external actions are limited ( restricted \write18 enabled ). The document will not compile (even without -halt-on-error ).
With -shell-escape , any external action is available ( \write18 enabled ) and the document compiles.
Chances are you're not actually building from the CLI every time. You've probably got an editor with some build commands stored. Don't add -shell-escape to all of your build profiles. It's a pain to toggle custom builds off and on, but having to rebuild your system after an attack is worse. Look for something like User Builds, Custom Commands, or the like.
For example, in TeXstudio , you can add custom builds via Configure TeXstudio > Builds > User Commands. In Texmaker , the same menu is available via User > User Commands > Edit User Commands.
Similarly, in Sublime via the LaTeXTools package , you can add custom builds to your project file (or anywhere else, for that matter).
You've already seen how simple it is to add code to a tex file. minted also makes it easy to include external source code without worrying about getting it to play well with your editor. The \inputminted macro lets you load any file while specifying the lexer.

The default style is one of many available to minted . You can check the styles available on your system via
You can preview any of the styles by visiting the pygments demo and trying out a highlighter. Once pygments has parsed the code, you'll be able to change the style at whim.
The default styles alone add a tremendous amount of utility to minted . There are many other settings that may be tweaked . Sharing style changes is an easy way to underscore minted 's versatility.

If you want to use the same style throughout your document, minted makes that simple too. The \newminted macro defines a configuration for a specific language, e.g. python . It can then be used as an environment in place of minted by appending code to the end, e.g. pythoncode .

You can use the same logic with \inputminted via \newmintedfile . Rather than defining a new environment, \newmintedfile creates a new macro. It has an optional name parameter to make things easier (otherwise the macro is called \<language>file ).

Sometime very soon I hope to look explore minted in combination with some other tools to build on its features. I've got some examples in use right now but I need to break them out and annotate them.
Personal blog of Felix Hoffmann on computational neuroscience, mathematics, open science and the tools he uses keep organizes his thoughts and ideas.
3 Diagrams per Page
Template for code highlighting with minted in latex beamer.
Syntax highlighting can be achieved in LaTeX via listings or more recently with minted . The latter package uses Pygments to create beautiful code highlighting and includes fantastic additional features such as line numbering.
Minted's compatibility with the Latex beamer class, however, is restricted and some workarounds (as laid out by Tristan Ravitch in his blog post are needed to assure full functionality of both the beamer class and minted.

Here's a template I made for anyone who wants to present code with the beamer class and the minted package, like in the image above:
Related Posts
Installing paprika on ubuntu 16.04 using wine 07 may 2020, open computational research study - a proof of concept 08 mar 2018, local line spacing in latex beamer 08 nov 2017.
Navigation Menu
Search code, repositories, users, issues, pull requests..., provide feedback.
We read every piece of feedback, and take your input very seriously.
Saved searches
Use saved searches to filter your results more quickly.
To see all available qualifiers, see our documentation .
- Notifications You must be signed in to change notification settings
LaTeX template for a Beamer presentation with code syntax highlighting provided by minted
fx-latex/template_beamer-minted
Folders and files, repository files navigation.
LaTeX Beamer template for code highlighting with minted. Since minted is used remember to compile with the --shell-escape option. For more details see: http://felix11h.github.io/blog/latex-beamer-minted
- Shell 21.8%
Source Code Highlighting with Minted in LaTeX
The minted package provides automatic syntax highlighting for source code listings. It uses the excellent pygments highlighter, which provides very high quality highlighting for a wide range of languages.
This example also shows how you can use minted to typeset LaTeX math embedded in your source code.

Have you checked our knowledge base ?
Message sent! Our team will review it and reply by email.
Email:
- Starting out with T e X...
- CTAN Background
- T e X user groups
- Upload basics
- Upload addendum
- T e X Directory Structure
- T e X Archive
- Contributors
Announcements
- Extended search
- File search
minted – Highlighted source code for L a T e X
The package that facilitates expressive syntax highlighting in L a T e X using the powerful Pygments library. The package also provides options to customize the highlighted source code output using fancyvrb .
Download the contents of this package in one zip archive (881.6k).
Community Comments
- 2022-12-13 CTAN update: minted
- 2021-12-25 CTAN update: minted
- 2017-07-21 CTAN update: minted
Suggestions
Maybe you are interested in the following packages as well.
- listings: Typeset source code listings using L a T e X
- pygmentex: Use Pygments to format code listings in documents
- highlightlatex: Syntax highlighting for L a T e X
- codehigh: Highlight code and demos with l3regex and lpeg
Package Links
Main Navigation
- Contact NeurIPS
- Code of Ethics
- Code of Conduct
- Create Profile
- Journal To Conference Track
- Diversity & Inclusion
- Proceedings
- Future Meetings
- Exhibitor Information
- Privacy Policy
NeurIPS 2024 Datasets and Benchmarks Track
If you'd like to become a reviewer for the track, or recommend someone, please use this form .
The Datasets and Benchmarks track serves as a venue for high-quality publications, talks, and posters on highly valuable machine learning datasets and benchmarks, as well as a forum for discussions on how to improve dataset development. Datasets and benchmarks are crucial for the development of machine learning methods, but also require their own publishing and reviewing guidelines. For instance, datasets can often not be reviewed in a double-blind fashion, and hence full anonymization will not be required. On the other hand, they do require additional specific checks, such as a proper description of how the data was collected, whether they show intrinsic bias, and whether they will remain accessible. The Datasets and Benchmarks track is proud to support the open source movement by encouraging submissions of open-source libraries and tools that enable or accelerate ML research.
The previous editions of the Datasets and Benchmarks track were highly successful; you can view the accepted papers from 2021 , 2002 , and 2023 , and the winners of the best paper awards 2021 , 2022 and 2023
CRITERIA. W e are aiming for an equally stringent review as the main conference, yet better suited to datasets and benchmarks. Submissions to this track will be reviewed according to a set of criteria and best practices specifically designed for datasets and benchmarks , as described below. A key criterion is accessibility: datasets should be available and accessible , i.e. the data can be found and obtained without a personal request to the PI, and any required code should be open source. We encourage the authors to use Croissant format ( https://mlcommons.org/working-groups/data/croissant/ ) to document their datasets in machine readable way. Next to a scientific paper, authors should also submit supplementary materials such as detail on how the data was collected and organised, what kind of information it contains, how it should be used ethically and responsibly, as well as how it will be made available and maintained.
RELATIONSHIP TO NeurIPS. Submissions to the track will be part of the main NeurIPS conference , presented alongside the main conference papers. Accepted papers will be officially published in the NeurIPS proceedings .
SUBMISSIONS. There will be one deadline this year. It is also still possible to submit datasets and benchmarks to the main conference (under the usual review process), but dual submission to both is not allowed (unless you retracted your paper from the main conference). We also cannot transfer papers from the main track to the D&B track. Authors can choose to submit either single-blind or double-blind . If it is possible to properly review the submission double-blind, i.e., reviewers do not need access to non-anonymous repositories to review the work, then authors can also choose to submit the work anonymously. Papers will not be publicly visible during the review process. Only accepted papers will become visible afterward. The reviews themselves are not visible during the review phase but will be published after decisions have been made. The datasets themselves should be accessible to reviewers but can be publicly released at a later date (see below). New authors cannot be added after the abstract deadline and they should have an OpenReview profile by the paper deadline. NeurIPS does not tolerate any collusion whereby authors secretly cooperate with reviewers, ACs or SACs to obtain favourable reviews.
SCOPE. This track welcomes all work on data-centric machine learning research (DMLR) and open-source libraries and tools that enable or accelerate ML research, covering ML datasets and benchmarks as well as algorithms, tools, methods, and analyses for working with ML data. This includes but is not limited to:
- New datasets, or carefully and thoughtfully designed (collections of) datasets based on previously available data.
- Data generators and reinforcement learning environments.
- Data-centric AI methods and tools, e.g. to measure and improve data quality or utility, or studies in data-centric AI that bring important new insight.
- Advanced practices in data collection and curation that are of general interest even if the data itself cannot be shared.
- Frameworks for responsible dataset development, audits of existing datasets, identifying significant problems with existing datasets and their use
- Benchmarks on new or existing datasets, as well as benchmarking tools.
- In-depth analyses of machine learning challenges and competitions (by organisers and/or participants) that yield important new insight.
- Systematic analyses of existing systems on novel datasets yielding important new insight.
Read our original blog post for more about why we started this track.
Important dates
- Abstract submission deadline: May 29, 2024
- Full paper submission and co-author registration deadline: Jun 5, 2024
- Supplementary materials submission deadline: Jun 12, 2024
- Review deadline - Jul 24, 2024
- Release of reviews and start of Author discussions on OpenReview: Aug 07, 2024
- End of author/reviewer discussions on OpenReview: Aug 31, 2024
- Author notification: Sep 26, 2024
- Camera-ready deadline: Oct 30, 2024 AOE
Note: The site will start accepting submissions on April 1 5 , 2024.
FREQUENTLY ASKED QUESTIONS
Q: My work is in scope for this track but possibly also for the main conference. Where should I submit it?
A: This is ultimately your choice. Consider the main contribution of the submission and how it should be reviewed. If the main contribution is a new dataset, benchmark, or other work that falls into the scope of the track (see above), then it is ideally reviewed accordingly. As discussed in our blog post, the reviewing procedures of the main conference are focused on algorithmic advances, analysis, and applications, while the reviewing in this track is equally stringent but designed to properly assess datasets and benchmarks. Other, more practical considerations are that this track allows single-blind reviewing (since anonymization is often impossible for hosted datasets) and intended audience, i.e., make your work more visible for people looking for datasets and benchmarks.
Q: How will paper accepted to this track be cited?
A: Accepted papers will appear as part of the official NeurIPS proceedings.
Q: Do I need to submit an abstract beforehand?
A: Yes, please check the important dates section for more information.
Q: My dataset requires open credentialized access. Can I submit to this track?
A: This will be possible on the condition that a credentialization is necessary for the public good (e.g. because of ethically sensitive medical data), and that an established credentialization procedure is in place that is 1) open to a large section of the public, 2) provides rapid response and access to the data, and 3) is guaranteed to be maintained for many years. A good example here is PhysioNet Credentialing, where users must first understand how to handle data with human subjects, yet is open to anyone who has learned and agrees with the rules. This should be seen as an exceptional measure, and NOT as a way to limit access to data for other reasons (e.g. to shield data behind a Data Transfer Agreement). Misuse would be grounds for desk rejection. During submission, you can indicate that your dataset involves open credentialized access, in which case the necessity, openness, and efficiency of the credentialization process itself will also be checked.
SUBMISSION INSTRUCTIONS
A submission consists of:
- Please carefully follow the Latex template for this track when preparing proposals. We follow the NeurIPS format, but with the appropriate headings, and without hiding the names of the authors. Download the template as a bundle here .
- Papers should be submitted via OpenReview
- Reviewing is in principle single-blind, hence the paper should not be anonymized. In cases where the work can be reviewed equally well anonymously, anonymous submission is also allowed.
- During submission, you can add a public link to the dataset or benchmark data. If the dataset can only be released later, you must include instructions for reviewers on how to access the dataset. This can only be done after the first submission by sending an official note to the reviewers in OpenReview. We highly recommend making the dataset publicly available immediately or before the start of the NeurIPS conference. In select cases, requiring solid motivation, the release date can be stretched up to a year after the submission deadline.
- Dataset documentation and intended uses. Recommended documentation frameworks include datasheets for datasets , dataset nutrition labels , data statements for NLP , data cards , and accountability frameworks .
- URL to website/platform where the dataset/benchmark can be viewed and downloaded by the reviewers.
- URL to Croissant metadata record documenting the dataset/benchmark available for viewing and downloading by the reviewers. You can create your Croissant metadata using e.g. the Python library available here: https://github.com/mlcommons/croissant
- Author statement that they bear all responsibility in case of violation of rights, etc., and confirmation of the data license.
- Hosting, licensing, and maintenance plan. The choice of hosting platform is yours, as long as you ensure access to the data (possibly through a curated interface) and will provide the necessary maintenance.
- Links to access the dataset and its metadata. This can be hidden upon submission if the dataset is not yet publicly available but must be added in the camera-ready version. In select cases, e.g when the data can only be released at a later date, this can be added afterward (up to a year after the submission deadline). Simulation environments should link to open source code repositories
- The dataset itself should ideally use an open and widely used data format. Provide a detailed explanation on how the dataset can be read. For simulation environments, use existing frameworks or explain how they can be used.
- Long-term preservation: It must be clear that the dataset will be available for a long time, either by uploading to a data repository or by explaining how the authors themselves will ensure this
- Explicit license: Authors must choose a license, ideally a CC license for datasets, or an open source license for code (e.g. RL environments). An overview of licenses can be found here: https://paperswithcode.com/datasets/license
- Add structured metadata to a dataset's meta-data page using Web standards (like schema.org and DCAT ): This allows it to be discovered and organized by anyone. A guide can be found here: https://developers.google.com/search/docs/data-types/dataset . If you use an existing data repository, this is often done automatically.
- Highly recommended: a persistent dereferenceable identifier (e.g. a DOI minted by a data repository or a prefix on identifiers.org ) for datasets, or a code repository (e.g. GitHub, GitLab,...) for code. If this is not possible or useful, please explain why.
- For benchmarks, the supplementary materials must ensure that all results are easily reproducible. Where possible, use a reproducibility framework such as the ML reproducibility checklist , or otherwise guarantee that all results can be easily reproduced, i.e. all necessary datasets, code, and evaluation procedures must be accessible and documented.
- For papers introducing best practices in creating or curating datasets and benchmarks, the above supplementary materials are not required.
- For papers resubmitted after being retracted from another venue: a brief discussion on the main concerns raised by previous reviewers and how you addressed them. You do not need to share the original reviews.
- For the dual submission and archiving, the policy follows the NeurIPS main track paper guideline .
Use of Large Language Models (LLMs): We welcome authors to use any tool that is suitable for preparing high-quality papers and research. However, we ask authors to keep in mind two important criteria. First, we expect papers to fully describe their methodology, and any tool that is important to that methodology, including the use of LLMs, should be described also. For example, authors should mention tools (including LLMs) that were used for data processing or filtering, visualization, facilitating or running experiments, and proving theorems. It may also be advisable to describe the use of LLMs in implementing the method (if this corresponds to an important, original, or non-standard component of the approach). Second, authors are responsible for the entire content of the paper, including all text and figures, so while authors are welcome to use any tool they wish for writing the paper, they must ensure that all text is correct and original.
REVIEWING AND SELECTION PROCESS
Reviewing will be single-blind, although authors can also submit anonymously if the submission allows that. A datasets and benchmarks program committee will be formed, consisting of experts on machine learning, dataset curation, and ethics. We will ensure diversity in the program committee, both in terms of background as well as technical expertise (e.g., data, ML, data ethics, social science expertise). Each paper will be reviewed by the members of the committee. In select cases where ethical concerns are flagged by reviewers, an ethics review may be performed as well.
Papers will not be publicly visible during the review process. Only accepted papers will become visible afterward. The reviews themselves are also not visible during the review phase but will be published after decisions have been made. Authors can choose to keep the datasets themselves hidden until a later release date, as long as reviewers have access.
The factors that will be considered when evaluating papers include:
- Utility and quality of the submission: Impact, originality, novelty, relevance to the NeurIPS community will all be considered.
- Reproducibility: All submissions should be accompanied by sufficient information to reproduce the results described i.e. all necessary datasets, code, and evaluation procedures must be accessible and documented. We encourage the use of a reproducibility framework such as the ML reproducibility checklist to guarantee that all results can be easily reproduced. Benchmark submissions in particular should take care to ensure sufficient details are provided to ensure reproducibility. If submissions include code, please refer to the NeurIPS code submission guidelines .
- Was code provided (e.g. in the supplementary material)? If provided, did you look at the code? Did you consider it useful in guiding your review? If not provided, did you wish code had been available?
- Ethics: Any ethical implications of the work should be addressed. Authors should rely on NeurIPS ethics guidelines as guidance for understanding ethical concerns.
- Completeness of the relevant documentation: Per NeurIPS ethics guidelines , datasets must be accompanied by documentation communicating the details of the dataset as part of their submissions via structured templates (e.g. TODO). Sufficient detail must be provided on how the data was collected and organized, what kind of information it contains, ethically and responsibly, and how it will be made available and maintained.
- Licensing and access: Per NeurIPS ethics guidelines , authors should provide licenses for any datasets released. These should consider the intended use and limitations of the dataset, and develop licenses and terms of use to prevent misuse or inappropriate use.
- Consent and privacy: Per NeurIPS ethics guidelines , datasets should minimize the exposure of any personally identifiable information, unless informed consent from those individuals is provided to do so. Any paper that chooses to create a dataset with real data of real people should ask for the explicit consent of participants, or explain why they were unable to do so.
- Ethics and responsible use: Any ethical implications of new datasets should be addressed and guidelines for responsible use should be provided where appropriate. Note that, if your submission includes publicly available datasets (e.g. as part of a larger benchmark), you should also check these datasets for ethical issues. You remain responsible for the ethical implications of including existing datasets or other data sources in your work.
- Legal compliance: For datasets, authors should ensure awareness and compliance with regional legal requirements.
ADVISORY COMMITTEE
The following committee will provide advice on the organization of the track over the coming years: Sergio Escalera, Isabelle Guyon, Neil Lawrence, Dina Machuve, Olga Russakovsky, Joaquin Vanschoren, Serena Yeung.
DATASETS AND BENCHMARKS CHAIRS
Lora Aroyo, Google Francesco Locatello, Institute of Science and Technology Austria Lingjuan Lyu, Sony AI
Contact: [email protected]
No Search Results
Using colors in LaTeX
- 1 Introduction
- 2.1 Accessing additional named colors
- 2.2 Example usage
- 3 Loading and using named colors in the color package
- 4.1 Drivers for color and xcolor
- 4.2 Automatic color driver detection
- 4.3 More advanced example using the dvisvgm driver to create an SVG file
- 5.1 xcolor-only color models
- 6 Setting the page background color
- 7.1 The luacolor package
- 7.2 The lua-ul package
- 7.3 Example: luacolor
- 7.4 Example: lua-ul
- 8 Further reading
Introduction
This article explains how to use color in your LaTeX document via the color or xcolor packages. Note that user-level documentation of the color package is contained in The LaTeX standard graphics bundle .
Both packages provide a common set of commands for color manipulation, but xcolor is more flexible and supports a larger number of color models, so is the recommended approach.
We’ll start with the following example:
Open this xcolor example in Overleaf
This example produces the following output:

In this example, the package xcolor is imported with
then the command \color{blue} sets the blue color for the current block of text. In this case for the itemize environment.
The code to typeset the horizontal line created by \rule{\linewidth}{0.5mm} is contained in a group, delimited by { and }, in order to keep the effects of the \color{red} local to that group.
Named colors provided by the xcolor package
As noted in the xcolor package documentation , the following named colors are always available without needing to load any package options:

Accessing additional named colors
Additional named colors can be accessed via the following xcolor package options:
- dvipsnames : loads 68 named colors (CMYK)
- svgnames : loads 151 named colors (RGB)
- x11names : loads 317 named colors (RGB)
For example, if you write
you can access the following named colors:

Refer to the xcolor package documentation for tabulated lists of colors provided by the svgnames and x11names options.
Example usage
The following example uses named colors loaded via the dvipsnames option.

Two new commands are also used in the example:
- \textcolor{red}{easily} : Changes the color of inline text. This command takes two parameters, the color to use and the text whose color is changed. In the example the word easily is printed in red .
- \colorbox{BurntOrange}{orange background} : Changes the background color of the text passed in as the second argument. In the example above, the words orange background are typeset on a background color of BurntOrange .
Loading and using named colors in the color package
You can also use the color package and load named colors via its usenames and dvipsnames package options:
The following code uses the color package to apply the same named colors used in the previous xcolor package example.
Open this color example in Overleaf
This example produces the same output as the previous xcolor version:

Drivers and color
Use of color when typesetting text or math was not part of the original design of TeX; instead, use/application of color was delegated to external “drivers” which converted TeX’s original output file format (DVI) into PostScript or PDF. In order for color to work, driver-specific instructions had to be “injected” into TeX’s output by using a built-in TeX command called \special whose job is simply to allow code/data to pass through the typesetting process and become embedded into the output file. When the chosen driver (software) processed the typeset output it would detect the embedded code/data and act upon it to achieve whatever the user intended—such as the use of color.
Times have changed, and PDF is now by far the most common output format used by TeX engines, long supplanting the use of legacy DVI drivers and creation of PostScript. Users also have a greater choice of TeX engine to use for typesetting their LaTeX documents, most notably pdfTeX, XeTeX or LuaTeX/LuaHBTeX, so it is still important to take account of differences in those TeX engines—ensuring the correct mechanisms are used to insert color data (PDF instructions) into their PDF files. To support and accommodate the legacy DVI output format and the wider environment of TeX engines and workflows in use, you can, if required, configure the color or xcolor packages to use a particular “driver” so that LaTeX will generate color data using using the appropriate method.
Drivers for color and xcolor
The color package provides out-of-the-box support for the following driver options:
- dvipdfmx , dvips , dvisvgm , luatex , pdftex and xetex
There are other options as described in the color package documentation .
The xcolor package provides the following driver options:
- dvips , xdvi , dvipdf , dvipdfm , dvipdfmx , luatex , pdftex , dvipsone , dviwindo , emtex , dviwin , oztex , textures , pctexps , pctexwin , pctexhp , pctex32 , truetex , tcidvi , vtex and xetex .
Automatic color driver detection
When typesetting your document LaTeX reads a configuration file called color.cfg which contains code that can determine if you are running pdfTeX, XeTeX or LuaTeX and automatically loads the appropriate driver ( .def file) for you, so you don’t need to specify the driver package option for those engines.
More advanced example using the dvisvgm driver to create an SVG file
The following example uses the color package with options that load named colors and the dvisvgm driver to output color definitions/data using SVG code:
Specifically, the output file typeset by Overleaf is converted to SVG using a program called dvisvgm , which is part of TeX Live and available on our servers. To run dvisvgm , after the page is typeset, we use a latexmkrc file which is created when you open the following code in Overleaf:
Open this example to create an SVG file
Once Overleaf has finished compiling you can access the SVG graphic, called mygraphic.svg , by selecting Logs and outputs and choosing the Other logs and files dropdown list:

Creating your own colors
It is possible to define your own colors, the manner in which the color is defined depends on the preferred color model. The following example uses 4 color models.
Open this example in Overleaf

The command \definecolor takes three parameters: the name of the new color, the model, and the color definition. Roughly speaking, each number represent how much of each color you add to the mix that makes up the final color.
- rgb : Red, Green, Blue. Three comma-separated values between 0 and 1 define the components of the color.
- RGB : The same as rgb , but the numbers are integers between 0 and 255.
- cmyk : Cyan, Magenta, Yellow and blacK. Comma-separated list of four numbers between 0 and 1 that determine the color according to the subtractive CMYK model used by commercial printers.
- gray : Grey scale. A single number between 0 and 1.
In the example, mypink1 , mypink2 and mypink3 define the same color but for different models. You can actually see that the one defined by cmyk is slightly different.
Colors defined by either model can later be used within your document not only to set the color of the text, but for any other element that takes a color as parameter, for instance tables (you must add the table option to xcolor ), graphic elements created with TikZ , plots , vertical rulers in multicolumn documents and code listings .
xcolor-only color models
The xcolor package provides additional commands which provide support for more color models and friendly color mixing, as demonstrated in the following example:

Three new colors are defined in this example, each one in a different manner.
- \colorlet{LightRubineRed}{RubineRed!70} : A new color named LightRubineRed is created, this color has 70% the intensity of the original RubineRed color. You can think of it as a mixture of 70% RubineRed and 30% white. Defining colors like this lets you derive different tints of a main color—common practice in corporate branding. In the example, you can see the original RubineRed and the new LightRubineRed used in two consecutive horizontal rules.
- \colorlet{Mycolor1}{green!10!orange} : A color named Mycolor1 is created with 10% green and 90% orange.
- \definecolor{Mycolor2}{HTML}{00F9DE} : The color Mycolor2 is created using the HTML model. colors in this model must be created with 6 hexadecimal digits, the characters A, B,C, D, E and F must be in upper-case.
The color models that only xcolor supports are:
- cmy : cyan, magenta, yellow
- hsb : hue, saturation, brightness
- HTML : RRGGBB
- Gray : Grayscale, a number between 1 and 15.
- wave : Wavelength, a number between 363 and 814. The number represents the wavelength of light, in nanometres (nm)
Setting the page background color
The background color of the entire page can be easily changed with \pagecolor . The following code demonstrates this, using the text of an earlier example::

The command \pagecolor{black} set the page color to black . This is a switch command, meaning it will take effect in the entire document unless another switch command is used to revert it. \nopagecolor will change the background back to normal.
Additional color packages for LuaLaTeX
In addition to the standard color and xcolor packages, LuaLaTeX supports the luacolor and lua-ul packages—both are written specifically for use with LuaLaTeX and neither is compatible with pdfLaTeX or XeLaTeX.
The luacolor package
The luacolor package redefines some internals of the standard color package commands using techniques unique to LuaTeX-based TeX engines.
Although luacolor automatically incorporates the color package, if you want to do either of the following:
- use specific options of the color package, such as \usepackage[usenames,dvipsnames]{color} , or
- use the xcolor package
you need to load the color or xcolor package prior to luacolor . For example, you can load the color package using:
or load the xcolor package with:
Consult the documentation of color and xcolor for details of package options.
By leveraging the capabilities of LuaLaTeX, luacolor enables more advanced applications of color; for example, colorizing individual glyphs within complex script languages or applying color to diacritical marks. luacolor also avoids kerning issues when applying color to single characters—see tex.stackexchange questions here and here for examples of that.
The lua-ul package
This package is mentioned because it has color highlighting features. It applies the advanced capabilities of LuaTeX to provide underlining, strikethough, and highlighting using methods in which kerning is not affected, underlined text can use arbitrary commands, hyphenation works and ligatures are preserved.
Example: luacolor
Here, we'll demonstrate using luacolor to colorize text typeset in Hindi and Arabic together with diacritics used on a Latin script (based on this example ). The following example uses the babel package to configure LuaLaTeX to typeset Hindi and Arabic using fonts present on Overleaf.
Open this luacolor example in Overleaf.
Example: lua-ul
This example demonstrates the following lua-ul package commands:
- \highLight[ color ]{ text to highlight } which applies the (optional) color to text to highlight . Note the capital L in the spelling of \high L ight command!
- \LuaULSetHighLightColor{ default color } : this sets the default color used by the \highLight command when the optional [ color ] is not specified.
Note: the luacolor package must also be loaded when using the \highLight command provided by the lua-ul package.
Open this lua-ul example in Overleaf.

Further reading
For more information see:
- The color package documentation (or access via texdoc.org )
- The xcolor package documentation (or access via texdoc.org )
- Lengths in LaTeX
- Font sizes, families, and styles
- Font typefaces
- Supporting modern fonts with XeLaTeX
- Inserting Images
- Documentation Home
- Learn LaTeX in 30 minutes
Overleaf guides
- Creating a document in Overleaf
- Uploading a project
- Copying a project
- Creating a project from a template
- Using the Overleaf project menu
- Including images in Overleaf
- Exporting your work from Overleaf
- Working offline in Overleaf
- Using Track Changes in Overleaf
- Using bibliographies in Overleaf
- Sharing your work with others
- Using the History feature
- Debugging Compilation timeout errors
- How-to guides
- Guide to Overleaf’s premium features
LaTeX Basics
- Creating your first LaTeX document
- Choosing a LaTeX Compiler
- Paragraphs and new lines
- Bold, italics and underlining
Mathematics
- Mathematical expressions
- Subscripts and superscripts
- Brackets and Parentheses
- Fractions and Binomials
- Aligning equations
- Spacing in math mode
- Integrals, sums and limits
- Display style in math mode
- List of Greek letters and math symbols
- Mathematical fonts
- Using the Symbol Palette in Overleaf
Figures and tables
- Positioning Images and Tables
- Lists of Tables and Figures
- Drawing Diagrams Directly in LaTeX
- TikZ package
References and Citations
- Bibliography management with bibtex
- Bibliography management with natbib
- Bibliography management with biblatex
- Bibtex bibliography styles
- Natbib bibliography styles
- Natbib citation styles
- Biblatex bibliography styles
- Biblatex citation styles
- Multilingual typesetting on Overleaf using polyglossia and fontspec
- Multilingual typesetting on Overleaf using babel and fontspec
- International language support
- Quotations and quotation marks
Document structure
- Sections and chapters
- Table of contents
- Cross referencing sections, equations and floats
- Nomenclatures
- Management in a large project
- Multi-file LaTeX projects
- Lengths in L a T e X
- Headers and footers
- Page numbering
- Paragraph formatting
- Line breaks and blank spaces
- Text alignment
- Page size and margins
- Single sided and double sided documents
- Multiple columns
- Code listing
- Code Highlighting with minted
- Using colours in LaTeX
- Margin notes
- Supporting modern fonts with X Ǝ L a T e X
Presentations
- Environments
Field specific
- Theorems and proofs
- Chemistry formulae
- Feynman diagrams
- Molecular orbital diagrams
- Chess notation
- Knitting patterns
- CircuiTikz package
- Pgfplots package
- Typesetting exams in LaTeX
- Attribute Value Matrices
Class files
- Understanding packages and class files
- List of packages and class files
- Writing your own package
- Writing your own class
Advanced TeX/LaTeX
- In-depth technical articles on TeX/LaTeX
Get in touch
Have you checked our knowledge base ?
Message sent! Our team will review it and reply by email.
Email:
IMAGES
VIDEO
COMMENTS
then the tags \begin{minted}{python} and \end{minted} delimit an environment that print the text verbatim in monospaced fonts and also apply colour to comments, keywords and functions. The parameter python is the programming language the source code is written in. minted supports over 150 programming and markup languages as well as configuration files, see the reference guide for a list of ...
I realise similar questions have been asked before, but no solution worked for me so far. Consider this document: \documentclass{beamer} \usepackage{minted} \begin{document} \begin{frame}[frag...
Code listing of a File in LaTeX. Instead of going smaller, we can go bigger, printing and highlighting whole files. For this purpose there is the \inputminted{tex}{filename.tex} command, where you pass the language highlighting and the file you want to input, and this file is written as a block of minted code.
minted is a package that facilitates expressive syntax highlighting using the powerful Pygments library. The package also provides options to customize the highlighted source code output. Development status: minted version 3.0 is now under development, thanks to a TEX Development Fund grant from the TEX Users Group.
minted - Highlighted source code for. L. a. T. X. The package that facilitates expressive syntax highlighting in LaTX using the powerful Pygments library. The package also provides options to customize the highlighted source code output using fancyvrb . Download the contents of this package in one zip archive (881.6k).
This five-part series of articles uses a combination of video and textual descriptions to teach the basics of creating a presentation using the LaTeX beamer package. These tutorials were first published on the original ShareLateX blog site during August 2013; consequently, today's editor interface (Overleaf) has changed considerably due to the ...
This is the easiest with XeLaTeX or LuaLaTeX where you can set the monospaced font (i.e., the font used for minted, and also for \texttt, \verb etc) with the fontspec package. For pdfLaTeX there are various packages to set the document font (or sometimes only the mono font) but there the choices are much more limited.
Convoluted dependency resolution aside, minted itself is a breeze to install (like pygments; we've already done all the hard work). $ sudo dnf install texlive-minted. -shell-escape. Because minted relies on an external application ( pygments) to highlight, it can't just run in a tiny, neatly contained environment.
Abstract. The minted package provides automatic syntax highlighting for source code listings. It uses the excellent pygments highlighter, which provides very high quality highlighting for a wide range of languages. This example also shows how you can use minted to typeset LaTeX math embedded in your source code.
A rude solution is put a color NAME in LaTeX (minted) in order to avoid a limmitation of minted (not CODE color for background, tes color NAME ) color; tcolorbox; minted; Share. Improve this question. Follow edited Jul 19, 2023 at 22:45. Mika Ike. asked ...
26 Oct 2013. Syntax highlighting can be achieved in LaTeX via listings or more recently with minted. The latter package uses Pygments to create beautiful code highlighting and includes fantastic additional features such as line numbering. Minted's compatibility with the Latex beamer class, however, is restricted and some workarounds (as laid ...
LaTeX template for a Beamer presentation with code syntax highlighting provided by minted - fx-latex/template_beamer-minted
Thanks for contributing an answer to Stack Overflow! Please be sure to answer the question.Provide details and share your research! But avoid …. Asking for help, clarification, or responding to other answers.
The minted package provides automatic syntax highlighting for source code listings. It uses the excellent pygments highlighter, which provides very high quality highlighting for a wide range of languages. This example also shows how you can use minted to typeset LaTeX math embedded in your source code. The minted package provides automatic ...
Here's a solution using my PythonTeX package, which uses the same Pygments highlighting library that minted does. I don't use Sweave, so this is just an example of how to get the Sinput and Soutput to do what you want; it's not a real Sweave document.. I've set Sinput to use the rconsole lexer, with emacs style, and Soutput to use the text lexer, with bw style.
The code above is a minimal example showing the problem I am having. Compiling this normally (without showing notes) I get the slide I want with the code highlighted by minted. However, if I show notes by adding. \setbeameroption{show notes on second screen=right} It fails to compile.
minted - Highlighted source code for. L. a. T. X. The package that facilitates expressive syntax highlighting in LaTX using the powerful Pygments library. The package also provides options to customize the highlighted source code output using fancyvrb . Download the contents of this package in one zip archive (881.6k).
A popular option for creating presentations with LaTeX is the beamer package, which is widely supported through additional themes and add-on packages. To get started with beamer you can try one of these: Overleaf's introduction to beamer; part 3 of our free online LaTeX course; a presentation template listed in our Gallery. powerdot package
32. Yes, there is the \setminted command for setting options for the whole document. From the package documentation: You may wish to set options for the document as a whole, or for an entire language. This is possible via \setminted[<language>]{<key=value,...>}. Language-specific options override document-wide options.
Full paper submission and co-author registration deadline: Jun 5, 2024. Supplementary materials submission deadline: Jun 12, 2024. Review deadline - Jul 24, 2024. Release of reviews and start of Author discussions on OpenReview: Aug 07, 2024. End of author/reviewer discussions on OpenReview: Aug 31, 2024.
You can use some optional arguments to your minted-environment.I added [obeytabs=true,tabsize=2] to your example, as well as Tabstops for the if and else block. Please have a close look at the indentation in the input file and in the output. Please read the manual of the minted-package especially the note to the obeyetabs-option. (If this answer doesn't suit you, you'll have to use another ...
The minted package provides automatic syntax highlighting for source code listings—here's an example showing how to use it. minted uses the excellent pygments highlighter, which provides very high-quality syntax highlighting for a wide range of languages . An online LaTeX editor that's easy to use. No installation, real-time collaboration ...
Introduction. This article explains how to use color in your LaTeX document via the color or xcolor packages. Note that user-level documentation of the color package is contained in The LaTeX standard graphics bundle.. Both packages provide a common set of commands for color manipulation, but xcolor is more flexible and supports a larger number of color models, so is the recommended approach.