Create collages, slideshows, and movies using Picasa3
How to create a photo collage.
In Picasa, select photos for a collage
In the top menu, click Create > Picture Collage
In the Settings tab are settings to change the look of the collage, add picture borders, change the background, select the page format, draw shadows, and show captions.
There is also a Desktop Background button and a Reset button
In the Clips tab, you can select more photos by clicking "Get more"
If there are pictures already displayed, click the green + button which will add the entire selection of photos to the collage.
Move the pictures around using the mouse
If you'd like to remove a photo, click the delete key and the photo will be tossed back into the Clips tab.
After the settings are made and photos are arranged, click the "Create Collage" button
If you want to cancel out of the collage, click "Close" and you will have the option to Save Draft, Discard Changes, or Cancel
Collages are saved in "Collages" under Pictures > Picasa in Windows 10; and in Pictures > Picasa on Mac.
In Picasa, your Collage folder is in a "Projects" folder (flat-folder view) or in the Picasa folder (tree view).

How to create a slideshow
Create a new album with the photos for the slideshow. Open the album.
In the top menu, click Album > View Slideshow
Slideshow settings are at the bottom of the window
Press the Esc key or click "Exit" to leave the slideshow
To continuously play a slideshow
Click Tools > Options (Windows) or Picasa > Preferences (Mac).
Click Slideshow.
Select Loop slideshow, then OK
How to create a movie presentation with photos, videos and audio
You can combine your photos, videos, and music into a movie.
Select photos and videos.
In the top menu, click Create > Movie > From Selection
There are 3 tabs: Movie, Slide, Clips
Movie tab: settings include Transition Style, Slide Duration, Overlap, Dimensions, Show Captions, Full frame photo crop
Slide tab: settings include font, size, style, template, and a box to type text
Clips: Click "Get More" button to add more photos
Click "Create Movie" (the YouTube button no longer works)
You can share the .wmv movie file with others, such as copying it to a flash drive, emailing (if it's not too large), or use any type of cloud sharing website.
A file with .mxf extension will also be created on your computer. This file will let you edit the movie, so please do not delete the .mxf file if you plan to edit the movie later.
Movies are saved on your computer under C then User > Pictures > Picasa > Movies (in Windows 10).
On a Mac computer, the movie is under Pictures > Picasa.
In Picasa, the Movies folder is in the "Projects" collection (flat-folder view) or Picasa folder (tree view).
Creating a Slide Show with Picasa 3
- pearlofafrika
- Categories : Google , Internet
- Tags : Internet google topics picasa
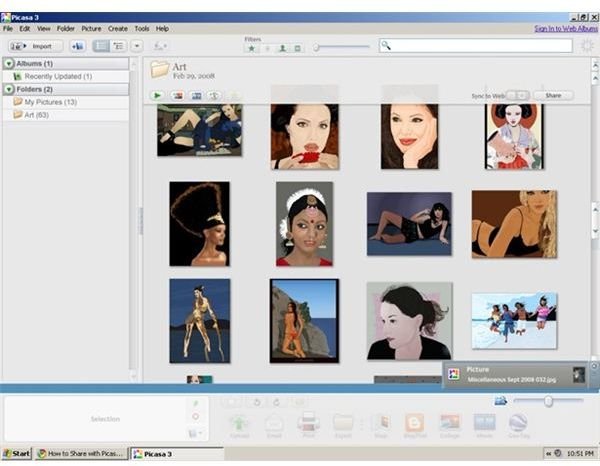
Google’s picture management tool, Picasa 3, is so easy to use that it makes tedious tasks fun and quick. One of the most tedious tasks in picture management is creating a slide show. In the old days of creating slide shows, it took a lot of photo organizing and resizing, to make sure that the slide show wasn’t too big to share with others. It was frustrating to spend two (or more) hours working on a project, just to find it was too large to send through email, or upload to a free photo sharing site.
Picasa 3 seeks to solve that problem with easy slide show creation. With Picasa 3, you can create a slide show that includes photos, music, captions, and even video. It’s integration with Google makes Picasa 3 very intuitive. It seems to anticipate all scenarios. Let’s get started with creating a slide show.
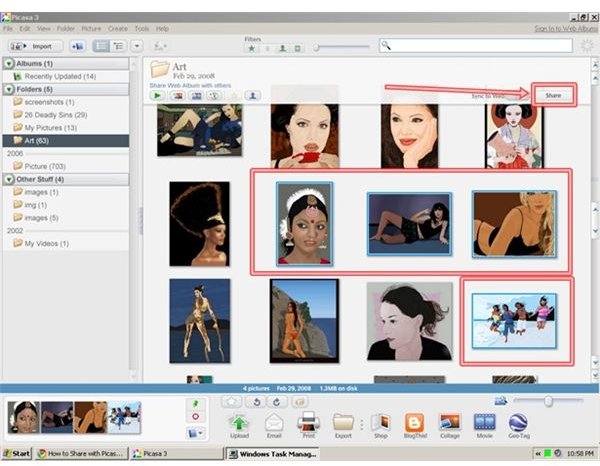
Download Picasa 3 from the Picasa website. It’s a free download that doesn’t take up much space on your hard drive. You’ll also need to create a Google log in, if you don’t already have a Google or Gmail account. After installation, Picasa will collect all the photos from your hard drive and organize by date and folder. You can then select the photos you’d like to use for the slide show by going directly to the folder and clicking on the image. If you’d like to select multiple images, click each image while holding the Ctrl button on your keyboard.
Click on the Create a Movie Presentation button. It is one of the six options available on the top left hand part of the folder screen. From this screen, you can add audio, change the transition style, and add captions. You can also add or delete images. After adding an image, it will no longer be available from the pool, which means you won’t need to worry about repeating images. Click on the slide button (above the red X) to add new slides.
After you have created the slide show to your specification, save the movie by clicking the Create Movie button. By default, it is saved as a .wmv movie file. You can also upload the photo directly to YouTube, another Google company.
Screen Shots
How to Make a Video Slideshow with Music on Picasa
by Shannon Adragna
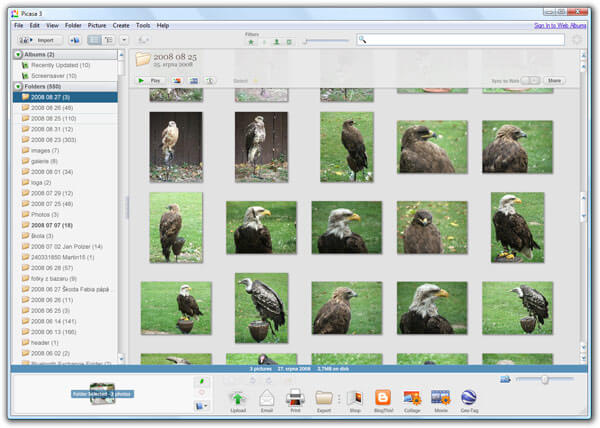
To begin, you must first download Picasa. Simply google Picasa and the official Picasa website will pop up. On the right hand side, click on “Download Picasa 3” and follow the directions to download the software. Once you’ve installed the software, Picasa will automatically search your computer for pictures and upload them to it’s library. Depending on how your pictures are cataloged, Picasa will put them into separate folders which you can name and organize.
To start making your video, choose which pictures you want showcased and put them into their own separate folder. Once you’ve done this, click on the “Create Movie Presentation” button. This button is located directly below the title of your folder and is the 3 rd from the right.
After you click this button, a new window will open called “Movie Maker.”
The title of your folder will be the first slide with the date below it. To change or edit this, click on the “Slide” tab located in the upper left corner. You will then be able to change the title, font, size, color and many other functions of the initial slide. Every other picture you have selected will be displayed on the bottom of the screen in the order in which they will appear. To view these pictures in the larger screen, simply click on the slide and it will pop up. To edit a slide, click on the image then click on the “Slide” tab.
To upload music, click on the “Movie” tab. The new tab will pop up and a button saying “Load” will be displayed in the upper left corner. Click on this button and a new window will pop up saying, “Open.” Browse your music library, choose a track, and click “Open.” The track will then be uploaded to the slideshow. To change how you would like the slides to be displayed with the music, click on the “Options” button. This selection will allow you to either time the slides so they will last the duration of the music, to spread them to your choosing, or to truncate the slides. Additionally, under the “movie” tab you can choose how you would like the slides to transition by clicking on the “Transition style” tab.
Once you’ve tailored your video to your choosing, click the green play button located above the picture tray in the lower left corner. This will allow you to preview your selections. If you are satisfied with your movie, click the “Create Movie” button. This will solidify your selections and automatically play your movie. If you need to change anything, you may click the “Edit movie” button in the upper left corner. This will take you back to the original window and allow you to edit anything.

How to Turn Your Picasa Photos to a Slideshow
Picasa is a wonderful free online photo sharing site for you to store, organize and back up thousands of pictures. It enables you to keep all your precious moments forever.
It will also be funny to turn your Picasa photos to a nice slideshow and sharing with your friends. The Picasa slideshow will be a camcorder to help you reappear these amazing moments in your life.
In this tutorial, luckily, you will learn 2 easy and efficient ways to view your pictures as a slideshow in Picasa.

Picasa Slideshow
Part 1: Make a Picasa slideshow via Picasa 3
Part 2: make a picasa slideshow via aiseesoft slideshow maker.
There is no denying that Picasa is an excellent free photo-sharing tool. For more professional requirements like transitions, effects, etc. however, you may search for a powerful slideshow maker.
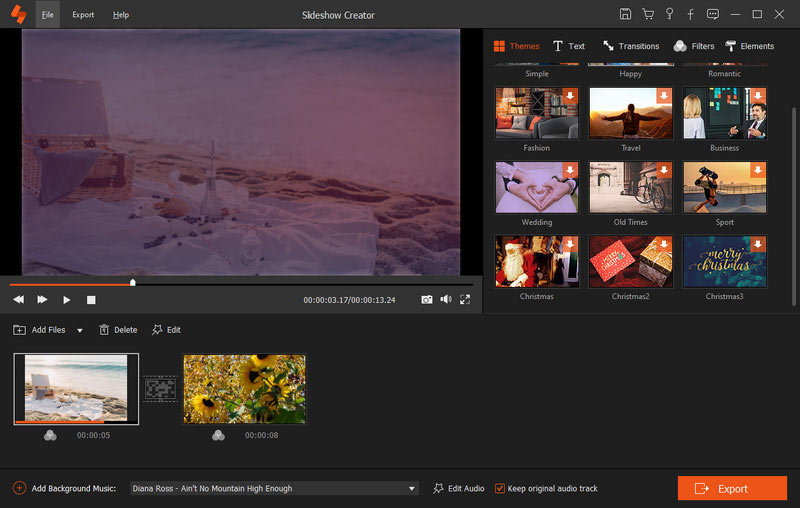
Aiseesoft Slideshow Creator , the best free Picasa slideshow creator among the market, should be a nice option for you to take into consideration. With its advanced features, you are able to make a slideshow with Picasa photos, online videos as well as music, edit video effects and so on within a few clicks.

Aiseesoft Slideshow Creator
- Support multiple image/video/music formats, such as IPG, PNG, MP4, MOV, MP3, AAC and so on.
- Transitions, text editing, photo effect editing (like rotate, crop, flip, blur, mosaic, gray, etc.) can be fully met.
- Enable you to make a Picasa photo slideshow without picture limits, and edit the music, including trimming; fade in/out, audio collection.
- Allow you to add prologue and epilogue to the slideshow directly and preview them with ease.
- The output format for the created slideshow video can be various, and resolution is high up to 4K.
Now let's start learn how to create an amazing slideshow with your Picasa photos via Aiseesoft Slideshow Creator.

You are able to rotate, flip, crop, set duration, adjust contrast/saturation/brightness/hue, and get more motion settings for these imported Picasa photos.
You are allowed to use the timer tab to adjust the duration of effects and the whole slideshow length conveniently.
What if you want your WordPress to be more attractive? Well, you can check the post to know more about WordPress slideshow plugins .
You may want to know more anout another slideshow maker alternative - Drupal Views Slideshow .
This tutorial is an ultimate guidance about how to turn your Picasa photos to a slideshow. With these 2 photo slideshow software above, you can create a unique slideshow with your Picasa photos without striking a blowing.
Do you have any other wonderful slideshow tools that can make a Picasa slideshow? Please tell us in the comment below.
What do you think of this post?
Rating: 4.7 / 5 (based on 90 votes) Follow Us on

From this article, you can get 17 popular jQuery slideshow plugins. Thus, you can achieve the slideshow effect on your website in a short time easily.

We'll show you how to make a Flickr slideshow in this article. You can make the slideshow via Flickr itself. And you can also make the slideshow via Aiseesoft Slideshow Maker.

How to use Instagram Slideshow app? Do you know how to make a slideshow for Instagram? Learn how to create a slideshow on Instagram in details from this page.
Create a Slideshow Online

Slideshow Creator is the best movie maker and video editor. Designed with various video/photo/music editing functions, you can adjust the visual effects easily.

- Retrieve Registration Code
- Contact Support Team
Get Our Newsletter
Exclusive discounts for subscribers only!
About Aiseesoft | Privacy | Support | Resource | Affiliate | Contact us Copyright © 2024 Aiseesoft Studio. All rights reserved.
- Grant Funding Information
- Chat & Conferencing
- Classroom Practice
- Files & Sharing
- Getting Started
- Motor Skills
- Mobile Devices
- Web Accessibility
for all your classroom technology needs
- How do I create a slideshow using Picasa?
NOTE: As of March 16, 2016, Google ceased to support Picasa and encouraged users to migrate to Google Photos. The Picasa application will continue to function, however, and can still be used by those who prefer it. We are maintaining the Picasa posts within TechEase because we find that many people are still using the application and come to the TechEase site looking for the specific help we offer.
To view your pictures as a slideshow in Picasa, select an album or label and then click on the Slideshow button at the top of the Picasa window.

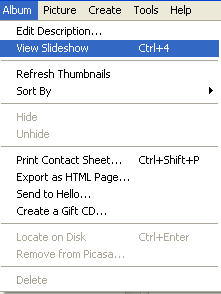
You can also use the keyboard shortcut Control + 4 or select Album > View Slideshow from the menu bar.
To access slideshow controls as the slideshow plays, click on the space bar on your keyboard or move your mouse.

These controls allow you to pause the slideshow (by clicking on the play button so that is it not selected) or move to the next or previous picture.

You can also use the rotate buttons to change the orientation of a picture, or click on the star button to assign a star rating to the currently displayed picture.

The plus and minus buttons on the right side of the control bar can be used to increase or decrease the duration of each slide.

You can exit a slideshow by pressing the Escape (Esc) key on your keyboard or by clicking on the Exit Slideshow button.

You will then be returned to the main Picasa window.
To share a slideshow with others, you have to create a Gift CD. First, insert a blank CD-R or CD-RW into your computer’s writeable drive (your “cd burner”). Next, open up Picasa and click on the Gift CD button in the toolbar.

On the Create a Gift CD screen, select the album or folder that has the photos you want to share as a slideshow by placing a checkmark next to its name in the Library.
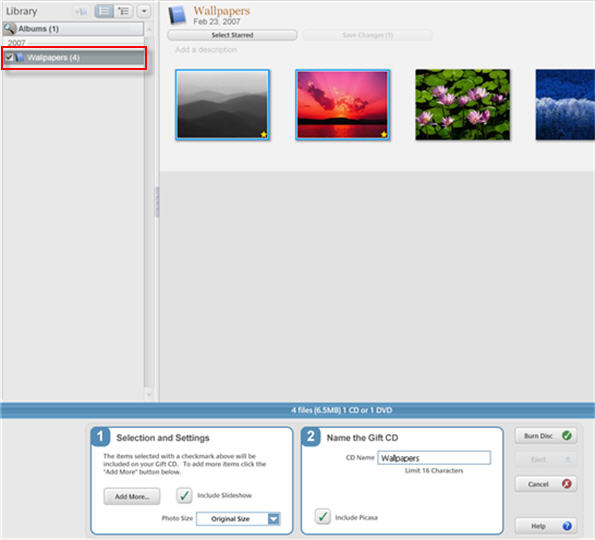
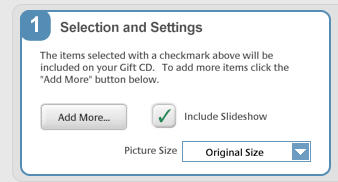
Under Step 1, you can click on the Add More button to display the other folders and albums in your library so that you can select them using checkmarks. To display the photos as a slideshow on the other person’s computer, you need to make sure the box next to that option is checked under Step 1. Finally, choose a size for your pictures using the drop-down menu.
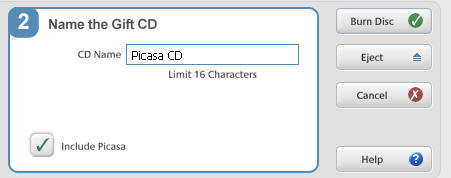
Under Step 2, provide a name for your CD and click on the Burn Disc button to create your CD. By default, a copy of the Picasa program will be included on the CD, but you can uncheck that option if you prefer. The CD will still include a PicasaCD player to display the slideshow on the other person’s computer.
- Search for:
- How do I add people to my Buddy List in iChat?
- How do I block users I don’t want to chat with me on iChat?
- How do I change my buddy icon in iChat?
- How do I change my online status in iChat?
- How do I chat with more than one buddy at a time with iChat?
- How do I send a file using iChat?
- How do I set up iChat?
- How do I start a a chat in iChat?
- I have an iSight camera, but my friend doesn’t, can I still do a video chat?
- What are emoticons, and how do I use them in iChat?
- What do all those abbreviations used in chat mean?
- What do I need to install in order to get started with chat?
- How do I encourage my students to stay on task while using the computer?
- How do I ensure that my students take good care of the computers we have in our classroom?
- How do I minimize disruptions due to technical problems?
- How do I promote collaborative learning using the computers in my classroom?
- I only have one computer, how do I implement technology in my classroom?
- How do I add a link to a webpage in my message?
- How do I check my mailbox for new messages?
- How do I control “spam”?
- How do I create a signature to appear at the end of my emails?
- How do I create an email list?
- How do I hide the names of my mailing list recipients?
- How do I know who is really sending me an email?
- How do I reply to or forward an email?
- How do I save a file sent to me?
- How do I send an email?
- How do I set up my email account in Mail?
- What are rules, and how do I use them to manage my email?
- What is “phishing” and how do I protect myself from it?
- What is an attachment, and how do I send one?
- What is good email Netiquette?
- Can I open files created with a PC on my Mac?
- How do I assign labels to my folders?
- How do I change the program that opens a type of file on my computer?
- How do I compress files to make them smaller?
- How do I connect two Macs to share files using a Firewire cable?
- How do I create a copy of a file?
- How do I delete files or folders?
- How do I find out how much disk space I have free to store files on my computer?
- How do I install programs on my computer?
- How do I rename a file or folder?
- How do I save my work on a Mac?
- How do I share files between Macs and PCs over a network?
- How do I share files between Macs over the network?
- How do I switch between open applications using my keyboard?
- How do I use the Finder to manage my files and folders?
- How do I view the properties of a file or folder?
- What is an alias, and how do I create one?
- What is Exposé?
- What is Spotlight, and how do I use it to search for files on my computer?
- What is the Dock, and how do I use it?
- How can I clean my computer?
- How do I burn a CD on my Mac?
- How do I change the default printer?
- How do I connect a digital camera to my computer to download pictures of my students?
- How do I connect my computer to my school’s network?
- How do I connect my laptop to a projector?
- How do I create a computer-to-computer wireless network?
- How do I install a printer on my Mac?
- How do I manage print jobs on my Mac?
- How do I print in landscape?
- How do I print in on the Mac?
- How do I safely remove a USB device from my computer?
- How do I share a printer?
- I can’t connect to my network, what should I do?
- I can’t print, what should I do?
- What is 802.11?
- What is a flash drive?
- What is Firewire?
- What is USB?
- How do I get images on my computer?
- How do I reduce the file size of an image?
- How do I use Flickr to create online presentations?
- How many megapixels do I need my camera to have?
- What are some tips for taking better pictures?
- What are the differences between the file formats used to save images?
- What is bit depth?
- What is Flickr?
- What is resolution?
- What is the difference between bitmap and vector images?
- What is the difference between optical and digital zoom?
- What resolution should I use when I scan my images?
- What is the World Wide Web?
- What is web 2.0?
- What is the Internet?
- What is a web browser?
- How do I use my web browser to navigate the Web?
- What is a URL?
- What is a 404 error and what should I do if I get one?
- What is a plugin? How do I install it?
- What is a cookie?
- How do I empty my browser’s cache?
- What is social bookmarking?
- What is tabbed browsing, and how do I use it?
- How should my students cite a web page?
- What is HTML?
- How do I create a webpage?
- How is writing for the web different?
- How do I make my web pages accessible?
- What is a “WebQuest”?
- What is blogging and how can I use it as a classroom activity?
- What is a wiki?
- What is RSS?
- How do I use online map services?
- What is Google Earth?
- What is a podcast and how do I create one?
- What is Netiquette?
- What is an Acceptable Use Policy (AUP)?
- How do I connect to the Web?
- How do I control all those pop-up windows?
- How do I bookmark a site I like so I can view it later?
- How can I share bookmarks with my students?
- How can I use a search engine to find the sites I want instead of ten thousand sites I don’t want?
- How can my students know if a web source is reliable?
- How can I check to see what sites my students have been visiting?
- How can I save a local copy of a website to show to my students in a room with no Internet connection?
- Introduction to Universal Access in Mac OS X
- Introduction to Ease of Access in Windows 7
- Setting Up Multiple User Accounts in OS X
- Creating Screen Recordings with QuickTime Player
- Introduction to VoiceOver
- The VoiceOver Quick Start Tutorial
- The VoiceOver Help Menu
- VoiceOver Keyboard Help
- Changing the Accessibility Settings for Mac OS X with the Keyboard and VoiceOver
- Changing the VoiceOver Preferences
- Changing the VoiceOver Preferences with VoiceOver
- Changing the Voice Used by VoiceOver
- Changing the VoiceOver Pronunciation Settings
- Changing the VoiceOver Verbosity Settings
- The VoiceOver Caption Panel
- The Tile Visuals Feature of VoiceOver
- Using VoiceOver to Interact with the Menu Bar
- Using VoiceOver to Interact with the Dock
- Using VoiceOver to Search with Spotlight
- Navigating a Web Page with VoiceOver
- Using the Web Rotor to Navigate a Web Page with VoiceOver
- VoiceOver’s Quick Nav Feature
- Switching Applications with VoiceOver
- Reading Email with VoiceOver and Apple Mail
- Sending an Email Message with VoiceOver and Apple Mail
- Using WebAnywhere
- Text to Speech in Mac OS X
- The Zoom Tool in Mac OS X
- Changing the Display Contrast in Mac OS X
- Changing the Cursor Size in Mac OS X
- Using Mouse Locator to Make the Cursor Easier to Find
- Making the Dock Easier to See
- Making the Icons on Your Computer Easier to See
- Setting Up Your Computer to Announce Alerts with Text to Speech
- How to Use Narrator in Windows 7
- Changing Ease of Access Preferences with Narrator
- The Windows 7 Magnifier
- Changing the Size of the Icons in Windows 7
- Adjusting the Display Contrast in Windows 7
- Making the Cursor Easier to See in Windows 7
- Installing NVDA on Windows 7
- Using the NVDA Screen Reader on Windows 7
- Changing the NVDA Synthesizer Settings
- Changing the Voice Settings for NVDA
- Enabling Audio Cues for NVDA
- Navigating Web Pages with NVDA
- Accessing the Text Only Version of the USF Website with NVDA
- Accessibility Options in Text-Only Version of USF Website
- Resizing Text In Your Browser (Mac)
- Resizing Text in Your Browser (Windows)
- Using Chromevis for Google Chrome
- Mac OS X Universal Access Settings for Hearing Disabilities
- Visual Notifications in Windows 7
- Searching for Closed Captioned Content in iTunes U
- Enabling Closed Captioning in iTunes
- Enabling Closed Captioning in QuickTime Player
- Using the reference tools built into Mac OS X
- The word completion feature in Mac OS X
- Spell check in iWork and TextEdit
- Creating an outline with Pages
- The full screen view in Pages
- Using Preview’s speech feature to listen to a PDF
- Using the Speech Service in Mac OS X to record text into an audio file
- The speech feature of the Mac OS X Calculator
- Using the Simple Finder to help students stay on task
- Browser Based Text to Speech
- The Readability Extension for Firefox and Chrome
- Sticky Keys in Mac OS X
- Sticky Keys in Windows 7
- Slow Keys in Mac OS X
- Filter Keys in Windows 7
- Mouse Keys in Mac OS X
- Mouse Keys in Windows 7
- Text substitution feature of Mac OS X
- Creating keyboard shortcuts in Mac OS X
- Using the onscreen keyboard in Mac OS X
- Using speech recognition in Mac OS X
- Automator Basics
- Setting up the speech recognition feature in Windows 7
- Using the Windows 7 speech recognition feature
- Dictating a document with Windows 7 speech recognition
- Simulating mouse functions with speech recognition in Windows 7
- Reordering Content with the Keyboard in Blackboard 9
- Safari Accessibility Preferences and Keyboard Shortcuts
- Firefox Keyboard Shortcuts
- Google Chrome Keyboard Shortcuts
- Internet Explorer Keyboard Shortcuts
- Introduction to IOS Accessibility Features
- Introduction to VoiceOver for IOS
- Using VoiceOver with iBooks
- Using the Web Rotor to Navigate Web Pages with Mobile Safari
- Changing VoiceOver Settings with the Rotor
- Restrictions in IOS 4.2
- iBooks and Print/Learning Disabilities
- Introduction to Web Accessibility
- Benefits of Web Accessibility
- Web Accessibility Myths
- The Web Content Accessibility Guidelines (WCAG)
- Introduction to Alternative Text for Images
- Dreamweaver Accessibility Preferences for Images
- Adding Alternative Text to Images in Dreamweaver
- Using the Web Developer Toolbar to Check Images for Alt Text
- Making Text Easier to Read On Screen
- Making Text Easier to Read with Dreamweaver
- Color and Web Accessibility
- Color Blindness Simulations
- Checking the Color Contrast of Web Pages
- Setting the Language in Dreamweaver
- Adding Page Titles in Dreamweaver
- Adding Page Structure with Headings in Dreamweaver
- Guidelines for Link Titles
- Adding Link Titles in Dreamweaver
- Creating a Skip Navigation Link in Dreamweaver
- Using Lists to Enhance Usability for Screen Reader Users
- Layout and Data Tables
- Creating an Accessible Data Table with Dreamweaver
- Creating Accessible Forms with Dreamweaver
- Grouping Form Elements with Fieldsets
- Improving Form Usability with CSS
- Aligning Form Elements with CSS
- Writing for the Web, Usability and Accessibility
- Writing for the Web and People with Low Literacy
- Checking the Reading Level of Your Website
- Checking the Section 508 Compliance of Your Site with Cynthia Says
- Checking for Section 508 and WCAG Compliance with Web Accessibility Checker
- Checking the Accessibility of Your Site with WAVE
- Checking the Accessibility of your Site with Accessibility Toolbars for Firefox
- Using the Fangs Screen Reader Emulator
- The Lynx Text Web Browser
- 5 Tips for More Accessible PDF Documents
- Adding Structure to a PDF Document Created with Microsoft Word
- Adding Alternative Text to Images in Microsoft Word 2007
- Adding Alternate Text to Images in Microsoft Word 2010
- Accessibility Options for Exporting Microsoft Word Documents to PDF Format
- Adding White Space in Microsoft Word to Improve PDF Conversion
- Adding Alternative Text to Images with Adobe Acrobat
- Marking Up Decorative Images in Adobe Acrobat
- Adding Tags to PDF Documents in Adobe Acrobat
- Changing the Reading Order of a PDF Document with Adobe Acrobat
- Using Adobe Acrobat’s Accessibility Checks
- Creating ePub Documents with Pages
- Making Image in ePub Documents for the iPad Accessible
- Captioning Guidelines
- Setting up MovieCaptioner on the Mac
- Captioning QuickTime Movies with MovieCaptioner
- Fine Tuning Captions with MovieCaptioner
- Adding Closed Captions to YouTube Videos
- How do I back up my photos using Picasa?
- How do I build a web gallery using Picasa?
- How do I capture video from my video camera using Windows Movie Maker?
- How do I create a movie in Windows Movie Maker?
- How do I create a web album in Picasa?
- How do I crop images using Picasa?
- How do I edit audio with Windows Movie Maker?
- How do I edit video clips with Windows Movie Maker?
- How do I email pictures using Picasa?
- How do I fix the colors in my images using Picasa?
- How do I import content into Windows Movie Maker?
- How do I import photos from my digital camera using Picasa?
- How do I narrate a movie with Windows Movie Maker?
- How do I order prints using Picasa?
- How do I print my pictures using Picasa?
- How do I remove red eye from my images using Picasa?
- How do I search in Picasa?
- How do I straighten an image using Picasa?
- How do I turn a color image into a black and white image with Picasa?
- How do I use Picasa to manage my photo collection?
- What are the main parts of the Picasa interface?
- What is Picasa and how do I install it on my computer?
- What is Windows Movie Maker?
- How do I add people to my contact list in Windows Messenger?
- How do I block users I don’t want to chat with me with Windows Messenger?
- How do I change my online status with Windows Messenger?
- How do I chat with more than one buddy at a time with Windows Messenger?
- How do I send a file using Windows Messenger?
- How do I set up Windows Messenger?
- How do I start a text chat in Windows Messenger?
- How do I start a Video Chat in Windows Messenger?
- How do I start a voice chat in Windows Messenger?
- How do I use the whiteboard feature in Windows Messenger?
- What are emoticons, and how do I use them in Windows Messenger?
- Can I open files created with a Mac on my Windows computer?
- How can I backup my files?
- How do I connect to a shared folder on the network?
- How do I create a shared folder that I can use to share files with my students?
- How do I delete files in Windows?
- How do I find out how much space I have free to store files on my computer?
- How do I install and uninstall programs on my computer?
- How do I protect my data from viruses?
- How do I rename a file in Windows?
- How do I save my work in Windows?
- How do I search for a file on my computer?
- How do I share files between Windows and Mac computers?
- How do I use Windows Explorer to manage my files and folders?
- What is a shortcut, and how do I create one?
- What is the proper way to name a file in Windows?
- How do I protect my computer while using email?
- What do I need to install to use email?
- How can I clean up my hard drive to create more space?
- How do I burn a CD in Windows XP ?
- How do I connect to a printer on my school’s network?
- How do I install a printer in Windows XP?
- How do I manage print jobs in Windows XP?
- How do I print in Windows XP?
- How do I scan my hard drive for errors?
- What is defragmenting and how do I do it?
- What is system restore and how do I use it?
- How do I keep my computer secure while surfing the Web?
- What is spyware and how do I get rid of it?
- No categories
Tech-Ease is your source for just-in-time answers for classroom technology questions. Funding for Tech-Ease content development has been provided by by various grants from the University of South Florida and the Florida Department of Education .
Copyright ©2018 by the Florida Center for Instructional Technology , College of Education , University of South Florida .
- Guest Posts
- Windows Vista
- Office 2010
- Office 2007
- Office 2003
- Google Calendar
- Google Chrome
- Google Docs
- Google Search
- iPad Guides
- iPhone Guides
- Internet Explorer
- Mozilla Firefox
- Write For Us
- Ask a Question

How to Create Movie Presentations and Slideshows in Picasa
One of Picasa’s newest features is the ability to create a Movie Presentation from a selection of videos and pictures. The feature allows you to customize the slide transitions, duration, and captions. This tool is excellent for those of you who like to create movie sideshows to upload to YouTube and/or to burn to a DVD for TV viewing. The how-to below will walk you through the movie creation process, if you have any questions or comments, feel free to post them below.
Note: You must have Picasa 3 to complete this tutorial and access these features. If you have Picasa 2 upgrade by downloading and installing Picasa 3
1. Select the pictures you wish to use for your movie and click the Create Movie Presentation icon
Note: You can also access the Create Movie Presentation option by clicking on Create > Movie… from the toolbar menu
2. The Movie tab allows you to customize your movie by allowing you to;
- Add an Audio track (click on Load… button to add music)
- Select Transitions for the slides/overlapping/speed (see below)
- Determine the Dimensions for the output file (see below, if you’re displaying the video on a wide screen, then you can set a wide screen resolution)
- The option to show captions (picture name & comments) throughout the slideshow
- Full frame cropping (crop to fit screen/no cropping)
3. Click on the Transition Style drop-box to select your desired transition
4. Use the sliders to adjust the Slide Duration and the % Overlap (opacity) during transitions.
5. Click on the Dimensions drop-down to select the width and height in pixels for your video, (the higher the number the better the quality), notice that the drop-down includes options for 720p and 1080p televisions.
Note: I recommend using the 720p & 1080p for screens displaying those resolutions, anything lower than that and the image may not look its best
6. You can check the box to display caption ( Show Captions ) and allow the program to automatically crop your picture ( Full frame photo crop ) to fit the frame specified in the previous step.
Note: I recommend leaving Full frame photo crop unchecked unless you don’t mind pictures of people being chopped up in different places.
7. Click on the Slide tab to specify how your captions will be displayed. In this section you can add to the captions, set formatting, and assign templates for the text displayed.
8. The Clips tab allows you to Add/Remove to your selection of ‘clips’ being used to compose your movie, we’re going to get more clips by clicking on the Get More… button
9. You will be brought back to your picture library, chose the pictures you wish to add and click on the Back to Movie Maker button located at the bottom of the library
10. Below the movie preview you can Delete or Add slides (you can add more blank slides with text by clicking on Add ) , you can also preview your movie by clicking on the Play button and/or moving the slide back and forth.
11. Once you are done editing your video you are presented with 3 options;
- Create Movie (which is what we did for this tutorial) – Simply generates your movie file
- Create Video and Upload to YouTube – This option will generate your video and prompt you for more options to upload to YouTube (see Step #15)
- Close – Need I say more?
12. Your preview will change to the display above as your video is generated. Generation time depends on the number and quality of pictures used and of course your computers’ capabilities.
13. Once the video is completed you can;
- Take Snapshot – Screenshot of a section of your video (screenshots will be stored under the Screenshot album)
- Upload to YouTube – Allows you to upload to YouTube (see #15 for instructions)
- Export Clip – Allows you to select a section of your video clip and export it as a separate file
14. A new Projects album will be created named Movies , click the album to access your new movie and future movie projects
15. When uploading to YouTube you will be prompted with this dialog box, fill out the appropriate sections, and click the Upload video button .
RELATED ARTICLES MORE FROM AUTHOR

How to Improve Computer Performance in Seconds

How to Resolve “This copy of the Install OS X Mavericks application can’t be verified.” Error
How to Disable Control Center in iOS 7
How to disable the auto search for network folders and printers.
Create a Movie With Photos and Music Using Picasa

Introduction: Create a Movie With Photos and Music Using Picasa
Recommendations.

Water Contest

Make it Resilient

Paper and Cardboard Contest

- Help Center
- Privacy Policy
- Terms of Service
- Submit feedback
Picasa & Picasa Web Albums are no longer supported. Learn more
Slideshows, photo collages & movies
You can create slideshows, photo collages and videos in Picasa.
- Create a new album with the photos for the slideshow. Open the album.
- Set your slideshow settings.
To continuously play your slideshow:
- Click Tools > Options (Windows) or Picasa > Preferences (Mac).
- Click Slideshow .
- Select Loop slideshow .
- Select the photos for the collage.
- At the top, click Create photo collage .
- Use the collage creation page to control the appearance and content of your collage.
- Click Create collage .
On your computer, collages are saved in "Collages", under My Pictures > Picasa (Windows) or Pictures > Picasa (Mac).
In Picasa, your Collage folder is in "Projects" (flat-folder view) or the Picasa folder (tree view).
You can combine your photos, videos and music into a movie.
- Select photos and videos.
- At the top, click Create movie presentation .
- Use the Movie maker to alter movie settings, adjust audio and transition, dimensions, add and edit text to slides, or add new photos.
- Click Create movie or YouTube to create the movie and upload it to YouTube.
Movies are saved on your computer in the Movies folder, under My pictures > Picasa (Windows) or Pictures > Picasa (Mac).
In Picasa, the Movies folder is in the "Projects" collection (flat-folder view) or Picasa folder (tree view).
- Virtual and Augmented Reality Headsets
- Comparisons
- Coupon & Hot Deals

How to Add Background Music in Photo Album Using Picasa

Picasa is a free software provided by Google.Picasa is an image organizer tool using Picasa we can edit our digital photos, easily manage photos on our computer and we can also upload and share the photos online.Originally Picasa is created by Lifescape in 2002 and in 2004 Google acquired Picasa from Lifescape and begin this tool as a freeware.You can download Picasa From this link .
In this article, we will see how to attach an audio track in our Picasa Photo albums.Here we will see three different methods of adding music in our Picasa Photo albums.
How to Add Music to a Particular Folder or Album in Picasa
Using this method you can set music for each album or folder in your Picasa.
- Open Picasa in your Computer and select the folder or album.
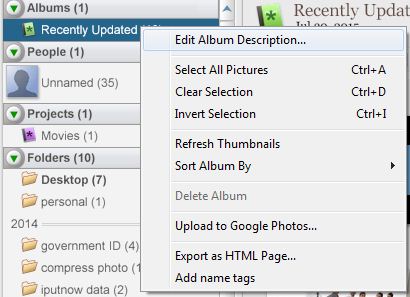
- Now click on the Green Horizontal arrow icon to play the slideshow.
How to Add Music to Any Slideshow in Picasa
Using this method you can set music for any Picasa SlideShow.
- Navigate to Main Menu -> Tools-> Options.
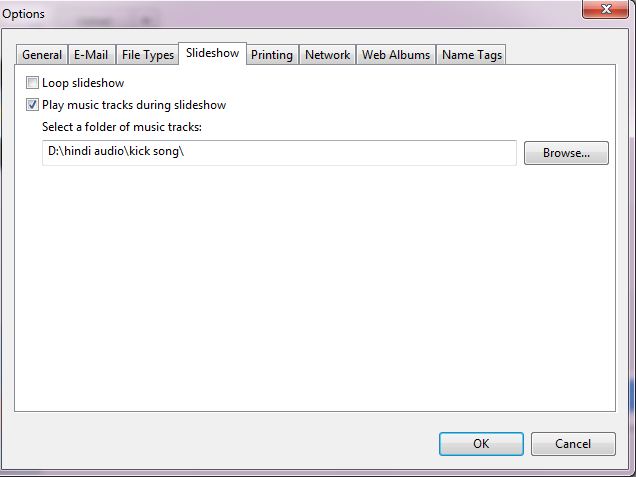
- Now click on Browse button to select the folder with music files.
- Next Click on OK button
In This way, selected music folder will play each time when you start the slideshow.

How to Add Music into Movie Presentation in Picasa
Picasa also allows you to create a movie presentation using video and photos and it can be saved in WMV or MOV format.You can also upload your movie presentation online using your YouTube account.
- First of select the album for which you want to make a movie presentation.
- Now click on the Create Movie Presentation icon located in the top-left corner.
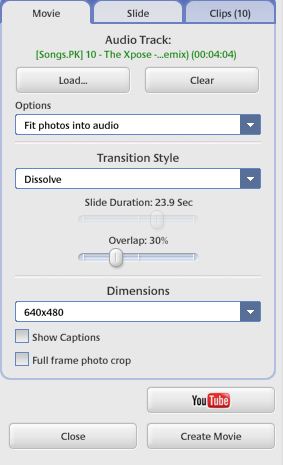
- It will show you following configuration options like Truncate Audio , Fit photos into audio and Loop photos to match audio (photos will be played in slide show until the music end).
So these are the simple method of adding music in your Picasa photo albums.If you know any other tricks related to Picasa please let us know about that.
RELATED ARTICLES MORE FROM AUTHOR
How to recover deleted files from an sd card (tutorial), how to get started with android apps on your chromebook, what is routerlogin and how to know about it, leave a reply cancel reply.
- Privacy Policy
- Manufacturers
Privacy Overview

Creating a movie in PICASA
Mar 31, 2019
110 likes | 349 Views
Creating a movie in PICASA. Combine your photos, videos, and music into a movie, and convert it to a . wmv (Windows) file. Share it with friends by uploading it directly to YouTube. To create a movie, you can follow these steps:.
Share Presentation
- truncate audio
- additional photos
- create movie presentation
- entire people album
- cover slide
- full frame photo crop

Presentation Transcript
Creating a movie in PICASA Combine your photos, videos, and music into a movie, and convert it to a .wmv (Windows) file. Share it with friends by uploading it directly to YouTube. To create a movie, you can follow these steps: STEP 1Select the photos and videos you'd like to include in your movie. STEP 2 Click the Movie button in the Photo Tray to go to the 'Movie Maker' screen. You can also create a movie for all photos in any folder or album by clicking the Create Movie Presentation button in the folder or album header. STEP 3 Use the Movie, Slide, and Clips tabs to alter movie settings, add text to slides, or insert new photos respectively.
MOVIE TAB • Use this tab to adjust the audio, appearance, and flow of your movie: • Audio track: You can load one supported audio file for use with each movie. Choose from three different options to sync your photos to music. • Transition style: Determine how to go from one picture to the next during the movie, e.g. wipe from left, dissolve, pan and zoom. • Slide Duration: Use the slider to adjust the amount of time spent on each slide. • Overlap: Adjust the amount of overlap during the transition from slide to slide. • Dimensions: Control the resolution of your movie. When choosing a dimension for your movie, it's useful to consider the format in which your movie will be viewed. • Show captions: Choose whether or not your photo captions should appear in your movie. • Full frame photo crop: Crop all movie images so that they completely fill the space on the slide.
SLIDE TAB Use this tab to add text to the slides in your movie. You can add text on top of any image or create a text-only slide to serve as a cover slide or a divider in your movie. Click the Slide tab on the 'Movie Maker' screen. Add text in the text box. The preview of your slide or photo will automatically update. Adjust the font, size, style, and color of your text and background. Change the style and location of your text using the 'Template' drop-down menu. By default, each movie has a cover slide that displays the title and date of your album. To create a new text-only slide, click the Add a new text slide button located below the Play button on the 'Movie Maker' screen.
CLIPS TAB Use this tab to add or remove photos, and to retrieve additional photos from your Library for use in your movie. Click the Clips tab on the left side of the 'Movie Maker' screen. Click the Get More button to find additional photos in your Library. Select your desired photos from your Library. After you've finished, click Back to Movie Maker in the Photo Tray. You should now see your additional images displayed on the Clips tab. Use the (+) and (-)buttons to insert and remove photos.
STEP 4 When you are satisfied with your creation, you have a few options: • Click the Play full screen button in the lower-right corner of the screen to see a full-screen preview. • Click the Create Movie button to begin the creation process. • Click the YouTube button to create the movie and automatically upload it to YouTube. • All completed movies in addition to drafts will be saved in the 'Movies' folder, located under My Pictures > Picasa (Windows). In Picasa, your 'Movies' folder is located in the 'Projects' collection (flat-folder view) or in the Picasa folder (tree view).
If you're not finished creating a movie, click the Close button and you'll be prompted to save a draft of your work in the 'Movies' folder. You can re-edit a draft or a finished movie at any time. In the 'Movies' folder, double-click your selected movie, then click the Edit Movie button to access the movie creation tools. Include music The Movie Maker allows you to add supported audio files to accompany your movies created in Picasa. On the 'Movie Maker' screen, click the Movie tab on the left side. Click the Load button to select the music you'd like to include from your computer. After you've loaded the music for your movie, you have three options for how your photos line up with the music:
Truncate audio: Your selected music will be cut-off at the end of your movie. • Fit photos into audio: Your photos will be automatically timed so that they fit within your chosen audio track. • You will not be able to adjust the 'Slide Duration' using this option; each of your photos will be displayed for the same amount of time. • Loop photos to match audio: Your photos will continue to display for the duration of your audio track. Unlike the 'Fit photos into audio' option, each photo will display for length of time you've specified in the 'Slide Duration' section. Photos will loop until the audio track ends.
STUDENT ACTIVITY
Creating a Face movie in PICASA Face Movie analyzes the faces in your selected photos to find the smoothest transitions across facial expressions and poses. Unlike a movie presentation, Face Movie overlays the most similar facial expressions in each photo on top of each other to create the smoothest transitions. To create a Face Movie, follow these steps: STEP 1 Select multiple photos or an entire People album. STEP 2 Click Create Face Movie • STEP 3 You can select different transitions from the 'Transition Style' drop-down menu, choose the slide duration, or even the amount of overlap across photos.
STEP 4 Click Create Movie Your drafts and finished masterpieces will be saved in your 'Movies' folder, located in your 'My Pictures' folder on Windows or your 'Pictures' folder on a Mac. In Picasa, your 'Movies' folder is located in your 'Projects' collection or your 'Picasa' folder.
- More by User
Creating My Movie with WB750
Now you can with the Samsung WB750 and its awesome function called Creative Movie Maker! Without plugging your camera to your computer, you can directly make a video of your most memorable times straight from the Samsung WB750!
252 views • 3 slides
Picasa 2. William F. Egle INFO 652 - Assignment #4. Overview. Created by Google Freeware Download at http://www.picasa.com. Overview. Organize Image files (and videos) By folder By year Shows thumbnails of images in: My Document & My Pictures only Whole Computer. Capabilities.
298 views • 15 slides
Google Picasa
Google Picasa. Simple Sharing & Photo Editing. Click to download and save the set-up file. Download. Visit picasa.google.com to download the latest version. You May Need This Screen. Set-up. Find your downloads & double-click the Picasa file to run the set-up process. Set-up (Cont.).
398 views • 24 slides
Creating Software = Movie Making
Creating Software = Movie Making. The process of creating software is very similar to creating a movie. What are the steps to create a movie?. Steps to Create a Movie. Create a story Create a script Create a story board Filming Editing Releasing the movie. Movie Making.
196 views • 6 slides
Picasa Editing Software
Picasa Editing Software. EME6205 Tricia Sproule Grades 4 th and 5 th -Editing Photos and Creating a Digital Story . I’ve taken my photos for the digital story, what next?. Attach camera to the computer with USB cable or card reader. Click the Import button. .
244 views • 8 slides

PICASA. The Picasa software provides a simple way to view, edit, and organize the photos on your computer. As you get started, there are two things you should always remember:
292 views • 9 slides
PICASA. A free photo management program that will help you organize, edit, and share your pictures. Content. Organize your photos Edit your photos Print and share your photos. Organize.
420 views • 16 slides

Creating a Blockbuster Advisement Center on a B-Movie Budget
Creating a Blockbuster Advisement Center on a B-Movie Budget. Starring Nicole Capehart Directed by Megan Conner Stunt Double Annie Glisson. Clip. Facing Budget Cuts?. You are not alone! The University of Arizona-$57 million, on top of a $20 million cut at the start of the year
190 views • 10 slides

“PICASA 3” required in dekstop
“PICASA 3” required in dekstop. Choose “PICTURE” and click. click “EDIT IN PICASA ”. click “TEXT”. w rite “TEXT” in blank box. c hoose “FONT” text. Choose text “COLOUR”. c hoose text “SIZE”. c hoose text “ALIGNMEN”. c lick “APPLY” after editing done.
205 views • 10 slides

Movie Studio in a Box
Movie Studio in a Box. Andrew Hopkins Harper Woods Public Schools [email protected]. Personal Background. Harper Woods Public Schools 20 years Instructional Design Apple Foundations Trainer Instructional Technology Specialist Baker College. Today’s Agenda.
496 views • 35 slides

Download Picasa
Download Picasa. Downloading from the internet. Type in www.google.com Click on more. Click on Even More. Picasa is on the list on the right-hand side. Download from CD. Click on I Agree. Click on Install. Importing into Picasa. Click on I Agree. Click on Install.
278 views • 14 slides

Picasa. Organizing Sharing your photos Editing One-click corrections Red-Eye correction Color Lighting Create collages Slideshows Add Photo text. What is GIMP?. First release: Feb. ‘96 GIMP is a multi-platform photo manipulation tool.
624 views • 44 slides

Creating Movie Trailers
Creating Movie Trailers. Multimedia Productions. Selling An Idea. Movies are not cheap to produced. James Cameron’s blockbuster, Avatar, is reported to have cost between $300 and $500 million dollars to launch from an idea to the cinema screen.
271 views • 6 slides

Picasa. The Swiss army knife for digital pictures. Picasa – Outline of the Workshop. Overview Installation Move the pictures to your computer Search your computer Organize your pictures Edit your pictures Share your pictures Appendix. Picasa.
407 views • 13 slides

PICASA. FREE. View, Organise, and Find Your Images. Software For Your Photos. Edit ( ‘Develop’ ) them. Print. Backup. Share. Be Creative. So, How Do You Get Picasa ?. Type: http://picasa.google.co.uk in your browser Click on the Download Picasa 3 button
320 views • 14 slides
Picasa 2 Photo Editing
Picasa 2 Photo Editing. Be sure to fill out your name and period and then delete this text box. Multimedia Mr. Seigler 1,2,3,4,5,6,7&8. Black and White. Tell why you chose this picture and describe how you did the edit. +raqd. Sepia Tone.
275 views • 12 slides

PICASA. What is PICASA?. Picasa is free photo editing software from Google that makes your pictures look great. The Picasa software lets you organize, edit, and upload your photos in quick, easy steps. Two things to know.
365 views • 11 slides
Creating & Editing a Video/Movie
Creating & Editing a Video/Movie. Editing Techniques. To open a project On the File menu, click Open Project . In the File name box, locate the saved project file, and click Open . The project appears in the storyboard/timeline. Editing Techniques. To Add a clip to a project
248 views • 12 slides

Creating Movie Trailers. Multimedia Productions. Selling An Idea. Hollywood puts in a great deal of effort to persuade us to part with our hard earned cash to see their movie production. The most effective way they do this is with a successful Movie Trailer. History.
235 views • 6 slides
The Alchemists Vessel
Decorating extraordinary people with extraordinary jewelry.
How To – Create A Movie Using Picasa 3 Tutorial
Good Morning, Last month there was a contest on the Handmade Artists Forum , aimed at making a Movie or a Video showcasing the site we all love and with which we hold buyer or shop accounts. Because my iMac is not quite vintage but it is outdated, and I was, as were many others for various reasons, unable to compete in the contest. My problem was simply a technical issue. However; in hope that they may try the contest again, it might be helpful for those that don’t have Movie Maker (Windows) or just don’t like their iMovie program, they might want to try using Picasa. Picasa is a free photo editing program on the web, if you have a blogger blog or a Google account of any kind you probably already have Picasa . My version is Picasa 3 for Mac OSXs. I am guessing that the program works more or less the same on either a MS or Apple based machine. I should mention that Picasa is fairly limited to movie making. Basically it is drag and drop photos to a new folder, click a button, let the program do it’s thing, add Title Cards (Slides) and add music. A word of *caution about adding music . Facebook WILL delete your video if you attempt to upload it to your page if you use an audio or music file. How To Make a Movie using Picasa 3 1. If you do not have Picasa you may click the link above to down load it. It is free. 2. Open your Picasa program on your desk top. You do not have to be logged into the web. 3. Click the + File Button at the top of the box.

Follow the Prompts in the Dialog Box

1. Enter a Name for your video 2. Change the date or leave it as is. 3. Choose to include music, click the box, if not leave blank.* 4. Place: I suggest using your business name. 5. Description: Anything you like. 6. Click OK. Your new folder will appear at the top of the program screen and will be empty. Select the photos you would like to include in your movie. Picasa should have all of your photos collected for you. Choose from an existing file or upload fresh pictures if you like. From a File: 1. Click on the photo you would like to add to the movie folder (file). 2. Right Click on the picture to bring up the menu.

3. Highlight Add to Album (as above). 4. A selection of available folders will appear, select the one you created for your movie. NOTE: The picture will be copied to the folder (file) you created for your movie and still remain in its original folder (file) as well. 5. Continue to Add photos to your Album until you are satisfied. *You may edit and add more pictures later. All done? OK. Your folder will look something like this.

From the Menu at the top of the screen, click “Create Movie Presentation”. It is the third button from the left .
| Create Movie Presentation Button |
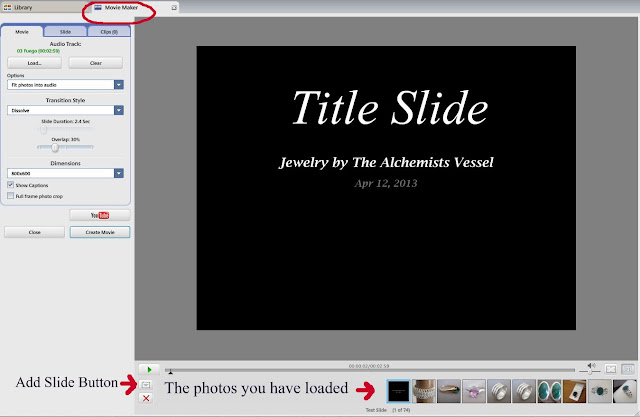
You will be whisked off to a screen that looks something like this.

You are in the Movie Maker Tab The First Tab in this window is Movie This first box is where you may choose your options for music (sync with photos). Transition Style (What the pictures do when the movie is played , fade, dissolve, etc). Dimensions – Full Screen or an actual dimension may be chosen. *I chose 800 x 600 so the photos would not automatically crop to odd views in Full Screen). The Second Tab in this window is Slide .

This is where you may change the text of the Title Slide (this is the first picture in your movie). 1. You may choose fonts, and varying styles. 2. You may also change the style of you slide’s template as well as the wording. 3. Type your changes in the box on the left, they will appear on the slide to the right. Double check your spelling. 4. You may also add more slides by clicking on the icon that looks like a rectangle with lines in it. (See photo). The photos and slides you have placed in your movie can be seen in the “tray” below the main screen. (See photo above). Almost there! The third tab in this window is Clips If you would like add photos you may do so here.

1. To add photos click Get More. It is the way you want it? Great. Return to the Movie tab.

1. Click “Create Movie”. The movie will take a while to download (mine took about five minutes or less). The movie will begin when processing is complete. After the movie ends, if you would like to make any changes it will give you an opportunity to Edit the movie. You may also return to the Clips page and remove photos after the movie has been processed. Select individual photos to be removed. *Remember each edit will take another five or so minutes to process your changes. After you are satisfied with you film, it will be saved to Picasa under the folder “Movies” (mine was any way) Before closing out the window, if you would like you may watch the movie again or select the YouTube button and upload the movie to your account. The finished product can look something like this.
In hope that you have enjoyed the tutorial and that inspiration may strike for your own video, or that you might give it if try, just for fun. Thank you for stopping by and having a look. The Alchemists Vessel would like to wish you a pleasant day.
Would you like to Share?
3 thoughts on “ how to – create a movie using picasa 3 tutorial ”.
This is a great post. I have not used Picassa but have used the windows program. I think these can be a very useful tool, beats having only a few photos on the blog for viewing. Great work Alix
thanks for the lesson…now I'll participate if they have that contest again.Debbi- yankeeburrowcreations
Wow! that is a really nice and detailed tutorial.
Leave a comment Cancel reply
- Google Plus
- Already have a WordPress.com account? Log in now.
- Subscribe Subscribed
- Copy shortlink
- Report this content
- View post in Reader
- Manage subscriptions
- Collapse this bar
- The Alchemists Vessel
Showcase and Discussion of Jewelry Designs by the Alchemists Vessel. A central place to find our sites all over the web. Custom work may also be discussed. Featured Artists, Crafts, Projects, and Interesting People can all be discovered here.
- Photo Gallery
- The Alchlemists Vessel Shop ~ Etsy
- Tutorials on Youtube
Wednesday, April 17, 2013
How to - create a movie using picasa 3 tutorial.

| Create Movie Presentation Button |
4 comments:

thanks for the lesson...now I'll participate if they have that contest again. Debbi - yankeeburrowcreations

Wow! that is a really nice and detailed tutorial.
Really helpful.... Thanx
How do you burn your movie to a disk?

IMAGES
VIDEO
COMMENTS
In this video I will show you Google Picasa 3 Tutorial - How to make a Movie. In this app have lot of new features to create and edit picture movie presentat...
If you have Picasa 2 upgrade by downloading and installing Picasa 3. 1. Select the pictures you wish to use for your movie and click the Create Movie Presentation icon. 2. The Movie tab allows you to customize your movie by allowing you to; 3. Click on the Transition Style drop-box to select your desired transition.
You can create slideshows, photo collages, and videos in Picasa. Create a slideshow. Create a new album with the photos for the slideshow. Open the album. At the top, click Play Fullscreen Slideshow. Set your slideshow settings. To continuously play your slideshow: Click Tools > Options (Windows) or Picasa > Preferences (Mac). Click Slideshow.
You can create slideshows, photo collages, and videos in Picasa. Create a slideshow Create a new album with the photos for the slideshow. Open the album. At the top, click Play Fulls
Using Picasa 3 to make a movie slide show, and create audio using Audacity.
How to create a movie presentation with photos, videos and audio. You can combine your photos, videos, and music into a movie. ... On a Mac computer, the movie is under Pictures > Picasa. In Picasa, the Movies folder is in the "Projects" collection (flat-folder view) or Picasa folder (tree view). Page updated. Google Sites ...
In this tutorial you will learn how to make a photo slideshow in Picasa.Don't forget to check out our site http://howtech.tv/ for more free how-to videos!htt...
With Picasa 3, slide shows are easy to make and share with others. Find out exactly how to create a slide show with this free tool from Google. ... Click on the Create a Movie Presentation button. It is one of the six options available on the top left hand part of the folder screen. From this screen, you can add audio, change the transition ...
To edit a slide, click on the image then click on the "Slide" tab. To upload music, click on the "Movie" tab. The new tab will pop up and a button saying "Load" will be displayed in the upper left corner. Click on this button and a new window will pop up saying, "Open.". Browse your music library, choose a track, and click ...
How go Make a Video Slideshow with Music about Picasa. Step 2. Tap the Movie icon. Click the Movie toggle beneath aforementioned folder title to create a Picasa slideshow presentation, or you can step the large one in this toolbar. Both this two icons offer the same function.
Step 1. Download Aiseesoft Slideshow Creator. Free download and install this slideshow creating tool on your computer, and tap its icon to launch it. Step 2. Import Picasa photos. Click the "Add photo (s) and video (s)" button to browse your computer and add your selected Picasa photos into this software. Step 3.
Next, open up Picasa and click on the Gift CD button in the toolbar. On the Create a Gift CD screen, select the album or folder that has the photos you want to share as a slideshow by placing a checkmark next to its name in the Library. Under Step 1, you can click on the Add More button to display the other folders and albums in your library so ...
Article #2 - How to Create Movie Presentations and Slideshows in Picasa. Once you've completed the light reading included in the two articles above, proceed to the directions below. Create Hi-Def Video in Picasa 3. 1. After you select the photographs for the slideshow (Step #1 of Article #2).
If you have Picasa 2 upgrade by downloading and installing Picasa 3. 1. Select the pictures you wish to use for your movie and click the Create Movie Presentation icon . Note: You can also access the Create Movie Presentation option by clicking on Create > Movie… from the toolbar menu. 2.
Picasa Tip: Make a Movie. Picasa 3 has a very easy way to take a bunch of photos, add a song you like, and create a movie. All you do is select the photos you want in the movie and click the Movie button at the bottom of the screen. Once in the 'Movie Maker' you can add a song from your computer's music library.
Introduction: Create a Movie With Photos and Music Using Picasa Instructions on how to create a movie using your own photos, music (MP3), and the free software Picasa. Great for creating holiday slideshows for the family or promote your own photography or music.
Tutorial Videos Make a Movie; Tutorial Videos: Movie Files from your Camera; Tutorial Videos:39.Record a Movie from your Webcam . This is different from Picasa's slideshow feature in that the end result is a single file - a .wmv movie file. Once the movie is created, you can upload it to your Picasa Web Album, or better yet, to Youtube.
For more information on Picasa's Movie Making function, see this past article: Picasa Tip: Make a Movie. Putting your Movie on a DVD. Once you have a completed movie file, you can use DVDMaker on windows to burn the movie onto a DVD that can be played on any DVD player. See this past article on DVD of Pictures that plays on your TV. On ...
You can create slideshows, photo collages and videos in Picasa. Create a slideshow Create a new album with the photos for the slideshow. Open the album. At the top, click Play full-screen. ... At the top, click Create movie presentation. Use the Movie maker to alter movie settings, adjust audio and transition, dimensions, add and edit text to ...
How to Add Music into Movie Presentation in Picasa. Picasa also allows you to create a movie presentation using video and photos and it can be saved in WMV or MOV format.You can also upload your movie presentation online using your YouTube account. First of select the album for which you want to make a movie presentation. Now click on the ...
Creating a movie in PICASA. Combine your photos, videos, and music into a movie, and convert it to a . wmv (Windows) file. Share it with friends by uploading it directly to YouTube. To create a movie, you can follow these steps:. Slideshow 2532872 by astro
Picasa is a free photo editing program on the web, if you have a blogger blog or a Google account of any kind you probably already have Picasa. My version is Picasa 3 for Mac OSXs. I am guessing that the program works more or less the same on either a MS or Apple based machine. I should mention that Picasa is fairly limited to movie making.
Picasa should have all of your photos collected for you. Choose from an existing file or upload fresh pictures if you like. From a File: 1. Click on the photo you would like to add to the movie folder (file). 2. Right Click on the picture to bring up the menu. 3. Highlight Add to Album (as above).
AI startup Synthesia debuted a slew of new features including the ability to make Apple-style presentations with avatars by using just a webcam or phone.