

How to Make College Assignment Heading
Table of Contents
The General Assignment Header Guidelines
How to head an assignment, page formatting heading rules, why college assignment heading is important.

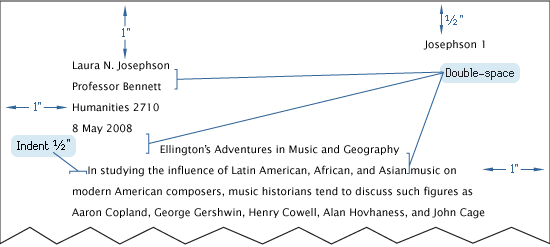
If you have written at least one assignment, you must have faced a college homework heading. You might remember how it is done in MLA style (at the very beginning of your paper) where the student’s name must be included on the first page, followed by the professor’s name, course name, and the delivery date. It is the most widespread assignment heading that students get to learn. It has a clear purpose: to help college professors identify the paper and enter relevant information in the grading book.
As a rule, the college assignment heading format rules may change, depending on an essay type and your course, yet the basic example (done in MLA format) will look like this:
John Smith Mr. Jackson English 1701 10 June 2019
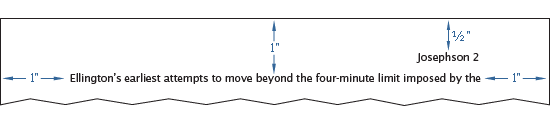
According to the MLA Style manual , it is obligatory to place this information in the top left corner of the front page with the header’s inclusion of the student’s last name and the page number in the top right corner. Depending on your academic writing format, it may be necessary to compose your assignment’s header in Chicago or APA format, which will require specific templates.
What makes all formats unified, however, as you learn how to title things, is the student’s name, the title of the paper, course name, institution, professor, or academic advisor being mentioned, and the date of the research project or an essay.
Regardless of what formatting style you have to follow or when you ask for online essay assignment help , make sure that you locate and write down the following information:
- Identify the paper style that you have to implement for your assignment. It is necessary to include all the necessary details that will be unique if it is a lab report or a research paper.
- Headings and margins. It is vital to make sure that your paper meets the same page margins from all sides. In most cases, it will be a 1-inch margin.
- First and Last Name must be included exactly in the same way as it is mentioned in your student’s card. The same relates to online courses to help keep your grading book active.
- Professor’s name part has to come next in most academic formats. Remember that in certain cases, it is necessary to consult with your college professor since it may be either “Professor Jones”, “Dr. Jones”, or simply “Jones” unless specified otherwise.
- The Course Name. This college assignment heading part may include a special code for your course like “ENG 201” or “Social Sciences Unit”. Always consult your academic advisor to get things right. Specifying the wrong course may not be considered a serious offense, yet your final grade may be deducted.
- Date. It always depends on the country and the calendar style that is being used. It is one of the most common mistakes that modern students make as they do not check this part in advance or pick examples from the Internet. The military date style is preferred in most cases.
Remember that the title of your paper should always be centered and double-spaced, according to most formats. The only exception is the inclusion of running headers in APA format, which will always be aligned to the left and will include CAPS and a shortened title of your paper. The latest edition of APA 7 does not require the “Running Head” prefix and only asks for the paper’s title, all in capital letters.
Your assignment can be completed in 3 hours!
Has your deadline come quicker than you expected? No worries! We have what you need – a 3-hours deadline option! All features available for any other order applied, including:
- 100% original assignment
- Free formatting and reference list
- 24/7 online support
While these often differ between styles, the majority of academic formats will also require learning about the page layout rules . Even when you download freely available assignment header templates from the web, make sure that they have:
- One-inch margins on left and right, top, and the bottom of the page.
- Times New Roman, 12 point font is used or Arial 12pt.
- Text and heading part must be double-spaced.
- Text of the paper is aligned to the left with the 1/2 inches indent for every paragraph.
- The block quotes must follow the same rule.
- Your bibliography part should use hanging indents for every second line of the reference, which also relates to the general heading guidelines for college assignments.
In case of doubt, always consult a relevant style manual!
Working with a cover page for a university assignment is a part of every curriculum, which is a reason why so many professors recommend passing the general English course. It will help to learn how to format your tasks accordingly. It may seem challenging at first, yet knowing how to write a professor’s name on paper will also help you to avoid plagiarism and embarrassment when you send the wrong assignment by accident. Once there is relevant information found in your assignment heading, educators from the other courses or fellow students can easily find and identify every lost college paper in case of necessity.

A footnote is a citation at the bottom of a page in academic writing that provides additional information and references for specific points made in the main text. What is a footnote? A...
A footnote is a citation at the bottom of a page in academic writing...
When you are facing the challenge of not knowing how to write a research assignment for your school or college class, there are many things that you should consider to make things work...
When you are facing the challenge of not knowing how to write a...
Bibliographies are generally not the easiest or most fun writing tasks, but they are necessary, so it’s important to get them right! Read on, to find out ‘how to make bibliography’...
Bibliographies are generally not the easiest or most fun writing...
Over 1000 students entrusted Bro
We use cookies to give you the best experience possible. By continuing we’ll assume you board with our cookie policy .
A step-by-step guide for creating and formatting APA Style student papers
The start of the semester is the perfect time to learn how to create and format APA Style student papers. This article walks through the formatting steps needed to create an APA Style student paper, starting with a basic setup that applies to the entire paper (margins, font, line spacing, paragraph alignment and indentation, and page headers). It then covers formatting for the major sections of a student paper: the title page, the text, tables and figures, and the reference list. Finally, it concludes by describing how to organize student papers and ways to improve their quality and presentation.
The guidelines for student paper setup are described and shown using annotated diagrams in the Student Paper Setup Guide (PDF, 3.40MB) and the A Step-by-Step Guide to APA Style Student Papers webinar . Chapter 1 of the Concise Guide to APA Style and Chapter 2 of the Publication Manual of the American Psychological Association describe the elements, format, and organization for student papers. Tables and figures are covered in Chapter 7 of both books. Information on paper format and tables and figures and a full sample student paper are also available on the APA Style website.
Basic setup
The guidelines for basic setup apply to the entire paper. Perform these steps when you first open your document, and then you do not have to worry about them again while writing your paper. Because these are general aspects of paper formatting, they apply to all APA Style papers, student or professional. Students should always check with their assigning instructor or institution for specific guidelines for their papers, which may be different than or in addition to APA Style guidelines.
Seventh edition APA Style was designed with modern word-processing programs in mind. Most default settings in programs such as Academic Writer, Microsoft Word, and Google Docs already comply with APA Style. This means that, for most paper elements, you do not have to make any changes to the default settings of your word-processing program. However, you may need to make a few adjustments before you begin writing.
Use 1-in. margins on all sides of the page (top, bottom, left, and right). This is usually how papers are automatically set.
Use a legible font. The default font of your word-processing program is acceptable. Many sans serif and serif fonts can be used in APA Style, including 11-point Calibri, 11-point Arial, 12-point Times New Roman, and 11-point Georgia. You can also use other fonts described on the font page of the website.
Line spacing
Double-space the entire paper including the title page, block quotations, and the reference list. This is something you usually must set using the paragraph function of your word-processing program. But once you do, you will not have to change the spacing for the entirety of your paper–just double-space everything. Do not add blank lines before or after headings. Do not add extra spacing between paragraphs. For paper sections with different line spacing, see the line spacing page.
Paragraph alignment and indentation
Align all paragraphs of text in the body of your paper to the left margin. Leave the right margin ragged. Do not use full justification. Indent the first line of every paragraph of text 0.5-in. using the tab key or the paragraph-formatting function of your word-processing program. For paper sections with different alignment and indentation, see the paragraph alignment and indentation page.
Page numbers
Put a page number in the top right of every page header , including the title page, starting with page number 1. Use the automatic page-numbering function of your word-processing program to insert the page number in the top right corner; do not type the page numbers manually. The page number is the same font and font size as the text of your paper. Student papers do not require a running head on any page, unless specifically requested by the instructor.
Title page setup
Title page elements.
APA Style has two title page formats: student and professional (for details, see title page setup ). Unless instructed otherwise, students should use the student title page format and include the following elements, in the order listed, on the title page:
- Paper title.
- Name of each author (also known as the byline).
- Affiliation for each author.
- Course number and name.
- Instructor name.
- Assignment due date.
- Page number 1 in the top right corner of the page header.
The format for the byline depends on whether the paper has one author, two authors, or three or more authors.
- When the paper has one author, write the name on its own line (e.g., Jasmine C. Hernandez).
- When the paper has two authors, write the names on the same line and separate them with the word “and” (e.g., Upton J. Wang and Natalia Dominguez).
- When the paper has three or more authors, separate the names with commas and include “and” before the final author’s name (e.g., Malia Mohamed, Jaylen T. Brown, and Nia L. Ball).
Students have an academic affiliation, which identities where they studied when the paper was written. Because students working together on a paper are usually in the same class, they will have one shared affiliation. The affiliation consists of the name of the department and the name of the college or university, separated by a comma (e.g., Department of Psychology, George Mason University). The department is that of the course to which the paper is being submitted, which may be different than the department of the student’s major. Do not include the location unless it is part of the institution’s name.
Write the course number and name and the instructor name as shown on institutional materials (e.g., the syllabus). The course number and name are often separated by a colon (e.g., PST-4510: History and Systems Psychology). Write the assignment due date in the month, date, and year format used in your country (e.g., Sept. 10, 2020).
Title page line spacing
Double-space the whole title page. Place the paper title three or four lines down from the top of the page. Add an extra double-spaced blank like between the paper title and the byline. Then, list the other title page elements on separate lines, without extra lines in between.
Title page alignment
Center all title page elements (except the right-aligned page number in the header).
Title page font
Write the title page using the same font and font size as the rest of your paper. Bold the paper title. Use standard font (i.e., no bold, no italics) for all other title page elements.
Text elements
Repeat the paper title at the top of the first page of text. Begin the paper with an introduction to provide background on the topic, cite related studies, and contextualize the paper. Use descriptive headings to identify other sections as needed (e.g., Method, Results, Discussion for quantitative research papers). Sections and headings vary depending on the paper type and its complexity. Text can include tables and figures, block quotations, headings, and footnotes.
Text line spacing
Double-space all text, including headings and section labels, paragraphs of text, and block quotations.
Text alignment
Center the paper title on the first line of the text. Indent the first line of all paragraphs 0.5-in.
Left-align the text. Leave the right margin ragged.
Block quotation alignment
Indent the whole block quotation 0.5-in. from the left margin. Double-space the block quotation, the same as other body text. Find more information on the quotations page.
Use the same font throughout the entire paper. Write body text in standard (nonbold, nonitalic) font. Bold only headings and section labels. Use italics sparingly, for instance, to highlight a key term on first use (for more information, see the italics page).
Headings format
For detailed guidance on formatting headings, including headings in the introduction of a paper, see the headings page and the headings in sample papers .
- Alignment: Center Level 1 headings. Left-align Level 2 and Level 3 headings. Indent Level 4 and Level 5 headings like a regular paragraph.
- Font: Boldface all headings. Also italicize Level 3 and Level 5 headings. Create heading styles using your word-processing program (built into AcademicWriter, available for Word via the sample papers on the APA Style website).
Tables and figures setup
Tables and figures are only included in student papers if needed for the assignment. Tables and figures share the same elements and layout. See the website for sample tables and sample figures .
Table elements
Tables include the following four elements:
- Body (rows and columns)
- Note (optional if needed to explain elements in the table)
Figure elements
Figures include the following four elements:
- Image (chart, graph, etc.)
- Note (optional if needed to explain elements in the figure)
Table line spacing
Double-space the table number and title. Single-, 1.5-, or double-space the table body (adjust as needed for readability). Double-space the table note.
Figure line spacing
Double-space the figure number and title. The default settings for spacing in figure images is usually acceptable (but adjust the spacing as needed for readability). Double-space the figure note.
Table alignment
Left-align the table number and title. Center column headings. Left-align the table itself and left-align the leftmost (stub) column. Center data in the table body if it is short or left-align the data if it is long. Left-align the table note.
Figure alignment
Left-align the figure number and title. Left-align the whole figure image. The default alignment of the program in which you created your figure is usually acceptable for axis titles and data labels. Left-align the figure note.
Bold the table number. Italicize the table title. Use the same font and font size in the table body as the text of your paper. Italicize the word “Note” at the start of the table note. Write the note in the same font and font size as the text of your paper.
Figure font
Bold the figure number. Italicize the figure title. Use a sans serif font (e.g., Calibri, Arial) in the figure image in a size between 8 to 14 points. Italicize the word “Note” at the start of the figure note. Write the note in the same font and font size as the text of your paper.
Placement of tables and figures
There are two options for the placement of tables and figures in an APA Style paper. The first option is to place all tables and figures on separate pages after the reference list. The second option is to embed each table and figure within the text after its first callout. This guide describes options for the placement of tables and figures embedded in the text. If your instructor requires tables and figures to be placed at the end of the paper, see the table and figure guidelines and the sample professional paper .
Call out (mention) the table or figure in the text before embedding it (e.g., write “see Figure 1” or “Table 1 presents”). You can place the table or figure after the callout either at the bottom of the page, at the top of the next page, or by itself on the next page. Avoid placing tables and figures in the middle of the page.
Embedding at the bottom of the page
Include a callout to the table or figure in the text before that table or figure. Add a blank double-spaced line between the text and the table or figure at the bottom of the page.
Embedding at the top of the page
Include a callout to the table in the text on the previous page before that table or figure. The table or figure then appears at the top of the next page. Add a blank double-spaced line between the end of the table or figure and the text that follows.
Embedding on its own page
Embed long tables or large figures on their own page if needed. The text continues on the next page.
Reference list setup
Reference list elements.
The reference list consists of the “References” section label and the alphabetical list of references. View reference examples on the APA Style website. Consult Chapter 10 in both the Concise Guide and Publication Manual for even more examples.
Reference list line spacing
Start the reference list at the top of a new page after the text. Double-space the entire reference list (both within and between entries).
Reference list alignment
Center the “References” label. Apply a hanging indent of 0.5-in. to all reference list entries. Create the hanging indent using your word-processing program; do not manually hit the enter and tab keys.
Reference list font
Bold the “References” label at the top of the first page of references. Use italics within reference list entries on either the title (e.g., webpages, books, reports) or on the source (e.g., journal articles, edited book chapters).
Final checks
Check page order.
- Start each section on a new page.
- Arrange pages in the following order:
- Title page (page 1).
- Text (starts on page 2).
- Reference list (starts on a new page after the text).
Check headings
- Check that headings accurately reflect the content in each section.
- Start each main section with a Level 1 heading.
- Use Level 2 headings for subsections of the introduction.
- Use the same level of heading for sections of equal importance.
- Avoid having only one subsection within a section (have two or more, or none).
Check assignment instructions
- Remember that instructors’ guidelines supersede APA Style.
- Students should check their assignment guidelines or rubric for specific content to include in their papers and to make sure they are meeting assignment requirements.
Tips for better writing
- Ask for feedback on your paper from a classmate, writing center tutor, or instructor.
- Budget time to implement suggestions.
- Use spell-check and grammar-check to identify potential errors, and then manually check those flagged.
- Proofread the paper by reading it slowly and carefully aloud to yourself.
- Consult your university writing center if you need extra help.
About the author

Undergraduate student resources
College Assignment Heading: A Quick Guide
.webp "assignment heading format")
College Assignment Header Writing Tips
Writing a college assignment heading requires attention to detail and adherence to any specific formatting guidelines provided by your instructor or institution. Here are some tips to help you create an effective header:
- Follow Formatting Guidelines
Before you begin, ensure you understand any specific requirements for formatting, such as font size, style, margin size, and spacing. To find out more about formatting in Chicago style, consult our guide.
- Include Necessary Information
Typically, a header should include your name, the course name or code, the paper title or number, and the date. Ensure that all required information is present.
- Use Consistent Formatting
Maintain consistency throughout your header. Use the same font, size, and style for all elements. Align them neatly either to the page's left, right, or center, depending on the guidelines provided.
- Keep it Simple
While including all necessary information is important, avoid adding unnecessary details that could clutter the header. Keep it clean and concise.
- Check for Accuracy
Double-check the spelling of your name, the course title, and the date. Accuracy in these details reflects professionalism.
- Include Page Numbers (if required)
Some instructors may require page numbers in the header. If this is the case, ensure they are included in the appropriate format specified (e.g., "Page 1 of 5"). To learn more, please refer to our guide about APA format .
- Use Proper Capitalization
Capitalize the first letter of each word in the header, except for articles, prepositions, and conjunctions, unless they are the first word. For example, "An Analysis of Climate Change in the 21st Century" would be appropriate.
- Consider the Assignment Type
Depending on the type of paper, you may need to include additional information. For example, if it's a group project, you might include the names of all group members in the header.
- Be Mindful of Specific Requirements
Some instructors or institutions may have specific preferences for headers. Always check the assignment guidelines or ask your instructor if you're unsure about any requirements.
- Use a Template or Style Guide
If your institution provides a template or style guide for papers, make sure to use it. This ensures compliance with institutional standards. By following these tips, you can create a professional and properly formatted header for your paper.
Do College Assignment Headings Puzzle You?
Let our professional writers show you how it’s done!

How to Head a College Assignment?
When you're preparing a college paper, it's crucial to establish a clear structure and formatting. Begin with a cover page if your instructor requires one, including essential details such as the assignment title, your name, course name and number, instructor's name, and the submission date.
If a cover page isn't necessary, ensure that your paper begins with a header on the first page. This college assignment heading should contain your name, the course name and number, the instructor's name, and the submission date. Center-align the title of your paper on the first page to make it stand out and reflect the content accurately.
.webp "assignment heading format")
Adhere to any specific formatting guidelines provided by your instructor regarding font type, size, spacing, and margins. Typically, assignments are double-spaced and employ legible fonts like Times New Roman or Arial at a standard size, often 12-point.
Include page numbers in the header or footer of each page, typically located in the top right corner or centered at the bottom.
To properly head a paper, you'll typically include your name, the course name or code, the paper cover or number, and the date. Here's an example of how you might format a header for a college assignment:
[Your Name]
[Course Name or Code]
[Assignment Title or Number]
Let's flesh out this example with specific details:
BIO 101: Introduction to Biology
Lab Report: Effects of Temperature on Enzyme Activity
March 20, 2024
In this example:
- Your Name: This is where you would put your full name.
- Course Name or Code: Include either the course's full name or its code, depending on what's required.
- Assignment Title or Number: Include your submitted paper's specific title or number. Include that information if it's a research paper, essay, or lab report.
- Date: Include the date you're submitting the assignment. Make sure to format it according to any guidelines provided.
Remember to follow any specific formatting guidelines provided by your instructor or institution. This example provides a basic template that you can adapt as needed.
No Time Left to Format Your Assignment?
Use our writing service to meet the deadline stress-free.

College Assignment Heading Formatting Rules
Formatting rules for college assignment headings can vary depending on the specific guidelines provided by your institution or instructor. However, here are some general guidelines that are commonly followed:
- Font: Unless otherwise specified, use a standard font such as Times New Roman, Arial, or Calibri. The size of the font is typically 12 points.
- Alignment: Headings are usually aligned to the left margin of the page.
- Title: The cover of your paper should be centered at the top of the first page. It should be in a larger font size (often 14 or 16 points) and may be bold or in a different style to distinguish it from the rest of the text.
- Subheadings: If your assignment is divided into sections, each section should have a subheading to indicate its topic clearly. Subheadings are often bolded and may be in a slightly larger font size than the body text, such as 12 or 14 points.
- Capitalization: In general, use title case for your headings and subheadings, which means capitalizing the first letter of each major word (nouns, verbs, adjectives, adverbs, and pronouns). Articles, conjunctions, and prepositions are typically not capitalized unless they are the first word in the heading.
- Spacing: There is often extra spacing (usually 12 points) above and below headings to separate them from the rest of the text visually.
- Indentation: Headings are usually not indented; they start at the left margin.
- Consistency: Maintain consistent formatting throughout your document. If you use bold for one level of headings, use it for all. If you use a certain font size for one heading, use the same size for others.
- Page Numbering: Page numbers usually start from the second page, following the cover page. They are typically placed in the header or footer, aligned to the right margin.
The Importance of a College Assignment Heading
The college assignment heading provides essential context for the reader, offering a concise summary of the content and purpose of the assignment. A well-crafted heading communicates the topic or focus of the assignment, allowing readers to grasp its subject matter and relevance quickly. Avoid plagiarism , as this clarity is especially important in academic settings where instructors may evaluate numerous assignments, as it helps them efficiently assess the content and understand the student's intentions. Moreover, a clear header sets the tone for the entire assignment, guiding readers on what to expect and how to approach the material presented.
Additionally, the assignment heading facilitates organization and navigation within the document. The reader can easily locate specific information within the paper by clearly demarcating sections with headings and subheadings. This organizational structure enhances readability and comprehension, enabling readers to follow the flow of ideas and arguments more effectively. Furthermore, headers aid students in structuring their writing process, guiding them to divide their content into coherent sections logically. This helps students present their ideas more cohesively and encourages critical thinking and analytical skills as they consider how best to organize and present their arguments within the framework provided by the headings. If you find it difficult to handle numerous tasks at once, simply let us know by saying, ‘ do my assignment ,’ and our writers will do the work.
.webp)
- Walden University
- Faculty Portal
Module Transcripts: Using & Formatting APA Headings
- Module Transcripts
- Avoiding Bias
- Avoiding Overt Plagiarism
- Avoiding Passive Plagiarism
- Clarifying the Actor
- Emphasis & Specification in APA Style
- Introduction to APA Style
- Introduction to Scholarly Writing
- Listing the Facts: Using Numbers, Hyphens, and Lists in APA
- Using & Formatting APA Headings
- Book Reference Entries
- Citation Formatting Basics
- Citation Frequency Basics
- Journal Article Reference Entries
- Essential Components and Purpose of APA Reference Entries
- Webpage Reference Entries
- Paragraph Development
- Transitions Within and Between Paragraphs
- Paragraph Development Part 2
- Writing Goals & Planning
- Previous Page: Listing the Facts: Using Numbers, Hyphens, and Lists in APA
- Next Page: Book Reference Entries
Why Use Headings?
Title : Why Use Headings? Readers
Speaker : Imagine reading a 25 page essay about using social media in marketing. Even if each paragraph started with a clear topic sentence, was developed with relevant research and meaningful analysis, you might struggle to list the main ideas of the essay. Why is that? Probably because as a reader you would have read several main ideas. Which ones were the most important main ideas? It is likely that the four most important main ideas you choose would be different from the four main ideas someone else would choose. As writers, we want to avoid this ambiguity and make each main idea stand out, even in longer essays. Headings can help organize ideas into smaller pieces, focus on those main ideas, and keep the reader on track.
Title : Why Use Headings? Writers
Speaker : Headings not only help the reader, they help you as the writer. Headings ensure that you have completed each part of an assignment, and they help you organize your ideas throughout the writing process. We will take a more detailed look at these next.
Speaker : Assignment prompts can help writers determine what sections they need to include in an assignment, which they can then remember and outline using headings. Review the directions for this assignment. There are several main points the student is asked to include. Click on each main point to highlight it. Click “Continue” when you’re ready to move forward.
Speaker : After a careful look at the directions, there are five main points the writer must include. It is important to note that being asked to look at two different aspects of marketing is two main ideas, not one. Using headings can help the writer remember to include each part of the directions by turning the phrases into headings as he or she writes.
Speaker : Here is the beginning of the student’s paper. She has placed headings to help ensure she includes all parts of the assignment. Look at the assignment prompt: Which main idea is missing?
Click on the main idea that is missing to identify it. Click “Continue” when you’re ready to move forward.
Title : Good to Know: Prescribed Headings
Speaker : Some courses, programs, and assignments have specific requirements for heading use and prescribe certain headings. In particular, doctoral students working on their capstone study premise, prospectus, or proposal should use their program’s template.
Title : How to Use Heading Levels
Speaker : Headings can have multiple levels, all of which work within a hierarchy.Level 1 headings may be used alone through a piece of writing, or if the writer needs to break down each of the level 1 points more, level 2 headings may be added. These can help organize the paper’s argument for the writer and the reader. However, writers must always remember that the heading levels must reflect the organization of the paper’s sections and main ideas; as APA says, "All topics of equal importance have the same level of heading throughout a manuscript" (APA, 2010, p. 62).
Speaker : The centered headings are level 1. These should represent main ideas or sections of the essay. Below, are left-justified headings, which are level 2 headings. These represent sub-points or details about the level 1 main idea.
Click “Show an Example” to see an example of each heading level. Review both the general outline of heading formatting and the example to get a sense of how heading levels are formatted. However, for now we will focus on how to use headings to organize ideas; in the next tutorial you’ll learn more about how to format each heading level.
Speaker : While there are best practices on when to use which heading levels, you as the writer determine which wording you use in your headings and the number of levels you use.
Click each author to see how headings can be used differently for the same assignment. Both approaches are correct, but are simply a different choice by each author.
Click “Continue” when you’re ready to move forward.
Speaker : Next let’s look at incorrect use of level 2 headings. Here the author moved the heading “Psychological Effects” to level 1. This would create unclear organization, as “Psychological Effects” are an effect of childhood obesity—a sub-point of the main point--and should be presented as a level 2 heading instead.
Review why this is an example of inappropriate use of heading levels, then click “Continue” when you’re ready to move forward.
Title : Why Use Heading Levels: Levels 3 and 4 Headings
Speaker : APA also has level 3 and level 4 headings. These heading levels may be useful in very long assignments, but sometimes breaking ideas down into too small of chunks will confuse or distract a reader. If you ever have questions about the use of headings, always reach out to your instructor or e-mail the Writing Center.
Formatting Headings
Title : APA Style Guidelines for Heading Formatting
Speaker : Like other formatting issues including citations and reference pages, APA style has guidelines for formatting headings. There are clear rules to follow regarding the placement of headings: if they are bolded, how they are capitalized, if a period appears after the heading, and where the paragraph text starts following the heading. We will explore each of these formatting guidelines in detail.
Speaker : Here are the four heading levels formatted per APA. We will look at each level one at a time, focusing on the formatting of each heading and how they differ.Click the headings to see an example of the heading level. Click “Continue” when you’re ready to move forward.
Title : Level 1 Heading Formatting
Speaker : Level 1 headings are centered, bolded, and use title case. Title case means that in addition to proper nouns, the first letters of words with four or more letters are capitalized, while all other letters are left lower case. The paragraph that follows starts on a new line and is indented. Remember, level 1 headings are used to start new main points.
Title : Level 2 Heading Formatting
Speaker : Level 2 headings are left justified, which means they are flat against the left margin. Level 2 headings are bolded and use title case. The paragraph that follows starts on a new line and is indented. Remember that level 2 headings are used to organize key details or sub-points of the level 1 main idea.
Title : Level 3 Heading Formatting
Speaker : Level 3 headings are indented .5 inches, which is the standard indentation for paragraphs in APA style. They are still bolded, but no longer use title case. Only the first word and proper nouns are capitalized in level 3 headings. This is called sentence case. Level 3 headings are followed by a period. The paragraph begins immediately after the heading on the same line.
Title : Level 4 Heading Formatting
Speaker : Level 4 headings are indented .5 inches. They are bolded and italicized. Like level 3 headings, level 4 headings use sentence case and only capitalize the first word and proper nouns. Level 4 headings end with a period. The paragraph begins immediately after the heading on the same line.
Speaker : Although it may seem like there are a lot of style rules for formatting headings, each is in place to help differentiate the headings. Main ideas are bolded, centered, and capitalized like titles. The most important sub-points also stand alone on their own lines and are capitalized. The level 3 and 4 smaller sub-points keep the heading part of the paragraph that follows, instead of standing alone on their own line. Again, headings are used to help organize the reader and writer and show the relationship and hierarchy of ideas.
Title : Recap: Formatting Headings
Speaker : Headings are formatted according to APA guidelines, which has rules for where the heading appears, what it looks like, and where the paragraph begins after the heading. These rules help to keep both the reader and writer organized, while showing a clear subordination of ideas.
Choosing Heading Formatting
Title : Choosing Heading Formatting
Speaker : At this point, we have learned several reasons why headings are useful in academic writing. Additionally, it is important to note that an effective heading is not only placed appropriately and formatted according to APA style, it is also worded in a relevant way.
Click on each heading to see why their wording may not be effective. Click “Continue” when you’re ready to move forward.
Speaker : Here are the headings we just reviewed. Click on each of the headings to see a revision that is specific to what the section contains. Remember, a heading should point the reader to one main idea. An effective heading will not leave room for confusion about what information and ideas the section contains.
Speaker : Although creating headings for each piece of an assignment prompt can be an effective way to ensure you have completed an assignment fully, copying the wording exactly can be troublesome. Click on the headings to learn more.
Speaker : By cutting some of the words out of the original headings, we can create stronger headings that introduce the main idea of the section without overwhelming the reader or sounding directive. Click each heading to see a revision that is more appropriately worded.
Title : Accurate & Connected Headings
Speaker : It is also important for headings to be accurate and connected. The heading for this section prepares a reader to hear about the impact testing has on teachers. The paragraph that follows, however, is about several other main ideas, including the history of No Child Left Behind, trends in student achievement, and improvements teachers should make. This paragraph doesn’t match the heading.
Review the paragraph and heading, then click “Continue” when you’re ready to move forward.
Speaker : To create strong headings, the heading must be accurate and be connected to the paragraphs that follow. As a writer, you can choose to revise the paragraph to better match your heading, or you can revise the heading to better match the content. Revising a heading to match the content can also depend on the purpose and focus of your writing.
Click each student to see how they would revise the heading.
- Office of Student Disability Services
Walden Resources
Departments.
- Academic Residencies
- Academic Skills
- Career Planning and Development
- Customer Care Team
- Field Experience
- Military Services
- Student Success Advising
- Writing Skills
Centers and Offices
- Center for Social Change
- Office of Academic Support and Instructional Services
- Office of Degree Acceleration
- Office of Research and Doctoral Services
- Office of Student Affairs
Student Resources
- Doctoral Writing Assessment
- Form & Style Review
- Quick Answers
- ScholarWorks
- SKIL Courses and Workshops
- Walden Bookstore
- Walden Catalog & Student Handbook
- Student Safety/Title IX
- Legal & Consumer Information
- Website Terms and Conditions
- Cookie Policy
- Accessibility
- Accreditation
- State Authorization
- Net Price Calculator
- Contact Walden
Walden University is a member of Adtalem Global Education, Inc. www.adtalem.com Walden University is certified to operate by SCHEV © 2024 Walden University LLC. All rights reserved.

How to Head a College Paper

How to Remove a Course From Your College Transcript
College is a new experience for students in many ways. From the freedom of scheduling classes at your convenience to finding your way around a new campus, the changes are evident immediately. Even the way you head your research papers may be different from what you have used in high school. There are a few simple rules to follow when heading a college paper. Once you get the format down, it will become second nature and you'll find yourself doing it automatically.
Paper Style
You can use MLA style for most papers you turn including homework assignments. When using this style on a written paper, do not skip lines in between the four lines of the initial heading. Your heading on subsequent pages should consist of your last name followed by the page number in a right justified format. Other paper formats you might use in college can include American Psychological Association (APA) and Chicago Style.
Heading and Margins
Place your heading in the upper left-hand corner of the page. To make sure your typed paper is easy to read on a visual level, use a 12-point font and recognizable font style. While the Times New Roman font is often chosen, Arial, Modern, Lucina and Palermo are also acceptable because they are not script-style fonts. This follows Modern Language Association (MLA) formatting which is the accepted standard for college papers.
First and Last Name
Place your first and last names on the first line. Double space each line of the heading. All lines of the heading are left justified at the left margin.
Professor's Name
Place your professor's name on the next line. Use his first and last name preceded by Professor. For example, "Professor John Doe" goes on this line.
Course Name
Place the name of your course on the next line. For example, you could use "English 101."
Place the date on the final line. To follow MLA formatting, the date should appear as the day in numeral format, the month in written format and the year. For example, "5 January 2011" is appropriate.
Title of Paper
Double space after the last line of your heading, and center the title of your paper on the next line. Use Title Case style to type the title. For example, "A History of Life During the Tudor Period."
First Paragraph
Double space after the heading and begin your paper using a 1-inch indent to begin the first paragraph.
Related Articles
How to write a paper in mba style.

How to Write a Lab Report Title

How to Find a Course Reference Number

Styles & Tones Used in Research Essays

Do You Italicize Latin in MLA-Format Papers?

APA-Style Citation of a Case Complaint

How to Write a Letter to First Lady Michelle Obama

How to Notate a Field Trip As a Reference for a Bibliography
- Purdue Online Writing Lab: MLA Formatting and Style Guide
- The MLA Style Center: Formatting a Research Paper
- Olympus: MLA Format For Essays and Research Papers
Amie Taylor has been a writer since 2000. Book reviews, gardening and outdoor lawn equipment repair articles and short fiction account for a handful of her published works. Taylor gained her gardening and outdoor equipment repair experience from working in the landscaping and lawn-care business she and her husband own and operate.

Find Graduate Programs and Masters degree courses
- Online Master’s
- Cheapest masters Program
- Cheapest Online Masters
- Phd Programs
- Online Phd Doctoral Programs
- Graduate Certificate
- Online Certificate Programs
- One Year Masters
- One Year Online Masters
- Fastest Online Masters
- IVY League Programs
- GRE Score for Masters
- No GRE Masters Programs
- No GRE Online Masters Programs
- Grad School Matcher
- FAFSA Graduate Programs
- Graduate Scholarships
- Graduate Fellowships
- Graduate Assistantships
- Ivy League Scholarships
How to Write a Proper College Heading for an Assignment?
Do you need help writing proper headings for your assignments? Don’t worry, and you’re not alone. Many students find it challenging to format their assignments correctly, especially regarding titles. Writing an appointment is a crucial aspect of your academic journey as a student. From essays to research papers, they are vital in shaping your grades and overall academic performance. While the content of a work is crucial, the title is equally essential. A proper college assignment heading gives your appointment a professional look and provides vital information.
This article will guide you on how to head a college assignment correctly.
What is the College Assignment Heading?

A college assignment heading is a summary of the topic that appears at the top of the first page. The title includes the name of the student, the course name, the submission date, and the appointment title. The heading should be placed at the center of the page, and the font size should be more significant than the body text.
Why a proper college assignment heading is important?
The heading of your task provides the reader with crucial information about the content of your text. It also helps to set the tone and structure of your task. A suitably formatted title helps to give your work a professional look. It makes it easy for your teacher to identify and grade your assignment.
If you want to format your university assignment heading correctly, that’s not a problem. You can use sites like AssignmentBro assignment maker to help you out. These websites provide templates you can customize according to your requirements. Moreover, they ensure that your work title follows the proper formatting guidelines. It makes it easier to submit your text without errors.
Follow the guidelines
Firstly, always follow the guidelines provided by your professor. Different professors may have additional requirements. So check the requirements before submitting the task. Secondly, use a clear and concise title that accurately reflects the content of your assignment. Avoid using vague or irrelevant titles.
Choose the right formatting
When formatting your heading, use bold or italic font styles to distinguish the sections. For example, use bold for the title and italic for the course name. It will make your title easier to read and understand.
Use proper capitalization
It’s essential to use the correct capitalization for your title. In general, capitalize the first letter of each significant word. It includes nouns, verbs, adjectives, and adverbs. However, you shouldn’t capitalize prepositions, articles, or conjunctions only if they’re the first word in the title. For example, “How to Write a Proper College Assignment Heading” is correct. “How to Write a Proper College Assignment Heading for Essays, Research Papers, and Exams” is incorrect.
Consider the audience
Your heading should be appropriate for the intended audience. If you are writing for a general audience, use a title that is easy to understand. If you are writing for an academic audience, use a more formal heading that includes the title of the assignment.
Use subheadings
If your document is long, use subheadings to break it into smaller, more manageable sections. It makes it easier for the reader to navigate the document and find the necessary information.
Add keywords
In addition to the formatting tips, it’s essential to remember the keywords relevant to your assignment topic. Incorporating these keywords will help the reader understand the purpose of your task. If your work concerns the benefits of reading books on campus, include relevant keywords like “books” and “campus” in your heading.
Think about the type of assignment
In addition to the tips mentioned above, it’s essential to remember the type of assignment you’re writing. For instance, if you’re writing an essay, including the essay type in your title, such as “argumentative” or “analytical.” Similarly, if you’re writing a research paper, including the research topic in your heading to make it clear to the reader.
Proofread your assignment heading
Moreover, it’s crucial to proofread your text title before submitting it. Make sure to check for any spelling or grammatical errors. A suitably formatted or error-filled heading can create a positive impression on the reader. It will affect your grades.
Your assignment heading should be clear and concise, providing a summary of the content of your text. Avoid using complex words and phrases that may confuse the reader. Also, your name and student ID should be included in the title. This information helps your teacher identify and link your assignment to your academic record. The date when the work is due should be included in the heading. This information helps your teacher to keep track of submission dates. Remember that your college assignment title is an essential part of your work. It’s an opportunity to showcase your professionalism and attention to detail. Following the proper guidelines can create a positive impression on your professor. It will make your assignment stand out.
Writing a proper college assignment heading is a vital aspect of academic writing. Always check with your professor for specific instructions, use clear and concise titles, format your titles appropriately, and include relevant keywords. A well-formatted heading provides vital information about your assignment, sets the tone and structure, and gives your work a professional look. Following the tips in this article and using the examples provided, you can write a proper college assignment title that will impress your teacher and help you achieve academic success. Writing proper college task headings may seem daunting at first. But it’s easy if you follow the ethical guidelines.
[show_link program=’graduate’ other=’courses’]
Leave a Reply Cancel reply
We use cookies to ensure we give you the best experience of our website. By browsing this site you accept we use cookies to improve and personalise our services and marketing. Read our privacy statement for more about what we do with your data, as well as your rights and choices.
- Studying by distance learning
- Get prepared for study
- How much time will you need?
- About our qualifications
- How to decide what to study
- How we'll support your studies
- Online tools and resources
- Te tautoko i te angitū o ngā ākonga Māori - Supporting Māori learner success
- Pasifika learner support
- Disability and Access Services
- Access to local campus services
- Fees free study
- Paying your fees
- Student loans
- Scholarships, awards and financial assistance
- Learner stories
- Choose courses
- How to apply to enrol
- Enrolment dates
- Recognising previous study and experience
- English language entry requirements
- Providing proof of your identity
- Terms and conditions of enrolment
- Fees and funding
- Changes to your enrolment
- International and studying from overseas
- Changes to benefit Open Polytechnic learners
- Student Advisory Group
- Disclaimer and copyright statement
- Notice of meetings
- Jobs at Open Polytechnic
- Who are our learners?
- Our Māori learners
- Our Pasifika learners
- Media Contact
- Publications
- First Impressions Survey
- Academic research
- Hei whaiwhakaaro i mua i tō ako - Some things to think about before you study
- Te whakatau he aha hei ako māu - Deciding what to study
- Whakawhiwhinga ākonga Māori - Scholarships and awards for ākonga Māori
- Message from Pule Ma’ata - Pasifika
- Meet our kaimahi Pasifika
- Pasifika success
- Scholarships for Pasifika
- Getting started with online learning
- Course and study support
- Supporting Māori learner success
- Meet some of our learners
- Dyslexia and the Dyslexia-Friendly Quality Mark
- Library & Learning Centre
- Mental health support
- Using iQualify
- MyOP learner portal and app download
- Accessing your learner email and free online Microsoft software
- Assistive technology tools
- Helperbird free assistive technology tool
- eduroam free Wi-Fi
- How to re-enrol
- Withdrawals and course transfers
- Learner forms
- Get your student ID card
- Get started
- Make a plan
- Set study goals
- Reading skills
- Active learning
- Taking notes
- Mind mapping
- Researching
- Evaluating information
- Critical thinking for reading and research
- Step-by-step guide to tackling assessments
- Assessment types
- Plan your assessment
- Understand your assessment task
- Writing skills
Formatting and presenting assessments
- Assessments information
- Get help with academic writing and research skills
- Referencing and plagiarism
- How to reference
- Preparing for exams
- Types of exam questions
- Planning your time for an exam
- Information for sitting exams
- Research ethics for doing research projects
- How your work will be assessed
- How to submit your assessment for marking
- Submitting your work in te reo Māori
- How to request an assessment extension
- Special Consideration for in-course assessments
- Grading scales
- Academic Integrity
- Assessment writing
- Referencing
- Word limits and word count guidelines
- Using AI - Artificial Intelligence services
- Exam dates and venue information
- Exam admittance information and permitted materials
- Information for exam day
- Sitting exams from overseas
- Getting assistance with exams
- Exam reconsiderations, resits and the return of exam papers
- Aegrotat consideration
- Getting your final results
- Te whare tapa whā
- The Fonofale model of health
- Taha tinana – physical wellbeing
- Taha hinengaro – mental wellbeing
- Taha whānau – family, community and social wellbeing
- Taha wairua – spiritual wellbeing
- Free mental health support
- Rainbow learner support
- Applying to graduate
- Attending a graduation ceremony
- Academic transcripts
- Graduation Live Stream
- Tertiary and International Learners Code of Practice
- Complaints and concerns
- Learning Engine LMS
- CPD and training services
- Digital design, video, animation and software development
- Instructional design
- Content licensing
- Digital design, video and animation
Formatting and presenting your assessments correctly is important because many include marks for presentation.
This may include marks for things such as:
- formatting and layout
- APA referencing
- writing style
- grammar and spelling.
Before you start on your assessment:
- check your assessment question, emails from your course leader, and learning materials for how it should be presented
- read the instructions carefully. Make sure you understand them and follow them exactly
- if you're not sure about what’s required contact your course leader.
Please note that assessments for psychology courses have specific requirements for formatting and presentation. Refer to the information and guidance provided on our Library and Learning Centre website:
APA Style for Psychology assessments
General guidelines for electronic submissions
- Most assessments should be produced using Microsoft Word.
- You can also submit assessments using: .doc, .docx, .xls, .xlsx or .rtf.
- if you don’t have Microsoft Word go to My Open Polytechnic to download and access your free version
- if you're not sure about the file type required, contact your course leader.
- Use a clear, readable font, such as Verdana, Calibri, Tahoma or Arial and use the same font throughout.
- Use black text on a white background.
- Avoid coloured backgrounds or text in a colour other than black, unless you have special permission to use them.
- Use 11 or 12 point font for the body of your assessment.
- Use 1.5 spacing and 2.53 cm (1”) wide margins.
- Leave a blank line between paragraphs.
- If the questions are short, leave a blank line between each question. If they are long, start each question on a new page.
- Left-justify your work (also known as left-aligned).
- Use bold for headings.
- Essays don’t usually need subheadings; reports usually do.
Most assessments need a title page, which should include:
- the title and number of the assessment
- the course number and name
- the due date
- your full name and student number.
Centre this information on the page, starting approximately one-third of the way down the page.
- Number and clearly label figures and tables.
- Add numbers as follows: Figure 1, Figure 2, Table 1, Table 2, and so on.
- Put table and figure captions above the table.
- Don't number the items in a reference list.
For more help with figures and tables, check:
Get more help with tables and figures – APA Style website
Headers and footers
Insert a header or footer on each page (except the title page). It should contain:
- your name (last name, first name/s)
- your student number
- the course code
- the assessment number
- page numbers.
Reference list
The reference list comes at the end of the assessment and should start on a new page labelled 'References'.
Need more help with reference lists? Check out the guides below:
Quick referencing APA guidelines (PDF 47 KB; opens in a new window)
Guide to APA referencing (PDF 395.11 KB; opens in a new window)
Appendices are used for information that:
- is too long to include in the body of your assessment
- supplements or complements the information you are providing.
Start each appendix (if applicable) on a new page. If there's just one appendix label it ‘Appendix’ without a number. If there is more than one, label them Appendix A, Appendix B, and so on.
In the main text of your assessment, refer to the Appendix by the label – for example, Appendix A.
Tops and bottoms of pages
Check the top and bottom of your pages to ensure they avoid:
- widows – single lines of text at the top of a page
- orphans – first lines of paragraphs at the bottom of a page
- tombstones – headings or subheadings alone at the bottom of a page
- split lists – lists that are divided between two pages (if possible).
General guidelines for hard copies
Most of the guidelines above also apply to hard copies (printed or handwritten documents).
If your course requires or allows handwritten assessments, be sure to follow the course instructions on presenting handwritten assessments.
Word limits and word count guidelines
Word limits support the development of concise writing skills. Word count guidelines help you to understand the expectation of workload for an assessment.
For more detailed information about these go to:
Word limits and word count guidelines
Got a question?
If you want to talk with someone about formatting and presenting your assessments, contact The Library and Learning Centre | Te Whare Pukapuka Wāhanga Whakapakari Ako.
Contact the Library and Learning Centre
APA (7th Edition) Referencing Guide
- Information for EndNote Users
- Authors - Numbers, Rules and Formatting
- In-Text Citations
- Reference List
- Books & eBooks
- Book chapters
- Journal Articles
- Conference Papers
- Newspaper Articles
- Web Pages & Documents
- Specialised Health Databases
- Using Visual Works in Assignments & Class Presentations
- Using Visual Works in Theses and Publications
- Using Tables in Assignments & Class Presentations
- Custom Textbooks & Books of Readings
- ABS AND AIHW
- Videos (YouTube), Podcasts & Webinars
- Blog Posts and Social Media
- First Nations Works
- Dictionary and Encyclopedia Entries
- Personal Communication
- Theses and Dissertations
- Film / TV / DVD
- Miscellaneous (Generic Reference)
- AI software
APA 7th examples and templates
Apa formatting tips, thesis formatting, tables and figures, acknowledgements and disclaimers.
- What If...?
- Other Guides
- EscAPA7de - the APA escape room
- One Minute Video Series (APA)
You can view the samples here:
- APA Style Sample Papers From the official APA Style and Grammar Guidelines
Quick formatting notes taken from the Publication Manual of the American Psychological Association 7th edition
Use the same font throughout the text of your paper, including the title and any headings. APA lists the following options (p. 44):
- Sans serif fonts such as 11-point Calibri, 11 point-Arial, 10-point Lucida,
- Serif fonts such as 12-point Times new Roman, 11-point Georgia or 10-point Computer Modern.
(A serif font is one that has caps and tails - or "wiggly bits" - on it, like Times New Roman . The font used throughout this guide is a sans serif [without serif] font). You may want to check with your lecturer to see if they have a preference.
In addition APA suggests these fonts for the following circumstances:
- Within figures, use a sans serif font between 8 and 14 points.
- When presenting computer code, use a monospace font such as 10-point Lucida Console or 10-point Courier New.
- Footnotes: a 10-point font with single line spacing.
Line Spacing:
"Double-space the entire paper, including the title page, abstract, text, headings, block quotations, reference list, table and figure notes, and appendices, with the following exceptions:" (p. 45)
- Table and figures: Words within tables and figures may be single-, one-and-a-half- or double-spaced depending on what you decide creates the best presentation.
- Footnotes: Footnotes appearing at the bottom of the page to which they refer may be single-spaced and formatted with the default settings on your word processing program i.e. Word.
- Equations: You may triple- or quadruple-space before and after equations.
"Use 1 in. (2.54 cm) margins on all sides (top, bottom, left, and right) of the page." If your subject outline or lecturer has requested specific margins (for example, 3cm on the left side), use those.
"Align the text to the left and leave the right margin uneven ('ragged'). Do not use full justification, which adjusts the spacing between words to make all lines the same length (flush with the margins). Do not manually divide words at the end of a line" (p. 45).
Do not break hyphenated words. Do not manually break long DOIs or URLs.
Indentations:
"Indent the first line of every paragraph... for consistency, use the tab key... the default settings in most word-processing programs are acceptable. The remaining lines of the paragraph should be left-aligned." (p. 45)
Exceptions to the paragraph indentation requirements are as follows:
- Title pages to be centred.
- The first line of abstracts are left aligned (not indented).
- Block quotes are indented 1.27 cm (0.5 in). The first paragraph of a block quote is not indented further. Only the first line of the second and subsequent paragraphs (if there are any) are indented a further 1.27 cm (0.5 in). (see What if...Long quote in this LibGuide)
- Level 1 headings, including appendix titles, are centred. Level 2 and Level 3 headings are left aligned..
- Table and figure captions, notes etc. are flush left.
Page numbers:
Page numbers should be flush right in the header of each page. Use the automatic page numbering function in Word to insert page numbers in the top right-hand corner. The title page is page number 1.
Reference List:
- Start the reference list on a new page after the text but before any appendices.
- Label the reference list References (bold, centred, capitalised).
- Double-space all references.
- Use a hanging indent on all references (first line is flush left, the second and any subsequent lines are indented 1.27 cm (0.5 in). To apply a hanging indent in Word, highlight all of your references and press Ctrl + T on a PC, or Command (⌘) + T on a Mac.
Level 1 Heading - Centered, Bold, Title Case
Text begins as a new paragraph i.e. first line indented...
Level 2 Heading - Flush Left, Bold, Title Case
Level 3 Heading - Flush Left, Bold, Italic, Title Case
Level 4 Heading Indented, Bold, Title Case Heading, Ending With a Full Stop. Text begins on the same line...
Level 5 Heading, Bold, Italic, Title Case Heading, Ending with a Full Stop. Text begins on the same line...
Please note : Any formatting requirements specified in the subject outline or any other document or web page supplied to the students by the lecturers should be followed instead of these guidelines.
What is an appendix?
Appendices contain matter that belongs with your paper, rather than in it.
For example, an appendix might contain
- the survey questions or scales you used for your research,
- detailed description of data that was referred to in your paper,
- long lists that are too unweildy to be given in the paper,
- correspondence recieved from the company you are analysing,
- copies of documents being discussed (if required),
You may be asked to include certain details or documents in appendices, or you may chose to use an appendix to illustrate details that would be inappropriate or distracting in the body of your text, but are still worth presenting to the readers of your paper.
Each topic should have its own appendix. For example, if you have a survey that you gave to participants and an assessment tool which was used to analyse the results of that survey, they should be in different appendices. However, if you are including a number of responses to that survey, do not put each response in a separate appendix, but group them together in one appendix as they belong together.
How do you format an appendix?
Appendices go at the very end of your paper , after your reference list. (If you are using footnotes, tables or figures, then the end of your paper will follow this pattern: reference list, footnotes, tables, figures, appendices).
Each appendix starts on a separate page. If you have only one appendix, it is simply labelled "Appendix". If you have more than one, they are given letters: "Appendix A", "Appendix B", "Appendix C", etc.
The label for your appendix (which is just "Appendix" or "Appendix A" - do not put anything else with it), like your refrerence list, is placed at the top of the page, centered and in bold , beginning with a capital letter.
You then give a title for your appendix, centered and in bold , on the next line.
Use title case for the appendix label and title.
The first paragraph of your appendix is not indented (it is flush with the left margin), but all other paragraphs follow the normal pattern of indenting the first line. Use double line spacing, just like you would for the body of your paper.
How do I refer to my appendices in my paper?
In your paper, when you mention information that will be included or expanded upon in your appendices, you refer to the appendix by its label and capitalise the letters that are capitalised in the label:
Questions in the survey were designed to illicit reflective responses (see Appendix A).
As the consent form in Appendix B illustrates...
How do I use references in my appendices?
Appendices are considered to be part of your paper for the purpose of referencing. Any in-text citations used in your appendix should be formatted exactly the same way you would format it in the body of your paper, and the references cited in your appendices will go in your reference list (they do not go in a special section of your reference list, but are treated like normal references).
If you have included reproduced matter in your appendices, treat them like an image or a table that has been copied or adapted. Place the information for the source in the notes under the reproduced matter (a full copyright acknowledgement for theses or works being published, or the shorter version used at JCU for assignments), and put the reference in the reference list.
- Thesis Formatting Guide Our Library Guide offers some advice on formatting a thesis for JCU higher degrees.
- Setting up a table in APA 7th
- Setting up a figure in APA 7th
If you are required to include an acknowledgement or disclaimer (for example, a statement of whether any part of your assignment was generated by AI, or if any part of your assignment was re-used, with permission, from a previous assignment), this should go in an author note .
The author note is placed on the bottom half of the title page, so if you are using an author note, you will need to use a title page. Place the section title Author Note in centre and in bold. Align the paragraph text as per a normal paragraph, beginning with an indent. See the second image on this page for an example of where to place the author note: Title Page Setup .
The APA Publication Manual lists several paragraphs that could be included in an author note, and specifies the order in which they should appear. For a student assignment, you will probably only require a paragraph or sentence on disclosures and acknowledgements.
An example author note for a student paper could be:
Author Note
This paper was prepared using Bing Copilot to assist with research and ChatGPT to assist with formatting the reference list. No generative AI software was used to create any part of the submitted text.
No generative AI software was used to create any part of this assignment.
- If the use of generative AI was permitted for drafting or developing parts of your assignment, you will need to include a description in the methodology section of your paper specifying what software was used, what it was used for and to what extent.
- If your subject outline has a specific disclaimer to use, use that wording in your author's note.
- If the use of generative AI software is permitted, you will still need to review the material produced by the software for suitability and accuracy, as the author of the paper is ultimately responsible for all of the content.
- << Previous: AI software
- Next: What If...? >>
- Last Updated: Jun 19, 2024 2:43 PM
- URL: https://libguides.jcu.edu.au/apa

- How to setup your software
- Sample MLA Paper – normal paper
- Sample MLA Paper – has cover page
- Sample APA Paper
- Sample Chicago Paper
- Sample CSE Paper
- APA Format Guidelines
MLA Format Heading
This page contains guidelines on how to properly format the headings of your research paper using the MLA format.
1. The Opening Page:
On the opening page or the first page, you would include the whole heading and your paper’s title. The whole heading would include the following information:
- Your Instructor’s Name
- Your Class Information
- Your Paper’s Due Date
- Font: choose an easy to read font such as Times New Roman.
- Font Size: set the font size to be twelve (12) throughout your research paper, including your paper’s title. Never set the font site larger than 12.
- Margins: 1-inch for top/bottom/right/left throughout your paper.
- Double-space: double-space throughout your paper. Don’t add extra spaces (besides double-space) between your headings, your title and your paragraphs.
Sample of the Opening Page:
A sample of the first page of your paper.
2. The Inner Pages:
For the pages that follow the first page, set the heading like this: instead of the whole heading, you would use the header feature on your word processing program and including the following information: Your Last Name and the Page Number.
Sample of the Inner Page:
Example of the heading for inner pages.
3. The Works Cited Page:
Every research paper must include a works cited page.
- The works cited list is placed at the end of your paper, on a new page.
- The heading for your works cited pages should be the same as the heading for your inner pages, which include your name and the page number at the top.
- Enter the title as “ Works Cited ” and place this title 1-inch from the top of the page, see more details in the example illustration picture below.
Sample of the Works Cited Page:

Example of the works cited page.
– MLA Handbook, 8th edition
If you find this website useful, please share with a friend:
This helped a lot thank you
Thank you so much 😀
Best website hands down. Got an A, thank you!
Thank you and God bless you! Jesus loves you!
I like how this site tells us the perfect way to write an essay on paper.
This page is helpful to a new student.
this is great!
Cool. But how many grade school students will look at this website to see how to set up their papers.
Wow, This site is amazing!
I have the following level 3 heading in my thesis:
Project management office and (pmo) metrics team.
Should the abbreviation pmo be in lower case as it is or should it be in upper case?
Please Advise. Thanks.
So for the works cited page, you don’t need the name, teacher, date, and period heading at all?
No. It should only be on the first page of the essay.
This is some good stuff to know.
I have to write a paper for an application and they want it to be in MLA format. I don’t know how to do the heading because it’s not going to one teacher in particular and it is not for one class.
I don’t think you need a heading besides the “Last name-1” on the inner pages.
Hey Shannon. You might try “To Whom it may concern” or something like that. Don’t trust me on this because I am not for sure on that and if you did do this you might get it wrong and whoever might not accept your application. I hope you figure out how to do it and do great on that application! 😀 – Christopher
Leave a Comment
Current ye ignore me @r *
Leave this field empty
Next post: Commonly Misspelled or Confused Word Pairs
Previous post: MLA Format Cover Page
- The Format of the Research Paper
- MLA Format Cover Page
- MLA Format Headings
- MLA Citations
- MLA Format Works Cited
- MLA Format FAQs
- MLA Format Sample Paper
- MLA Sample Paper w/ Cover and Outline Pages
HOW TO SETUP YOUR SOFTWARE
- MLA Format using Google Docs
- MLA Format Microsoft Word 2016
- MLA Format using Pages on Mac
Copyright © 2011–2024 • MLA Format • All rights reserved. Currently, MLA is at its 8th edition. This website has no official relationship with the Modern Language Association and is not endorsed by the MLA.

Graduate College Formatting Guide
- Page Numbers (Microsoft Word)
- Page Numbers (Google Docs)
- Page Breaks and Section Breaks
- Headings, Subheadings, and Table of Contents (Microsoft Word)
- Headings, Subheadings, and Table of Contents (Google Docs)
- Inserting Tables and Figures
- Comments and Track Changes
- References, Bibliography, Works Cited
- Landscape Pages & Special Materials
Setting the Normal Style
Set the "normal" style of font.
Before we can set up headings, we'll need to define the format of the text that isn't a heading. The "styles" in word set some default formatting for text. Setting up the "Normal" style will create a default font setting to keep the text uniform throughout the document. The Styles pane is located under the HOME tab.

Right click on the "Normal" style to open the Modify option.

This will open a Modify Style Dialog Box. Start by changing the Paragraph formatting. This is located by selecting the Format drop down in the bottom left of the Dialog Box.

There are two things that should be set under the Paragraph settings. Under the INDENTS AND SPACING tab, check to turn on "Don't add space between paragraphs of the same style." Under the LINE AND PAGE BREAKS tab, check to turn on the "Widow/Orphan Control."

Once both of those have been set and you click "okay," you'll be returned to the Modify Style Dialog Box. Now we can set the font formatting. Select the font you wish to use throughout the document, change the font size to 12 point, ensure the line spacing is double spaced, and select the option to remove space between paragraphs (this is indicated by two lines pointing towards each other).

Adding Headings & Subheadings
Inserting headings and subheadings.
Using the same technique we can create a standard for the various types of headings and subheadings used across the thesis. The Thesis & Dissertation Manual generally follows APA style for heading levels. In order to keep headings consistently correct and link the Table of Contents, the Styles function in Word is used. This is going to show you some examples of the formatting required for the headings and how to use the various heading levels. We'll also see how to use styles and update your Table of Contents.
Modifying Heading Levels to Match Required Formatting
Level 1 headings.
Chapters will be linked to Heading Level 1. If you choose not to have chapters, you will use level 1 for your major headings (typically: Introduction, Literature Review, Methods, etc.). They should be typed in title case, center aligned, and bold. The number of the chapter can be in Arabic or Roman numerals or spelled out so long as it is consistently done throughout the document. The heading should be on one line, so if you are using chapters, it should look something like this:
Chapter 1: Introduction
Once you have formatted a chapter heading, select the text of the chapter heading then right click on Heading 1 in the Styles pane and select "Update Heading 1 to Match Selection."

Adding More Level 1 Headings
Once you have formatted the first heading and updated the style, you simply need to type the new level 1 heading in title case and then, with your cursor in line with the heading, click on the heading 1 button in the styles pane to format it and link it for your table of contents. Make sure to use this feature every time to ensure all headings are properly linked to your table of contents.

Level 2 Headings
Subsections of your major headings should be the next level down. Level 2 headings will be left aligned, bold, and title case. They should look like this:
Level 2 Heading
Once you have formatted a level 2 heading, select the text of the heading then right click on Heading 2 in the Styles pane and select "Update Heading 2 to Match Selection."

Adding More Level 2 Headings
Once you have formatted the first heading and updated the style, you simply need to type the new level 2 heading in title case and then, with your cursor in line with the heading, click on the heading 2 button in the styles pane to format it and link it for your table of contents. Make sure to use this feature every time to ensure all headings are properly linked to your table of contents.

Level 3 Headings
If you wish to further subsection your paper, you will use level 3 headings. Level 3 headings will be bold italic, left aligned, and title case. They should look like this:
Level Three Heading
Once you have formatted a level 3 heading, select the text of the heading then right click on Heading 3 in the Styles pane and select "Update Heading 3 to Match Selection."

Adding More Level 3 Headings
Once you have formatted the first heading and updated the style, you simply need to type the new level 3 heading in title case and then, with your cursor in line with the heading, click on the heading 3 button in the styles pane to format it and link it for your table of contents. Make sure to use this feature every time to ensure all headings are properly linked to your table of contents.

Level 4 & 5 Headings (and beyond)
It is common to find the first 3 heading levels in papers that are as long as a thesis or dissertation. Occasionally, you may find the need to go beyond those levels. It is important to note that for the thesis and dissertation, only the first 3 headings should be included in the table of contents. It is also recommended that you only use the styles function for the first 3 headings because they stand alone on their own line of text. The next heading levels will begin on the same line as the paragraph that starts that section which means that the style function will not work properly. If you were to link the heading, the entire paragraph will appear in your table of contents.
This means that you will need to, carefully, ensure you are formatting the headings manually. Each level should be consistently formatted the same way. APA has standards for levels 4 & 5 which are described here. For heading levels beyond level 5, you should pick a consistent formatting that clearly indicates they are a subsection of the level 5 heading. It is also recommended that you carefully evaluate if this level of heading is truly necessary for your writing.
Level 4 Heading
Level 4 headings will begin on the same line of the paragraph that makes up the section. It will be indented 0.5", much like a normal paragraph indent. The heading will be in title case and bold font with a period at the end of the heading:
Level Four Heading Here. Start the first sentence of the paragraph that follows the heading on the same line and continue typing. Lorem ipsum dolor sit amet, consectetur adipiscing elit. Nunc at pellentesque massa. Sed nec urna nec est efficitur iaculis. Etiam efficitur velit id dignissim eleifend. Duis euismod, nisi sed cursus sodales, sem nisi porttitor ante, eu dignissim justo tortor nec mauris.
Level 5 Heading
Level 5 headings will begin on the same line of the paragraph that makes up the section. It will be indented 0.5", much like a normal paragraph indent. The heading will be in title case and bold italic font with a period at the end of the heading:
Level Five Heading Here. Start the first sentence of the paragraph that follows the heading on the same line and continue typing. Lorem ipsum dolor sit amet, consectetur adipiscing elit. Nunc at pellentesque massa. Sed nec urna nec est efficitur iaculis. Etiam efficitur velit id dignissim eleifend. Duis euismod, nisi sed cursus sodales, sem nisi porttitor ante, eu dignissim justo tortor nec mauris.
Table of Contents
Once you have added headings and used the styles feature, you will be able to use the word function to "generate" a table of contents. You will need to type "Table of Contents" in bold font, centered at the top of the page you will be inserting your table of contents onto. Then, place your cursor on the next line

From the References tab, click on Table of Contents and select Custom Table of Contents...

From the pop up window, you will want to change the tab leaders to (none) rather than the default. The rest of the default settings will be fine, so click ok once you've done so.

This will populate your table of contents.

From here, you will need to open the style pane to modify some of the formatting of the table of contents.

You will need to locate TOC 1 and click on it, and select "modify" from the drop down list.

TOC 1 style should be bold. If you've properly set up your "normal style" of font (see above), this should be the only modification to your TOC styles that you need to make. If the text is not properly set up and you need to further format it, you can do so from this window.

If set up correctly, your table of contents should look like the image below.

- << Previous: Page Breaks and Section Breaks
- Next: Headings, Subheadings, and Table of Contents (Google Docs) >>
- Last Updated: Apr 19, 2024 2:45 PM
- URL: https://guides.lib.uni.edu/grad-college-format

Tips For College Assignment Heading
Table of Contents
An assignment heading is effective only when it is clear, concise, and relevant. It should include title, course name, and the student’s name. To improve the quality of your work, you can seek a college assignment help too. You’ll need to understand the following aspects when writing a college paper: Title, Purpose and the MLA Style. Page length is also important. These are tips for college assignment titles. The MLA format is the best format to use to write research papers. These tips will help you create an essay to college. Making sure your essay is formatted correctly using MLA formatting is crucial.
The title page will be the most important thing your professor is likely to see. It must meet two main goals in order to provide the reader with the necessary details, and also to create a good impression. In this post, we’ll review the proper layout for your title page and provide suggestions on how you can make it stand out from the other papers. For tips and tricks on designing a title page which is memorable for canada assignment help follow this article.
The cover page of the college project should have the student’s name as well as the institution or college that gave the assignment and the due date. In some cases, you’ll have to make a declaration regarding plagiarism on your paper. It states that the writing is completely original and was not copied from another source. Different assignment types require different covers pages. Therefore, you need to consult your academic adviser or your professor for the appropriate one that matches the type of paper you are writing and your academic style.
The best way to begin an assignment is by stating the assignment’s purpose. For most educational settings it will be in the form of the name of the professor, such as “Professor Jones,” “Dr. Jones,” or simply “Jones.” This may include a code for the course, but ensure that you clearly label it. An incorrect course description can result in a deduction of a grade. These are some helpful tips for starting your college project.
First, you’ll need to determine the format of the paper. A header is required for all documents. It refers to the page number located on the left-hand side of the page. The font style for a heading should be a recognizable one, such as Times New Roman. Arial, Lucina and Palermo are the most acceptable fonts to use for college essays. For college papers it is recommended to follow the standards of the Modern Language Association. This means that the both names of the author be mentioned in the title and all lines be lined towards the left.
In MLA format, headings for college papers provide the most important information upfront. This helps discern who wrote the assignment and also who’s instructing. While it may seem more professional to address professors or instructors by their full names, this is acceptable. Instructors or professors will provide specific instructions for students. Particular guidelines must be followed in the MLA formats for headings of college assignments.
The heading should use the same typeface as the remainder of the paper. It is important to consider readability when choosing the right font. A font that is difficult to read could create difficulties. Times New Roman is the best choice for paper following MLA format. A header should only be located on the front page. It is recommended to include a header on every subsequent page.
Page length
Headings for college assignments, there are specific format rules. The first line and last line of the heading must be one-inch apart. The college assignment’s initial page should have a number, and it must include instructors’ names, dates of birth and student as well as the date and course names. It is important to adhere to the guidelines for style set by the institution. It is possible to experiment with various styles of fonts in case you do not want to go with the traditional font.
Reference to
Within the body of college projects In the body of college assignments, a reference list needs to be provided. This page should be clearly marked with the author’s name and affiliation as well as the date of publication as well as the editor. In this part, you must also cite the source you have employed. This page should be referenced as references. Make sure you acknowledge the author of the original source in order to not commit plagiarism.
References are listed by alphabetical order. As an example, the initial phrase in a reference should be the name of the author, or, if the author is unknown, the first word of the title. Following the author’s name then the comma must be followed by a colon or a period. If the source cites two or more works the works should be listed alphabetically separated with a semi-colon. It is in accordance with APA style
Photo by Kelly Sikkema on Unsplash
Generate accurate MLA citations for free
- Knowledge Base
- MLA format for academic papers and essays
MLA Format | Complete Guidelines & Free Template
Published on December 11, 2019 by Raimo Streefkerk . Revised on May 6, 2024 by Jack Caulfield.
The MLA Handbook provides guidelines for creating MLA citations and formatting academic papers. This includes advice on structuring parenthetical citations, the Works Cited page, and tables and figures. This quick guide will help you set up your MLA format paper in no time.
Cite your MLA source
Start by applying these MLA format guidelines to your document:
- Use an easily readable font like 12 pt Times New Roman
- Set 1 inch page margins
- Use double line spacing
- Include a ½” indent for new paragraphs
- Include a four-line MLA heading on the first page
- Center the paper’s title
- Use title case capitalization for headings
- Cite your sources with MLA in-text citations
- List all sources cited on a Works Cited page at the end
Alternatively, you can automatically apply the formatting with our MLA docx or Google Docs template.
Table of contents
How to set up mla format in google docs, header and title, running head, works cited page, creating mla style citations, headings and subheadings, tables and figures, frequently asked questions about mla format.
The header in MLA format is left-aligned on the first page of your paper. It includes
- Your full name
- Your instructor’s or supervisor’s name
- The course name or number
- The due date of the assignment
After the MLA header, press ENTER once and type your paper title. Center the title and don’t forget to apply title-case capitalization. Read our article on writing strong titles that are informative, striking and appropriate.

For a paper with multiple authors, it’s better to use a separate title page instead.
At the top of every page, including the first page, you need to include your last name and the page number. This is called the “running head.” Follow these steps to set up the MLA running head in your Word or Google Docs document:
- Double-click at the top of a page
- Type your last name
- Insert automatic page numbering
- Align the content to the right
The running head should look like this:

The Works Cited list is included on a separate page at the end of your paper. You list all the sources you referenced in your paper in alphabetical order. Don’t include sources that weren’t cited in the paper, except potentially in an MLA annotated bibliography assignment.
Place the title “Works Cited” in the center at the top of the page. After the title, press ENTER once and insert your MLA references.
If a reference entry is longer than one line, each line after the first should be indented ½ inch (called a hanging indent ). All entries are double spaced, just like the rest of the text.

Generate accurate MLA citations with Scribbr
Prefer to cite your sources manually? Use the interactive example below to see what the Works Cited entry and MLA in-text citation look like for different source types.
Headings and subheadings are not mandatory, but they can help you organize and structure your paper, especially in longer assignments.
MLA has only a few formatting requirements for headings. They should
- Be written in title case
- Be left-aligned
- Not end in a period
We recommend keeping the font and size the same as the body text and applying title case capitalization. In general, boldface indicates greater prominence, while italics are appropriate for subordinate headings.
Chapter Title
Section Heading
Tip: Both Google Docs and Microsoft Word allow you to create heading levels that help you to keep your headings consistent.
Tables and other illustrations (referred to as “figures”) should be placed as close to the relevant part of text as possible. MLA also provides guidelines for presenting them.
MLA format for tables
Tables are labeled and numbered, along with a descriptive title. The label and title are placed above the table on separate lines; the label and number appear in bold.
A caption providing information about the source appears below the table; you don’t need one if the table is your own work.
Below this, any explanatory notes appear, marked on the relevant part of the table with a superscript letter. The first line of each note is indented; your word processor should apply this formatting automatically.
Just like in the rest of the paper, the text is double spaced and you should use title case capitalization for the title (but not for the caption or notes).

MLA format for figures
Figures (any image included in your paper that isn’t a table) are also labeled and numbered, but here, this is integrated into the caption below the image. The caption in this case is also centered.
The label “Figure” is abbreviated to “Fig.” and followed by the figure number and a period. The rest of the caption gives either full source information, or (as in the example here) just basic descriptive information about the image (author, title, publication year).

Source information in table and figure captions
If the caption of your table or figure includes full source information and that source is not otherwise cited in the text, you don’t need to include it in your Works Cited list.
Give full source information in a caption in the same format as you would in the Works Cited list, but without inverting the author name (i.e. John Smith, not Smith, John).
MLA recommends using 12-point Times New Roman , since it’s easy to read and installed on every computer. Other standard fonts such as Arial or Georgia are also acceptable. If in doubt, check with your supervisor which font you should be using.
The main guidelines for formatting a paper in MLA style are as follows:
- Apply double line spacing
- Indent every new paragraph ½ inch
The fastest and most accurate way to create MLA citations is by using Scribbr’s MLA Citation Generator .
Search by book title, page URL, or journal DOI to automatically generate flawless citations, or cite manually using the simple citation forms.
The MLA Handbook is currently in its 9th edition , published in 2021.
This quick guide to MLA style explains the latest guidelines for citing sources and formatting papers according to MLA.
Usually, no title page is needed in an MLA paper . A header is generally included at the top of the first page instead. The exceptions are when:
- Your instructor requires one, or
- Your paper is a group project
In those cases, you should use a title page instead of a header, listing the same information but on a separate page.
Cite this Scribbr article
If you want to cite this source, you can copy and paste the citation or click the “Cite this Scribbr article” button to automatically add the citation to our free Citation Generator.
Streefkerk, R. (2024, May 06). MLA Format | Complete Guidelines & Free Template. Scribbr. Retrieved July 10, 2024, from https://www.scribbr.com/mla/formatting/
Is this article helpful?

Raimo Streefkerk
Other students also liked, creating an mla header, block quoting in mla style, how to format your mla works cited page, get unlimited documents corrected.
✔ Free APA citation check included ✔ Unlimited document corrections ✔ Specialized in correcting academic texts
Purdue Online Writing Lab Purdue OWL® College of Liberal Arts
Parts of a Memo

Welcome to the Purdue OWL
This page is brought to you by the OWL at Purdue University. When printing this page, you must include the entire legal notice.
Copyright ©1995-2018 by The Writing Lab & The OWL at Purdue and Purdue University. All rights reserved. This material may not be published, reproduced, broadcast, rewritten, or redistributed without permission. Use of this site constitutes acceptance of our terms and conditions of fair use.
Standard memos are divided into segments to organize the information and to help achieve the writer's purpose.
Heading Segment
The heading segment follows this general format:
Make sure you address the reader by his or her correct name and job title. You might call the company president "Maxi" on the golf course or in an informal note, but "Rita Maxwell, President" would be more appropriate for a formal memo. Be specific and concise in your subject line. For example, "Clothes" as a subject line could mean anything from a dress code update to a production issue. Instead use something like, "Fall Clothes Line Promotion."
Opening Segment
The purpose of a memo is usually found in the opening paragraph and includes: the purpose of the memo, the context and problem, and the specific assignment or task. Before indulging the reader with details and the context, give the reader a brief overview of what the memo will be about. Choosing how specific your introduction will be depends on your memo plan style. The more direct the memo plan, the more explicit the introduction should be. Including the purpose of the memo will help clarify the reason the audience should read this document. The introduction should be brief: approximately the length of a short paragraph.
The context is the event, circumstance, or background of the problem you are solving. You may use a paragraph or a few sentences to establish the background and state the problem. Oftentimes it is sufficient to use the opening of a sentence to completely explain the context, such as,
Include only what your reader needs, but be sure it is clear.
Task Segment
One essential portion of a memo is the task statement where you should describe what you are doing to help solve the problem. If the action was requested, your task may be indicated by a sentence opening like,
If you want to explain your intentions, you might say,
Include only as much information as is needed by the decision-makers in the context, but be convincing that a real problem exists. Do not ramble on with insignificant details. If you are having trouble putting the task into words, consider whether you have clarified the situation. You may need to do more planning before you're ready to write your memo. Make sure your purpose-statement forecast divides your subject into the most important topics that the decision-maker needs.
Summary Segment
If your memo is longer than a page, you may want to include a separate summary segment. However, this section is not necessary for short memos and should not take up a significant amount of space. This segment provides a brief statement of the key recommendations you have reached. These will help your reader understand the key points of the memo immediately. This segment may also include references to methods and sources you have used in your research.
Discussion Segments
The discussion segments are the longest portions of the memo, and are the parts in which you include all the details that support your ideas. Begin with the information that is most important. This may mean that you will start with key findings or recommendations. Start with your most general information and move to your specific or supporting facts. (Be sure to use the same format when including details: strongest to weakest.) The discussion segments include the supporting ideas, facts, and research that back up your argument in the memo. Include strong points and evidence to persuade the reader to follow your recommended actions. If this section is inadequate, the memo will not be as effective as it could be.
Closing Segment
After the reader has absorbed all of your information, you want to close with a courteous ending that states what action you want your reader to take. Make sure you consider how the reader will benefit from the desired actions and how you can make those actions easier. For example, you might say,
Necessary Attachments
Make sure you document your findings or provide detailed information whenever necessary. You can do this by attaching lists, graphs, tables, etc. at the end of your memo. Be sure to refer to your attachments in your memo and add a notation about what is attached below your closing, like this:
IMAGES
VIDEO
COMMENTS
Learn how to compose your college assignment heading or cover page correctly with our helpful heading tips.
The goal of using headings in a document is not only to divide information, but also to allow easy navigation of the document. In academic writing,
Learn how to use APA headings and subheadings in your paper with a sample and a formatting guide from Scribbr.
There are five levels of heading in APA Style. Level 1 is the highest or main level of heading, Level 2 is a subheading of Level 1, Level 3 is a subheading of Level 2, and so on through Levels 4 and 5. The number of headings to use in a paper depends on the length and complexity of the work.
This article walks through the formatting steps needed to create an APA Style student paper, starting with a basic setup that applies to the entire paper (margins, font, line spacing, paragraph alignment and indentation, and page headers). It then covers formatting for the major sections of a student paper: the title page, the text, tables and ...
Student Paper Setup Guide This guide will help you set up an APA Style student paper. The basic setup directions apply to the entire paper. Annotated diagrams illustrate how to set up the major sections of a student paper: the title page or cover page, the text, tables and figures, and the reference list.
Heading Levels Template: Student Paper The following template demonstrates how to use heading levels in an APA Style student paper.
Learn how to set up APA format for your paper. From the title page and headings to references and citations.
College Assignment Heading Formatting Rules Formatting rules for college assignment headings can vary depending on the specific guidelines provided by your institution or instructor.
Speaker: Assignment prompts can help writers determine what sections they need to include in an assignment, which they can then remember and outline using headings. Review the directions for this assignment. There are several main points the student is asked to include. Click on each main point to highlight it.
Moving from high school to college, you may notice differences in styles for writing research papers, the way you head your papers may be different. There are simple style rules when heading a college paper that make the process easier to follow and adjust to when writing college research papers.
Learn how to write proper college assignment headings with tips and guidelines. Check out this article, and you'll become a professional in writing headings.
The Purdue OWL® APA Formatting and Style Guide provides comprehensive guidelines for writing in APA style.
Find out how to format and present your assignments correctly before you submit them for marking.
Learn how to format your references in APA (7th Edition) style with this comprehensive guide from JCU Library.
This page contains guidelines on how to properly format the headings of your research paper using the MLA format.
Learn how to format headings in APA style (6th edition) with examples and tips. This guide covers the five levels of heading styles and when to use them.
In this step-by-step guide, learn how to brainstorm and structure your personal statement for your college essay.
Information on how to meet the Graduate College thesis and dissertation formatting requirements as outlined in the Thesis & Dissertation Manual.
The Ultimate College Assignment Formatting Guide In this blog post, we're going to dive headfirst into everything that has to do with college assignment formatting and talk about its significance. We'll explore the impact of formatting on our academic journey and why paying attention to this often underestimated detail can make a world of difference in our grades and overall success.
These are tips for college assignment titles. The MLA format is the best format to use to write research papers. These tips will help you create an essay to college.
MLA format is a widely used citation style for academic papers. Learn how to format your title page, header, and Works Cited page with our free template and examples. Watch our 3-minute video to see how easy it is to apply MLA rules to your document.
Heading Segment The heading segment follows this general format: TO: (readers' names and job titles) FROM: (your name and job title) DATE: (complete and current date) SUBJECT: (what the memo is about, highlighted in some way) Make sure you address the reader by his or her correct name and job title. You might call the company president "Maxi" on the golf course or in an informal note, but ...