because LaTeX matters
Beamer: an introduction to latex presentations.
Beamer is a LaTeX document class that provides extensive functionality to create presentations. Here, I will only show the basics and after reading this guide you will be able to create a simple presentation in LaTeX. I am aware there are a lot of tutorials available out there and this is not different from any other tutorial. I hope however, I can encourage some of you who have hesitated so far, for whatever reason, to create your next presentation with LaTeX. And I’m sure it will be a lot of fun, with similar effort. I should add that the output will obviously be a PDF file (with all its advantages!). Luckily, PDF-viewers (including Adobe Acrobat) provide a fullscreen-mode for presentation purposes.
So lets get started!
Now that line is straight forward, not much to say about it. Once that’s done, we have to choose a theme. This website gives a visual overview of the most common themes. I like Singapore:
Next, still in the preamble, we prepare the title page, using a similar set of commands as for other document-classes:
A frame may have one or several slides. Since PDFs are static, dynamic “effects” such as adding more content to a frame are achieved by two consecutive slides in the output file.
We use the previously defined title page to create our first (single-slided) frame:

Similar to articles, sections, subsections, etc. are available and can be used to define an outline, printed with \tableofcontents . For many themes, the outline will be displayed in the header/footer and provides direct access to a certain section of the presentation. Frame-titles are created using \frametitle{Title} .
Most of the time, a frame will show a list of items created through the well known itemize-environment:

Now what if you don’t want to show all the items at once, but one after another. The \pause -command will take care of it. Just add it anywhere you want to “pause” and will produce 3 slides. In presentation mode, the next bit of information is only shown after you press a key (usually space or arrow keys). So the above code example now looks as follows:
Figures are used similarly as within other document-classes:
Finally, I will show you something a little more advanced. Two columns, with items on the left and figures on the right side. The idea is to show an item along with an image. We want one item after the other to appear, while the image replaces the previous. Let me give you the code first and then explain some of the details:
What’s new here is called overlay specification within an environment (itemize) and lets you display different text/content on different slides or a range of slides.
<1-> indicates that this item will be displayed from slide 1 onwards in this frame. We could also have used <1-3> . Whereas the actual figures will only be displayed on their specific slide, e.g. <1> .
If there is no environment, the set of things to display has to be enclosed by the overprint-environment: \begin{overprint}...\end{overprint}.
Another thing is the “overlay specification” for commands, e.g. to change the text-color for slides 2 and 3:
\color<2-3>[rgb]{1,0,0} This text is red on slides 2 and 3, otherwise black.
Here, the overlay specification always has to follow the command before any additional arguments. I have to admit, slightly useless, but at least it illustrates the result nicely ( example was taken from the user guide page 81 ).
The following a complete code sample with a few frames containing the various examples described above:
The packages hyperref, xcolor, color are automatically loaded when using the beamer class.
A comprehensive user guide can be downloaded from CTAN .

Share this:
26. October 2011 at 16:29
In latex this is shown as error.explain.please send reply to my email id.please.
26. October 2011 at 16:41
Use math mode for everything and it works perfectly:
Cheers, Tom.
Leave a Reply Cancel reply
- How to make a presentation with Latex - Introduction to Beamer
- exampleblock
- compilation
- beamergotobutton
- presentation
We shall see in this article how to make a presentation with LaTeX, using the powerful class Beamer. If you want to make an outstanding “stressfree” presentation and bring your ideas or your work under a whole new light, let’s get started!!!
Installing the Beamer class
You will first need to install the package Beamer . Under Debian or Ubuntu, you can type the following command:
Once the latex-class Beamer is installed, you are definitely ready to stat your first presentation!!!
Basic presentation with Beamer
A few explanations:
means that our document is a Beamer presentation
this package enables us to use special letters (with accents, cedillas, etc). You can discard this command when the presentation is in English.
This is our outer theme (color and background). As you can imagine, there are tons of themes. You can refer to Beamer documentation for more details.
this defines the title of the presentation. As you can see, there are two titles:
- the first one, between brackets. [Making a LaTeX presentation with Beamer] is a substitute title which appears at the bottom of the page. This is useful especially if the original title is long. Since this is anoption only, if it is not mentioned, then the original title is the one shown in the bottom of the page.
- the second one, between braces, is the principal title of the presentation. The command
defines Nadir Soualem and Astozzia (us!) as the authors of the presentation.
defines where the presentation was held. Finally, we use
as the date.
To define the document, we use the markers
To define a slide of the presentation, we use the markers
To define a page title (frame), we mention it as follows
Introduction will be the title of the page. To define the first page, which contains details such as the title, the author, the date, etc - we use a frame in which we include the \titlepage command
To define a frame containing the layout of the presentation, we proceed as follows:
The layout is therefore mentioned at every section and subsection. You should insert \section and \subsection throughout the presentation and out of the frames:
Animations – Overlays
A good presentation is one that is dynamic and attracts the audience’s interest. Generally, we resort to a dynamic type of presentations. Alternatively stated, when we speak, we simultaneously show significant points of the talk, or hide others, or keep just the important ones. We shall see in this section how animations function in Beamer.
Item-by-item list view: the \pause command
In order to view several items of a list on the same slide, we type the following commands inside a frame:
We will thus see the items of our list, one by one.
Item-by-item list view: the \item<n-> command
An alternative way to visualize the elements of a list item by item is to use the \item<n-> command, where n is a natural number referring to the slide, beginning from which the item appears.
List item interval and isolated items: the \item<n-> and \item<p> commands
An example is worth a long speech:
\item<n-> means that the list item will appear on slides numbered n to m, whereas \item<p> means that the item will appear on slide p.
Item-by-item long list view: the [<+->] command
Sometimes the lists you want to display are long and it is not practical to use the \item<n-> command. An alternative solution is the use of the [<+->] command
Up to now, we have dealt with lists. We shall now see how to use text and slides.
Displaying and hiding text in slides: the \uncover<n->, \uncover<n-> and \uncover<p> commands
\uncover<n-> will display the text from slide n on; \uncover<n-> means the text element will appear from slide n to m. Finally, \uncover<p> means that the text will appear on slide p. Here is a case in point of a frame containing the \uncover command.
Be careful not to forget the braces after the \uncover command. The syntax is as follows:
Displaying and hiding text in slides: the \only<n->, \only<n-> and \only<p> commands
\only works like \uncover with the exception that the \only command is not as “cumbersome” on slides. Here is an example:
Here is an other example to better grasp the difference between \only and \uncover
Hide text in slides: the \invisible<n> commands
\invisible<n> makes text invisible on slide n
Another alternative: the \alt<n>{…}{…} commands
As an alternative, one can use the \alt<n>{…}{…} command on a slide. The first argument is the value on slide n. The second is for values other than n. Here is an example:
Highlighting text in red: the \alert<n>{…} command
To highlight text in red on slide n, we use the \alert<n>{…} command.
Successively highlighting list items in red: the <+-| alert@+> command
Using colors in a text on a slide: the \color<n->{…}{…}, \color<n->{…}{…} and\color<p>{…}{…} commands.
The first argument is the red, green, yellow, blue, etc … The second is the text to be colored
Creating links: the \hyperlink{…}{\beamergotobutton{…}} commands
To define internal links, we should add the following package in the preamble
Then, we should define a label pointing on the frame:
you define MY_LABEL as you please ! Finally, on the frame where the link is to be created, we proceed as follows:
There we are! We can see a button Refer to this page pointing to the frame labeled MY_LABEL .
Thus, the first argument of \hyperlink{…}{\beamergotobutton{…}} is the name of the label to be pointed at and \beamergotobutton{…} has the name of the button as an argument.
Defining blocks inside frames
For important stuff, we define blocks as follows:
As clear as onion soup !!!
Dynamic display of tables: the \pause and \onslide<n-> commands
First off, we should add the package colortbl to the preamble
To display rows dynamically, we shall use the \pause command as follows:
To display columns dynamically, we shall use the \onslide<n-> command as follows:
Writing on several columns: the \begin{columns}...\end{columns} commands
For two columns, we proceed as follows:
l,r,c refers to the position: left, right, center. The syntax is as follows:
Inserting a figure in a Beamer presentation
To insert an image or a figure, we proceed as in LaTeX by using the \includegraphics command. Here is an example:
In Beamer, we should distinguish between two types of figures:
- PS type: .eps, .ps and pspicture type (LaTeX)
- General type: .pdf, .png, .jpg, .jpeg You will need to compile a Beamer-class file.
Compiling a Beamer presentation
I assume that the your file is called file.tex. . There are ways to compile, depending on the type of figure you inserted. For PS-type figures, we shall use the following commands
We shall obtain the file file.pdf.
For general-type figures, we shall use the command
We shall also obtain the file file.pdf.
It goes without saying that explaining all the possibilities that Beamer offers is way too long. Have look to the official documentation, which is more exhaustive.
Have fun !!!
If you found this post or this website helpful and would like to support our work, please consider making a donation. Thank you!
Articles in the same category
- Useful software to start LaTeX
- Introduction au Latex
- Introduction à Beamer - Faire une présentation en Latex
- How to install latex package ?
- Comment installer un package Latex ?
- Latex Extra
- Variance Symbol in LaTeX
- Union and Big Union Symbol in LaTeX
- Transpose Symbol in LaTeX
- Transformée de Laplace en LaTeX
- Texte au dessus d'une flèche en LaTeX
- Text above arrow in LaTeX
- Symbole "plus grand que ou similaire à" en LaTeX
- Symbole de Variance en LaTeX
- Symbole de transposée en LaTeX
- Symbole de "non équivalent à" en LaTeX
- Symbole d'union et de grande union en LaTeX
- Symbole d'intersection et de grande intersection en LaTeX
- Strikethrough - strike out text or formula in LaTeX
- Passer en mode mathématique en Latex: $, $$ et displaymath
- Partial Derivatives of Multivariable Functions in LaTeX
- Numéroter les équations en Latex: leqno et fleqn
- Not Equivalent Symbol in LaTeX
- Latex yen symbol
- Latex valeur absolue
- Latex tensor product
- Latex symbole sous-ensemble - inclusion
- Latex symbole racine carrée
- Latex symbole produit
- Latex symbole produit vectoriel
- Latex symbole pourcentage
- Latex symbole plus ou moins
- Latex symbole parallèle
- Latex symbole orthogonal - Latex symbole perpendiculaire
- Latex symbole norme pour un vecteur ou une somme
- Latex symbole n'existe pas
- Latex symbole n'est pas un sous-ensemble - non-inclus
- Latex symbole n'est pas parallèle
- Latex symbole n'appartient pas à
- Latex symbole multiplication
- Latex symbole loi normale
- Latex symbole infini
- Latex symbole il existe
- Latex symbole il existe un seul et unique
- Latex symbole euro
- Latex symbole Est proportionnel à
- Latex symbole espérance mathématiques
- Latex symbole équivalent / équivalence
- Latex symbole dual ou dague
- Latex symbole différent
- Latex symbole dérivée partielle
- Latex symbole degré
- Latex symbole de la moyenne
- Latex symbole de la constante de Planck h
- Latex symbole congruent
- LaTeX symbole complément
- Latex symbole chapeau
- Latex symbole approximativement
- Latex symbole appartient à
- Latex symbol there exists one and only one
- Latex symbol Planck constant h
- LaTex symbol partial derivative
- Latex symbol not in
- Latex symbol not exists
- Latex symbol not equal
- Latex symbol norm for vector and sum
- Latex symbol multiply
- LaTeX symbol Is proportional to
- Latex symbol if and only if / equivalence
- Latex symbol for all x
- Latex symbol exists
- Latex symbol different
- Latex symbol checkmark
- LaTeX symbol characteristic function
- Latex symbol belongs to
- Latex symbol average
- Latex symbol approximately
- Latex subset symbol
- Latex square root symbol
- Latex real part symbol
- Latex real numbers
- Latex rational numbers
- Latex quaternion numbers
- Latex produit tensoriel
- Latex product symbol
- Latex pour tout x
- Latex points de suspension: \ldots,\cdots,\vdots et \ddots
- Latex plus or minus symbol
- Latex piecewise function
- Latex partie réelle
- Latex partie imaginaire
- Latex parallel symbol
- Latex overset and underset
- Latex orthogonal symbol - Latex perpendicular symbol
- Latex numbering equations
- Latex not subset symbol
- Latex not parallel symbol
- Latex normal distribution symbol
- Latex natural numbers
- Latex k parmi n - coefficient binomial
- Latex jacobian symbol
- Latex infinity symbol
- Latex indicator function
- Latex imaginary part symbol
- Latex how to write underscore
- Latex how to write text in math mode
- Latex how to write percent
- Latex how to write bar
- Latex how to write a fraction
- Latex how to insert a blank or empty page with or without numbering \thispagestyle,\newpage,\usepackage{afterpage}
- Latex how to hide page number
- Latex horizontal space: qquad,hspace, thinspace,enspace
- Latex hat symbol - wide hat symbol
- Latex gradient symbol
- Latex fonction plancher - Latex partie entière inférieure
- Latex fonction plafond - Latex partie entière supérieure
- Latex fonction indicatrice
- Latex floor function
- Latex flèche
- Latex expected value symbol - expectation
- Latex euro symbol
- Latex espace horizontal: qquad,hspace, thinspace,enspace
- Latex ensemble vide
- Latex empty set
- Latex écrire du texte dans les équations ou en mode mathématique
- Latex dérivée, limite, somme, produit et intégrale
- LateX Derivatives, Limits, Sums, Products and Integrals
- Latex degree symbol
- Latex dagger symbol or dual symbol
- Latex copyright, trademark, registered symbols
- Latex convolution symbol
- Latex congruent symbol
- Latex complex numbers
- Latex complement symbol
- Latex comment insérer une page blanche,vide avec ou sans numéro, \thispagestyle,\newpage,\usepackage{afterpage}
- Latex comment faire un underscore
- Latex ceiling function
- Latex bra ket notation
- Latex binomial coefficient
- Latex barrer du texte ou une équation
- Latex backslash symbol
- Latex arrows
- Latex accolades horizontales et verticales: \left\{,\right\},\underbrace{} et \overbrace{}
- Latex absolute value
- Laplace Transform in LaTeX
- $L^1$, $L^2$, $L^p$ and $L^\infty$ spaces in Latex
- Intersection and big intersection symbols in LaTeX
- How to write table in Latex ? begin{tabular}...end{tabular}
- How to write number sets N Z D Q R C with Latex: \mathbb, amsfonts and \mathbf
- How to write matrices in Latex ? matrix, pmatrix, bmatrix, vmatrix, Vmatrix
- How to write angle in latex langle, rangle, wedge, angle, measuredangle, sphericalangle
- How to write algorithm and pseudocode in Latex ?\usepackage{algorithm},\usepackage{algorithmic}
- How to write a vector in Latex ? \vec,\overrightarrow
- How to get dots in Latex \ldots,\cdots,\vdots and \ddots
- How to display formulas inside a box or frame in Latex ? \boxed
- Horizontal and vertical curly Latex braces: \left\{,\right\},\underbrace{} and \overbrace{}
- Greater Than or Similar To Symbol in LaTeX
- Fonction caractéristique en LaTeX
- Espaces $L^1$, $L^2$, $L^p$ et $L^\infty$ en Latex
- Écrire les ensembles classiques en Latex: \mathbb, amsfonts et \mathbf
- Dérivées partielles de fonctions à plusieurs variables en LaTeX
- Comment faire un tableau en Latex ? begin{tabular}...end{tabular}
- Comment encadrer des formules en Latex ? \boxed
- Comment écrire un angle en latex langle, rangle, wedge, angle, measuredangle, sphericalangle
- Comment écrire un algorithme en Latex ?\usepackage{algorithm},\usepackage{algorithmic}
- Comment écrire des vecteurs en Latex? \vec,\overrightarrow

How to Make a Presentation in LaTeX
Trudy Firestone
Reading time: about 13 min
What? LaTeX for Presentations?

Building Your Own Beamer Theme
- beamerinnerthemelucid.sty
- beamerouterthemelucid.sty
- beamercolorthemelucid.sty
- beamerthemelucid.sty

- Inner: Defines the appearance of any items that make up the slides central content, e.g., lists or the title on the title page
- Outer: Defines the appearance of the chrome of the slide, e.g., the title and footer of each slide
- Color: Defines the colors used in various parts of the theme, e.g.,the color for frame titles or the background color

Additional References:
About lucid.
Lucid Software is a pioneer and leader in visual collaboration dedicated to helping teams build the future. With its products—Lucidchart, Lucidspark, and Lucidscale—teams are supported from ideation to execution and are empowered to align around a shared vision, clarify complexity, and collaborate visually, no matter where they are. Lucid is proud to serve top businesses around the world, including customers such as Google, GE, and NBC Universal, and 99% of the Fortune 500. Lucid partners with industry leaders, including Google, Atlassian, and Microsoft. Since its founding, Lucid has received numerous awards for its products, business, and workplace culture. For more information, visit lucid.co.
Making Presentations With LaTeX
Last updated: March 18, 2024

1. Introduction
Currently, multiple programs enable us to create presentations. However, most of these programs are proprietary. It means that the presentations may depend on resources available only in particular versions of these programs.
To avoid problems with proprietary software versioning, we can employ open-source and holistic programs to create presentations. This category of programs enables the user to focus on the presentation content instead of its theme.
So, we can choose the presentation theme after defining the presentation content. Furthermore, we can apply the different themes by only modifying a few lines in the presentation document.
An example of such a program is LaTeX/Beamer. Beamer is a LaTeX package that enables users to create presentations through a LaTeX fashioned document.
In this tutorial, we’ll explore the LaTeX/Beamer program. First, we’ll have a brief conceptual review on Latex and a presentation of the Beamer package. So, we’ll investigate several resources provided by Beamer to create presentations. Moreover, we’ll create a sample Beamer presentation to see how Beamer’s resources work in practice.
2. LaTeX and Beamer
LaTeX is a well-known program for typesetting typically employed to write medium-large scientific documents. However, LaTeX also supports importing packages that extend its resources and enables the user to use LaTeX for several purposes.
An example of these packages is TikZ. TikZ is a graphical package that makes it possible to create images with LaTeX. Through TikZ, we can easily, for instance, draw charts , flowcharts , and graphs .
Another relevant LaTeX package is Beamer . Beamer consists of a powerful package to make presentations with LaTeX. With Beamer, we can use straightforward and clean themes or create new themes with particular and exclusive designs for the presentations.
Beamer was developed to be fully compliant with LaTeX. So, the presentations created with Beamer are provided to the user as PDF files.
Employing PDF files for rendering presentations is a great choice since most hardware (computers, printers, smartphones, …) and software (Windows, Linux, macOS, …) support this file format.
2.1. A Little Bit Deeper on Beamer
There are many advantages to using Beamer for creating presentations. Among them, we can cite, for instance, Beamer compatibility with different LaTeX compilers, such as pdflatex, dvips, and lualatex.
Furthermore, most of the widely known LaTeX commands and packages are available to use with Beamer. In this way, we have excellent resources for, for example, mathematical and source code typesetting.
Finally, Beamer provides a library with different themes. Thus, we can customize the presentation layout by changing just a few lines in the LaTeX code. It is also possible to create and import new themes, making the presentation customization process even more powerful.
The most challenging about Beamer is that the learning curve is steeper. This challenge gets higher proportions if the user is not familiar with LaTeX. So, the user may find it hard to give the first steps with this package.
Another typical challenge is the syntax of the Beamer/LaTeX commands, which are quite unusual when compared to other text/presentation editing programs.
Furthermore, Beamer uses coordinates to position graphical resources. So, the positioning is very precise but can be harder to define for non-experienced users.
In such a way, this tutorial will present the first steps on Beamer, discussing multiple challenges of this package and showing how to tackle them.
3. Beamer in Practice
In this section, we’ll study the process of creating LaTeX/Beamer presentations from scratch. First, we’ll have an explanation of the Beamer basic structure. Thus, we’ll see some particular Beamer resources.
3.1. Beamer Basics
So, we opened an empty LaTeX document, and we want to create a Beamer presentation. The very first thing to do is define our document class as a Beamer document. We do that by adding the following line to the document:
Next, we do the definition of the presentation core information. The most common information in this step consists of the presentation title, the authors’ name, the institute or company name, and the date. We can do these definitions using the lines below:
With these predefinitions done, we can finally start to build our presentation frames. So, we insert the following line to the LaTeX document:
The aforementioned line indicates to the LaTeX compiler that the following commands, flags, and text should be present as part of the presentation. Similarly, we show that the presentation ended with the line next (which is typically the last line of the document):
Between the beginning and end flags, we build the presentation itself. A Beamer presentation is organized with frames (slides). Usually, the first frame is the presentation title one. Thus, with the previously stated information, we create the presentation title frame with the following line:
Compiling the document at this point will generate the following frame:

Other frames ( let’s call them content frames ) are quite different: they require a beginning and end flag to delimitate their scope. So, we define a content frame with the lines next:
Inside a frame, we have its content. The frame content is from text to images, besides other flags and commands to define some frame features. In the following subsection, we’ll explore the building of a frame from scratch.
3.2. Frame Building
At first, we should consider that all the commands, flags, and content defined in this subsection are included in the scope of a frame.
In such a way, the first thing that we typically define in a frame is its title. We can do that in Beamer by using the following line:
After defining the frame title, we can work on the frame content. By default, only typing into a frame scope results in a justified text vertically centralized in the frame after being compiled. Thus, let’s consider the following content of a frame:
So, this frame has three lines. It is relevant to note that the symbol \\ indicates a line breaking for the LaTeX compiler. Furthermore, we can see basic text formatting with a bold line (\textbf{}) and an italic line (\textit{}).
Moreover, it is possible to change the text alignment in the frame. We can do that by inserting the text between begin (\begin{}) and end (\end{}) flags defining the scope of a different alignment. The available alignments are right (flushright), left (flushleft), and center (center). Let’s see the example below:
At last, we can add images to a presentation frame. We do that by using the standard figure scope of LaTeX. An example is provided next:
This example includes a centered image called Lena.png (available in the same folder of the LaTeX project) in the frame. The caption appears below the image, and we can employ the label to refer to the figure in any presentation frame.
So, the following image shows the compiled frame with the previously presented texts and images:

3.3. Theme Gallery
Besides the default theme (employed in the examples of the previous sections), the Beamer package natively provides a set of themes. This set encompass 25 themes: AnnArbor; Antibes; Bergen, Berkeley, Berlin, Boadilla, CambridgeUS, Copenhagen, Darmstadt, Dresden, Frankfurt, Goettingen, Hannover, Ilmenau, JuanLesPins, Luebeck, Madrid, Malmoe, Marburg, Montpellier, Pittsburgh, Rochester, Singapore, Szeged, and Warsaw.
To change the presentation theme, we need to add a theme flag before the beginning of the document scope (\begin{document}). Let’s see this flag for the Frankfurt theme:
In this way, the previously presented frames with the Frankfurt theme are shown next:

In addition to the native Beamer themes, we can use custom themes from third-party repositories, such as the Overleaf repository .
4. Conclusion
In this tutorial, we learned about how to create presentations with LaTeX. We took into account a popular LaTeX package to build presentations: the Beamer package. In this way, we first reviewed some fundamental concepts about LaTeX and, especially, about Beamer. So, we in-depth explored the process of building presentations in practice.
Specifically, we studied the basic structure of a LaTex/Beamer presentation, the creation of frames, inserting and formatting the frame content, and how to change the Beamer default theme.
We can conclude that LaTeX and Beamer compose a powerful solution to build presentations. The main benefits of using them consist of a generic and precise way to define graphical resources and the compiling process that automatically generates a PDF file with the presentation.
LaTeX/Presentations
| |
|
|
|---|
| Getting Started Common Elements Mechanics Technical Text Special Pages Special Documents Creating Graphics Programming Miscellaneous Help and Recommendations Appendices |
| • |
LaTeX can be used for creating presentations. There are several packages for the task, such as- Powerdot , Prosper , Seminar , etc, however, the Beamer package is the most widely used.
It should be noted that Latex produces the presentation as a PDF which can be viewed in fullscreen mode with some pdf reader (e.g. Okular , Evince or Adobe Reader). If you want to navigate in your presentation, you can use the almost invisible links in the bottom right corner without leaving the fullscreen mode.
- 1.1 Title page and author information
- 1.2.1 Sections and subsections
- 1.2.2 References (Beamer)
- 1.3.1 The Built-in solution
- 1.3.2 User-defined themes
- 1.3.3.1 Math Fonts
- 1.4 Frames Options
- 1.5 Hyperlink navigation
- 1.6 Animations
- 1.7 Handout mode
- 1.8 Columns
- 1.10 PDF options
- 1.11 Numbering slides
- 2 The Powerdot package
- 3.1 Beamer based themes/examples
- 3.2 References
The Beamer package
The beamer package is provided with most LaTeX distributions, but is also available from CTAN . If you use MikTeX, all you have to do is to include the beamer package and let LaTeX download all wanted packages automatically. The documentation explains the features in great detail. You can also have a look at the PracTex article Beamer by Example . [1]
The beamer package also loads many useful packages including xcolors, hyperref , etc. An introductory example and its output are shown below.
| \documentclass[10pt]{beamer} % Add extra packages here \title{Presentation on XXX topic} \author{AAA} \begin{document} \maketitle \begin{frame} \frametitle{This is the first slide} Here you can put any text/equation etc. $a^2 + b^2 = c^2$. \end{frame} \begin{frame} \frametitle{This is the second slide} \framesubtitle{A bit more information about this} Some random text. \end{frame} \end{document} |
In above code, the Beamer package is loaded by the \documentclass{beamer} command in the header. The usual header information may then be specified. In Beamer presentation a frame is an equivalent term for the slide (used in MS office). A frame is defined using the environment \begin{frame} ...... \end{frame} . The \frametitle{} command specifies the title for each slide. The frame title and subtitle can also be passed with the environment as following.
The usual environments ( itemize , enumerate , equation , etc.) may be used. Inside frames, you can use environments like block , theorem , proof , ... Also, \maketitle is possible to create the Title page, if title and author are set.
Title page and author information
The title page is the first page where one may insert following information
- Title and subtitle (optional)- Use \title and \subtitle commands, or use \title[short title (optional)]{Long title}{subtitle (optional)}
- Author(s) name- Use the \author{} command.
- Institute name- Use the \institute command. Note the use of \inst{1} and \inst{2} commands to associate the authors with their respective institutes.
- Date and Place of presentation- It can be inserted using the \date[short date(optional)]{Long date} command.
- Logo of Institute, etc.
It should be noted that the information within square braces, i.e., [ ] is optional.
| \documentclass{beamer} \title[Crisis] {The Economics of Financial Crisis}{Evidence from India} \author[Author, Anders] {F.~Author\inst{1} \and S.~Anders\inst{2}} \institute[Universities Here and There] { \inst{1} Institute of Computer Science\newline University Here \and \inst{2} Institute of Theoretical Philosophy\newline University There} \date[KPT 2004] {Conference on Presentation Techniques, 2004} \subject{Computer Science} \begin{document} \maketitle % place your frames here. \end{document} |
It is important to include the \maketitle command in the document (as in above code) to create the title frame. The commands \maketitle and \titlepage are equivalent.
Table of Contents
The table of contents, with the current section highlighted, is displayed by:
This can be done automatically at the beginning of each section using the following code in the preamble:
Or for subsections:
Sections and subsections
As in all other LaTeX files, it is possible to structure the document using
Those commands have to be put before and between frames. They will modify the table of contents with the argument in brackets. The optional argument will be shown in the headline navigation on the slide, depending on the theme used. You can use \sectionpage macro to generate a separator slide for a declared section, for example
References (Beamer)
The following example shows a manually made references slide containing two entries:
As the reference list grows, the reference slide will divide into two slides and so on, through use of the allowframebreaks option. Individual items can be cited after adding an 'optional' label to the relevant bibitem stanza. The citation call is simply \cite . Beamer also supports limited customization of the way references are presented (see the manual).
The different types of referenced work are indicated with a little symbol (e.g. a book, an article, etc.). The symbol is set with the commands beamertemplatebookbibitems and beamertemplatearticlebibitems . It is also possible to use setbeamertemplate directly, like so
Other possible types of bibliography items, besides book and article , include e.g. online , triangle and text . It is also possible to have user defined bibliography items by including a graphic.
If one wants to have full references appear as foot notes, use the \footfullcite from the biblatex package. For example, it is possible to use
Beamer offers two ways for define the themes- 1) Use built-in themes, 2) Use user-defined themes.
The Built-in solution
Beamer has several built-in themes which can be used by specifying their "Name" and their "color" in the preamble. This Theme Matrix contains the various theme and color combinations included with Beamer . For more customizing options, have a look to the official documentation included in your distribution of beamer , particularly the part Change the way it looks .
The full list of themes is:
The full list of color themes is:
User-defined themes
First you can specify the outertheme , which defines the head and the footline of each slide.
Here is a list of all available outer and inner themes:
| infolines | shadow | smoothbars | split | rectangles | inmargin | |
| miniframes | sidebar | smoothtree | tree | circles | rounded | |
You can define the color of every element:
Colors can be defined as usual:
Block styles can also be defined:
You can also suppress the navigation symbols:
You may also change the fonts for particular elements. If you wanted the title of the presentation as rendered by \begin { frame } [plain] \titlepage\end { frame } to occur in a serif font instead of the default sanserif, you would use:
You could take this a step further if you are using OpenType fonts with Xe(La)TeX and specify a serif font with increased size and oldstyle proportional alternate number glyphs:
The default settings for beamer use a different set of math fonts than one would expect from creating a simple math article. One quick fix for this is to use
Frames Options
The options to a frame can be passed as following
Some of the useful options and their description is following.
- plain : This option removes all the formatting from your slide and thus give you extra space to accommodate a large figure or a large table.
- shrink : If you want to include lots of text on a slide use the shrink option.
- allowframebreaks : option will auto-create new frames if there is too much content to be displayed on one.
- fragile : Before using any verbatim environment (like listings ), you should pass the option fragile to the frame environment, as verbatim environments need to be typeset differently. Usually, the form fragile=singleslide is usable (for details see the manual). Note that the fragile option may not be used with \frame commands since it expects to encounter a \end { frame } , which should be alone on a single line.
Hyperlink navigation
Internal and external hyperlinks can be used in beamer to assist navigation. Clean looking buttons can also be added.
| |
By default the beamer class adds navigation buttons in the bottom right corner. To remove them one can place
in the preamble.
It is possible to make figure and text to appear and disappear using the commands such as \pause, \uncover, \only and \itemize<a-b>. Text or figures after these commands will display after one of the following events (which may vary between PDF viewers): pressing space, return or page down on the keyboard, or using the mouse to scroll down or click the next slide button. A short explanation of each command is as follows and refer to chapter 9 of the Beamer manual for more details..
The \pause statement can be used as following to provide a break. I.e. the text after the command will be displayed on next event (button click/ key press/etc.)
The \uncover command specifies the appearance explicitly; \only works the same but without reserving space when hidden.
The \item command specifies appearance and disappearance of text by using <a-b> where a and b are the numbers of the events the item is to be displayed for (inclusive). For example:
A simpler approach for revealing one item per click is to use \begin { itemize } [<+->] .
In all these cases, pressing page up, scrolling up, or clicking the previous slide button in the navigation bar will backtrack through the sequence.
Above command uncovers the item and they are visible only on/after the specified frame numbers. One may also use the \setbeamercovered{transparent} command to see the uncovered items, which are shown with little opacity. This means if the visible text is in black then the uncovered text will be in gray. One may use \setbeamercovered{invisible} to revert this setting.
Similar option is also available for formatting the text. for example if you want the text to be of specific style then you may use \style<3->{Text} command. For example one may use \alert<3->{Some text.} which will show the specified text in the respective formatting for specified slides. Similarly one may use
\textbf, \textit, \textsl, \textrm, \textsf, \textcolor, \structure etc. commands.
Same is true for theorem, corollary, and proof environments. An example is given below.
For the tables one must add \onslide slide command before placing the new line (i.e., \\) .
Test 1 & repeat & 14.5 & 656 \onslide<3-> \\
Handout mode
In beamer class, the default mode is presentation which makes the slides. However, you can work in a different mode that is called handout by setting this option when calling the class:
This mode is useful to see each slide only one time with all its stuff on it, making any \itemize [<+->] environments visible all at once (for instance, printable version). Nevertheless, this makes an issue when working with the only command, because its purpose is to have only some text or figures at a time and not all of them together.
If you want to solve this, you can add a statement to specify precisely the behavior when dealing with only commands in handout mode. Suppose you have a code like this
These pictures being completely different, you want them both in the handout, but they cannot be both on the same slide since they are large. The solution is to add the handout statement to have the following:
This will ensure the handout will make a slide for each picture.
Now imagine you still have your two pictures with the only statements, but the second one show the first one plus some other graphs and you don't need the first one to appear in the handout. You can thus precise the handout mode not to include some only commands by:
The command can also be used to hide frames, e.g.
or even, if you have written a frame that you don't want anymore but maybe you will need it later, you can write
and this will hide your slide in both modes.
A last word about the handout mode is about the notes. Actually, the full syntax for a frame is
and you can write your notes about a frame in the field note (many of them if needed). Using this, you can add an option
The first one is useful when you make a presentation to have only the notes you need, while the second one could be given to those who have followed your presentation or those who missed it, for them to have both the slides with what you said.
Columns environment divides a slide (vertically) into columns. Example

Enclosing text in the block environment creates a distinct, headed block of text (a blank heading can be used). This allows to visually distinguish parts of a slide easily. There are three basic types of block. Their formatting depends on the theme being used.

PDF options
You can specify the default options of your PDF. [2]
Numbering slides
It is possible to number slides using this snippet:
However, this poses two problems for some presentation authors: the title slide is numbered as the first one, and the appendix or so-called "backup" (aka appendix, reserve) slides are included in the total count despite them not being intended to be public until a "hard" question is asked. [3] This is where two features come in:
- Ability to exclude certain frames from being numbered. For instance, this may be used at the title slide to avoid counting it:
- This stuff works around the problem of counting the backup frames:
The Powerdot package
The powerdot package is an alternative to beamer. It is available from CTAN . The documentation explains the features in great detail.
The powerdot package is loaded by calling the powerdot class:
The usual header information may then be specified.
Inside the usual document environment, multiple slide environments specify the content to be put on each slide.
Simple presentations
The beamer class is very powerful and provides lots of features. For a very simple presentation, a class based on article can be used.
Beamer based themes/examples
Some of the nice examples of the presentation are available below
- The Nord beamer theme
- Metropolis theme
- Kenton Hamaluik
- A list of theme maintained at github
- ↑ Andrew Mertz and William Slough, Beamer by Example
- ↑ Other possible values are defined in the hyperref manual
- ↑ Appendix Slides in Beamer: Controlling frame numbers
- Wikipedia:Beamer (LaTeX)
- Beamer user guide (pdf) from CTAN
- The powerdot class (pdf) from CTAN
- A tutorial for creating presentations using beamer
- Pages using deprecated enclose attributes
- Wikibooks pages with to-do lists
Navigation menu
Support via Liberapay
Writing Beamer presentations in org-mode
1. introduction.
Beamer is a LaTeX package for writing presentations. This documents presents a simple introduction to preparing beamer presentations using org-mode in Emacs.
This documents assumes that the reader is already acquainted with org-mode itself and with exporting org-mode documents to LaTeX. There are tutorials and references available for both org-mode itself, for LaTeX exporting , and for Beamer exporting . The document also assumes that the reader understands the notation for Emacs keybindings .
2. First steps
2.1. the export template.
Starting with an empty file called presentation.org 1 , say, the first step is to insert the default org export template ( C-c C-e # with the default keybindings). This will generate something that looks like this (some specific entries will vary):
In this default template, you will want to modify, at the very least, the title, as I have done, as this will be used as the title of your presentation. It will often be useful to modify some of the LaTeX export options, most commonly the toc option for generating a table of contents. For this document, and the associated sample presentation , I have left all options as they are by default according to the template.
2.2. Beamer specific settings
As well as the general options provided by the template, there are Beamer specific options. The following options are what I use:
The first line enables the Beamer specific commands for org-mode (more on this below); the next two tell the LaTeX exporter to use the Beamer class and to use the larger font settings 2 .
2.3. Outline levels for frames (slides)
The following line specifies how org headlines translate to the Beamer document structure.
A Beamer presentation consists of a series of slides, called frames in Beamer. If the option shown above has a value of 1, each top level headline will be translated into a frame. Beamer, however, also makes use of LaTeX sectioning to group frames. If this appeals, setting the option to a value of 2 tells org to export second level headlines as frames with top level headlines translating to sections.
2.4. Column view for slide and block customisation
The final line that is useful to specify to set up the presentation is
The purposes of this line is to specify the format for the special interface that org-mode provides to control the layout of individual slides. More on this below.
Once all of the above has been set up, you are ready to write your presentation.
3. The slides
Each slide, or frame in Beamer terminology, consists of a title and the content. The title will be derived from the outline headline text and the content will simply be the content that follows that headline. A few example slides are presented below. These will only cover the basic needs; for more complex examples and possible customisations, I refer you to the detailed manual .
3.1. A simple slide
The simplest slide will consist of a title and some text. For instance,
defines a new section, Introduction , which has a slide with title A simple slide and a three item list. The result of this with the settings defined above, mostly default settings, will generate a slide that looks like this:

3.2. A more complex slide using blocks
Beamer has the concept of block, a set of text that is logically together but apart from the rest of the text that may be in a slide. How blocks are presented will depend on the Beamer theme used ( customisation in general and choosing the theme specifically are described below).
There are many types of blocks. The following
creates a slide that has a title (the headline text), a couple of sentences in paragraph format and then a theorem block (in which I prove that org increases productivity). The theorem proof is a list of points followed a bit of LaTeX code at the end to draw a fancy end of proof symbol right adjusted.
You will see that there is an org properties drawer that tells org that the text under this headline is a block and it also specifies the type of block. You do not have to enter this text directly yourself; org-mode has a special beamer sub-mode which provides an easy to use method for specifying block types (and columns as well, as we shall see in the next section ).
To specify the type of block, you can type C-c C-b 3 . This brings up a keyboard driven menu in which you type a single letter to select the option you wish to apply to this headline. For the above example, I typed C-c C-b t . The options selected in this manner are also shown as tags on the headline. However, note that the tag is for display only and has no direct effect on the presentation. You cannot change the behaviour by changing the tag; it is the property that controls the behaviour.
3.3. Slides with columns
The previous section introduced the special access keys ( C-c C-b ) for defining blocks. This same interface allows you to define columns. A headline, as the text that follows it, can be in a block, in a column, or both simutaneously. The | option will define a column. The following
defines a two column slide. As the text in the slide says, the left column is a list and the right one is an image. The left column's headline text is ignored. The column on the right however is placed with an example block (whose appearance will depend on the Beamer theme).
The columns also have widths. By default, these widths are the proportion of the page width to use so I have specified 40% for the left column and 60% for the right one.
The image in the right column is inserted simply by specifying a link to the image file with no descriptive text. I have added an attribute to the image (see the #+ATTR_LATEX line above) to tell LaTeX to scale the image to the full width of the column ( \textwidth ).
3.4. Using Babel
One of my main uses for Beamer is the preparation of slides for teaching. I happen to teach Octave to engineering students. Org provides the Babel framework for embedding code within org files. For teaching, this is an excellent tool for presenting codes and the results of evaluating those codes.
For instance, the following code:
will generate a slide with two blocks and a pause between the display of each of the two blocks:

4. Customisation
Org has a very large number of customisable aspects. Although daunting at first, most options have defaults that are suitable for most people using org initially. The same applies to the Beamer export support. However, there are some options which many will soon wish to change.
4.1. Beamer theme
Beamer has a large number of themes and I simply refer the reader to the manual or the Web to find what themes are available and what they look like. When you have chosen a theme, you can tell org to use it by inserting some direct LaTeX code into the preamble of the document, the material that comes before the first headline. For instance, adding this line
to the preamble after the beamer font size option described above will produce a presentation that looks very different from the default (with no other changes required!):

4.2. Table of contents
The default toc:t option generated by the export template command ( C-c C-e # ) indicates that a table of contents will be generated. This will create a slide immediately after the title slide which will have the list of sections in the beamer document. Please note that if you want this type of functionality, you will have to specify the BEAMER-FRAME-LEVEL to be 2 instead of 1 as indicated above .
Furthermore, if you have decided to use sections, it is possible to have Beamer automatically place a table of contents slide before the start of each section with the new section highlighted. This is achieved by inserting the following LaTeX code, again in the preamble:
4.3. Column view for slide and block customisation
In an early section of this document , I described a magical incantation! This incantation defines the format for viewing org property information in column mode. This mode allows you to easily adjust the values of the properties for any headline in your document. This image shows the type of information you can see at a glance in this mode:

We can see the various blocks that have been defined as well as any columns (implicit by the presence of a column width). By moving to any of these column entries displayed, values can be added, deleted or changed easily. Please read the full org Beamer manual for details.
A previously created example presentation is available.
I am a firm believer in using the largest font possible to encourage less text on slides. This is obviously a personal view.
org-beamer-mode must be turned on for this keybinding to be available.
Documentation from the orgmode.org/worg/ website (either in its HTML format or in its Org format) is licensed under the GNU Free Documentation License version 1.3 or later. The code examples and css stylesheets are licensed under the GNU General Public License v3 or later.
Beamer Themes — Full List
Inbuilt themes in beamer
A theme in beamer can be set using the command \ usetheme{themeName} . Here is a 27 inbuilt themes in Beamer:
It should be noted that these themes apply changes to the global structure of the presentation.
1. Default theme
To use the default theme \usetheme {default} command should be added to the preamble. However, if no theme is specified then beamer will apply the default theme to all the frames.
Default frame is preferred when the user wants to customize the frames according to his/her purpose. It is easy to make local changes (color and font) in local structure in the default theme. Compiling the above code with default theme, we get the following:

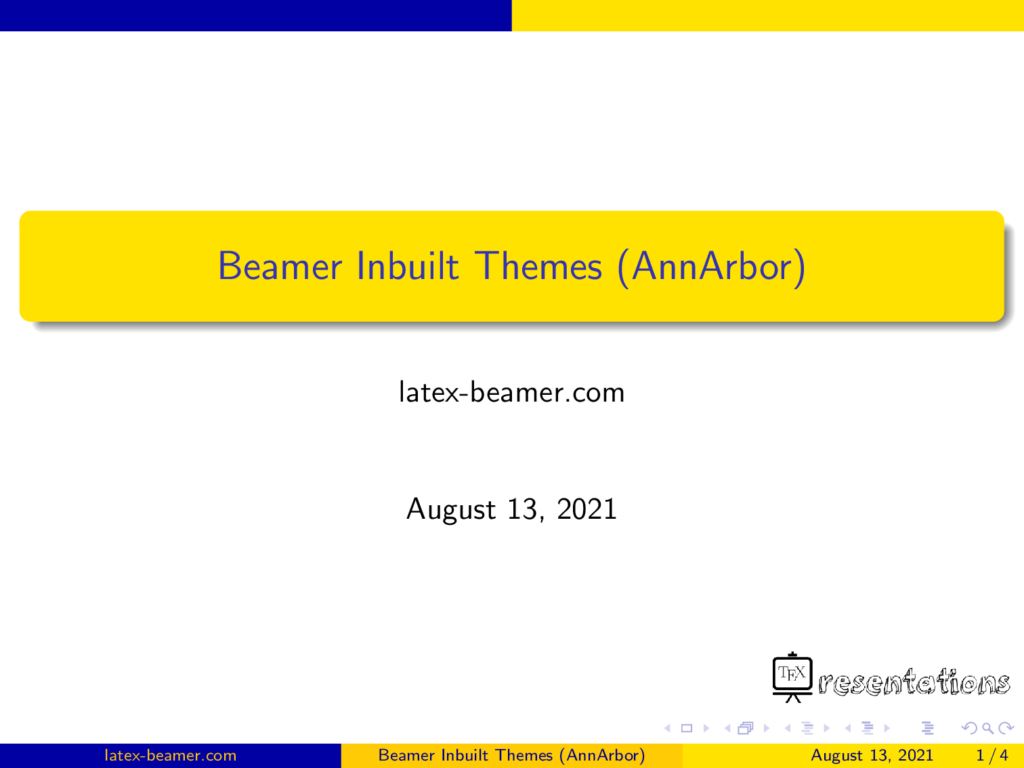
2. AnnArbor theme
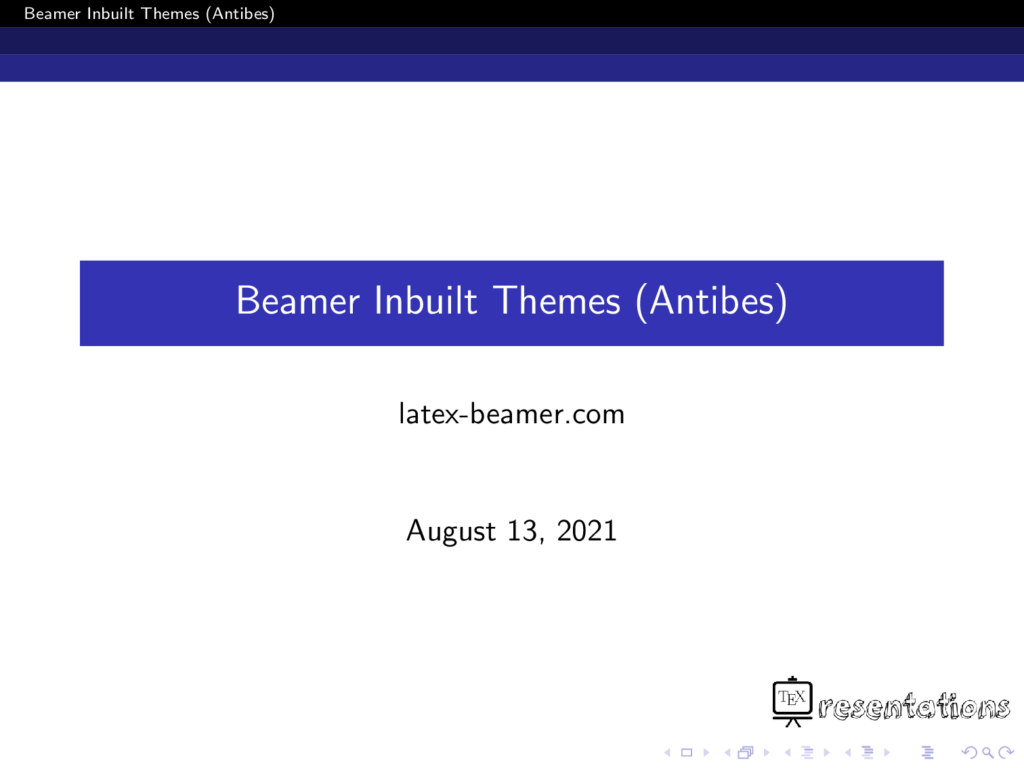
3. Antibes theme
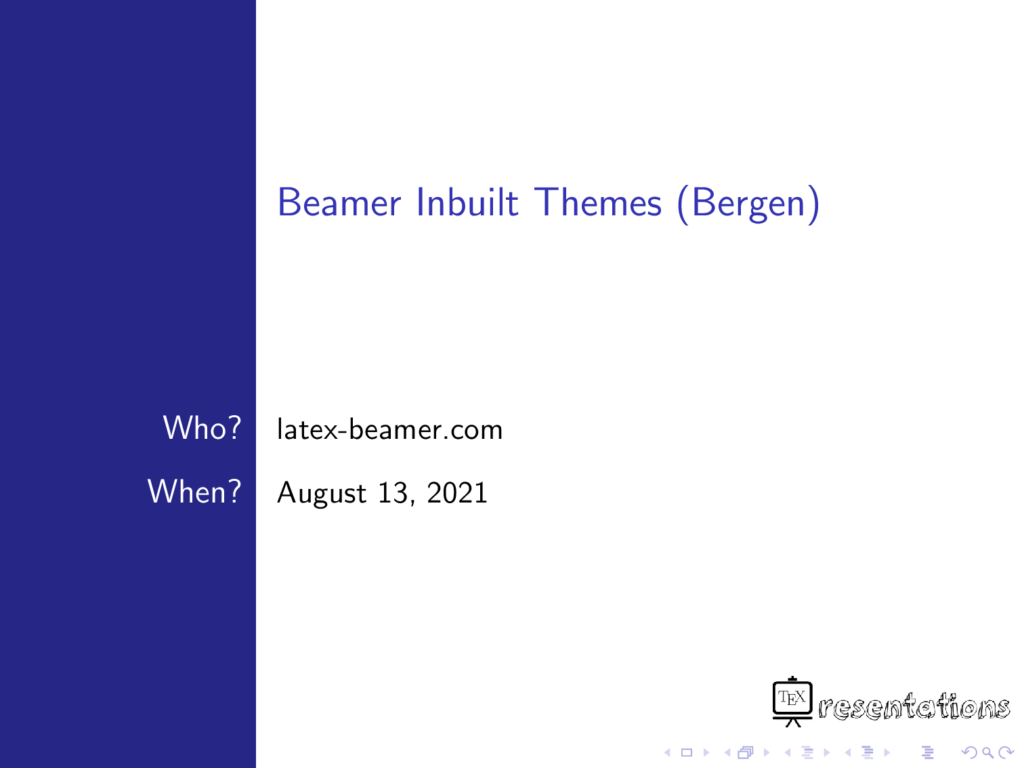
4. Bergen theme
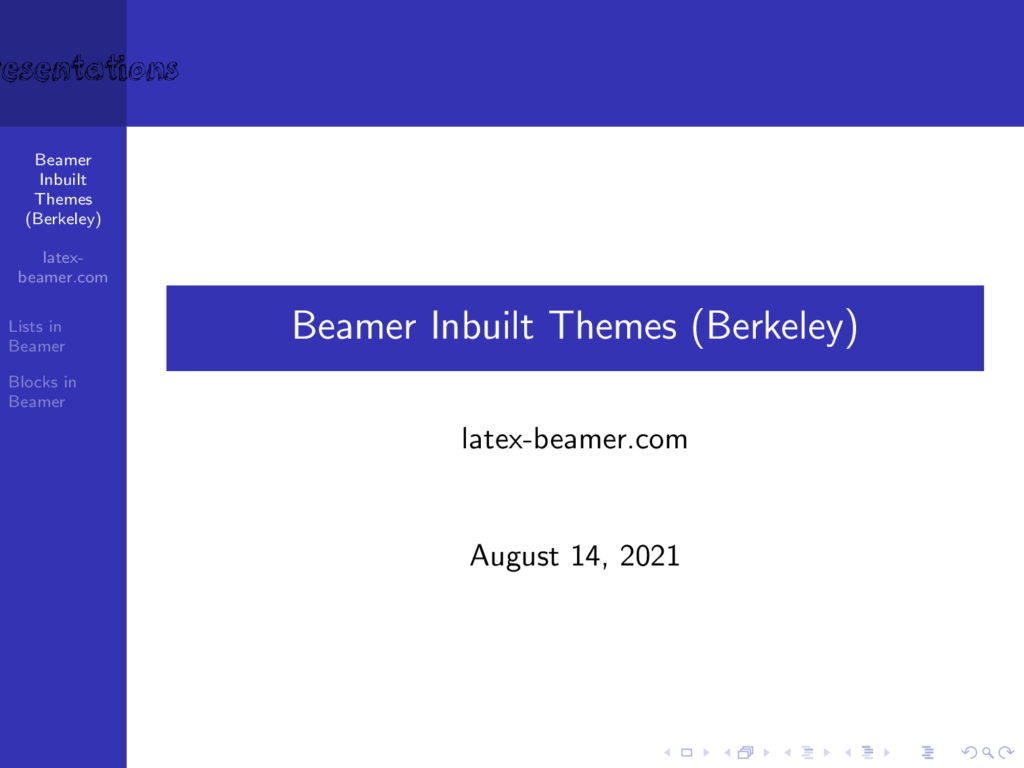
5. Berkeley theme
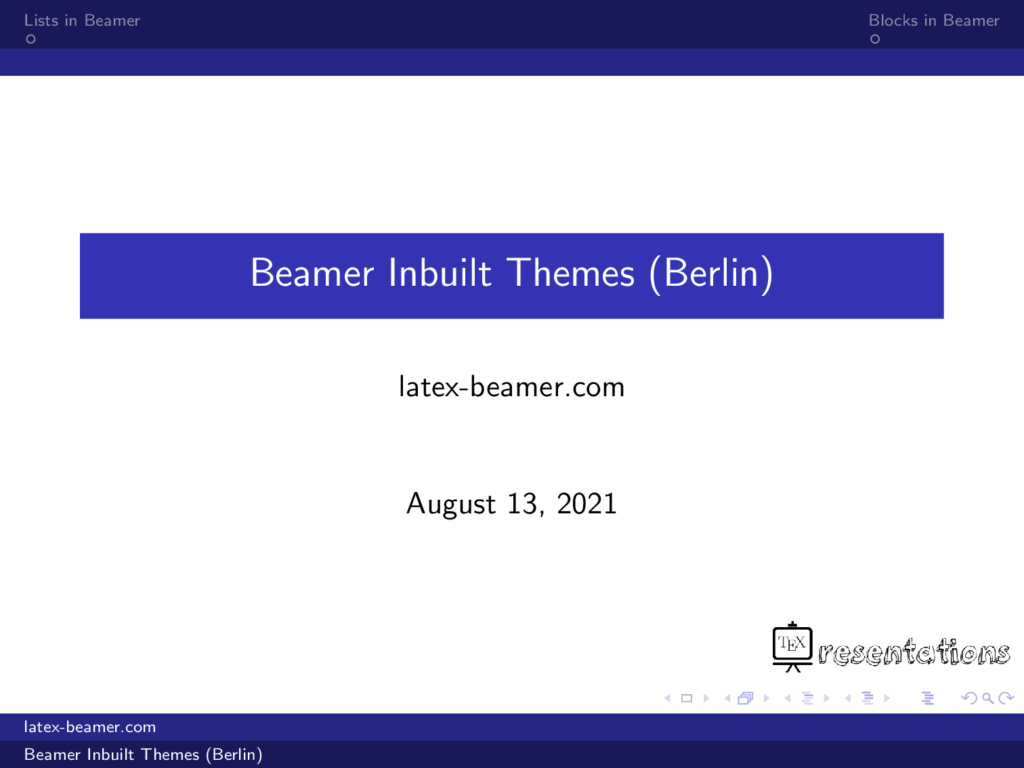
6. Berlin theme
Continue or check the Next Lesson: 09 Your Beamer Guide to Text Formatting
Stack Exchange Network
Stack Exchange network consists of 183 Q&A communities including Stack Overflow , the largest, most trusted online community for developers to learn, share their knowledge, and build their careers.
Q&A for work
Connect and share knowledge within a single location that is structured and easy to search.
\mode<presentation> between two frames in beamerarticle [closed]
There is a minimal code of what I want to do :
I get the following error :
In my mind, I thought it would the same than :
EDIT : I want to have a document and a presentation. The document works well :
But the presentation doesn't :
I don't want to use [allowframebreaks] because the \uncover command doesn't works with...
I don't want to create two blocks because it will create two blocks in the document
I want all the text in one block for the document and half the text in one block in the presentation and half the text in one other block on one other frame... This in order to be able to use \uncover command
- presentations
- beamerarticle
- 4 Your mode is crossing frame boundaries (not in tune with begin and end ). – jon Commented Jan 10, 2014 at 16:27
- By far the simplest way will be to just include the material for this part twice: once in the scope of \mode<article> and once in the scope of \mode<presentation> with the blocks set up as you wish. – cfr Commented Jan 10, 2014 at 23:38
- @cfr : by doing that, I loose the interest of beamerarticle. – kara Commented Jan 11, 2014 at 16:54
- 1 @kara Well, as jon pointed out, your mode specification can't cross frame boundaries in that way. So you may need to modify your requirements ;). – cfr Commented Jan 11, 2014 at 18:48
Browse other questions tagged beamer presentations beamerarticle .
- Featured on Meta
- Announcing a change to the data-dump process
- Upcoming initiatives on Stack Overflow and across the Stack Exchange network...
- We spent a sprint addressing your requests — here’s how it went
Hot Network Questions
- Difference Between Air Data Computer and ADIRU on the Boeing 737
- Tax Implications of exercising both NSOs and ISOs
- Can my necromancer have this bridge built with those constraints?
- Issues with ICL7660 ICs from eBay - Overheating and Failure
- Is removing the frightened condition the same as making a successful saving throw when it comes to immunity from the effect?
- Why does FindInstance[x>0,x] give 27?
- How did Voldemort know that Frank was lying if he couldn't use Legilimency?
- Which civil aircraft use fly-by-wire without mechanical backup?
- How do you use entropy and enthalpy to explain how chemical reactions come to equilibrium?
- Spirit of the Beehive: painting in the father's study
- How can I merge overlapping faces converted from a text string in geometry nodes, to avoid Z-fighting issues during rendering?
- How much travel is efficient
- What happened to the job market for assembly programmers once high level languages became mainstream?
- What file format was used for binary executables on Motorola 680x0 Macintoshes?
- Does a rocket moving in a circle expel exhaust at a greater velocity?
- Draw a Regular Reuleaux Polygon
- Why do cubic equations always have at least one real root, and why was it needed to introduce complex numbers?
- ミラさん が すんで いた うち を かいました。Who bought the house? Me or Mira-san?
- different color result in principle bdsf
- How do I get Windows 11 to use existing Linux GPT on 6TB external HDD?
- Older brother licking younger sister's legs
- Is it customary to hold off recognition of a state that seceded from another country through a referendum?
- Meaning of "S. Epiph. her. 78" in the Douay-Rheims Bible (1635)
- What's the price of banana?
IMAGES
VIDEO
COMMENTS
This five-part series of articles uses a combination of video and textual descriptions to teach the basics of creating a presentation using the LaTeX beamer package. These tutorials were first published on the original ShareLateX blog site during August 2013; consequently, today's editor interface (Overleaf) has changed considerably due to the ...
I really like the way Keynote and MS Office (and also OpenOffice & similar) support a presentation mode that displays the current slide, the next (and maybe previous) slide, the elapsed and current time, and also any notes attached to the slides on one screen and the presentation itself on the beamer/second screen.. It enables me to give good, professional presentations without having to know ...
Almost any PDF viewer have in the view menu a "Full Screen Mode", "Presentation mode" or something similar,as well as shortcuts as Ctrl+L (Acrobat Reader), F5 (Evince) or Crtl+Shift+P (Okular).Just search in the menu. But if you want start in this mode to avoid delays in front of the audience, you can use the option pdfpagemode=FullScreen of ...
Available font sizes are 8pt, 9pt, 10pt, 11pt, 12pt, 14pt, 17pt, 20pt. Default font size is 11pt (which corresponds to 22pt at the full screen mode). Font types. To change the font types in your beamer presentation there are two ways, either you use a font theme or import directly a font from your system. Let's begin with a font theme:
This five-part series of articles uses a combination of video and textual descriptions to teach the basics of creating a presentation using the LaTeX beamer package. These tutorials were first published on the original ShareLateX blog site during August 2013; consequently, today's editor interface (Overleaf) has changed considerably due to the ...
The minimal code of a LaTeX presentation includes: 1) loading the beamer class package, 2) choosing a default presentation theme and a frame. Here is an example: Copy to clipboard. % Quick start guide. \documentclass{beamer} \usetheme{default} \begin{document} \begin{frame} This is your first presentation!
3. May 2011by tom 2 Comments. Beamer is a LaTeX document class that provides extensive functionality to create presentations. Here, I will only show the basics and after reading this guide you will be able to create a simple presentation in LaTeX. I am aware there are a lot of tutorials available out there and this is not different from any ...
Introduction Code Beamer Features More LATEX Themes Five Theme Categories 1 Presentation (the slide template) 2 Color∗ (color scheme for slide template) 3 Font∗ 4 Inner∗ (how you want bullets, boxes, etc. to look) 5 Outer∗ (how you want the top/bottom of frames to look) ∗ if you don't like the default of the Presentation Theme Example \documentclass[compress, red]{beamer}
Inserting a figure in a Beamer presentation. To insert an image or a figure, we proceed as in LaTeX by using the \includegraphics command. Here is an example: \begin{figure} \includegraphics[options]{path_to_image} \end{figure} In Beamer, we should distinguish between two types of figures:
Beamer automatically converts all files with its document class to presentation mode. The rest of the file simply sets all the portions of the theme to the new lucid theme and then returns the file to the normal mode. Each of the .sty files used to create the theme needs to be put in presentation mode in the same way.
So, we opened an empty LaTeX document, and we want to create a Beamer presentation. The very first thing to do is define our document class as a Beamer document. We do that by adding the following line to the document: \documentclass{beamer} Next, we do the definition of the presentation core information.
In this video series we're going to show you how to create a simple presentation in LaTeX using Beamer. In this first video we show you how to set up your pr...
From section 21.3 Details on Modes in The Beamer class User Guide for version 3.36:. When beamer typesets your text, it is always in one of the following five modes: beamer is the default mode.; second is the mode used when a slide for an optional second screen is being typeset.; handout is the mode for creating handouts.; trans is the mode for creating transparencies.
LaTeX can be used for creating presentations. There are several packages for the task, such as- Powerdot, Prosper, Seminar, etc, however, the Beamer package is the most widely used. It should be noted that Latex produces the presentation as a PDF which can be viewed in fullscreen mode with some pdf reader (e.g. Okular, Evince or Adobe Reader). If you want to navigate in your presentation, you ...
Highlight mode: allows one to draw freehand on the slide currently on screen. Go to slide: You can jump to a selected slide without having to go through the whole presentation. Software pointer: you can emulate a laser pointer with your mouse. Talk time breakdown: the Timing Breakdown menu item displays a breakdown of how much time was spent on ...
Beamer is a LaTeX package for writing presentations. This documents presents a simple introduction to preparing beamer presentations using org-mode in Emacs. This documents assumes that the reader is already acquainted with org-mode itself and with exporting org-mode documents to LaTeX. There are tutorials and references available for both org-mode itself, for LaTeX exporting, and for Beamer ...
There are lots of different predefined presentation themes available for us to use. Here are a few of them. This is the Bergen theme:. This is the Madrid theme:. There are also themes that include navigation bars, for example the Antibes theme:. We could also use a theme that includes a table of contents sidebar, like the Hannover theme:. The Singapore theme is one that includes what beamer ...
Here we see how to create a very basic presentation in LaTeX, using the beamer document class. We see how to use the \frame command to create slides, and in the next tutorial we'll see how to add a title page and more. The example given in the video is also provided here as a template. To get started, click here to open the 'Presentation' example.
It should be noted that these themes apply changes to the global structure of the presentation. Minimal working example. The following code is used to generate the Beamer presentation ... \end{alertblock} \begin{exampleblock}{An example of typesetting tool} Example: MS Word, \LaTeX{} \end{exampleblock} \end{frame} \end{document} 1. Default ...
thus avoiding having to specify the mode every time and avoiding having to specify a new label. MWE example using 3 files follows. Note that, sometimes, the explanatory text included for a given slide in the article version may be a few pages long. %minitest.beamer.tex \documentclass[ignorenonframetext]{beamer} \input{minitest.tex}
Heck, I've seen Microsoft engineers do their PowerPoint presentation in edit mode, because switching to presentation mode would screw up the text positions. Plus, the PDF can easily be put online. And even more: pdflatex with the hyperref package will not just create a dumb PDF, but actually a cross-referenced PDF. As for being static. I never ...
A popular option for creating presentations with LaTeX is the beamer package, which is widely supported through additional themes and add-on packages. To get started with beamer you can try one of these: Overleaf's introduction to beamer; part 3 of our free online LaTeX course; a presentation template listed in our Gallery. powerdot package
Your mode is crossing frame boundaries (not in tune with begin and end ). - jon. Jan 10, 2014 at 16:27. By far the simplest way will be to just include the material for this part twice: once in the scope of \mode<article> and once in the scope of \mode<presentation> with the blocks set up as you wish. - cfr.