How To Get Into Presentation Mode In PowerPoint
Are you looking to take your PowerPoint presentations to the next level?
We will discuss why you should use Presentation Mode, how to enter it, its key features, and how to navigate through your slides.

Key Takeaways:
What is presentation mode in powerpoint.
Presentation Mode in PowerPoint refers to a feature that allows presenters to display their slides in a full-screen view, enhancing the visual impact of their presentation.
This mode is particularly useful during formal presentations, as it eliminates distractions and ensures that the audience’s focus remains on the content being discussed. In Presentation Mode , presenters can navigate through their slides smoothly, interact with their content, and make annotations in real time. One notable advantage of this mode is the Presenter view , where speakers can see upcoming slides, and speaker notes, and even manage time effectively without disrupting the flow of the presentation.
Why Use Presentation Mode in PowerPoint?
Using Presentation Mode in PowerPoint offers numerous advantages, such as creating a more engaging and professional presentation experience for both the presenter and the audience.
Allows for a more engaging and professional presentation
One of the key reasons to use Presentation Mode in PowerPoint is that it allows presenters to deliver a more engaging and professional presentation by providing advanced control over their slides, including features like a laser pointer .
Helps the presenter stay on track and organized
Presentation Mode in PowerPoint aids presenters in maintaining focus, organization, and efficiency throughout their presentation by offering tools like Presenter View, where notes and slide previews can be accessed.
Provides a better experience for the audience
Engaging Presentation Mode in PowerPoint not only benefits the presenter but also enhances the audience’s experience by ensuring a seamless and visually appealing display of the content.
When toggling to Presentation Mode, the display settings undergo a transformation that optimizes the presentation for viewer interaction. The ability to seamlessly swap displays allows the presenter to effortlessly navigate through slides, ensuring a smooth transition between different sections of the presentation. This elegant integration of features not only captivates the audience but also enables a more fluid and engaging delivery of the content. The visual appeal of the slides is enhanced, making it easier for viewers to follow along and grasp the key points being presented.
How to Enter Presentation Mode in PowerPoint?
To enter Presentation Mode in PowerPoint, follow these simple steps: open your presentation, click on the ‘Slide Show’ tab in the menu bar, and select ‘From Beginning’ or ‘From Current Slide’ to start your presentation.
Step 1: Open your PowerPoint presentation
The first step to enter Presentation Mode in PowerPoint is to ensure that your presentation file is open and ready for display.
Step 2: Click on the ‘Slide Show’ tab in the top menu bar
Once your presentation is open, navigate to the ‘Slide Show’ tab located in the top menu bar of PowerPoint to access presentation controls and features like zooming into specific slides.
Once you’re on the ‘Slide Show’ tab, you’ll find a variety of essential controls that aid in delivering a seamless presentation experience. Here, you can click on ‘From Beginning’ to start the slide show from the very first slide. You can choose ‘From Current Slide’ to begin from the slide you’re currently on.
You’ll notice the ‘Slide Show’ tab offers options to toggle various functionalities like accessing presenter view or setting up custom slide shows. This tab is a hub of useful tools that elevate your presentation delivery.
Step 3: Select ‘From Beginning’ or ‘From Current Slide’ to start the presentation
When you opt for ‘From Beginning,’ your presentation will start from the very first slide, whereas selecting ‘From Current Slide’ allows you to start your presentation from the slide you are currently on. This choice depends on whether you want to begin at the start of the presentation or jump in at a specific point.
What Are the Features of Presentation Mode in PowerPoint?
The features of Presentation Mode in PowerPoint are designed to enhance the presenter’s experience and engage the audience, offering functionalities such as Presenter view with notes, laser pointer integration, and slide previews.
Presenter view with notes allows speakers to refer to their talking points discreetly, ensuring a seamless delivery. The incorporated laser pointer feature permits highlighting key areas on slides, directing the audience’s focus effectively. Slide previews provide a comprehensive overview of the presentation flow, aiding in smoother transitions between topics. The option to hide or reveal slides as needed enhances the element of surprise and control during the presentation, captivating the audience’s attention. These combined features transform the presenter’s performance into a dynamic and engaging experience for all participants.
Full-screen display of slides
This feature eliminates distractions and directs attention to the key points of the presentation. By seamlessly transitioning between slides, the flow of information is maintained, keeping the audience engaged throughout the talk. The full-screen view enhances the visibility of multimedia elements, such as images and videos, making them more impactful.
Ability to use a laser pointer or pen tool
Presentation Mode enables presenters to use a laser pointer or a pen tool to highlight key points on slides, enhancing the clarity and impact of their presentation.
Presenter view with notes and slide previews
When utilizing the Presenter view, presenters gain the advantage of accessing notes discretely without them being displayed to the audience, allowing for a more professional and polished delivery. In addition, having a live preview of the upcoming slides enables the presenter to seamlessly transition between points, enhancing the flow of the presentation. Through system preferences or the displays app, customization options such as adjusting the layout to suit individual preferences or toggling between speaker notes and slide previews can be easily configured, providing a tailored experience for each presenter.
Option to hide the presentation controls
By opting to hide presentation controls, presenters can focus on delivering their content without any distractions or overlays obstructing their view. This is especially beneficial when engaging in live demonstrations, showcasing visual content, or utilizing mirror displays for a seamless and professional presentation.
In scenarios where presenters are utilizing a two-monitor setup for advanced display configurations, such as showing notes on one screen while presenting on the other, hiding presentation controls on the main display ensures that only the essential content is visible to the audience, maintaining a neat and streamlined appearance.
How to Navigate Through Slides in Presentation Mode?
Use the arrow keys on your keyboard.
Utilize the arrow keys on your keyboard to seamlessly advance through slides in Presentation Mode, ensuring a smooth and controlled flow of your presentation.
Click on the arrows in the bottom left corner of the screen
Users can enhance their presentation experience by utilizing the fullscreen mode . By entering fullscreen, viewers can keep the focus solely on the presentation content, removing any distractions from the surrounding interface elements. This feature is particularly useful when showcasing detailed slides or when presenting to a larger audience, allowing for a more immersive and engaging delivery.
Use the scroll wheel on your mouse
With its responsive nature, the scroll wheel ensures quick and precise movements, enabling presenters to fluidly transition between slides with the utmost ease.
How to Exit Presentation Mode in PowerPoint?
To exit Fullscreen mode in PowerPoint, you can simply press the ‘Esc’ key, the keyboard shortcut that is universally used to escape full-screen views across various applications. This action will promptly take you out of the immersive mode and back to the regular interface.
Step 1: Press the Esc key on your keyboard
Exiting Presentation Mode using the ‘Esc’ key is a simple maneuver that can swiftly transition you back to your familiar workspace. Once you press the ‘Esc’ key, the fullscreen effect will dissolve, and any Speaker Notes you might have been glancing over will no longer dominate your screen, ensuring a seamless flow as you exit the presentation. This action provides an effortless way to shift the focus back to the general view of your PowerPoint, facilitating a smooth continuation of your usual workflow.
Step 2: Click on the ‘End Show’ button on the top left corner of the screen
Step 3: select ‘end show’ from the drop-down menu.
For a more detailed exit process, users can select ‘ End Show ‘ from the drop-down menu within PowerPoint, ensuring a controlled and comprehensive conclusion to their presentation.

Frequently Asked Questions
How do i enter presentation mode in powerpoint.
To enter presentation mode in PowerPoint, click on the Slideshow tab in the top menu and then select “From Beginning” or “From Current Slide” depending on where you want to start your presentation.
Can I customize the way I enter presentation mode in PowerPoint?
Yes, you can customize the way you enter presentation mode by going to the Slideshow tab and selecting “Set Up Slide Show.” From there, you can choose options such as looping, presenter view, and more.
Is there a shortcut to enter presentation mode in PowerPoint?
Can i use a different display for presentation mode in powerpoint.
Yes, you can use a different display for presentation mode by going to the Slideshow tab and selecting “Set Up Slide Show.” From there, you can choose to present on a secondary monitor or projector.
How do I exit presentation mode in PowerPoint?
Can i add speaker notes while in presentation mode in powerpoint, similar posts, how to add music from youtube in powerpoint, how to present figures in powerpoint, how to write in hindi in powerpoint, how to use edit points in powerpoint, how to join lines in powerpoint, how to insert a row into a table in powerpoint.
Critical PowerPoint Shortcuts – Claim Your FREE Training Module and Get Your Time Back!
How to Present a PowerPoint Slideshow (w/ Shortcuts)
- PowerPoint Tutorials
- Shortcuts & Hacks
- May 11, 2019
There are a variety of ways to start a PowerPoint presention, depending on:
- Where you start your presentation (from beginning or from current)
- Which PowerPoint view you prefer to present in (Slide Show view or Presenter view)
- How comfortable you are with keyboard shortcuts
Why would Microsoft include so many ways to present a presentation? My guess is that everyone learns PowerPoint differently, and has personal presentation styles. The more options you have, the easier your life will be as there will always be a way to start your presentation the way you want to (or jump back into it when you need to).
See all the options below and find the method that works best for you and let the slide show begin !
NOTE: If you are running two presentations side-by-side, each presentation needs to be started as it’s own slide show. To see how to set up two PowerPoint presentations to run side-by-side like this before you start your slide show, read my guide here .
Table of Contents
Start slide show from beginning.

To start a slideshow from the beginning of your presentation using the ribbon, simply.
- Navigate to the Slide Show tab
- Select From Beginning
Selecting From Beginning starts your presentation from the very first non-hidden slide in your presentation, regardless of which slide you are currently inside of your deck.

You can also start your slide from the beginning of your presentation by hitting the Slideshow From Beginning keyboard shortcut, F5 .
Regardless of which method you use, this is the classic way to start your presentation in full screen from your first title slide (regardless of where you are in your slide deck).
Let the slide show begin!
NOTE: To expand your knowledge and learn how to use PowerPoint’s FREE and HIDDEN built-in laser pointer to point things out during your presentation, read my guide here .
Take your PPT skills to the next level
Start slide show from current.

To begin your slide show from the slide you are currently on using the ribbon, simply
- Navigate to the Slide Show tab
- Select From Current Slide
Selecting From Current Slide starts your slide show from whatever slide you are currently on, even if the slide is hidden.

You can also start your slide from the current slide you are on by hitting the Shift+F5 keyboard shortcut.
Because it’s often easiest to catch errors when building your slides in this full screen mode, I highly recommend learning the Shift+F5 shortcut and using it frequently as you build your slides to spot them for errors.
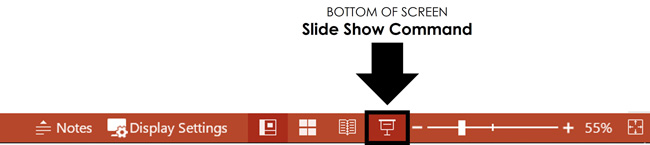
If you don’t want to bother learning the From Current Slide shortcut, you can also start your slideshow by clicking the Slide Show icon at the bottom of your screen.
This is a fantastic way to spot check your slides as you are building them. On top of that, it’s a fast and uncomplicated way to re-start your presentation from where you left off after demoing something on screen.
Start a mini-slide show in PowerPoint
You can also use the following hidden PowerPoint shortcut to run a mini slide show over the top of your current deck.

To run a mini slide show, simply:
- Hold down the Alt key on your keyboard
- With your mouse, click the Slide Show icon
Doing so starts a small slide show of your presentation that you can see below, from the current slide you are on.

Presenter View
The Presenter View is an alternate way to run your presentation in PowerPoint. In this view, your slides are projected on screen, and the details of your presentation are displayed on your computer as pictured below.

The presenter view includes your next (non-hidden) slides that is coming up, your current slide projected on screen, how long you’ve been talking and your speaker notes.

To launch the Presenter View from the beginning of your presentation using your Ribbon, simply:
- Navigate to the Slide Show tab
- Hold down the Alt key on your keyboard
- Click From Beginning
Holding down the Alt key and clicking From Beginning , the Presenter View will launch from the very first (non-hidden) slide in your presentation.
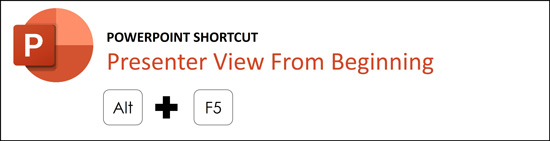
You can also launch the presenter view from the beginning of your presentation at any time by clicking Alt + F5 on your keyboard.
Start Presenter View in PowerPoint From Current Slide

Did you know that you can access different views in PowerPoint by adding keys as you click commands in the PowerPoint ribbon?
To start the Presenter view from your current slide using your Ribbon, simply:
- Hold down the Alt key on your keyboard
- Click From Current Slide
Holding the Alt key and clicking From Current Slide launches the Presenter View from your current slide. So, this is another way you can quickly practice your presentation, see your speaker notes and see what’s coming up next.
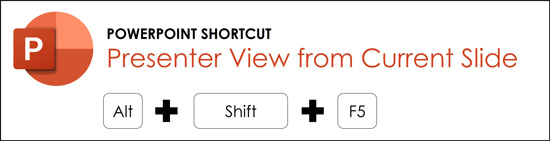
You can also launch the Presenter View from the beginning of your presentation at any time by hitting Alt+F5 on your keyboard.
Showing and Hiding Presenter View
Regardless of which view you start your PowerPoint slide show; you can switch between the two different slide show views without exiting presentation.

To switch between the two slideshow views (while giving your presentation), simply:
- Right-click your slide in whichever presentation view you are currently in
- Select either Show Presenter View or Hide Presenter View
When would you use a feature like this during a presentation? One example is if you want to view your notes without leaving the slide show mode.
NOTE: The letter r for both Show Presenter View and Hide Presenter View is underlined. This means that it is a keyboard shortcut. So, if you want to quickly flip between these two presentation views, you can simply right-click your slide and hit the letter r on your keyboard. Doing so automatically switches the view you are in.
Controlling how your presentation runs
Another way to control how your presentation runs (including the default laser pointer and pen color), is the Set Up Slide Show dialog box.

To open the Set Up Slide Show dialog box, simply:
- Select the Set Up Slide Show command
Doing so, opens all your PowerPoint slide show settings and options as pictured below.
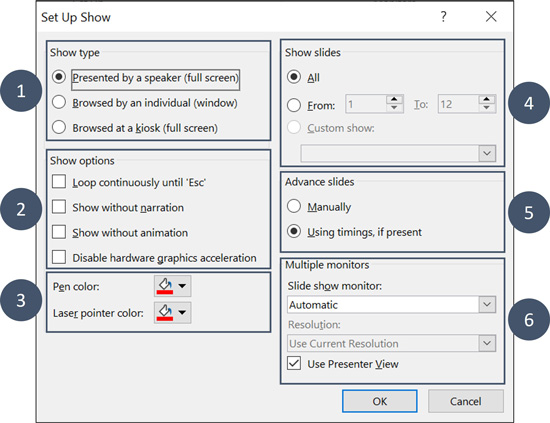
Inside the slide show settings dialog box, you can select:
- How your presentation runs (full screen, window or in kiosk mode).
- Your default pen and laser pointer color options ( see our laser pointer article here ).
- Which slide you want start from, or which slides you want to show. You can also setup a custom show here.
- How your slides progress (manually or using slide timings).
- Which of your computer monitors (or screens) your slide show runs on.
The Set Up Slide Show dialog box is also the secret to running multiple presentations at the same time in PowerPoint. To expand your knowledge and learn how to set this up, read our guide here .
Setup Slide Show SECRET Shortcut

To use the SECRET shortcut to open the Set Up Slide Show dialog box, simply:
- Hold down the Shift key on your keyboard
- With your mouse, click the Reading View icon at the bottom of your screen
This is useful when you need to quickly cycle through lots of PowerPoint presentations and change how those presentations run. Instead of wasting time clicking through the Ribbon, simply hold the Shift key and click the Reading View icon. This is also a friendly conversation starter with a fellow PowerPoint enthusiast at Happy Hour.
NOTE: The color of your Reading View icon might be different than in the picture above, as it is dependent on the Office Theme you selected for PowerPoint.
How to exit a PowerPoint presentation early?

Regardless of how you start your full screen presentation, you can end your presentation at any time by hitting the Esc key on your keyboard.
Hitting Esc immediately takes you out of the PowerPoint presentation mode and back to the normal editing view of your slides, on whatever slide you were last presenting.
Here is how you can use a combination of all the different keyboard shortcuts to spot check and practice your presentation in full screen before you finalize your presentation.
- Hit F5 on your keyboard to start your presentation in full screen from the very first slide in your presentation. You can then use your arrow keys to advance, spot checking your slides for errors.
- When you find an error, simply hit Esc key to return to the normal PowerPoint editing view to fix your slide.
- When you are done, hit Shift + F5 to return the full screen presentation mode from the slide you just updated. You can then continue spot checking your presentation (without having to start over from the beginning).
In this way you can quickly work your way through your slides and practice your presentation, fixing and adjusting your content as you go.
Understanding how to run your presentations is CRITICAL to the success of your presentation. Not only in presenting them live, but also in knowing how to spot check your slides as you build them.
I personally find it easiest to spot check your slides and quickly fix errors by running your presentation in slide show mode (or full screen). The last place you want to discover an error is during your presentation.
Using the commands and shortcuts above, you can quickly start, exit and step back into your slide show. Once you have these commands and features down, you will also look like a whiz during your presentations.
If you enjoyed the depth of this article, you will love our other PowerPoint training courses and free resources. To learn more, visit us here .
🔒 Unlock the PowerPoint Shortcuts Trusted by Industry Leaders KKR, American Express, HSBC, and More!
Join over 114,880 professionals from diverse fields including consulting, investment banking, advertising, marketing, sales, and business development who have supercharged their PowerPoint game with our proven methods.
✅ Customize compelling presentations effortlessly.
✅ Master time-saving techniques for faster deck creation.
✅ Boost your career prospects with top-notch PowerPoint skills.
Get FREE access to the Critical PowerPoint Shortcuts module of our premium training course by entering your name and email below.
DISCLAIMER: PC Users Only!
We respect your privacy and will keep your info safe and confidential.
Related Articles
About the author.

Popular Tutorials
- How to Strikethrough Text (l̶i̶k̶e̶ ̶t̶h̶i̶s̶) in Word, Excel & PowerPoint
- How to Make Animated Fireworks in PowerPoint (Step-by-Step)
- Strikethrough Shortcut (l̶i̶k̶e̶ ̶t̶h̶i̶s̶) for Word, Excel & PowerPoint
- How to Create a Flash Card Memory Game in PowerPoint (Like Jeopardy)
- Keyboard Shortcuts Not Working: Solved
PowerPoint Tutorial Categories
- Strategies & Opinions
- Presentation Design
- Pictures, Icons, Videos, Etc.
- New Features
- Miscellaneous
- Charts & Data Viz
We help busy professionals save hours and gain peace of mind, with corporate workshops, self-paced courses and tutorials for PowerPoint and Word.
Work With Us
- Corporate Training
- Presentation & Template Design
- Courses & Downloads
- PowerPoint Articles
- Word Articles
- Productivity Resources
Find a Tutorial
- Free Training
- For Businesses
We help busy office workers save hours and gain peace of mind, with tips, training and tutorials for Microsoft PowerPoint and Word.
Master Critical PowerPoint Shortcuts – Secure Your FREE Training Module and Save Valuable Time!
⌛ Master time-saving expert techniques.
🔥 Create powerful presentations.
🚀 Propel your career to new heights.
We value your privacy – we keep your info safe.
Discover PowerPoint Hacks Loved by Industry Giants - KKR, AmEx, HSBC!
Over 114,880 professionals in finance, marketing and sales have revolutionized their PPT skills with our proven methods.
Gain FREE access to a full module of our premium PowerPoint training program – Get started today!
We hate spam too and promise to keep your information safe.
You are currently viewing a placeholder content from Facebook . To access the actual content, click the button below. Please note that doing so will share data with third-party providers.
- Slidesgo School
- PowerPoint Tutorials
How to Use the Presentation Modes and the Screen Recording Features in PowerPoint

After designing all the slides for your presentation, the next and last step is presenting in front of your audience. In this new Slidesgo School tutorial, you’ll see how the presenter view works and how you can record your presentation .
Presentation Modes
Presentation modes — set up slide show, presentation modes — record slide show.
- There are different presentation modes in PowerPoint, besides the one you can find at the bottom of the screen.
- To access the presentation modes, go to the Slide Show tab.
- The first two options allow you to start the presentation from the beginning or from the currently selected slide.

- If you choose Present Online, an URL will be generated, which you can then share with your potential online viewers. After clicking this button, a new window will open, displaying info about the Microsoft Office online presentation service and a checkbox to enable remote download for your online audience. To enjoy this service, you need an Office 365 account. When you’re ready, click Connect to generate the URL.
- If you choose Custom Slide Show, you can select which slides to display in your presentation. First, create a new custom slide show and select the slides that you want to display. Then, click Add, enter the name of the presentation and click OK. This new custom presentation will appear on the list. Select it and click Show to begin the presentation.
- In the Set Up group you’ll find options to set up the presentation, hide slides, rehearse your presentation and even record it.
- Click Set Up Slide Show to adjust several settings regarding your presentation. You’ll find more information in the next section of this tutorial .
- If you click Hide Slide, the selected slide won’t show up during your presentation. Hidden slides will appear faded out on the list and their numbers will be crossed out.
- If you click Record Slide Show, you’ll be able to record your presentation from the beginning or from the current slide. We’ll go into detail in the last section of this tutorial.
- There are several checkboxes regarding whether to play narrations, use timings and show media controls.

- In the Monitors group you can choose which screen to display your presentation.
- The last group, Captions & Subtitles, is only available in Office 365. You’ll find options to enable subtitles, which will be generated out of your speech (so you’ll need to have a mic). There are settings to change the language and the position of the subtitles.
- Open your presentation in PowerPoint.
- Go to the Slide Show tab.
- In the Set Up group, click Set Up Slide Show. A new window will open, where you’ll find several options.
- In the top-left corner, under “Show type”, you can choose whether the presentation will be in fullscreen with speaker notes, windowed, or in fullscreen without speaker notes or the menu bar.

- Under “Show options” you can choose whether to show the presentation without narration or animations, or disable the hardware graphics acceleration (for better performance). You can also set the pen and laser pointer color.

- Under “Show slides”, you can choose which slides to show in your presentation. You can select all of them, a specific range or a custom slideshow.
- There are other settings to determine how to advance slides (manually or using timings), what the resolution will be and whether to use the presenter view.
- Click Record Slide Show. From the drop-down menu, select From the Current Slide or From the Beginning.
- A new window will open, along with the presentation in fullscreen mode. At the top-left you’ll find a button to start recording.
Do you find this article useful?
Related tutorials.

How to Use the Presenter View in Google Slides
Google Slides, like PowerPoint, has different presentation modes that can come in handy when you’re presenting and you want your slideshow to look smooth. Whether you’re looking for slides only, speaker notes or the Q&A feature, in this new Google Slides tutorial, you’ll learn about these and their respective settings. Ready? Then let’s explore the presenter view!

How to Download Google Slides Templates
When preparing a presentation, many people start panicking because they realize how much time it will take to edit each and every slide. Creating them from scratch, filling them in, looking for pictures, moving the elements...How stressful! But there is a solution that saves you a lot of time. We're sure that you've browsed the internet for templates, or basically, pre-established designs and elements, that can be downloaded for free and can be edited to your liking. Are we right? Then, we have some good news for you!

Discover our collection of printable templates
With the advance of technology, printing has become something that is no longer a necessity. Smartphones have made the paper format less and less frequent, but there are still certain cases in which having physical resources is much more convenient. Whether it's for taking notes, handing out assignments, making worksheets or handing out business cards or invitations, it's necessary to print your customized designs.From now on, in every Slidesgo printable presentation that you download, you will find the instructions for printing on the third slide. Depending on the style, colors or format of each presentation, we will tell you if you can...

How to Add Superscript and Subscript in Google Slides
Let’s take the most famous formula: E=mc^2, Einstein’s relativity equation. It wouldn’t be the same if it was E=mc2, right? Okay, yes, some people write it like that because it’s very famous and it won’t be misunderstood. But technically… It can! This is where the sophistication of superscript or subscript enters the room! Do you know how to write them in equations, copyright brands or even footnotes in your presentations? Let’s figure out how.
How to Set Presentation Mode in Windows 11
How do you set presentation mode in windows 11.
Presentation mode in Windows 11 is a very useful way to ensure the user experience is the best possible. Helps keep programs, applications and files organized easily for best results. If you want to set up presentation mode for Windows 11, follow these simple steps.
Step 1: Open Control Panel
To access the control panel, open the Start menu and click the Control Panel icon.
Step 2: Adjust the parameters
At the top of the Control Panel window there is an option called “Presentation Settings”, click on it. In this window you can modify taskbar settings, desktop settings, thumbnails, and more.
Step 3: Customize the screen
To customize the screen to make it look better, click the “Customize Screen” option at the bottom of the window. This option will give you a number of options to choose from, such as the screen background theme, color layout, and thumbnail size.
Step 4: Save the changes.
Once you have made the desired changes, remember to click the “Save Changes” button so that the changes are saved. This way, the settings will remain saved even when you restart your computer.
Examples of Presentation Mode:
- Wide taskbar : This option will add a second row to the taskbar to allow you to view more apps at the same time.
- Large desk folders : This option will set all desktop folders and files to a larger thumbnail size so you can see them in greater detail.
- Transparent miniatures : This option makes app and file thumbnails easier to identify by displaying them as a transparent background.
Recommendation:
It is always recommended that users configure presentation mode every time they install Windows 11, as this will make the system better suited to their needs and easier to use.
If you want to change the settings at any time, you can always reopen the Control Panel and make the necessary changes.
Presentation mode settings in Windows 11
Windows 11 includes specific presentation modes to help users beautifully present their content. This feature offers many useful options for setting aspects such as the appearance and behavior of the projector that allow you to optimize your presentations. Below we show you how to configure presentation mode in Windows 11.
Step 1: Open the Settings Menu
Setting up presentation mode in Windows 11 begins by opening the Settings Menu. To do this, press the key Windows + I Next, click on “System” and then on the “Projection” section.
Step 2: Set Presentation Mode
Now, click on the “Presentation Mode” button to open a new window with configuration options.
In this window there are several possible configurations:
- Design: here you can set the appearance of what is displayed on the screen.
- Advanced: In this section there are options related to the behavior of the projector. For example, you can configure whether you want the toolbar to be automatically displayed on the screen or whether you want it to be hidden.
- Background: From here you can set a background for your presentation. You can choose between a solid color or a default image.
Once you're done, click the "Apply" button to save your changes.
Example: Setting up a Presentation Background
As an example, we are going to set up a presentation background with an image. To do this, open the presentation mode settings window and click on the "Background" section. Select the “Image” radio and click the “Browse” button to find the image you want to use. Next, click the “Apply” button to save the changes and you will see your presentation background ready to use.
Step 3: Save your Presentation
Once you've finished setting up your projector, it's time to save the presentation to make the changes permanent. To do this, go back to the presentation mode settings window and click the “Save” button to save the changes.
The process to configure the presentation mode in Windows 11 is simple and fast, with these simple steps you can optimize your content to present it professionally.
You may also be interested in this related content:
- How to Update Whatsapp on Android
- Wombo For Computer
- How to Play Cards Against Humanity online
Unsupported browser
This site was designed for modern browsers and tested with Internet Explorer version 10 and later.
It may not look or work correctly on your browser.
- Presentations
How to Present a PowerPoint Slideshow With Presenter View (+ Video)
- Bahasa Indonesia
Giving a presentation can be intimidating, even to seasoned speakers. Learn how to use PPT Presenter View , which is your private cockpit view.

This is a view that you'll see on your own screen while giving a presentation using PowerPoint. While the audience will see the presentation on the projector or big screen, you'll have your own private view on a second monitor.
This feature is like a cockpit for giving presentations. You'll keep all the most important controls front and center while presenting.
PowerPoint Presenter View gives you at least four essential tools that make presenting your slideshow more comfortable:
- In Presenter View , this display keeps your speaker notes in view to reference while speaking.
- You'll see a thumbnail for the next slide to begin preparing for your next key point, and you can jump to other slides quickly.
- A timekeeping tool helps you track how long you've been speaking to ensure you don't overrun any time limits.
- Drawing tools allow you to add illustrations on screen while presenting to draw attention to specific parts of your slides.
You need every advantage you can get when it's time to give a presentation. In this tutorial, you'll learn how to make the most out of Presenter View in PowerPoint.
In this tutorial, I'm going to focus on an underused feature of PowerPoint: Presenter View.
How to Present a PowerPoint Slideshow With Presenter View (Video)
In this video, I'll teach you how to get started with Presenter View in PowerPoint. You'll learn how to enable Presenter View and then use the tools inside of it. I'll teach you to use the special Presenter View features to keep your notes and tools close, that way you can present more confidently.

Keep reading to find out more about using Presenter View in PowerPoint and the best features to try out.
Turn On PowerPoint Presenter View
In PowerPoint for macOS, simply click on Presenter View on the Slide Show tab to kick off the presentation in Presenter view .

You'll see the Presenter View interface on one screen. The other display will show the "audience version" of the presentation. In other words, it shows what they'll see on a projector screen, or even their own display.
How to Make the Most of Presenter View
Let's dive into some of my favorite features that Presenter View brings to the table. Using even one of these is reason enough to try out Presenter View in PowerPoint. But when you combine them together, it's a no-brainer.
This is how to use Presenter View on PowerPoint. But the real question is why to use presenter mode PowerPoint. The reason is twofold:
- It helps your slides look better.
- It keeps you organized.
You can share neat, uncluttered slides that aren’t packed with content. That’s because you can keep your supporting content to yourself.
For this Presenter View in PowerPoint tutorial, we’ll be using the beautiful Tezia - Corporate PowerPoint Template from Envato Elements. Tezia has 40 stunning slide layouts. Each one works great in PowerPoint Presenter View . Download it today and follow along.

Now, let’s learn how to use Presenter View in PowerPoint fast!
1. Speaker Notes
Speaker Notes is a top feature that works best with Presenter View in PowerPoint. Many presenters will spend time filling out cards or scribbling ideas onto paper. But it's much easier to add them directly into your PowerPoint file.

To add Speaker Notes to a presentation, start off by working in Normal view on PowerPoint's View tab. At the bottom of your screen, you can click on Notes to open up the Speaker Notes section and add your own text.

Speaker Notes and Presenter View go hand in hand. When you're in Presenter View , your speaker notes will show up on the right side of your screen. You can adjust the text size with the icons near the lower right corner.

Speaker Notes show how to use Presenter View in PowerPoint to your advantage. They help keep you on track as you present on your key topics.
Speaker Notes are important because they avoid the potential of you reading off your slides. Why? Because you don’t have to commit every key detail to memory! You can engage with your audience, all while referring to pre-built notes that they’ll never see.
2. Slide Previews
Let’s face it: you might be sharing a presentation with dozens of different slides inside. When you know how to put PowerPoint in presentation mode, you can get a sneak preview as you present. It’s easy to forget exactly how you sequenced slides together.
With Presenter View , you can stop guessing. That’s because you’ll always have a preview of the next slide in your deck.
As you work in Presenter View in PowerPoint, notice the slide thumbnail in the upper right corner. It’s labeled Next Slide , and that’s exactly what you’re seeing. This helps you transition smoothly from slide to slide. Often, you may set up some closing narration on one slide to help introduce the next. Guesswork and delays are gone, thanks to using Presenter View in PowerPoint.
Knowing how to present on PowerPoint involves keeping slides in a logical order. That means that on occasion, your next slide should no longer be the next one in line. Presenter View helps you handle this situation.

Across the bottom of the view is a filmstrip of every slide’s thumbnail. You can scroll through it and click on any slide to jump directly to it.
This way, you can jump around in your slide deck without your audience ever knowing it! This helps you drive the flow of your slide deck in real time, with no interruptions or distractions.
3. Drawing Tools
Like sports commentators do during a broadcast, you can use drawing tools to draw on top of your slides. This is perfect if you've got a tablet for example, but the feature works well for computer users with a mouse too.
To enter the drawing tools, you can click on the icon shown in the PowerPoint screenshot below. This turns on the tools you need to add highlights and annotations to the selected slide.

Annotations are great if you want to call out key details in real time. You can highlight, mark up, or circle any element on a slide. This is how to use Presenter View in PowerPoint in a live environment. You can use it to capture audience attention and focus on details as your narrative flows.

Choose from tools like the Laser Pointer, Pen, and Highlighter to add annotations to a slide. A laser pointer is a digital version of the popular tool used to draw attention to parts of a slide.
The Pen and Highlighter tools will actually add new marks on top of the slide that your audience will see.
4. Timekeeping
This feature is straightforward to use, but I can't stress enough how helpful it is. Nothing is worse than giving a presentation and realizing that you used only half of the time. Or that you went far over the time limit.
In Presenter View , you'll see a feature that keeps time above the current slide thumbnail. You can pause this feature with the Pause button or reset the counter with the icon on the far right. But often, it's best to leave it running. This keeps you on pace, on track, and focused on your message.

Plus, this is how to put PowerPoint in presentation mode to work for you. At a glance, you can see how much time you have left. This may encourage you to speed up your dialogue. Or it may afford you extra time to expound on a key point or new supporting detail.
I can think of many times when this feature would have been a big help during presentations in college. When you're graded or judged based upon your runtime, it's a great idea to keep that time total in view.
5. Navigate Effortlessly with Keyboard Shortcuts
Presenter mode PowerPoint presentations are easy to navigate. That’s because they work well with a variety of keyboard shortcuts. By using these shortcuts, you can see how to present on PowerPoint efficiently.

Presenter View offers an array of keyboard and mouse shortcuts that you can use as you present. Again, your audience won’t notice this.
For a look at them, click on the Tips button in the upper left corner of Presenter View . You’ll see a complete cheat sheet of shortcuts listed. Refer to it often and use these tips to navigate through your slides.
The Best Source for Stunning PowerPoint Templates (With Unlimited Downloads)
Envato Elements is the best place to find stunning PowerPoint templates in 2022 . For a flat, monthly rate, you can download as many PowerPoint templates as you want. Plus, Elements offers an array of other creative content. This includes stock photos, music, fonts, and more.

When you’re using Presenter View in PowerPoint, you need templates that look their best. It’s tempting to turn to free options. But premium templates from Envato Elements are always your best bet.
Why? They’re designed by creative experts with you in mind. You simply fill in the blanks to add your own content. You don’t have to spend time and effort designing slides from scratch. This gives you even more time to craft a compelling narrative to wow any audience.

With premium Envato Elements templates, you’ll unlock an array of features. Each of these helps you shine when you use presenter mode PowerPoint features:
- easy-to-edit text placeholders
- photos and illustrations throughout
- charts and infographics
- pre-built animations
As you learn how to put PowerPoint in presentation mode, you’ll see how all these benefit you.
Learn More Powerful PowerPoint Tools
We can use tools like Presenter View to reduce the anxiety that comes along with giving presentations. It may still take time to prepare and feel confident about your presentation. But Presenter View keeps those key features in easy view so that you aren't scrambling for written notes.
Check out these tutorials to learn more about giving presentations using Microsoft PowerPoint :

Download Our eBook on Making Great Presentations (Free PDF)
We have the perfect complement to this tutorial, which will walk you through the complete presentation process. Learn how to write your presentation, design it like a pro, and prepare it to present powerfully.
Download our eBook: The Complete Guide to Making Great Presentations . It's available for FREE with a subscription to the Tuts+ Business Newsletter.

Start Using Presenter View Today
You just learned how to use Presenter View in PowerPoint. You're the pilot, and now you're in the cockpit of your presentation plane! The features you saw in this tutorial will keep everything you need in view while you give a presentation.
Don't forget to launch your presentation in presenter mode PowerPoint mode. That means you'll always have your slide cues, notes, and more while you speak to an audience.
Editorial Note: This post has been updated with contributions and a video from Andrew Childress . Andrew is a freelance instructor for Envato Tuts+.

At the edge of tweaking
Advertisement
Command Line Options
The Presentation Mode feature is implemented via an executable file, presentationsettings.exe .
By simply running it, you will open the Settings dialog shown above.
It supports the following command line options:
This command will directly enable Presentation Mode.
The next command will disable it:
Winaero greatly relies on your support. You can help the site keep bringing you interesting and useful content and software by using these options:
If you like this article, please share it using the buttons below. It won't take a lot from you, but it will help us grow. Thanks for your support!
Author: Sergey Tkachenko
Sergey Tkachenko is a software developer who started Winaero back in 2011. On this blog, Sergey is writing about everything connected to Microsoft, Windows and popular software. Follow him on Telegram , Twitter , and YouTube . View all posts by Sergey Tkachenko
4 thoughts on “Enable Presentation Mode in Windows 10”
Does this also prevent reboots from Windows 10 crappy updates?
I doubt that
I generally use the “pause updates” feature the day before I give a presentation. It should stop windows doing any updates/reboots while you’re delivering a talk :)
Sadly, it seems that the presentationsettings.exe is only available on Windows 10 PRO, not on home.
Leave a Reply Cancel reply
Your email address will not be published. Required fields are marked *

Privacy Overview
Top PowerPoint Keyboard Shortcuts to Present Like a Pro!

From business consultants to sales reps and entrepreneurs, anyone who works with presentations can benefit from knowing some PowerPoint keyboard shortcuts. Today, I’ll show you 20+ handy commands to help you shine before and during your presentations.

But First, What Are PowerPoint Shortcuts?
PowerPoint shortcuts are keys or keyboard combinations that quickly allow you to perform an action in the program . Otherwise, you’d have to use your mouse or navigate through multiple menus and toolbars until finding the right command. In other words, PowerPoint keyboard shortcuts help you reduce steps and optimize your experience when working in a presentation.
Now, let’s see which are the top shortcut keys you should know:
Useful PowerPoint Keyboard Shortcuts for Last-minute Changes
Even the most experienced speakers find themselves making last-minute changes in their slides' appearance or presentation structure. It’s just part of the presenter’s life. But there’s no reason to panic, the following keyboard shortcuts will give you a hand in those moments.
PowerPoint Shortcuts for a Quick Formatting
1) use “alt+w+m” to enter slide master view.
For last-minute changes in the layout of your presentation, your slide master is the place to go.

Let’s say you want to replace the logo in your footer, change the color palette, or replace the font of your headlines. When you have only a few minutes available before presenting, this seems like an impossible task but here’s the secret: Anything that you put in your slide master will apply to all your slides so that you don’t need to go fixing them one by one.
If you’re not familiar with this type of slides, we’ve got a complete guide for you on how to create and use your master slides in PowerPoint .
2) Use “Shift” to keep objects in proportion
Have you ever resized a circle in PowerPoint and it ended up looking like an oval? When you resize by sight it’s hard to obtain perfect symmetry but the “Shift” key can help with that.
Simply press and hold “Shift” while resizing your elements. This comes in handy to make your objects bigger or smaller without losing their proportions. It works for shapes, images, and any other object in your slides.
3) Align your text
Alignment is essential to provide a clean and professional aspect to your documents. However, as formatting is one of the last steps in the making of a presentation, people tend to forget it. If this happens to you often, these are the PowerPoint shortcuts you need for a quick text alignment before starting your slide show:
- Use “Ctrl + J” to justify your text
- Press “Ctrl+E” to center the text
- Use “Ctrl+L” for left alignment
- Press “Ctrl+R” to right-align your text.
4) Use F7 to check your spelling
Most people don’t know this but you can actually check your presentation’s spelling in PowerPoint. It’s pretty simple: Once you enter the last words in your slides, press F7 . A new section will appear at the right of your screen showing misspelled words and giving you some options you can replace them with.
In some cases, you might need to try with “Fn + F7” to activate the check spelling shortcut.
5) Fix Up your Slides
Not exactly a PowerPoint keyboard shortcut but definitely a hack that will save you time and effort in the making of your slides.
If you work with presentations constantly, you’ll be happy to learn that you don’t need to design them yourself. You can have your deck quickly polished (or completely redesigned!) by professional PowerPoint designers . Check out some examples from the 24Slides team:
Want to get results like these? Learn more about the 24Slides’ presentation design services .
PowerPoint Keys To Edit Your Presentation Structure
1) use “ctrl + m” to insert a new slide.
Sometimes new information appears right before the big moment and you need to quickly update your presentation. Whenever you find yourself in this situation, select a slide and press “Ctrl+M'' to insert a new one. You’ll have a fresh title slide to keep adding content.
2) Use “Ctrl + D” to duplicate
But if you want to have similar slides, use “Ctrl + D” to duplicate them. This way, instead of working from a blank slide, you’ll be able to use one as your base and replace as much information as you want. This PowerPoint shortcut works for slides and objects alike.
3) Move slides
Arrange your presentation structure by using “Ctrl + Up arrow” to move a slide up or “Ctrl + Down arrow” to move it down.
I find this PowerPoint shortcut very useful especially when working with long presentations. Here’s why: Dragging slides one by one makes the thumbnails pass quickly and if you have 30+ slides, you’ll need more than a few seconds to land your slide in the spot that you want. Save yourself some time with this simple trick.
PowerPoint Shortcut Keys to Use During a Presentation
There are other PowerPoint keyboard shortcuts that only work in the slide show mode. We’ll go from my favorite basic commands to some advanced keyboard shortcuts to help you manage your presentation like a pro.
Basic PowerPoint Commands
1) use f5 to start a slideshow.
Done editing and ready to present? Press F5 to start your Slideshow from the first slide.
2) Use “Shift + F5” to start from the current slide
If you want to start from a specific slide, press “Shift+F5” . Let’s say you made a pause in your presentation to review some slides and want to pick up where you left off. Just select the last slide you were at and use this shortcut. It will save you tons of time because you won’t have to go through all your slides again.
3) Zoom in and Zoom out
Whenever you want to show an area of your slide in detail, press “+” to zoom in. You’ll be able to get a closer view of any element in your slide just by dragging the pointer. And when you’re finished zoom out with “-”
Advanced PowerPoint Shortcuts to Wow your Audience
1) annotate in your slides.
Did you know that you can mark up your slides during a live presentation? Yes, PowerPoint has some secret tools that help you grab and hold your audience’s attention while on a slideshow. And here are the shortcuts you need to activate them:
- Use “Ctrl + P” for a Pen Tool
You’ll be able to draw free lines and scribble across your slide. The PowerPoint pen tool comes in handy when you want to explain a process or show how to get from one point to another.
- Use “Ctrl + i” for a Highlighter
The PowerPoint highlighter pen uses a yellow color to help you annotate and draw attention to your slide’s key points.
- Use “Ctrl + L” for a Laser
A laser pointer is always useful to highlight specific aspects of your presentation. But don’t worry if you didn’t bring yours, PowerPoint lets you turn your cursor into a cool laser pointer.
- Extra: The PowerPoint Eraser tool
Now that you know how to annotate in your presentation, it’s fair that I share with you how to erase the marks you made in your slides. Use “Ctrl + E” to activate the Eraser tool. And if you want all the marks to vanish at once, just press the E key .
2) Show a black or white screen
Sometimes you’re elaborating on a concept and want people to focus all their attention on you and not your slides. In those moments, use the key “B” to change the screen to black during a slideshow or “W” to turn it white. You can go back to your slides by pressing the same key again.
3) Use “G” to display all the slides
You’ll open a nice visualization of all your slides so you can easily go back and forth through your presentation in a matter of seconds. Try it and check your audience’s reaction!

How to See Your Keyboard Shortcuts in PowerPoint?
I know. There are so many PowerPoint shortcuts that it’s impossible to remember them all. But that shouldn’t be a problem for presenters like you because PowerPoint offers some help.
A) In Presentation Mode
Whenever you need to check how to use keyboard shortcuts during your presentation, press F1 . A slide show help dialog box will display a list of your PowerPoint shortcuts available.

B) In Normal View
There are other types of shortcuts in PowerPoint called Key Tips or Access Keys which allow you to navigate through the ribbons and main menu. To activate them, press Alt or F10 .

C) Help Box
If you want to get the full list of PowerPoint shortcuts and further information about them, use the Help box. Just press F1 and search for “shortcuts”.

Note that this option only works when you’re connected to a WiFi network.
INFOGRAPHIC: Top PowerPoint Keyboard Shortcuts Every Presenter Should Know
The 24Slides team created this incredible infographic that summarizes all the PowerPoint keyboard shortcuts we’ve seen.

Save it, share it, and don’t forget to practice before your live presentation!
Create professional presentations online
Other people also read

6 Presentation Styles of Famous Presenters
How to create and deliver a powerful presentation introducti...

The seven worst presentations of all time and why they went ...

How to Enable or Disable The Presentation Mode Settings in Windows 11/10
Presentation Mode is a feature in Windows 10 designed to help people carrying their Presentations on their portable devices. The User can specify certain settings like volume to be set, screensaver to be used, desktop background to be in place in Presentation mode and when the Presentations mode is enabled, these changes are done to the OS.
- Only people with Admin rights can enable or disable the Presentation Mode Settings
- This feature is only available in Windows Pro, Enterprise, and Education versions.
In this article, let us see how to enable or disable Presentation Mode Settings in Windows 10 in two different ways.
Method 1: Using Registry Editor
Step 1: Open the Run Dialog using the keys Windows+R
Step 2: Type regedit and hit Enter

Step 3: In the UAC window that opens asking for permissions, click on Yes
Registry editing can harm the system even with the slightest mistake. It is advised to take the backup of the registry before proceeding. To take a backup, In the Registry Editor–> Go to File –> Export –> Save your Backup file .
Step 4: In the Registry Editor window, on the search bar at the top, copy-paste the following location
Step 5: If you cannot see the PresentationSettings folder, create one, right-click on Policies, choose New > Key.
Step 6: Name the folder as PresentationSettings

Step 5: Open the PresentationSettings folder.
Step 6: On the right-hand side, right-click anywhere on the empty area.
Step 7: ChooseNew > DWORD(32-bit) Value.

Step 8: Name the newly created Key NoPresentationSettings
Step 9: Double-click on the key to change its value.
Step 10: To Turn Off or disable the Presentation mode settings, Set the value to 1 click OK
Step 11: If you want to enable the settings , set the value to 0 .
Step 12: Restart the System.
Method 2: Using Group Policy Editor
Step 1: Open the Run Command Window using Windows+R.
Step 2: Type gpedit.msc and hit Enter.
Step 3: In the Local Group Policy Editor window that opens, from the left-hand side, navigate to the following location. Simply double-click on the section to expand the selection.
Step 4: On the right-hand side, double-click Turn off Windows presentation settings.
Step 5: To disable this setting, tick on the Disabled option.
Step 6: To Enable, click on the Enabled option.
Step 7: Finally click on the Apply button, followed by OK.
NOTE: Ensure that this setting is applied. If not,
1. Open Run Dialog using Windows+R
2. Type cmd and hold the keys Ctrl+Shift+Enter to open a command prompt in Admin mode.
3. Type the below command and hit Enter
Step 8: Restart your System.
That’s All
We hope this article has been informative. Thank you for Reading.
Kindly comment and let us know which fix helped you solve the issue.
- How to Enable / Disable Airplane Mode in Windows 11
- How to Enable / Disable YouTube Restricted Mode in Edge
- How To Enable Or Disable Performance Mode In Microsoft Edge
- How to Enable Developer Mode in Windows 11
- How to Use and Enable Focus Assist Mode on Windows 11
- How to Enable Dark Mode for Calculator App in Windows 11
How-To Geek
How to start a powerpoint slideshow.

Your changes have been saved
Email Is sent
Please verify your email address.
You’ve reached your account maximum for followed topics.
How Can You Protect Your Car, Devices, Keys, and Cards from Wireless Hacks?
6 quick access toolbar must-haves in microsoft excel, microsoft’s office web apps have a fresh new design, quick links, start a slideshow in powerpoint's desktop app, start a slideshow in powerpoint's web app, start a slideshow in powerpoint's mobile app, key takeaways.
To start a PowerPoint slideshow on your desktop, open your slideshow and click "Start Slide Show" in the "Slide Show" tab. If you're using the web app, select "From Beginning" in the "Slide Show" tab. On mobile, simply tap the Monitor icon at the top of your screen.
There's nothing quite like finishing a presentation after spending hours getting it just right. Now, show off your hard work by starting your Microsoft PowerPoint slideshow on desktop, web, and mobile using the methods below.
Related: How (and Why) to Start Microsoft PowerPoint from the Command Prompt
To play a slideshow in PowerPoint's desktop app, all you have to do is click an option or press a shortcut on your keyboard .
Start the process by opening your presentation with PowerPoint. Then, in the app's ribbon at the top, select the "Slide Show" tab.

In the "Slide Show" tab, from the "Start Slide Show" section, choose "From Beginning" (or press F5). Now your presentation will play from the very first slide.
If you'd like to start the slideshow from your current slide, choose the "From Current Slide" option. Alternatively, press Shift+F5 on your keyboard.

While your presentation is playing, you can perform various tasks, like moving to the next slide or ending the show. You can reveal these options by right-clicking anywhere on the slide.

Alternatively, you can use the following keyboard shortcuts while viewing your slideshow:
- Spacebar or Right Arrow Button: Go to the next slide in the presentation.
- Left Arrow Button: Go to the previous slide in the presentation.
- Esc: End the show.
- W: Hide your current slide and display a white screen. Press the same key again to bring back the slide's content.
- B: Hide your current slide and display a black screen. Revert back to the slide's content by pressing the same button.
- Ctrl+Left Mouse Button: Activate the laser point tool to point at things in your slides.
- Ctrl+P: Launch the pen tool to annotate your slide's content during your show. You can choose if you'd like to keep these annotations when you end the show.
- Ctrl+i: Access the highlighter tool to highlight items in your slides.
If you'd like to jump to a specific slide while presenting, press that slide's number on your keyboard and hit Enter. For example, press 12 and hit Enter to access that slide quickly.
To access the Presenter view, where you can see the upcoming slides and other options, right-click anywhere on your slide and choose "Show Presenter View."

With these options, you can start a slideshow and have it play exactly how you want.
To play a slideshow on the web, launch your preferred web browser and access PowerPoint on the web . Then, open your presentation.
From PowerPoint's ribbon at the top, select the "Slide Show" tab.

In the "Slide Show" tab, start your slideshow from the first slide by clicking the "From Beginning" option. To have your show play from your current slide, choose "From Current Slide."

Your presentation is now playing.
To reveal the options for moving slides, annotating items, and using Presenter Coach , bring your cursor to your screen's bottom-left corner. Then, click the appropriate icon.

Related: How to Practice Your Presentations with PowerPoint's Presenter Coach
To start a slideshow in the PowerPoint mobile app , launch the app on your phone and open your presentation.
On the presentation screen, at the top, tap the Monitor icon to play the slideshow.

Your presentation has now begun.
To move to the next slide, swipe left on your screen. To go to the previous slide, swipe right.

You can reveal PowerPoint's presentation options, like annotation and black screen tools, by tapping at the top of your presentation. Then, choose the option you'd like to use.

And that's it. Happy presenting!
Want to learn a few tips to help you make the best PowerPoint presentations ? If so, check out our guide.
Related: 8 Tips to Make the Best PowerPoint Presentations
- Microsoft Office
- Microsoft PowerPoint
Stack Exchange Network
Stack Exchange network consists of 183 Q&A communities including Stack Overflow , the largest, most trusted online community for developers to learn, share their knowledge, and build their careers.
Q&A for work
Connect and share knowledge within a single location that is structured and easy to search.
Enable Presentation Mode permanently on Windows
I want to enable the presentation mode forever on my Windows 10 device. When I turn it on, it again turns off after reboot or sign out. I have also tried to set the values through registry, but seems not to be working.
HKEY_CURRENT_USER\Software\Microsoft\MobilePC\AdaptableSettings\SkipBatteryCheck > 1
HKEY_CURRENT_USER\Software\Microsoft\MobilePC\MobilityCenter\RunOnDesktop > 1
The main reason why I want to enable it is, it's an unattended PC and I have tried all power settings to turn the sleep off. But after some time it goes to sleep mode.
- power-management
- So, from what I understand, you don't need to enable windows presentation mode, you need to prevent the PC from sleeping right? – Genesis_GDK Commented Jun 6, 2017 at 13:45
- Yes. Since I tried all other option that I know and those are not working. But this presentation mode works well unless the device is rebooted. – Gaurav Commented Jun 6, 2017 at 14:52
2 Answers 2
In order to enable presentation mode forever, I suggest you create a startup script to invoke it.
To control the presentation settings, you can call the executable directly, followed by the arguments. Example:
or, to stop:
If the first line is scheduled to run at boottime then Presentation mode will always be activated.
- Can you confirm that this works for you? – Genesis_GDK Commented Jun 11, 2017 at 11:24
Your main goal from what your question shows, is to prevent your system from switching off the screen or hibernating or anything like that. In which case, if you have tried disabling all the energy saving features that you know of, and the PC is still hibernating, then I suggest you use Caffeine. It costs nothing and it's adware free.
Caffeine works in a rather simple way to try and prevent your computer going into standby, the screen from shutting off or even the screensaver kicking in. This is to simulate a key press once every 59 seconds so Windows is fooled into thinking you’re using your computer when in fact, you aren’t.
Get it from zhornsoftware, and the link below: zhornsoftware.co.uk/caffeine/index.html#download
- Yes, I have replicated same thing in my application (which runs always on device) what Caffeine does, triggering F15 key press event every 50 seconds. Will have to wait till 24 hours to make sure that it's working. Isn't there a way to enable the presentation mode forever? – Gaurav Commented Jun 6, 2017 at 14:55
You must log in to answer this question.
Not the answer you're looking for browse other questions tagged windows windows-10 sleep power-management iot ..
- Featured on Meta
- We spent a sprint addressing your requests — here’s how it went
- Upcoming initiatives on Stack Overflow and across the Stack Exchange network...
Hot Network Questions
- Is ElGamal homomorphic encryption using additive groups works only for Discrete Log ElGamal? What about EC ElGamal?
- The rise and fall of oval chainrings?
- What is the maximum velocity possible for autofocus (focusing speed) on a Canon 5D Mark II
- How can I watch a timelapse movie on the Nikon D7100?
- a question about silicon diode
- What if Mars is the same size as Earth with an atmospheric pressure of 1 atm?
- Why does black have a higher win rate in Exchange French?
- Finding the Zeckendorf Representation of a Positive Integer (BIO 2023 Q1)
- How can I power both sides of breaker box with two 120 volt battery backups?
- If someone clearly believes that he has witnessed something extraordinary very clearly, why is it more reasonable to believe that they hallucinated?
- What is the computational scaling of DFT energy vs gradient vs Hessian?
- RAID 0 or not to RAID at all
- Why does Google Maps only rotate 90º but not 180º when I rotate my iPhone?
- Sitecore Scriban is not rendering fields when using dynamic field values
- MOSFET Datasheet Confusion
- Why the number of bits or bytes is different for a folder that has been copied between two external drives?
- Proof by Contradiction: "Bad Form" or "Finest Weapon"? Reconciling Perspectives
- Have human infant foreskins been put into commercial cosmetic products?
- Is "sinnate" a word? What does it mean?
- Are there dedicated research facilities in the USA?
- LilyPond: how do I visualize Bezier control points?
- Fill the grid subject to product, sum and knight move constraints
- What Does Feynman Mean When He Says Amplitude and Probabilities?
- How to arrange three identical habitable planets in one solar system in similar or, if possible, same orbit?
European Microsoft Fabric Community Conference
The ultimate Microsoft Fabric, Power BI, Azure AI, and SQL learning event: Join us in Stockholm, September 24-27, 2024. Save €200 with code MSCUST on top of early bird pricing!
- Power BI forums
- News & Announcements
- Get Help with Power BI
- Report Server
- Power Query
- Mobile Apps
- DAX Commands and Tips
- Custom Visuals Development Discussion
- Health and Life Sciences
- Power BI Spanish forums
- Translated Spanish Desktop
- Training and Consulting
- Instructor Led Training
- Dashboard in a Day for Women, by Women
- Community Connections & How-To Videos
- COVID-19 Data Stories Gallery
- Themes Gallery
- Data Stories Gallery
- R Script Showcase
- Webinars and Video Gallery
- Quick Measures Gallery
- 2021 MSBizAppsSummit Gallery
- 2020 MSBizAppsSummit Gallery
- 2019 MSBizAppsSummit Gallery
- Custom Visuals Ideas
- Upcoming Events
- Community Blog
- Power BI Community Blog
- Custom Visuals Community Blog
- Community Support
- Community Accounts & Registration
- Using the Community
- Community Feedback
Find everything you need to get certified on Fabric—skills challenges, live sessions, exam prep, role guidance, and more. Get started
How do I use Presentation Mode?
- Subscribe to RSS Feed
- Mark Topic as New
- Mark Topic as Read
- Float this Topic for Current User
- Printer Friendly Page
- All forum topics
- Previous Topic

- Mark as New
- Report Inappropriate Content
Solved! Go to Solution.

View solution in original post
Helpful resources

Power BI Monthly Update - June 2024
Check out the June 2024 Power BI update to learn about new features.

Fabric Community Update - June 2024
Get the latest Fabric updates from Build 2024, key Skills Challenge voucher deadlines, top blogs, forum posts, and product ideas.
How to Get Your Question Answered Quickly
| User | Count |
|---|---|
| 138 | |
| 120 | |
| 110 | |
| 47 | |
| 43 |
| User | Count |
|---|---|
| 221 | |
| 95 | |
| 88 | |
| 86 | |
| 85 |

More From Forbes
How to make your presentation sound more like a conversation.
- Share to Facebook
- Share to Twitter
- Share to Linkedin
The main difference between strong, confident speakers and speakers who seem nervous in front of the room is in how relaxed and conversational they appear. Here are some basic pointers that will help you create a conversational tone when speaking, regardless of the size of your audience.
1. Avoid using the word, “presentation.” Every time you say, “I’m here to give you a presentation on X,” or, “In this presentation, you’ll see…,” you are emphasizing the formal, structured, sometimes artificial nature of the interaction. No one wants to be “presented” to. Instead, use language that emphasizes a natural, conversational exchange. “We’re here today to talk about X,” or “Today I’ll be sharing some ideas regarding Y.” You can even go so far as to say, “I’m glad we have time together today to discuss Z.” Even if your talk is not going to truly be a dialogue, you can use language that suggests engagement with the audience.
2. If you are using PowerPoint, avoid using the word “slide.” Instead of talking about the medium, talk about the concepts. Swap out, “This slide shows you…,” for, “Here we see….” Instead of saying, “On that slide I showed you a moment ago,” say, “A moment ago we were discussing X. Here’s how that issue will impact Y and Z.” Casual conversations don’t usually involve slide decks. Just because your complicated presentation on tax exposure, supply chain issues, or new health care regulations requires you to use slides, doesn’t mean you have to draw attention to that fact that the setting is formal and structured.
3. For many large-group events, speakers are provided with what’s called a “confidence monitor,” a computer screen that sits on the floor at the speaker’s feet showing the slide that appears on the large screen above the speaker’s head. Avoid using confidence monitors. Our natural inclination when using a confidence monitor is to gesture at the bullet point we’re discussing at the moment. However, we are pointing to a bullet point on the screen at our feet, which the audience can’t see, so it creates a disconnect between us and the audience. Instead, stand to the side of the large screen and gesture at the bullet point you’re talking about so that the audience knows which point you are discussing at the moment.
4. Don’t tell your audience, “I want this to be interactive.” It’s your job to make it interactive. If you are delivering the type of presentation where your audience size allows you to create true engagement with your listeners, create that connecting in stages to “warm up” the audience. Stage One engagement is to ask the audience a question relevant to your topic that you know most of the audience members can respond to affirmatively. “Who here has ever bought a new car?” or, “How many of you have ever waited more than 5 minutes on hold on a customer service line?” Raise your hand as you ask the question to indicate to the audience how to respond. Whoever has raised their hand has now participated in the discussion. They have indicated a willingness to engage. Stage Two engagement is calling on one of the people who raised their hand and asking a specific, perfunctory question. Again, it needs to be a question they can answer easily. If your first questions is, “Who here has bought a new car?” you can then call on someone and ask, “How long ago,” or “What kind of car did you buy most recently?” If your first question was, “Have you ever waited on hold for more than 5 minutes,” you can’t ask, “What company were you calling at the time?” The people who raised their hands weren’t thinking of a specific instance; they were just thinking broadly about that type of experience. You could, however, call on someone and ask, “Do you prefer when they play music or ads for the company’s products?” Anyone can answer that question. At that point, you are in an actual dialogue with that person. Stage Three engagement is asking them a question where they need to reveal something more personal. “How does that make you feel when you hear those ads?” You’ve warmed up your audience and drawn them in with baby steps. Now you have actual, meaningful audience participation.
Best High-Yield Savings Accounts Of 2024
Best 5% interest savings accounts of 2024.
5. Use gestures. When we’re speaking in an informal setting, we all use hand gestures; some people use more than others, but we all use them. When we try to rein in our gestures, two things happen that diminish our speaking style. First, we look stiff and unnatural. We look like we are presenting a guarded or cautious version of ourselves; we look less genuine. Second, hand gestures burn up the nervous energy we all have when speaking in front of a large group. That’s good. When we try to minimize our hand gestures, we tie up that nervous energy and it starts to leak out on odd ways, where we start to tap our foot, fidget with our notes or microphone, or tilt our head side to side to emphasize key points. Just let the gestures fly. It’s unlikely they will be too large or distracting. I have coached people on their presentation skills for 26 years. In that time, I have met three people who gestured too much. Everyone else would benefit from using their gestures more freely.
The impact we have as communicators is based on the cumulative effect of many different elements of our delivery. These suggestions alone won’t make you a terrific presenter. They will, however, add to the overall package your present of yourself when speaking to large audiences.

- Editorial Standards
- Reprints & Permissions
Join The Conversation
One Community. Many Voices. Create a free account to share your thoughts.
Forbes Community Guidelines
Our community is about connecting people through open and thoughtful conversations. We want our readers to share their views and exchange ideas and facts in a safe space.
In order to do so, please follow the posting rules in our site's Terms of Service. We've summarized some of those key rules below. Simply put, keep it civil.
Your post will be rejected if we notice that it seems to contain:
- False or intentionally out-of-context or misleading information
- Insults, profanity, incoherent, obscene or inflammatory language or threats of any kind
- Attacks on the identity of other commenters or the article's author
- Content that otherwise violates our site's terms.
User accounts will be blocked if we notice or believe that users are engaged in:
- Continuous attempts to re-post comments that have been previously moderated/rejected
- Racist, sexist, homophobic or other discriminatory comments
- Attempts or tactics that put the site security at risk
- Actions that otherwise violate our site's terms.
So, how can you be a power user?
- Stay on topic and share your insights
- Feel free to be clear and thoughtful to get your point across
- ‘Like’ or ‘Dislike’ to show your point of view.
- Protect your community.
- Use the report tool to alert us when someone breaks the rules.
Thanks for reading our community guidelines. Please read the full list of posting rules found in our site's Terms of Service.

Start a presentation automatically with a PowerPoint Show
If you’re sending your PowerPoint presentation to colleagues or friends, or if you're running it in a booth or kiosk, you might want people to immediately watch your presentation as a slide show instead of seeing the slides in edit mode. Save your PowerPoint presentation as a PowerPoint Show (a .ppsx file) so it automatically starts the slide show when the file is opened.
Make a slide show that starts automatically when opened
Select File > Save as (or Save a Copy ).
Click More options .
Browse to the folder where you want to save your presentation.
In the File name box, type a name for your presentation.
Under Save as type , select PowerPoint Show .

The file is saved as a .ppsx file. When the file is double-clicked, it opens as a slide show.
Edit a .ppsx file
In PowerPoint, click File > Open .
Browse to the .ppsx file, and open it.
Saving a presentation as a PowerPoint Show (.ppsx file) isn't available in PowerPoint for the web.
To start a slide show in PowerPoint for the web , open the file, and on the Slide Show tab of the ribbon, select Play from Beginning .

(If you've turned off the Simplified Ribbon, you don't have a Slide Show tab; instead use the View tab to start Presenter Coach.)
For more details on running a slide show, see Present your slide show in PowerPoint for the web .
Set the speed and timing of transitions
Create a self-running presentation
Record a slide show with narration and slide timings
Turn your presentation into a video

Need more help?
Want more options.
Explore subscription benefits, browse training courses, learn how to secure your device, and more.

Microsoft 365 subscription benefits

Microsoft 365 training

Microsoft security

Accessibility center
Communities help you ask and answer questions, give feedback, and hear from experts with rich knowledge.

Ask the Microsoft Community

Microsoft Tech Community

Windows Insiders
Microsoft 365 Insiders
Was this information helpful?
Thank you for your feedback.
Microsoft 365 Life Hacks > Presentations > Six tips for recording a presentation
Six tips for recording a presentation
Your latest presentation is filled with crucial information and key concepts your colleagues need to remember. Record and archive it for easy reference and absorption.

How to record your presentation
Whether you’re recording a presentation for work, a webinar or school, both you and your colleagues will greatly appreciate having it available to reference. You can absorb information at your pace, ensuring that you retain pertinent information, without having to rely solely on your notes. While the method of recording depends on the virtual meeting platform or whether its in person, here are some guidelines on how to record you presentation:

Tell your story with captivating presentations
Powerpoint empowers you to develop well-designed content across all your devices
1. Choose the right equipment
High-quality recording equipment is essential for producing professional-looking and sounding presentations. Laptops are equipped with microphone and a high-resolution webcam, but it’s always a good idea to consider investing in higher quality recording equipment.
2. Test Your equipment
Before starting your presentation, it’s crucial to test your recording equipment to ensure everything is working properly. Check the audio levels, video quality, and any additional accessories you may be using, such as lighting or a green screen. Conducting a test run will help identify any technical issues that need to be addressed. Review the virtual meeting platform you are using to ensure that the recording feature is enabled, so you won’t have to search for it when the presentation time rolls around.
3. Optimize your environment
Choose a quiet, well-lit environment for recording your presentation. Minimize background noise and distractions to ensure clear audio and video quality. Consider using a neutral background or a virtual background to maintain a professional appearance. Natural lighting is ideal, but if that’s not possible, invest in good quality lighting equipment to ensure your face is well-lit and visible.
4. Organize your presentation contents
Organize your presentation materials in a logical order to facilitate smooth delivery. Create an outline or script to guide your presentation, making sure to include key points, transitions, and visual aids. Practice your presentation multiple times to become familiar with the contents and ensure a confident delivery. If you have multiple presenters, solidify the speaking order and designate one person to facilitate the presentation.
5. Engage with Your Audience
Even though you’re recording your presentation, it’s essential to engage with your audience as if they were present in the room with you. Encourage interaction by asking questions, prompting viewers to think critically, and inviting them to share their thoughts or experiences in the comments section. Respond to comments and questions promptly to foster a sense of community and connection with your audience.
6. Monitor Your Time
Keep track of time during your presentation to ensure that you stay within the allotted timeframe. Plan your presentation carefully, allocating sufficient time to cover each topic or section. If you find yourself running out of time, prioritize the most critical points and consider saving less crucial information for a follow-up or supplementary material.
For more ways to improve presentation skills, like calming presentation anxiety and connecting with a virtual audience , learn more presentation tips .
Get started with Microsoft 365
It’s the Office you know, plus the tools to help you work better together, so you can get more done—anytime, anywhere.
Topics in this article
More articles like this one.

How to introduce yourself in a presentation
Gain your audience’s attention at the onset of a presentation. Craft an impressionable introduction to establish tone, presentation topic, and more.

How to add citations to your presentation
Conduct research and appropriately credit work for your presentation. Understand the importance of citing sources and how to add them to your presentation.

How to work on a group presentation
Group presentations can go smoothly with these essential tips on how to deliver a compelling one.

How to create a sales presentation
Engage your audience and get them interested in your product with this guide to creating a sales presentation.
Everything you need to achieve more in less time
Get powerful productivity and security apps with Microsoft 365

Explore Other Categories

- SUGGESTED TOPICS
- The Magazine
- Newsletters
- Managing Yourself
- Managing Teams
- Work-life Balance
- The Big Idea
- Data & Visuals
- Reading Lists
- Case Selections
- HBR Learning
- Topic Feeds
- Account Settings
- Email Preferences
How to Make a “Good” Presentation “Great”
- Guy Kawasaki

Remember: Less is more.
A strong presentation is so much more than information pasted onto a series of slides with fancy backgrounds. Whether you’re pitching an idea, reporting market research, or sharing something else, a great presentation can give you a competitive advantage, and be a powerful tool when aiming to persuade, educate, or inspire others. Here are some unique elements that make a presentation stand out.
- Fonts: Sans Serif fonts such as Helvetica or Arial are preferred for their clean lines, which make them easy to digest at various sizes and distances. Limit the number of font styles to two: one for headings and another for body text, to avoid visual confusion or distractions.
- Colors: Colors can evoke emotions and highlight critical points, but their overuse can lead to a cluttered and confusing presentation. A limited palette of two to three main colors, complemented by a simple background, can help you draw attention to key elements without overwhelming the audience.
- Pictures: Pictures can communicate complex ideas quickly and memorably but choosing the right images is key. Images or pictures should be big (perhaps 20-25% of the page), bold, and have a clear purpose that complements the slide’s text.
- Layout: Don’t overcrowd your slides with too much information. When in doubt, adhere to the principle of simplicity, and aim for a clean and uncluttered layout with plenty of white space around text and images. Think phrases and bullets, not sentences.
As an intern or early career professional, chances are that you’ll be tasked with making or giving a presentation in the near future. Whether you’re pitching an idea, reporting market research, or sharing something else, a great presentation can give you a competitive advantage, and be a powerful tool when aiming to persuade, educate, or inspire others.
- Guy Kawasaki is the chief evangelist at Canva and was the former chief evangelist at Apple. Guy is the author of 16 books including Think Remarkable : 9 Paths to Transform Your Life and Make a Difference.
Partner Center
5 Video Presentation Techniques for Maximum Impact
Senior Marketing Manager at Loom

Traditional slideshows can be a snooze-fest. You know, the kind where the people read aloud the text on the slides verbatim while you're also reading the same text yourself.
The flood of information and monotonous narration don’t help their case either.
How will you transform your lackluster, one-way presentations into captivating experiences that leave a stronger impact on your audience?
The answer is simpler than you think: video presentations .
Ready to ditch the dull and embrace the dynamic? Learn five techniques to create video presentations that enthrall your audience and learn how to record them.
The power of video presentations
Video presentations aren’t just a fancy way to show off your tech skills. They’re a powerful way to interact with your audience and leave a lasting impression.
Think about all the times you zoned out during a PowerPoint presentation with endless paragraphs and bullet points. Video presentations serve as an antidote.
So, what really sets video presentations apart?
They grab attention like nothing else. Research shows that presentations with video get 32% more engagement . People are likelier to watch and interact with a video than stare at a static slide.
It’s not just about getting more people to watch your presentations. Videos also boost understanding and retention.
As they say, “A picture is worth a thousand words.” It turns out that a video is worth even more.
The same study revealed that presentations with videos embedded had a 37% longer average reading time. The data shows that video presentations keep people around longer to absorb your message.
How to record a video presentation with audio and video
Video presentations are staples in business and education.
Whether used as video messaging for internal communications , client-facing pitches, tutorials, intros to your webinars, or for onboarding new employees, presentations offer a dynamic way of presenting information.
Luckily, screen recording tools like Loom are now making this process easier than ever before.
You don't need to buy fancy mics or wrestle with clunky presentation slides. You just have to hit record, make some simple edits, and share your video presentation with as many people as you want with a single click. Anyone can create a good video presentation with a bit of practice. Plus, Loom’s video editing tools make it easy to trim and polish your presentation.
Here’s a quick step-by-step overview of how to record a video presentation with audio and video using Loom:
Step 1. Prepare your presentation material
Before you sit down to record, be prepared with your notes, script, or any props or visual aids you might need. At the same time, make sure you choose a quiet, well-lit environment to ensure excellent audio and video quality.
Step 2. Launch Loom
To capture your Mac or Windows screen, open the Loom app on your desktop or use the Chrome extension. If you’re using your mobile for screen recording , you can install Loom’s mobile app.
Also, if you plan to capture:
Google Slides: You can use Loom’s Chrome extension .
PowerPoint, Keynote, or Canva slides: Install the desktop app to capture yourself along with the slides.
Whatever device or computer system you use, you can download and install the Loom app within minutes.
Step 3. Select recording mode
Choose whether you want to record your screen, webcam, or both. If you have slides, select screen and webcam to capture both your presentation and your face. Your face will appear on the screen in a cam bubble, as shown here.

You can also choose to record only your screen or the entire desktop.
Step 4. Start recording
Finally, click the “Start Recording” button.
Watch Loom’s own training video on video recording best practices.
Step 5. Begin your presentation
Deliver your presentation as you would in person, and remember to make eye contact with the camera.
Step 6. Review and edit your presentation video
After stopping the recording, Loom automatically uploads the video file to your Loom account. You can trim the video, add a call to action (CTA), or make other edits directly in Loom’s video editor.
Where some video presentations fall short
Even well-intentioned presentations can sometimes miss the mark. Here are some areas where your video presentations might be falling short:
Lack of engagement: Presentations are a two-way street. If you don’t build in opportunities for audience engagement elements like Q&A, live feedback, polls, and even simple interaction, you’re missing out.
Information overload: Too many key points covered in one presentation can overwhelm viewers.
Technical glitches: Double-check your equipment before the final presentation. Technical glitches like a frozen screen or a microphone cutting out can derail even the best-prepared presentation.
Lack of personalization: What’s the point of the presentation if your tone and message don’t resonate with the audience? Consider your target audience and adjust your presentation style accordingly. For example, a video for new hires might need a different tone and content than one for senior executives.
Considering these nuances and implementing a few interactive elements will help you create an engaging video presentation.
5 techniques for creating great video presentations
Technique 1: engaging storytelling.
Viewers crave something more than just data. They want a story.
Stories resonate powerfully because they tap into your emotions, creating a connection that facts alone can't achieve.
There’s science behind it. When you hear a story, your brain releases oxytocin , which increases trust and positive emotions. Stories also activate multiple brain parts, making them more memorable than isolated facts. In a world where attention is scarce, stories capture and hold it.
So, how do you capture your audience with engaging storytelling? Here are some tips:
Find your narrative arc: Every good story has a beginning, middle, and end. Think of a classic hero facing obstacles, overcoming challenges, and emerging as the victor. Your video presentation can follow a similar arc, even if the hero is your product or service.
Evoke emotions: Identify your target audience to discover what type of content resonates with them. Based on your research, add emotional moments—either funny or thought-provoking—to catch your audience’s attention and create a lasting impact.
Build conflict: Before you start pointing out the solution, introduce the problem that needs solving, the challenge that needs overcoming, or a question that needs answering.
Show, don’t just tell: Talking doesn’t have the same effect as showing the problem your product solves. Use screen recording tools like Loom to demonstrate the problem and its solution firsthand. This helps the viewer appreciate the real value of your product.
Apple’s product launches are an excellent example of engaging storytelling.
They don’t just point out features, they weave a story and paint a picture of how Apple devices will enrich your daily life.
Technique 2: Visual impact and design
Remember those “wall of text” slides? The clipart that looks like it’s from the 90s?
While these types of presentations do the job, it’s worth noting that people process visuals faster than text. A visually appealing video presentation will endear you to your audience and engage them better.
According to research by Robert Horn at Stanford University, actions and visuals make written information 70% more memorable .
Clearly, incorporating visuals into your presentation isn’t just about aesthetics. It’s also about making your message stick.
Here are some tips to help you create visually stunning presentations:
Use high-quality videos and images. High-resolution visuals make your presentation more appealing and easier to grasp. If you’re recording your screen, invest in a good-quality screen recording tool to create polished and professional presentations.
Incorporate data visualization. Use charts, graphs, GIFs, and infographics to present data in an easily understandable manner.
Leverage color psychology. Pick a color combination that aligns with your brand image and messaging. For example, blue evokes professionalism and trust, while orange conveys energy and excitement.
Choose fonts wisely. Typography also affects how your presentation appears visually. Sans serif fonts like Helvetica and Arial are clean and modern, while serif fonts like Times New Roman and Georgia add a touch of sophistication.

Incorporating these tips makes your presentations both visually appealing and more effective in getting your point across.
Technique 3: Effective use of audio elements
You’re watching a National Geographic documentary. It features sweeping aerial shots of the sun-drenched plains of the Masai Mara, close-ups of exotic wildlife, and evocative narration.
But it’s not just the visuals that hold you spellbound. It’s the sound of the rustling leaves, the leap of the gazelles, the gentle river flow, and the commanding voice of the narrator. The background music ties it all together, transporting you into the experience.
While visuals and text capture attention, audio completes the experience by evoking emotions and reinforcing your message.
Want to create a similar immersive audio experience for your presentation? Here are some things to consider:
The voice-over should be crisp and clear. There are two ways to record crisp, clear voice-overs. One, you can invest in a good microphone. Or, you can record your screen with audio like Loom.
Add strategic sound elements. Add background music that matches your content and complements your messaging. In between your presentation, add sound effects that emphasize key points and transitions.
Embrace silence at strategic moments. A well-timed pause can help you create anticipation or emphasize a point. A pause before you move forward also allows the previous message to sink in.
Make sure you blend all these audio elements, including a voice-over, background music, sound effects, and even pauses, to create a perfect harmony.
Technique 4: Interactive elements to engage audience
According to a recent survey, 78% of people saw better online sales with interactive video compared to a passive video.
This means that viewers are more likely to stick around if your video has interactive elements, compared to a one-sided monologue.
Here are some interactive elements that can help you turn one-way presentations into two-way conversions:
Knowledge check quizzes: Keep your audience engaged with brief quizzes a few minutes into the presentation. This will reinforce your message while keeping the viewers engaged.
Polls and surveys: These elements work as the proverbial two birds, one stone—they keep viewers from dozing off and provide feedback you can use to tailor your content.
Clickable CTAs: Guide your viewers to take a specific action by adding clickable elements to your presentation.
Gamification elements: Add a touch of fun with animations, points, badges, and leaderboards. These elements also work as incentives and might encourage viewers to stick around to the end.
But how do you add these interactive elements to your videos?
Pro tip: The easiest way is to find a video recording platform that simplifies the process.
For instance, Loom offers a range of built-in interactive features.
Creators can embed clickable CTAs, annotate their screens, and even add tasks to their presentation videos.

At the same time, viewers can react with emojis for instant feedback, leave time-stamped comments to encourage discussions and tag their teammates.
Recipients can react to a Loom video with any emoji
Technique 5: Timing and pace for maximum retention
Ever watched a video that felt like it was dragging on forever? Or one that was so fast-paced you felt like you were missing key information?
The wrong timing and pace can leave your audience mentally exhausted or disengaged.
But how do you strike the right balance for maximum retention?
One approach is to use Guy Kawasaki’s 10/20/30 Rule of PowerPoint :
Your presentation should have at most 10 PowerPoint slides, which could be 10 critical points in the case of video presentations.
It shouldn’t be more than 20 minutes long.
The font shouldn’t be smaller than 30 points.
If you can’t contain your message in 20 minutes, break your video presentations into bite-size segments to prevent information overload.
Think of it like chapters in a book. Each segment contributes to the overall narrative while standing alone as a valuable piece of information.
You can use a video presentation tool like Loom to make this process seamless.
Loom automatically creates a video library to organize your video clips. This also allows your audience to revisit specific presentation segments later to access key takeaways.

You can also label your videos by specific topics or categories, making them easily accessible.
Elevate communication with video presentations
The verdict is clear: Video presentations help engage your audience and increase interaction.
So, why rely on traditional slideshows when you can get better outcomes with video presentations, especially with access to advanced video presentation software?
For example, with Loom, you can record, edit, and share high-quality video presentations that captivate your audience. No more technical headaches or pricey equipment.
Ready to turn your presentation ideas into videos? Sign up for free and create polished video presentations in no time with Loom.
Jun 29, 2024
Featured In:
Share this article:.
Jeong Lee works in Marketing at Loom.

- PlayStation 5
- PlayStation VR2
- PlayStation 4
- PlayStation Store
- PlayStation Plus
- Portuguese (Br)
- Spanish (LatAm)
- Spanish (EU)
- Traditional Chinese
Introducing new PlayStation Studios collectible figures from Spin Master, launches starting this August

The Shapes Collection features Aloy, Kratos, Jin Sakai, and more, available for pre-order.
At Sony Interactive, we’re always looking for opportunities to bring our players closer to some of PlayStation’s most beloved games – and that includes bringing to life collections of physical products to add to your home decor. Today we are pleased to reveal a new collaboration with Spin Master, a leading toy company, to introduce The Shapes Collection – a new line of collectibles, based on our hit PlayStation Studios titles. This includes iconic characters from God of War Ragnarök, Horizon Forbidden West, and Ghost of Tsushima.
The highly detailed figures deliver the interactive storytelling element of these titles in an all-new way, extending the gaming experience from digital to physical. This creative line takes inspiration from details in each game, with interchangeable accessories and dozens of points of articulation to pose and display each figure in your collection of memorabilia.
The first in the collection to launch is a 6-inch deluxe figure of Aloy from Horizon Forbidden West, which is available for pre-order now on PlayStation Gear (where available) and Amazon in US and Australia .

The Shapes Collection
Deluxe Figure 6-inch Aloy, Horizon Forbidden West
- Deluxe collector grade figure with 42 points of articulation and 12 different accessories including multiple face plates and alternative hands
- Pre-order on PlayStation Gear (where available) and Amazon in US and Australia starting July 3 rd , shipping beginning August.

Core Figures 6-inch Kratos and Atreus (God of War Ragnarök), Varl (Horizon Forbidden West), Jin Sakai (Ghost of Tsushima)
- Deluxe collector grade figures with 24-34 points of articulation and 2-4 accessories (varies by character)
- Pre-order PlayStation Gear (where available) and Amazon in US and Australia starting July 15, shipping this September.
- Pre-order on PlayStation Gear (where available) and Amazon in US ( Kratos , Atreus , Varl , Jin Sakai ) and Australia starting July 15, shipping beginning September.

PlayStation Studios developers have closely collaborated on this new creative lineup from Spin Master, and share details they are most excited about with the PlayStation community.
“It was a great pleasure to work on the Aloy and Varl figurines together with Spin Master. They are based on the actual digital sculpts used for the game, something you can really see in the final result. We made sure the many articulation points made sense and even the finest textural detail shows up on the figures. A personal highlight was the ability to provide different facial expressions for Aloy, which, together with those many articulation points (even her hair has some!), make her a very poseable figure. Also, the technique used to apply color to the faces meant we were really able to maintain the likeness of actual models, something that was very important and adds a lot to the appeal of these figures.” – Arno Schmitz, Lead Character Artist, Guerrilla

“We’re excited to have a new action figure version of Jin that fans can keep on their shelf to protect their home. Jin’s Ghost armor has so many beautiful details, including intricate fabric patterns and overlapping armor plates that are integral to the design of his character. In addition to his katana, it’s also always important to us to see all of his various Ghost tools represented to capture his different fighting techniques.” – Jason Connell, Creative Director, Sucker Punch

Did you like this? Like this
Join the Conversation
But don't be a jerk!
Please be kind, considerate, and constructive. Report inappropriate comments to [email protected]
30 Comments
Leave a Reply Cancel reply
You must be logged in to post a comment.
Trending Stories

Dragon Ball: Sparking Zero – Battle Training mode gameplay revealed

Zanda Ra Associate Brand Manager, Bandai Namco Entertainment America

Zenless Zone Zero debuts on PS5 July 4 – details on combat, new area and characters unveiled

Zhenyu Li Producer, HoYoverse

PlayStation Plus Monthly Games for July: Borderlands 3, NHL 24, Among Us

Adam Michel Director, Content Acquisition & Operations, Sony Interactive Entertainment

Jango Fett returns in enhanced Star Wars: Bounty Hunter, coming to PS5 August 1

Chris Bashaar Director of Product, Aspyr

PlayStation Plus Monthly Games for April: Immortals of Aveum, Minecraft Legends, Skul: The Hero Slayer

Marvel’s Spider-Man 2 arrives only on PS5 October 20, Collector’s & Digital Deluxe Editions detailed

James Stevenson Community Director, Insomniac Games

PlayStation Plus Game Catalog for June + PS5 Game Streaming news update for Premium members
Nick Maguire VP, Global Services, Global Sales and Business Operations, SIE

PlayStation Plus Game Catalog lineup for February: Horizon Forbidden West, The Quarry, Resident Evil 7 biohazard and more

Please enter your date of birth.
Sorry, you may not access this content..
COMMENTS
1. Open the Windows Mobility Center (mblctr.exe). 2. Click/tap on the available Turn on or Turn off button for Presentation Settings. (see screenshots below) 3. When finished, you can close the Windows Mobility Center if you like. OPTION TWO.
To enter Presentation Mode in PowerPoint, follow these simple steps: open your presentation, click on the 'Slide Show' tab in the menu bar, and select 'From Beginning' or 'From Current Slide' to start your presentation. If you want to ensure a seamless transition into Presentation Mode, it's essential to set the right display options.
Start presenting. On the Slide Show tab, in the Start Slide Show group, select From Beginning. Now, if you are working with PowerPoint on a single monitor and you want to display Presenter view, in Slide Show view, on the control bar at the bottom left, select , and then Show Presenter View.
I am currently giving a presentation: When you checkmark this setting, it will enable the presentation mode, which means your PC will stay awake, and notifications will be disabled. Turn off the screen saver: When you check to mark its settings, it will disable the screensaver till you are presenting. Set the volume to: It will allow you to set it as you prefer.
How your presentation runs (full screen, window or in kiosk mode). Your default pen and laser pointer color options (see our laser pointer article here). Which slide you want start from, or which slides you want to show. You can also setup a custom show here. How your slides progress (manually or using slide timings).
First, create a new custom slide show and select the slides that you want to display. Then, click Add, enter the name of the presentation and click OK. This new custom presentation will appear on the list. Select it and click Show to begin the presentation. Defining a custom slide show.
Start a presentation from the beginning. F5. Start a presentation from the current slide. Shift+F5. Start the presentation in Presenter View. Alt+F5. Perform the next animation or advance to the next slide. N. Enter. Page down. Right arrow key. Down arrow key. Spacebar. Perform the previous animation or return to the previous slide. P. Page up ...
Select the Use Presenter View checkbox. Select which monitor to display Presenter View on. Select From Beginning or press F5. In Presenter View, you can: See your current slide, next slide, and speaker notes. Select the arrows next to the slide number to go between slides. Select the pause button or reset button to pause or reset the slide ...
Step 2: Adjust the parameters. Step 3: Customize the screen. Step 4: Save the changes. Examples of Presentation Mode: Recommendation: Presentation mode settings in Windows 11. Step 1: Open the Settings Menu. Step 2: Set Presentation Mode. Example: Setting up a Presentation Background.
Keep reading to find out more about using Presenter View in PowerPoint and the best features to try out.. Turn On PowerPoint Presenter View. In PowerPoint for macOS, simply click on Presenter View on the Slide Show tab to kick off the presentation in Presenter view. Turn on Presenter View by clicking on Presenter View on the Slide Show tab.. You'll see the Presenter View interface on one screen.
Right click the Start button. Instead of the context menu of the taskbar, Windows 10 shows Win + X menu. Or, press Win + X shortcut keys on the keyboard. Click on the Mobility Center item. Under Presentation Settings click on the Turn on button to enable it. Presentation Mode is now enabled. You can customize its settings by using the tray icon.
If this happens to you often, these are the PowerPoint shortcuts you need for a quick text alignment before starting your slide show: Use "Ctrl + J" to justify your text. Press "Ctrl+E" to center the text. Use "Ctrl+L" for left alignment. Press "Ctrl+R" to right-align your text.
Simply double-click on the section to expand the selection. Step 4: On the right-hand side, double-click Turn off Windows presentation settings. Step 5: To disable this setting, tick on the Disabled option. Step 6: To Enable, click on the Enabled option. Step 7: Finally click on the Apply button, followed by OK.
Start a Slideshow in PowerPoint's Web App. To play a slideshow on the web, launch your preferred web browser and access PowerPoint on the web. Then, open your presentation. From PowerPoint's ribbon at the top, select the "Slide Show" tab. In the "Slide Show" tab, start your slideshow from the first slide by clicking the "From Beginning" option.
To control the presentation settings, you can call the executable directly, followed by the arguments. Example: C:\Windows\System32\PresentationSettings.exe /start. or, to stop: C:\Windows\System32\PresentationSettings.exe /start. If the first line is scheduled to run at boottime then Presentation mode will always be activated.
Want to start presentation mode without taking over your screen? If you are sharing slides in Zoom or with a virtual camera, starting your presentation takes...
You can show your presentation to an audience with PowerPoint Mobile. Start presenting. On the Slide Show tab, in the Start Slide Show group, select From Beginning or From Current Slide.. Presenter View. If you have a two-screen setup in which you are projecting from your device to a large screen, you can see Presenter View visible on your device while your audience sees the slide show on the ...
If so, we'd suggest you save presentation file as .ppsx type file, if you are using PowerPoint in Windows, we'd suggest you go to PowerPoint File > Save as > Click More Options > select PowerPoint Show under Save as type, the file is saved as a .ppsx file. When the file is double-clicked, it opens as a slide show.
And the presentation mode is available in the second one. I think this second one is basically a Windows 10 port of the mobile app. It appears to be an app designed for people that just want to view reports, not author them. With this app I think you can either view reports from an on premise PBI Report Server or reports that are stored on ...
2. If you are using PowerPoint, avoid using the word "slide." Instead of talking about the medium, talk about the concepts. Swap out, "This slide shows you…," for, "Here we see…."
Make a slide show that starts automatically when opened. Select File > Save as (or Save a Copy ). Click More options. Browse to the folder where you want to save your presentation. In the File name box, type a name for your presentation. Under Save as type, select PowerPoint Show. The file is saved as a .ppsx file.
Create an outline or script to guide your presentation, making sure to include key points, transitions, and visual aids. Practice your presentation multiple times to become familiar with the contents and ensure a confident delivery. If you have multiple presenters, solidify the speaking order and designate one person to facilitate the ...
Summary. A strong presentation is so much more than information pasted onto a series of slides with fancy backgrounds. Whether you're pitching an idea, reporting market research, or sharing ...
Select recording mode. Choose whether you want to record your screen, webcam, or both. If you have slides, select screen and webcam to capture both your presentation and your face. ... Step 4. Start recording ... Your presentation should have at most 10 PowerPoint slides, which could be 10 critical points in the case of video presentations. ...
Pre-order on PlayStation Gear (where available) and Amazon in US (Kratos, Atreus, Varl, Jin Sakai) and Australia starting July 15, shipping beginning September. PlayStation Studios developers have closely collaborated on this new creative lineup from Spin Master, and share details they are most excited about with the PlayStation community.