So Many Papers, so Little Time
A blog about scientific publishing and academic productivity
- Paperpile News
- Productivity
- Inspiration

6 Tips for Writing Your Thesis in Google Docs

The birds are singing, the bees are buzzing, which means it’s officially spring time. This is good news for just about everyone… except those with a looming thesis deadline.
If you’re pursuing a Bachelors, Masters, or PhD, you’re either feeling very good or very not-so-good right about now. For some of you, no words have yet made it onto the page. That’s okay! We’re not here to judge. We’re here to help.
One thing you may or may not have considered yet is where you’re going to be writing your thesis. Sure, Microsoft Word is the obvious choice. But is it the best one? There are a lot of problem with Words including feature bloat, incompatibilities between versions and operating systems and plain old crashes . If you’ve ever considered Word to be the bane of your existence (and who hasn’t?), you may want to consider a simple cloud-based alternative like Google Docs. You’ll be able to work from anywhere, including offline, and barring circumstances of an apocalyptic proportion, you’ll never lose your work. Sounds like a win-win.
If you decide to make the Google Docs plunge for something as important as your thesis, arguably your magnum opus , here are a few tips for making the transition a success.
1. Enable Offline Access
If you chose Google Docs as your go-tool for your thesis you likely to belong to a generation who is online all time. But there are occasionally moments when you are cut off from the internet and want to work on your thesis. You can enable offline access to your Google Docs simply by checking a box in your Google Drive settings . To make all other files in your Google Drive available offline you can set up desktop sync . Got a long flight coming up? Work on your thesis. Internet’s down at the local coffee shop? Work on your thesis. Commute by train? Work on your thesis. You get the drift. Don’t set up barriers to keep you from getting work done - take action to bring them down.
2. Decide on an Organizational Structure Ahead of Time
Lets face it: your thesis is going to be a big, unruly document. So big in fact, that it probably makes more sense to break it down in manageable chunks while you’re in the development phase. That means setting up different folders and documents based on how your thesis will be organized.
The way you do this can, and should, vary based on the needs of your project and the way that you like to write. One simple way to do it is to break up your document by section of your thesis, so that you have a Google Doc for each of the following: Introduction, Literature Review, Methodology, Results, and Conclusion. Alternatively, you may also choose to keep all of your sections in one document, and take advantage of Google Doc’s new outline feature to move from place to place.

Another way to organize your documents is by theme. If you have topics that cross over sections, this may be the most sensible option. You take the big ideas out of your thesis and write about them one by one. For example, for my thesis in Education, I cover topics like Community of Inquiry, Online Learning, Personality, etc., and I make a document for each of those. When the time comes to pull them all together, I know where to find each of my arguments.
Whatever you do, it’s important to make a decision ahead of time and stick to it . This allows you to keep the same organizational structure across all of your apps. Just like you have the same days of the week across all of your calendars, having your citation management system in the same format as your Google Docs makes life infinitely simpler. Which brings me to my next point…
3. Decide on a Citation Management System
Have you kept track of your sources manually up until now? It’s time to wake up and smell the coffee. Your thesis will be the biggest document you’ve ever managed, and quite possibly the biggest document you ever will manage. No sane person keeps track of hundreds of sources by hand . There’s no need to make more work for yourself, and it’s just plain ludicrous if you have a looming deadline.
You have a ton of options to choose from in this arena. Whatever system you decide to work with, whether it’s a simple add-on to Google Docs or a comprehensive PDF management system, make sure it integrates with your workflow . If it’s a pain to enter data, you won’t do it, and you’ll be left with glaring gaps of information at the end of your project. Keep it simple, and keep it smart.
4. Clean up Your Digital Workspace
One of the many benefits to using Google Docs to write a thesis is that you don’t have to constantly move between windows to get things done. Most of your research is done in-browser, and your writing belongs right next to it. But with great power comes great responsibility. It’s very easy to get overwhelmed and distracted by the magic of the Internet. This is why you should make every effort to keep your digital workspace as tidy as your physical one.
What does this mean? For starters, it means making an assessment of the apps and websites you regularly use to do your research, take notes, and write your thesis. Now jot down a list of these. Go into Chrome (or your preferred browser) and pin them . Pinning a tab keeps it open, neatly organized in the left of your browser window, and unclosable. So everything you need is always handy.
5. Make Use of Add-ons
A few years ago, Google Docs might have seemed like a poor-man’s Microsoft Word. But the platform has become increasingly sophisticated over the years, to the point that some now say it surpasses traditional desktop tools. What takes it to the next level? Add-ons, of course. The Google Docs add-on store is full of helpful apps for students, with more being added every day.
Some particular ones to take note of include AutoLaTeX for statistical equations and Thesaurus for when you’ve used the word “nuance” too many times. Paperpile also offers a free citation generator for Google Docs that makes it a breeze to find, cite, and style academic sources within your document.
6. Leave Time to Make it Pretty
One thing Google Docs cannot do is make a truly visually striking document. It suffers from the same limitations that all WYSIWYG editors do - it can’t be both easy to use and complicated to produce. Ever notice how the paper you converted into PDF from Microsoft Word looks nothing like the journal article you downloaded? The spacing, the balance, all the small details that go into putting together a visually appealing document are lost with WYSIWYG authoring. Google Docs is no different, and it isn’t intended to be. It’s an amazing collaborative and drafting tool. But when it comes to the final product, you can and should go the extra mile into making it look good. This is your magnum opus, remember?
There are many ways to go about this. Many scientists use the programming language LaTeX to create elegant research papers. If the idea of coding seems intimidating, look into a publishing program like Adobe InDesign . Whatever you choose, get comfortable with it before your project is done. And give yourself a solid week to turn the final product into one you’ll be proud of. Will it turn a satisfactory grade into an exemplary one? No. But will it be enough to push a “good” to a “very good”? Possibly. And that makes it worth the effort.
Are you currently writing a thesis in Google Docs? Tell us the good, the bad, and the ugly in the comments.

Brought to you by the folks at Paperpile.
We love papers so we blog about it.
How to write academic documents with GoogleDocs
These past months I’ve been mostly working on one huge project which might be close to an end, hopefully! This project involves a massive manuscript with many supplementary figures and tables. Today we sent it out to other members in our team, and to celebrate, I’m now writing more 😅: though this is a blog post. I’m allowing myself to do so before I dive into the pile of tasks I haven’t completed 1 . So I’m going to share with you the tools I’ve been using since 2018 or so for writing academic documents shared via Google Docs . You can use these tools for manuscripts 2 , capstone projects 3 , and well, basically any document where you want to do any of the following:
- Automatic figure/table numbering
- Insert math equations
- Cite the literature
Yes, you can do both with LaTeX and you can collaborate with others using Overleaf , but it’s really hard to convince others to use LaTeX in my experience.
There are many tools out there for you to organize the literature items you are reading or keeping tabs on. Some of them are Zotero and Mendeley , which you might have heard about. The one that I highly recommend for writing documents with Google Docs is F1000Workspace .
Get an account
First, you need to make an account. Worried about paying? Don’t worry, the accounts are free 4 !
I strongly recommend that you use your academic email here if you have one, because I believe that it grants you access for an unlimited free account. Your university might also give you free access.
Start a project
Once you have your account set up, start a shared project . I mean, private ones also work, but shared ones allow you to collaborate with others so that your teammembers can also update the citations in your document. For example, we have one called brainseq phase2 .
Once you open your project page, at the top left you’ll see a big blue button called Import References . Click on it.
As you can see, F1000Workspace allows you to import references from many different sources. I typically import using identifiers, either a DOI or a PMID one. They also have a browser add-on that you can use to import references into your library when using websites such as PubMed .
Insert references into a Google Doc
On your Google Chrome browser, install the F1000Workspace Google Docs add-on available here . Next, open up your Google Doc and you’ll see that F1000 appears in your toolbar. If you click on it, the F1000 interface will open on the right sidebar.
That interface lets you link your Google Doc to a particular F1000Workspace project, which I recommend doing. You can then go to Insert citations and start searching your project citations. I typically search by name or by the identifier, which is particularly useful if I just added the reference to the project via the identifier on a separate browser tab.
Update your document’s bibliography
Lets say that you’ve added a few citations in your document and now want to format them appropriately. In your Google Doc, click on F1000 , then navigate to the Format citations and bibliography section.
Before you click the big blue button that says Update citations and bibliography you’ll notice a dropdown menu that lets you choose your favorite citation style (or whichever the journal you want to send your manuscript requires).
Well, not really. You’ll likely keep adding many citations as you keep working on your document. One thing that I’ve noticed is that the F1000Workspace add-on has a bit of trouble under “suggesting” mode or when the citation was inserted as a suggestion. So I recommend that you accept the suggestion first, then use “editing” mode for updating your bibliography file. It’s always good to keep an eye on what the add-on is doing so you can notice anything weird and undo it with ctrl + z (cmd + z in macOS).
And hey, did you know that F1000Workspace also works with Microsoft Word?
For more details, check the FAQs .
Automatic figure numbering
Now that we have figured out citations in Google Docs, lets learn how to cross reference figures, tables, equations, and whatever else you want. This is something that LaTeX users are familiar with but that you can’t do out of the box in Google Docs or Microsoft Word (as far as I know). Luckily others have made add-ons that solve this problem. The one I use, and so do other 11,197 people as of today, is Cross Reference available from the Google Chrome Store for free.
This add-on allows the user to label equations, figures and tables and refer to them within the text. It now also allows users to create labels for any element. These elements are numbered automatically and references are updated to match. If their order changes, references update to match. If one is removed, references to it are highlighted in red in the text. The text and style of references and labels can be customised. Insert labels and references as hyperlinks. Instead of a URL, add a code recognised by Cross Reference, then an underscore, then your choice of name.
Configuration
Once you install Cross Reference , you’ll see it listed under the Add-ons menu in your Google Doc.
You’ll see all the different types of elements that you have configured with Cross Reference . Some come out of the box, like Figures .
For every element you have to configure the following:
- The code you will use for the label, here #figur .
- The text that will be displayed before the number. In this case, Figure (yes, there’s a space there).
- The style of the label; bold here.
Then the same thing for the reference. In this case, the code for the reference is #fig . The codes have to be at least 3 characters long for the references and 5 characters long for the labels.
In my documents I typically add configurations for supplementary figures and tables using:
| type | code: label | code: reference | text |
|---|---|---|---|
| Supplementary Figure | |||
| Supplementary Table | |||
| Supplementary File |
Now that you have configured Cross Reference you can start using it. Lets say that I want to write the text We did many things (Figure S1) where Figure S1 links to my overview figure whose description starts Figure S1. Overview of my project . Since we are talking about the overview figure, lets use _overview as the unique identifier for this figure. As this is a supplementary figure, the label code is #sfigu and the reference code is #sfi . Meaning that we must write the label code once in the figure description using #sfigu_overview and we can reference to it as many times as we want using #sfi_overview .
The last tricky part is that you can write whatever you want, lets say hello , and then you need to create a link (shortcut is cmd + k in macOS) with the correct code (either the reference or the label one). So the text that you would write would be We did many things ([hello](#sfi_overview)) and later on when you describe the overview figure you need [whatever you want](#sfi_overview). Overview of my project where here I’m using the Markdown syntax for links: [text](link) .
Once you’ve inserted the links both for the reference and the label, you can then go to Add-ons , navigate to Cross Reference and click Update document . Doing so will change the text you had initially filed in for the correct text. So it will look like this: We did many things ([Figure S1](#sfi_overview)) plus [Figure S1](#sfi_overview). Overview of my project . Here’s a real case example where my identifier for the first supplementary figure is _rna , thus the full reference code is #sfi_rna :
And you are done!
The number used for the item your reference depends on what order the reference codes are listed in the Google Doc. To check that the numbering order is correct (Table S1 appears in the text before Table S2, etc), I recommend opening your google document in two separate tabs. In one tab, you start reading your document from the top. If you encounter items out of order, then on tab two you can switch them around. That way you don’t have to scroll around and waste time, which is a more cumbersome problem as the document gets longer.
Overall, this process that takes a bit of time and can break due to a typo. So I highly recommend that you update your cross references as soon as you make a new one, so you can easily trace any typos and fix them easily. If you don’t, then it can become very hard to track down what went wrong.
Finally, lets say that you want to insert equations. You can insert some equations with Google Docs, but you might want more fine control. If you use LaTeX I recommend the Auto-LaTeX Equations add-on available from the Google Chrome Store for free.
This add-on lets you automatically convert every LaTeX equation in your document into beautiful images! Simply enclose your math equations within $$ … $$ and click the button in the sidebar, and all of your equations will be rendered in LaTeX!
It’s as simple as it sounds. What this add-on does is that it takes your LaTeX equation code, renders an image with the equation, and then inserts it back into your Google Doc. It also enables you to restore the LaTeX equation code so you can edit it if you find a typo.
Wrapping up
I hope that you’ll find this blog post / tutorial useful when writing your own academic documents. These tools have saved me so much time when writing academic documents in collaboration with others. I don’t want to imagine having to re-number all the references manually whenever we added each of the 48 supplementary figures, 17 supplementary tables, and 11 equations to the project we are about to complete 😱.
Acknowledgments
The authors of F1000Workspace, Cross Reference and Auto-LaTeX equations add-ons have made my life much easier. THANK YOU!!!
This blog post was made possible thanks to:
- BiocStyle ( Oleś, 2023 )
- blogdown ( Xie, Hill, and Thomas, 2017 )
- knitcitations ( Boettiger, 2021 )
- sessioninfo ( Wickham, Chang, Flight, Müller et al., 2021 )
\[1\] C. Boettiger. knitcitations: Citations for ‘Knitr’ Markdown Files . R package version 1.0.12. 2021. URL: https://CRAN.R-project.org/package=knitcitations .
\[2\] A. Oleś. BiocStyle: Standard styles for vignettes and other Bioconductor documents . R package version 2.28.0. 2023. DOI: 10.18129/B9.bioc.BiocStyle . URL: https://bioconductor.org/packages/BiocStyle .
\[3\] H. Wickham, W. Chang, R. Flight, K. Müller, et al. sessioninfo: R Session Information . R package version 1.2.2. 2021. URL: https://CRAN.R-project.org/package=sessioninfo .
\[4\] Y. Xie, A. P. Hill, and A. Thomas. blogdown: Creating Websites with R Markdown . Boca Raton, Florida: Chapman and Hall/CRC, 2017. ISBN: 978-0815363729. URL: https://bookdown.org/yihui/blogdown/ .
Reproducibility
Including answering some questions on the Bioconductor support forum , finishing another manuscript, etc. ↩︎
Like this one or this other one . ↩︎
Like my former student Amy Peterson did in 2018. ↩︎
For up to 3 projects. ↩︎
Leonardo Collado-Torres
Investigator @ libd, assistant professor, department of biostatistics @ jhbsph.
#rstats @Bioconductor /🧠 genomics @LieberInstitute / @lcgunam @jhubiostat @jtleek @andrewejaffe alumni/ @LIBDrstats @CDSBMexico co-founder

- Master Your Homework
- Do My Homework
Formatting a Research Paper in Google Docs
Writing a research paper is an essential part of many academic programs, and having the necessary skills to format your paper correctly can be invaluable. With advancements in technology, you now have the option to use Google Docs as an efficient tool for formatting your document. This article will outline several key steps to ensure that your research paper is properly formatted using this popular platform.
1. Introduction to Formatting a Research Paper in Google Docs
2. advantages of using google docs for writing and publishing research papers, 3. step-by-step guide to formatting your research paper in google docs, 4. adding headers, footers, page numbers & margins to the document layout, 5. adjusting line spacing & font styles for professional formatted text, 6. inserting citations & generating bibliographies automatically with addons, 7. exporting your final draft as pdf or word file ready for submission.
Google Docs is a powerful and easy-to-use word processor that can be used for formatting research papers. With Google Docs, you have all the features of a typical desktop publishing software without having to download anything!
Formatting your research paper in Google Docs is straightforward. To begin, open up the “Insert” menu and select “Table of Contents.” This will create an outline for your paper based on headings and subheadings so readers know what topics are being discussed. Next, choose a font size (10 or 12 pt) that works best with your document style. You can also change text alignment by selecting “Paragraph” from the left sidebar menu. Finally, use HTML tags such as unordered lists , bolded words ,and numbered/bulleted lists to highlight key information in your paper.
Research papers benefit immensely from using Google Docs. With it, researchers can easily write and collaborate with their team members in real-time. Plus, research paper format google docs is also available to structure the document properly.
- Easy Collaboration: Research teams no longer have to send each other multiple versions of a single project through email or online file sharing services; instead they can use Google Docs’ built-in collaboration feature for seamless communication.
- Document Formatting: Google Docs provides users with a wide range of formatting options that allow them to personalize their documents. Everything from font size and color selection to adding tables and images are all possible within the platform.
Furthermore, it offers an easy way for authors to publish their work since there is support for both HTML coding as well as Markdown syntaxes. Documents stored on Google Drive are automatically saved every few seconds which ensures nothing will be lost if something goes wrong. The search bar feature allows authors quickly locate what they need without having any issue along the way!
Creating a research paper in Google Docs is now easier than ever before. With the help of this step-by-step guide, you can easily format your document with ease.
- First , make sure that the font size used for all text elements is 12pt and set it to Times New Roman as its typeface.
This will ensure uniformity throughout the entire document. Also, apply double spacing between lines and use 1 inch margins on both sides (left & right). To do this, go to “Format” located under File > Options > Format then change Line Spacing to Double and Margins accordingly.
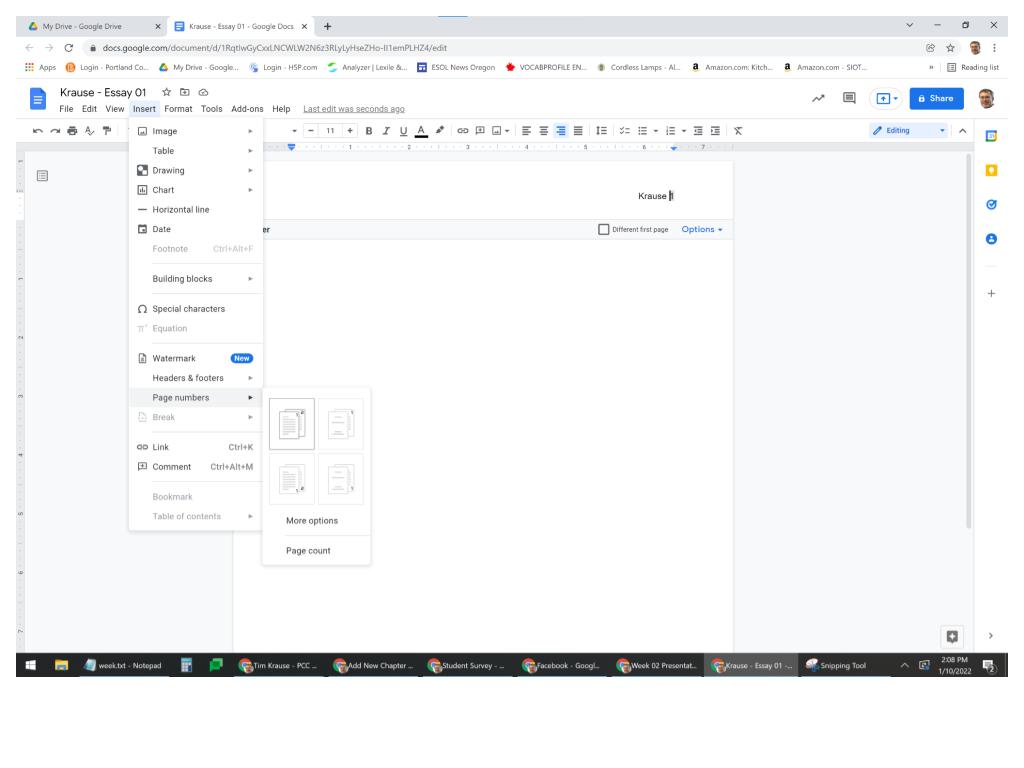
- Second , include page numbers starting from page two onwards at the bottom center of each page using Page Number option within Insert tab.
To create a more professional and organized document layout, it is essential to add headers, footers, page numbers and margins. Depending on the style of your paper, some of these items may be required by an academic journal or publisher.
- Headers: Headers are lines at the top of each page that contain text such as your name, course information or chapter title. These can easily be added in Google Docs through “Insert > Header & Page Number” , where you can customize what appears in the header for different pages.
- Footers: Footer content typically appears at the bottom right side of each page. Just like with headers they can also be inserted via “Insert > Header & Page Number”. Commonly used elements include a running head (a shortened version of your paper’s main title) or copyright information.
- Page Numbers: Adding consistent numbered pages makes it easier for readers to navigate large documents such as research papers. Again this task is accomplished using “ “Header & Page Number” . By clicking on ‘Different first page’ when adding page numbers allows us to assign certain details only visible from our coverpage.
Adjusting line spacing and font styles can be a key part of creating professional formatted text. A consistent style throughout your document is essential for making it look polished and presentable.
Google Docs provides multiple ways to adjust the appearance of your documents with its formatting tools. You can easily change the line spacing from single, 1.15 or double-spaced lines by selecting ‘Line Spacing’ in the menu bar, then choosing one of these options in the dropdown list that appears on screen. The exact font style you use should reflect both the content and tone of what you are writing – so make sure that whatever typeface you choose fits with this purpose! It’s also possible to format individual words or phrases within Google Docs by highlighting them and applying a bolded effect through ‘Format’ > ‘Text’ > ‘Bold’. Additionally, unnumbered lists (e.g bullet points) help keep information concise while still breaking up long paragraphs into digestible chunks – select any paragraph(s) before clicking ‘List Options’ under ‘Format’ where an array of choices will appear including bulleted/unnumbered lists which you can quickly apply to all selected text in order to give structure & clarity to your research paper draft!
In the process of writing a research paper, properly citing sources is vital. Fortunately, there are Addons available to automate this tedious task and make it easier for students.
Using Citation Addons in Google Docs Google Docs offers several citation add-ons which can be used to quickly insert citations within your text as you write. To get started with one of these tools, select ‘Add-Ons’ from the menu bar at the top of any open document and choose ‘Get Add-Ons.’ Here you’ll find options such as EasyBib Bibliography Creator and Scribbr Citation Generator that will help format your citations according to standard formats like APA or MLA.
- EasyBib: This addon allows you to search an online database while typing out your paper; simply enter keywords related to a source’s title or author into EasyBib’s search box.
- Scribbr: Another great tool for generating bibliographies automatically is Scribbr – once installed on your computer through Google docs, it helps accurately generate reference entries in popular styles such as APA 6th Edition and MLA 8th Edition.
These citation add-on programs are designed specifically for use with documents created in Google Docs; they make it easy for writers who need assistance formatting their references correctly according their chosen style guide.
Once your research paper is ready, it’s time to export the final draft into a format that can be easily shared and/or submitted. Luckily, there are two popular formats used for academic papers: PDFs or Word documents.
Exporting as a PDF (Portable Document Format) allows you to keep track of all formatting applied in the document so everyone who views it sees exactly what you intended them too – no surprises! To export your work as a PDF from Google Docs simply click on File > Download As > Portable Document Format (.pdf). Make sure to review any potential formatting issues before exporting , just like with any other type of file transfer method when working with digital files; things may look one way in one application but quite another after transferring out of that application.
For those submitting their research papers through an online portal such as Turnitin, they will likely need an editable Word document instead of a non-editable pdf version since some institutions use this platform for plagiarism checking purposes. Exporting your completed paper into Microsoft Word format is simple – again go File > Download As and select “Microsoft Word (.docx)” format which should provide most basic editing capabilities required by educators when using Turnitin software systems.
- Tip 1: Always make sure to save backups prior to converting.
- Tip 2: Double check font compatibility across different applications.
This article has provided an overview of formatting a research paper in Google Docs. It is important to keep in mind that the style, format and overall look of your paper may depend on its purpose; for example, if you are writing an academic essay, it must adhere to more specific guidelines than a creative piece. With the use of templates available from Google Docs as well as other online sources, creating and formatting papers can become easier and faster over time with practice. Furthermore, advanced features such as citations allow users to conveniently incorporate external information into their own work while maintaining proper citation standards according to their field or institution’s requirements. Through this process we have seen how utilizing Google Docs offers greater control over text presentation while ensuring accuracy during editing cycles and collaboration with peers or mentors.
How-To Geek
Google docs features to help you ace your college papers.
Learning about these features might turn a C paper into an A+.
Quick Links
Research with the explore feature, use the built-in dictionary, add citations and a bibliography, include footnotes, open the equation editor, take advantage of collaboration features.
Google Docs can be great for writing school essays and other projects. From citations to research to collaborating with classmates, take advantage of these helpful features for your college papers.
Related: Learn These Microsoft Word Features to Make College Easier
Just like the Researcher tool in Microsoft Word , the Explore tool in Google Docs helps you locate sources and get your research done. Select the Explore button on the bottom right of the Google Docs screen.

When the sidebar opens, enter a search term at the top. You'll see three tabs for your results. So, you can choose Web, Images, or Drive (your Google Drive) to find the item you need.

You can add a citation as a footnote or insert an image that includes a link to the source. Or, simply select a result to read up on the topic. It's easy to research your paper using Explore in Google Docs.
For correcting spelling , checking verb tense, or finding synonyms, check out the Google Docs Dictionary. You can look up any word and save yourself a trip to an online or physical dictionary.
Related: How to Check Your Spelling in Google Docs
Either select a word in your document and go to Tools > Dictionary or open the tool from the menu and enter your word into the Search box in the sidebar.

You'll see everything you need to use the word correctly, spell it right, or get another word that means the same thing.

For including your references in the text and in the form of a bibliography, Google Docs gives you the Citations feature. Go to Tools > Citations to open the Citations sidebar.

Select your writing style from APA, MLA, or Chicago in the drop-down box at the top. Then, click "Add Citation Source" to add the type and reference details for your source.

Save the citation and then insert an in-text reference easily. Hover your cursor over the source in the sidebar's list and pick "Cite."

Once you have a citation in the sidebar, you can insert a bibliography . Place your cursor where you want the list and head to the bottom of the sidebar. Choose "Insert Works Cited" or "Insert References" depending on the writing format you picked.

Google Docs automatically inserts and formats your bibliography so you can continue writing without worry.

Related: How to Automatically Insert a Bibliography in Google Docs
When you have additional details or notes you want to include but not directly in the main content, use a footnote.
Place your cursor next to the word or select the word in your text. Go to Insert > Footnote in the menu.

You'll see the footnote number where your cursor was placed, and the cursor then appears in the footnote area for you to add your text.

Add more footnotes the same way and they'll be numbered automatically per page.
If the paper you're composing is for a math class, you can use the built-in equation tool . This saves you time by providing the letters, symbols, and operators you need to enter an equation instead of hunting them down elsewhere.
Related: How to Use the Equation Editor in Google Docs
Select Insert > Equation from the menu and you'll see the Equation Editor bar at the top of your document.

Make sure your cursor is in the spot in your document where you want the equation. Then, use the drop-down boxes in the Equation Editor to select what you need for the equation. As you choose each equation element, you'll see it added to your document.

When you finish, use the X on the right side of the Equation Editor bar to close it.
If you're working on a group project with other classmates, Google Docs has the features you need to collaborate. Start by sharing the document with editing permissions and then use the following tools to work together.
Related: How to Share Documents on Google Docs, Sheets, and Slides
Leave Comments
Select an item in your document such as a word, sentence, or image and then click the Comment icon on the top right or in the floating toolbar. Add your comment , use the @ (At) symbol to mention a specific person, and click "Comment."

Everyone with access to the document can see the comments. And as you take care of the notes or tasks, click the Resolve icon (checkmark) to keep track.
You can also use the emoji feature for quick reactions to parts of the document and the comment assignment feature to delegate tasks.
See the Version History
When several people are working on a document at the same time, it can be tough to recall who did what and when. You can select "See Version History" in the File > Version History menu to view all changes to the document.

You'll see a list of dates and names, and you can select a version to view it. This does not immediately change your current document; it's simply a way to see what's changed and by whom. If you do want to use a particular version, select the three dots to the right of it and pick "Restore this Version."

When you finish viewing the Version History, click the arrow on the top left and you'll return to the document.
Quickly Email Your Classmates
For a quick and easy way to get in touch with your classmates, you can email all collaborators for a document at once. Select File > Email from the menu and pick "Email Collaborators."

A message window opens with your collaborators already included and the name of the document as the subject line. Type your message and press "Send."

This gives you a terrific way to check in with your classmates on the project without creating a separate email in another app where you have to track down their email addresses.
For other collaboration tools, look at how to suggest an edit , or specifically, how to track changes in Google Docs .
With these Google Docs features, you can find what you need, cite your sources correctly, and work with your fellow students to create a paper that wows your professor.
Related: 7 Time-Saving Google Docs Features You Need to Know

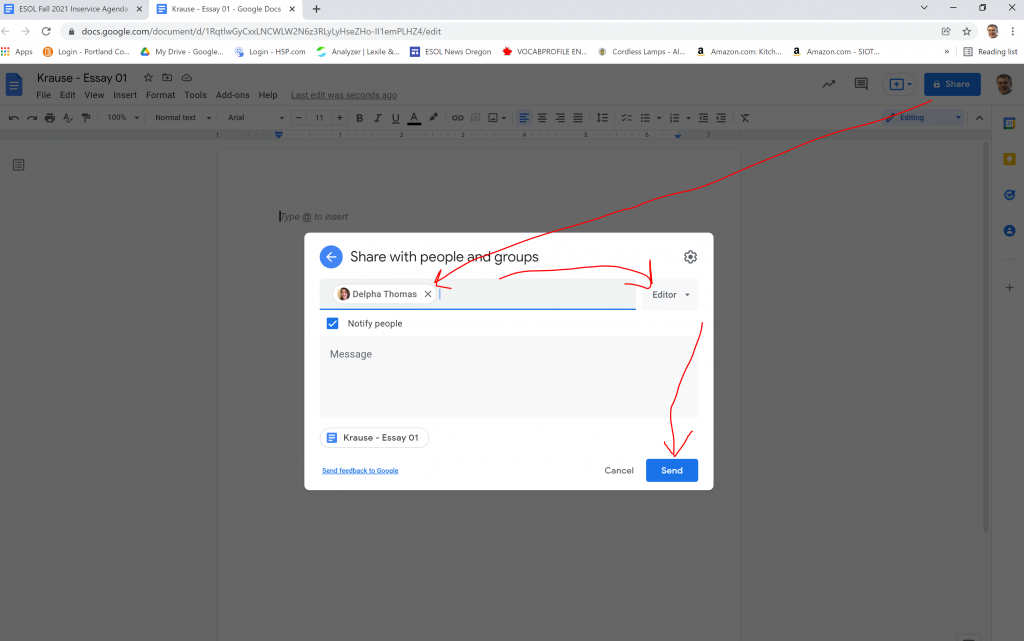
1.4 GETTING STARTED: Setting Up a Google Doc

- Open a new, blank Google Doc. Tip: Sometimes it’s easiest to enter from your college Gmail account by clicking on the Google Apps icon (the nine little squares in a grid) and then Docs.
- Give the document a name by clicking in the box in the upper-left hand corner. Tip: Be specific so that it is easy to find later (for example: Krause – Essay 01).
- From the menu bar near the top, click Format > Line and Paragraph Spacing > Double to use double-spaced lines.
Level 8 Writing
January 13, 2022
- On the next line, type the title of your essay. Use the Center Align button in the toolbar to place the text in the center of the page.
- Press Enter and click the Left Align button to start the first paragraph at the left margin. Press the computer’s Tab key to indent the first line of the paragraph.
Synthesis Copyright © 2022 by Timothy Krause is licensed under a Creative Commons Attribution-NonCommercial-ShareAlike 4.0 International License , except where otherwise noted.

Cloud Storage

Custom Business Email

Video and voice conferencing

Shared Calendars
Word Processing

Spreadsheets

Presentation Builder

Survey builder

Google Workspace
An integrated suit of secure, cloud-native collaboration and productivity apps powered by Google AI.
Build your best ideas together, in Google Docs
Create and collaborate on online documents in real-time and from any device.
- For my personal use
- For work or my business

Seamless collaboration, from anywhere
Edit together in real-time with easy sharing, and use comments, suggestions, and action items to keep things moving. Or use @-mentions to pull relevant people, files, and events into your online Docs for rich collaboration.

Write faster with built-in intelligence
Assistive features like Smart Compose help you write faster with fewer errors, so you can focus on ideas. And save time with spelling and grammar suggestions, voice typing, and quick document translation.

Seamlessly connect to your other Google apps
Docs is thoughtfully connected to other Google apps you love, saving you time. Reply to comments directly from Gmail, embed charts from Google Sheets, and easily share via Google Meet. You can even search the web and Google Drive for relevant content and images, directly from Docs.

Bring collaboration and intelligence to other file types
Easily edit Microsoft Word files online without converting them, and layer on Docs’ enhanced collaborative and assistive features like action items and Smart Compose. You can also import PDFs, making them instantly editable.

Do more with add-ons
Access a variety of third-party applications, right from Docs. Whether it’s an e-signature app or project management tool, open it from Docs to work faster.

Work on fresh content
With Docs, everyone’s working on the latest version of a document. And with edits automatically saved in version history, it’s easy to track or undo changes.

Stay productive, even offline
You can access, create, and edit Docs even without an internet connection, helping you stay productive from anywhere.
Security, compliance, and privacy

Secure by default
We use industry-leading security measures to keep your data safe, including advanced malware protections. Docs is also cloud-native, eliminating the need for local files and minimizing risk to your devices.
Encryption in transit and at rest
All files uploaded to Google Drive or created in Docs are encrypted in transit and at rest.
Compliance to support regulatory requirements
Our products, including Docs, regularly undergo independent verification of their security, privacy, and compliance controls .
Private by design
Docs adheres to the same robust privacy commitments and data protections as the rest of Google Cloud’s enterprise services .

You control your data.
We never use your docs content for ad purposes., we never sell your personal information to third parties., find the plan that’s right for you, google docs is a part of google workspace.
Every plan includes

|
|
| $12 USD info Or $14.40 per user / month, when billed monthly
|
|---|---|---|
| content creation | done | done |
| Secure cloud storage | 15 GB per user | 2 TB per user |
| remove | done | |
| Secure email | done | done |
| remove | done | |
| Video and voice conferencing | 100 participants | 150 participants |
| remove | done | |
| Centralized administration | remove | done |
| remove | done | |
| Self-service online and community forums | 24/7 online support and community forums |
Collaborate from anywhere, on any device
Access, create, and edit your documents wherever you are — from any mobile device, tablet, or computer — even when offline.

Get a head start with templates
Choose from a variety of dashboards, project trackers, and other professionally-designed templates to kick things off quickly..

Visit the Docs Template Gallery for more.
Ready to get started?
- Skip to primary navigation
- Skip to main content
- Skip to primary sidebar
- Skip to footer
Don't Miss a Post! Subscribe
- Guest Posts
- Educational AI
- Edtech Tools
- Edtech Apps
- Teacher Resources
- Special Education
- Edtech for Kids
- Buying Guides for Teachers
Educators Technology
Innovative EdTech for teachers, educators, parents, and students
Here is How to Use Google Docs Compare Documents
By Med Kharbach, PhD | Last Update: May 15, 2024

Google Docs, a widely adopted tool in the realm of education and beyond, boasts a plethora of features designed to streamline the collaborative process of document creation and editing. Among these features, the ‘Compare Documents’ function stands out as a particularly innovative and practical tool, especially for educators and students alike.
As an educator with a passion for integrating technology into the classroom, I’ve found the ‘Compare Document’ feature to be a game-changer. It offers a straightforward way to juxtapose two documents with just a few clicks, allowing teachers to meticulously compare essays and track revisions.
This is not just a trivial feature—it represents a significant time-saver in the grading process. Imagine effortlessly pinpointing the changes made between drafts, facilitating a more comprehensive and nuanced feedback process. This tool doesn’t merely compare; it reveals the progression of a student’s thought and writing process, offering invaluable insights into their learning journey.
But the utility of this feature isn’t confined to the teacher’s desk. Students, too, can harness the power of ‘Compare Documents’ to monitor their own progress. It allows them to keep a meticulous record of the changes they’ve made to a document, essentially capturing the evolution of their writing style over time.
This can be particularly enlightening for students, helping them to visualize their growth and identify areas for improvement in real time. Moreover, when it comes to collaborative projects, this tool becomes an essential asset, enabling students to document new edits and seamlessly share feedback with their peers, fostering a collaborative and constructive learning environment.
How to Access Google Docs Compare Documents
Accessing this feature is a breeze. It’s built right into the Google Docs interface. To get started, simply open the Google document you wish to use as your ‘base document.’ Then, navigate to the top toolbar, click on ‘Tools,’ and select ‘Compare Documents’ from the dropdown menu.

From there, the process is intuitive: click on ‘My Drive’ to select the comparison document from your Google Drive. It’s worth noting that the person whose name you choose will be displayed as the author of the suggested edits in the ‘comparison output file.’ Once you’ve made your selections, click ‘compare,’ and watch as Google Docs efficiently generates a detailed comparison of the two documents.
Courtesy of Google
The Benefits of the ‘Compare Documents’ Feature
Here are some of the key advantages The ‘Compare Documents’ feature in Google Docs offers, especially in an academic setting:
- Efficient Feedback and Grading : For educators, the ability to compare versions of a document streamlines the grading process. It enables quick identification of changes and additions, making it easier to provide targeted feedback. This not only saves precious time but also enhances the quality of feedback by focusing on specific revisions.
- Tracking Student Progress : This feature offers a clear, visual representation of a student’s progress over time. Educators can compare early drafts with final submissions to gauge improvement, understand a student’s writing process, and identify areas where further support might be needed.
- Enhancing Collaborative Work : In group projects, ‘Compare Documents’ proves invaluable. It allows team members to view individual contributions, ensuring transparency and accountability. This feature fosters a collaborative environment where feedback and constructive criticism can be shared efficiently.
- Documenting Writing Evolution : For students, seeing how their work evolves from the first draft to the final submission is profoundly insightful. It encourages self-reflection and self-assessment, empowering students to take ownership of their learning process.
- Facilitating Peer Review : The tool is perfect for peer review sessions. Students can compare their work with that of their peers, learn from each other’s strengths, identify common pitfalls, and collectively enhance their writing skills.
- Minimizing Plagiarism : By comparing documents, teachers can effectively spot similarities with other texts, which can be a deterrent to plagiarism. It’s a way to uphold academic integrity while teaching students the value of original work and proper citation.
- Ease of Access and Use : Being integrated into Google Docs, the feature is incredibly user-friendly and accessible. There’s no need for additional software or complicated processes, making it a seamless part of the digital classroom.
- Time-stamped Revisions : This aspect of the feature helps in understanding the sequence of edits and contributions, which can be particularly useful in project management and meeting deadlines.
- Building a Portfolio : Students can create a portfolio of their work, showcasing their improvement and the feedback received. This can be a valuable resource for one-on-one meetings or parent-teacher conferences.
Related: Here is How to Insert a Page Break in Google Docs
Concluding thoughts
For educators, ‘Compare Documents’ is akin to having an extra set of eyes, offering a detailed and nuanced view of each student’s writing journey. It’s a tool that respects the uniqueness of each learner’s path, providing tailored feedback that recognizes their individual growth and challenges. For students, it’s more than a writing aid; it’s a mirror reflecting their progress, encouraging self-reflection, and fostering a sense of achievement as they see their ideas and skills evolve.The ‘Compare Documents’ feature in Google Docs definitely stands out as a bridge connecting ideas, facilitating clearer understanding, and nurturing a culture of shared learning and collective growth.
Join our mailing list
Never miss an EdTech beat! Subscribe now for exclusive insights and resources .

Meet Med Kharbach, PhD
Dr. Med Kharbach is an influential voice in the global educational technology landscape, with an extensive background in educational studies and a decade-long experience as a K-12 teacher. Holding a Ph.D. from Mount Saint Vincent University in Halifax, Canada, he brings a unique perspective to the educational world by integrating his profound academic knowledge with his hands-on teaching experience. Dr. Kharbach's academic pursuits encompass curriculum studies, discourse analysis, language learning/teaching, language and identity, emerging literacies, educational technology, and research methodologies. His work has been presented at numerous national and international conferences and published in various esteemed academic journals.
Join our email list for exclusive EdTech content.
- Help Center
- Get started
- Learn by product
- Learn by role & industry
- Hybrid workplace tips
- Gen AI tips
- Productivity tips
- Business tutorials
- Switch from Microsoft & others
- Support & accessibility
- Google Workspace
- Privacy Policy
- Terms of Service
- Submit feedback
- What's new?
- Get started Welcome Get ready to switch What to do on your first day Your first week & beyond Cheat sheets & reference guides Open Google Workspace apps
- Learn by product Calendar Chat Chrome browser Docs Drive Gemini Gmail Meet Sheets Slides Managed teams Mobile & device setup All products
- Learn by role & industry Administrative assistants Digital marketing Finance Healthcare Human resources Law practices Manufacturing Media & entertainment Nonprofits Professional services Project management Research & development Retail Sales & marketing Technical support UX design Visual design Web development
- Hybrid workplace tips Hybrid work training & help Use Meet Companion mode Stay connected when working remotely Work from home Work with remote teams Plan & hold meetings from anywhere Hold large remote events Work with non-Google Workspace users
- Gen AI tips Generative AI training & help Get started with Gemini Gemini cheat sheet Role-specific prompts & use cases Tips for writing prompts for Gemini Gemini usage limits Learn about generative AI
- Productivity tips Set up business meetings Discuss topics with your team Brainstorm with colleagues Improve communication Make video conference calls Create great presentations Create strong proposals Onboard team members Optimize your inbox Analyze data Clean up data Go paperless
- Business tutorials Use generative AI at work Plan & manage a project Plan & hold meetings from anywhere Hold large remote events Stay connected when working remotely Collaborate with decision makers Share a final document Free up storage space Plan a project with external clients Delegate work when you're OOO Get up to speed after time off Additional training resources
- Switch from Microsoft & others Switch from Microsoft Switch from Slack Switch from Zoom, Skype, or Webex Switch from Box, Dropbox, or C:\ drive Switch from HCL Notes
- Support & accessibility Support for users Support for administrators Accessibility Save or customize Learning Center guides
Bring your best ideas to life with Gemini for Google Workspace. Get tips & real-life use cases for using gen AI at work .
Share a final document
what you'll learn.
| How to share the final version of a document with colleagues. Also, how to set permissions to prevent changes to a final document. |
What you'll need
In this tutorial
Decide who you want to share the file with and find co-workers using Cloud Search. If you can't sign in, your account doesn't have Cloud Search. Learn more
If you’re sharing with a few specific people, you can add it to your own Drive and share it from there. If your organization uses shared drives , you can add it to your shared drive and share it with everyone who has access to the shared drive. To share the document more widely with your entire organization or to share it publicly, add it to Google Sites. Add the document to Drive: On your computer, you can upload from drive.google.com or your desktop. You can upload files into private or shared folders.
Add the document to a shared drive: Requires at least Contributor access Any files you add are owned by the team. If you leave the shared drive, your files remain.
*If you don't own the file but have Editor access in Drive, you can move it to a shared drive if your administrator has allowed this option. Note: To store and access files on your desktop, use Google Drive for desktop. For details, see What can you do with Drive for desktop . Add the document to Sites: Go to Google Sites and open the site and page where you want to add the file. Click Insert Docs, Slides, or Sheets to choose a file on your Drive. Embed any file from Drive or the contents of a folder stored in Drive. If you make changes to your files in Drive, the same changes automatically show in Sites. Back to top
Share a file or folder with specific people:
Share a link to a file or folder:
People who aren't signed in to a Google Account show up as anonymous animals in your file . Learn more about anonymous animals .
If you’re sharing a file, the owner and anyone with editor access can change the permissions and share the file. To prevent others from sharing your file:
To prevent viewers and commenters from printing, copying, or downloading your file:
Important: You can limit how people share, print, download, and copy within Google Drive, Docs, Sheets, and Slides, but you can't stop how others share the file content in other ways.
You can rename a document to mark it as final and then change the permissions on it to view-only. People can view the content but won’t be able to make changes. Rename your document in Docs, Sheets, or Slides to mark it final:
Change your document to view-only:If you shared the file with specific people or a group: If you shared the file with your organization: From Drive:Stop sharing a file or folder you own:
Remove a link to a file or folder you own:
From a shared drive :Unshare files with your organization: Unshare files with individuals: Note: Group settings can override individual settings. So, if you try to unshare a file with a person who belongs to an organization or group with access to the file, this person can still access the file. If people don’t have access to your document, they’ll see a “You need permission” message. They can click Request access , and you’ll get an email asking for your approval. If you want to share the document with that person, follow the instructions in Share the document . In Google Drive, you can see and manage access requests in Activity . Note: You will need to have edit access for the file to see the Activity dashboard data.
Google, Google Workspace, and related marks and logos are trademarks of Google LLC. All other company and product names are trademarks of the companies with which they are associated. Was this helpful?Learn how to print Learning Center guides, save them as PDFs, or customize them for your organization. Generate accurate MLA citations for free
MLA Format | Complete Guidelines & Free TemplatePublished on December 11, 2019 by Raimo Streefkerk . Revised on May 6, 2024 by Jack Caulfield. The MLA Handbook provides guidelines for creating MLA citations and formatting academic papers. This includes advice on structuring parenthetical citations, the Works Cited page, and tables and figures. This quick guide will help you set up your MLA format paper in no time. Cite your MLA sourceStart by applying these MLA format guidelines to your document:
Alternatively, you can automatically apply the formatting with our MLA docx or Google Docs template. Table of contentsHow to set up mla format in google docs, header and title, running head, works cited page, creating mla style citations, headings and subheadings, tables and figures, frequently asked questions about mla format. The header in MLA format is left-aligned on the first page of your paper. It includes
After the MLA header, press ENTER once and type your paper title. Center the title and don’t forget to apply title-case capitalization. Read our article on writing strong titles that are informative, striking and appropriate.  For a paper with multiple authors, it’s better to use a separate title page instead. At the top of every page, including the first page, you need to include your last name and the page number. This is called the “running head.” Follow these steps to set up the MLA running head in your Word or Google Docs document:
The running head should look like this:  The Works Cited list is included on a separate page at the end of your paper. You list all the sources you referenced in your paper in alphabetical order. Don’t include sources that weren’t cited in the paper, except potentially in an MLA annotated bibliography assignment. Place the title “Works Cited” in the center at the top of the page. After the title, press ENTER once and insert your MLA references. If a reference entry is longer than one line, each line after the first should be indented ½ inch (called a hanging indent ). All entries are double spaced, just like the rest of the text.  Generate accurate MLA citations with ScribbrPrefer to cite your sources manually? Use the interactive example below to see what the Works Cited entry and MLA in-text citation look like for different source types. Headings and subheadings are not mandatory, but they can help you organize and structure your paper, especially in longer assignments. MLA has only a few formatting requirements for headings. They should
We recommend keeping the font and size the same as the body text and applying title case capitalization. In general, boldface indicates greater prominence, while italics are appropriate for subordinate headings. Chapter Title Section Heading Tip: Both Google Docs and Microsoft Word allow you to create heading levels that help you to keep your headings consistent. Tables and other illustrations (referred to as “figures”) should be placed as close to the relevant part of text as possible. MLA also provides guidelines for presenting them. MLA format for tablesTables are labeled and numbered, along with a descriptive title. The label and title are placed above the table on separate lines; the label and number appear in bold. A caption providing information about the source appears below the table; you don’t need one if the table is your own work. Below this, any explanatory notes appear, marked on the relevant part of the table with a superscript letter. The first line of each note is indented; your word processor should apply this formatting automatically. Just like in the rest of the paper, the text is double spaced and you should use title case capitalization for the title (but not for the caption or notes).  MLA format for figuresFigures (any image included in your paper that isn’t a table) are also labeled and numbered, but here, this is integrated into the caption below the image. The caption in this case is also centered. The label “Figure” is abbreviated to “Fig.” and followed by the figure number and a period. The rest of the caption gives either full source information, or (as in the example here) just basic descriptive information about the image (author, title, publication year).  Source information in table and figure captionsIf the caption of your table or figure includes full source information and that source is not otherwise cited in the text, you don’t need to include it in your Works Cited list. Give full source information in a caption in the same format as you would in the Works Cited list, but without inverting the author name (i.e. John Smith, not Smith, John). MLA recommends using 12-point Times New Roman , since it’s easy to read and installed on every computer. Other standard fonts such as Arial or Georgia are also acceptable. If in doubt, check with your supervisor which font you should be using. The main guidelines for formatting a paper in MLA style are as follows:
The fastest and most accurate way to create MLA citations is by using Scribbr’s MLA Citation Generator . Search by book title, page URL, or journal DOI to automatically generate flawless citations, or cite manually using the simple citation forms. The MLA Handbook is currently in its 9th edition , published in 2021. This quick guide to MLA style explains the latest guidelines for citing sources and formatting papers according to MLA. Usually, no title page is needed in an MLA paper . A header is generally included at the top of the first page instead. The exceptions are when:
In those cases, you should use a title page instead of a header, listing the same information but on a separate page. Cite this Scribbr articleIf you want to cite this source, you can copy and paste the citation or click the “Cite this Scribbr article” button to automatically add the citation to our free Citation Generator. Streefkerk, R. (2024, May 06). MLA Format | Complete Guidelines & Free Template. Scribbr. Retrieved June 8, 2024, from https://www.scribbr.com/mla/formatting/ Is this article helpful? Raimo StreefkerkOther students also liked, creating an mla header, block quoting in mla style, how to format your mla works cited page, get unlimited documents corrected. ✔ Free APA citation check included ✔ Unlimited document corrections ✔ Specialized in correcting academic texts Navigation MenuSearch code, repositories, users, issues, pull requests..., provide feedback. We read every piece of feedback, and take your input very seriously. Saved searchesUse saved searches to filter your results more quickly. To see all available qualifiers, see our documentation .
🐙 Guides, papers, lecture, notebooks and resources for prompt engineering dair-ai/Prompt-Engineering-GuideFolders and files.
Repository files navigationPrompt engineering guide. Prompt engineering is a relatively new discipline for developing and optimizing prompts to efficiently use language models (LMs) for a wide variety of applications and research topics. Prompt engineering skills help to better understand the capabilities and limitations of large language models (LLMs). Researchers use prompt engineering to improve the capacity of LLMs on a wide range of common and complex tasks such as question answering and arithmetic reasoning. Developers use prompt engineering to design robust and effective prompting techniques that interface with LLMs and other tools. Motivated by the high interest in developing with LLMs, we have created this new prompt engineering guide that contains all the latest papers, learning guides, lectures, references, and tools related to prompt engineering for LLMs. 🌐 Prompt Engineering Guide (Web Version) We've partnered with Maven to deliver the following live cohort-based courses on prompt engineering: LLMs for Everyone (Beginner) - learn about the latest prompt engineering techniques and how to effectively apply them to real-world use cases. Prompt Engineering for LLMs (Advanced) - learn advanced prompt engineering techniques to build complex use cases and applications with LLMs. Happy Prompting! Announcements / Updates
Join our Discord Follow us on Twitter Subscribe to our Newsletter You can also find the most up-to-date guides on our new website https://www.promptingguide.ai/ .
We have published a 1 hour lecture that provides a comprehensive overview of prompting techniques, applications, and tools.
Running the guide locallyTo run the guide locally, for example to check the correct implementation of a new translation, you will need to:
AppearancesSome places where we have been featured:
If you are using the guide for your work or research, please cite us as follows: MIT License Feel free to open a PR if you think something is missing here. Always welcome feedback and suggestions. Just open an issue! Sponsor this projectContributors 190.
Welcome to Microsoft Forms!
Explore templates
| ||||||||||||||||||||||||||||||||||||||||||||||||||||||||||||||||||||||||||||||||||||||||||||||||||||||||||||||||||||||||
IMAGES
VIDEO
COMMENTS
Create and edit web-based documents, spreadsheets, and presentations. Store documents online and access them from any computer.
Paperpile also offers a free citation generator for Google Docs that makes it a breeze to find, cite, and style academic sources within your document. 6. Leave Time to Make it Pretty. One thing Google Docs cannot do is make a truly visually striking document. It suffers from the same limitations that all WYSIWYG editors do - it can't be both ...
But with Google Docs, it's as easy as 1-2-3! Here is a step-by-step guide to formatting your document using all of its features: 1) Begin by opening up an empty Document in Google Docs. 2) To ensure that you are utilizing proper research paper format, use the built in Heading styles - Heading 1 for your title; and Heading 2 and 3 for ...
Provided by The Academic Center for Excellence 2 Google Docs: Instructions for Formatting Updated May 2021. Figure 2. Creating a Google Doc. 1. To create a Google Doc, log in to myGCC, and open Gmail. Click on the "Apps" button in the upper right hand of the screen and select "Docs" (see Figure 1). If the "Docs" button is not ...
Insert references into a Google Doc. On your Google Chrome browser, install the F1000Workspace Google Docs add-on available here. Next, open up your Google Doc and you'll see that F1000 appears in your toolbar. If you click on it, the F1000 interface will open on the right sidebar.
Google Docs is quickly becoming an increasingly popular platform for students to create and format research papers. This comprehensive guide outlines the basic guidelines needed to effectively use Google Docs in order to complete a successful research paper, allowing students more control over their final product without sacrificing quality or accuracy of content.
Exporting your Final Draft as PDF or Word File Ready for Submission; 1. Introduction to Formatting a Research Paper in Google Docs. Google Docs is a powerful and easy-to-use word processor that can be used for formatting research papers. With Google Docs, you have all the features of a typical desktop publishing software without having to ...
Add Citations and a Bibliography. For including your references in the text and in the form of a bibliography, Google Docs gives you the Citations feature. Go to Tools > Citations to open the Citations sidebar. Select your writing style from APA, MLA, or Chicago in the drop-down box at the top. Then, click "Add Citation Source" to add the type ...
Open a new, blank Google Doc. Tip: Sometimes it's easiest to enter from your college Gmail account by clicking on the Google Apps icon (the nine little squares in a grid) and then Docs. Give the document a name by clicking in the box in the upper-left hand corner. Tip: Be specific so that it is easy to find later (for example: Krause ...
Seventh edition APA Style was designed with modern word-processing programs in mind. Most default settings in programs such as Academic Writer, Microsoft Word, and Google Docs already comply with APA Style. However, you may need to make a few adjustments before you begin writing. Margins: Use 1-in. margins on all sides of the page (top, bottom ...
An essay outline is a way of planning the structure of your essay before you start writing. It involves writing quick summary sentences or phrases for every point you will cover in each paragraph, giving you a picture of how your argument will unfold. You'll sometimes be asked to submit an essay outline as a separate assignment before you ...
Use Google Docs to create, and collaborate on online documents. Edit together with secure sharing in real-time and from any device.
Refer to this video when typing assignments using Google Docs to ensure that you use proper final draft format.
Formatting a Chicago paper. The main guidelines for writing a paper in Chicago style (also known as Turabian style) are: Use a standard font like 12 pt Times New Roman. Use 1 inch margins or larger. Apply double line spacing. Indent every new paragraph ½ inch. Place page numbers in the top right or bottom center.
To get started, simply open the Google document you wish to use as your 'base document.'. Then, navigate to the top toolbar, click on 'Tools,' and select 'Compare Documents' from the dropdown menu. From there, the process is intuitive: click on 'My Drive' to select the comparison document from your Google Drive.
Find the file or folder in Google Drive, Google Docs, Google Sheets, or Google Slides. Open or select the file or folder. Click Share or Share . Find the person you want to stop sharing with. To the right of their name, click the Down arrow Remove access. Click Save. Remove a link to a file or folder you own:
MLA format is a widely used citation style for academic papers. Learn how to format your title page, header, and Works Cited page with our free template and examples. Watch our 3-minute video to see how easy it is to apply MLA rules to your document.
The final essay will need to be between 500-600 words and contain revisions from the rough draft to the final draft. Please note that essay/projects and worth 40% of your grade, and failure to complete the essay will result in not passing this quarter. Options. Analyze 2 characters from the play and explain how they contributed to the tragedy. 2.
Offer some more specific background information (as needed). 3. Provide the title of the piece and the author's name if the essay is about a specific book/poem/article/passage. C. Thesis Statement 1. State your topic and position. Remember that a thesis = claim + reasons. 2. Outline your main points and ideas.
🐙 Guides, papers, lecture, notebooks and resources for prompt engineering - dair-ai/Prompt-Engineering-Guide. 🐙 Guides, papers, lecture, notebooks and resources for prompt engineering - dair-ai/Prompt-Engineering-Guide ... Docs; Contact; Manage cookies Do not share my personal information You can't perform that action at this time. ...
Microsoft Forms is a web-based application that allows you to: Create and share online surveys, quizzes, polls, and forms. Collect feedback, measure satisfaction, test knowledge, and more. Easily design your forms with various question types, themes, and branching logic. Analyze your results with built-in charts and reports, or export them to ...
Mr. Modi took a more positive view in a statement on X declaring that his coalition had won a third term. "This is a historical feat in India's history," he said. Supporters of the Congress ...