Subject Explorer
School Subjects
Math & Science
Business & Technology
Electives & Health
Board & Administration
Teaching & Learning
Audio/Video Lectures
Books & Documents
Classifieds
Jobs & Resources
Discussions
Language & Literature

Practice Projects for PowerPoint

Powerpoint Project 5
In this practice project for Powerpoint, students will create a powerpoint presentation following the example given. Students will be required to have slides enter with custom animation and differing …

Powerpoint Project 4
In this practice project for Powerpoint, students will creat a basic powerpoint where slides advance automatically. …

Powerpoint Project 3
In this practice project for Powerpoint, students will create a basic powerpoint based on the example given. Students will need to create and insert a chart and have different parts of the slide …

Powerpoint Project 2
In this practice project for Powerpoint, students will follow basic instructions to create a powerpoint where slides and text appear with different animations. …

Powerpoint Project 1
In this practice project for Powerpoint, students will create a basic powerpoint based on the example given. Students will need to write titles, insert pictures and use different animations for key …
Categories:
Resource Type:
Pass it on:
Leave a Reply

PowerPoint Practice 1

Prefer to watch and learn? Check out this video tutorial:
Complete the following Practice Activity and submit your completed project.
We will use PowerPoint to create a presentation that welcomes new students to Paradise Valley Community College. As a Peer Leader, you have been asked to present at New Student Orientation, where new students are introduced to college life at PVCC. We will build upon this presentation over the next 4 practice assignments. Key skills in this practice include creating a new presentation, entering text, presentation views, presentation themes, speaker notes, adding and formatting pictures, printing a presentation, and Header and Footer options.
- Start PowerPoint, notice how it opens in Backstage View. Under Theme s , select the Facet theme. If the Facet theme is not visible, use the search to locate it. Select the second color variant , and the select Create. If PowerPoint does not open in Backstage View, select the file button to show Backstage View, and then select blank presentation. Then, on the Design tab, select the theme as indicated above.
- Select File, Save As, Browse, and then navigate to your PowerPoint folder on your flash drive or other location where you save your files. Name the presentation as Yourlastname_Yourfirstname_PowerPoint_Practice_1.

- Notice that the layout of slide 1 is Title and Content. This is a common layout for the Title Slide . All text, graphics, videos, or anything that is on a slide must be in a placeholder . In the Click to add title placeholder, type Welcome Pumas! In the subtitle placeholder type Fall New Student Orientation.
- On the Design tab, in the Themes group, ensure under Variants, Blue colors are selected.
- Although we only have our title slide added, most presentations have several slides. When creating your presentation, keep in mind the attention span of your audience, and the allotted amount of time. For this presentation, we have been allotted 10 minutes, and will create 5 slides.
- Outline View
- Slide Sorter
- Notes Pages
- Reading View
- On the Home tab, in the Slides group, select the arrow next to New Slide and selected Title and Content. In the Click to add title placeholder type Student Life.
- With slide 2 still active, on the Home Tab, in the Slides Group, select the arrow next to Layout and select Two Content. Notice how the layout of slide 2 changed.
- Get involved with Student Life and Leadership!
- Connect with fellow students
- Discover empowerment
- Make a difference
- Format the text as a bulleted list, with the default bullet. Change the font size of the text to 28.
- In the second placeholder, use the placeholder shortcut to insert an online picture. In the Insert Pictures dialog box, use the Bing image search to search for a picture of students. Choose any picture of college students, and insert it into the placeholder.
- With slide 2 displayed, in the Status Bar , click Notes. Notice that the Notes Pane displays below the Slide Pane. In the Notes pane type: We sponsor numerous campus events and opportunities for you to participate in our dynamic learning environment. Through Student Life, students engage in educational relationships that inspire positive social change, contributing to a richer and more fulfilling college experience. Not only that, students build leadership and professional skills that carry on through life.
- Cross Country
- Track and Field
- Resize the text to 28 pt and use the default bullet.
- With slide 3 still active, on the Insert tab in the Illustration group, select the arrow next to Shapes, under Stars and Banners add the Explosion 1 shape to the right of the bulleted list. Click and drag the shape onto the slide.
- Inside the shape type Find us on Social Media @Puma Athletics
- Use the Sizing handle to turn the Explosion shape slightly to the left, and move it so that it is in line with the text. Use the guides to align the image.
- With the Explosion graphic still selected, on the Drawing Tools Format tab, in the Shape Styles group, select the Colored Fill-Blue, Accent 2 shape style.
- On the Home tab, in the Slides Group, select New Slide and choose Picture with Caption Layout. In the picture placeholder, click to add a picture. Browse to your data files, and insert the image PowerPoint_Practice_1. On the Picture Tools Format tab, in the Size group select the arrow under Crop and select Fit .
- Select the placeholder below the image and enter the following title: It is great to be a Puma! In the placeholder below that, type: Welcome to PVCC! Change the font size of the second text placeholder to 36.
- With slide 4 still active, ensure the Notes Pane displays. In the notes section, add the following speaker notes : Explain the Puma Commitment and the support available to students.
- On the Home tab, in the Slides Group, select New Slide and choose Blank Layout. Ensure slide 5 is active
- On the Insert tab, in the Text Group, select the arrow under WordArt , and select Word Art in the second row, second column Gradient Fill Green Accent 1 Reflection. Type the text: Any Questions?
- Change the font size of the WordArt to 72.
- Display slide 1. On the Insert tab, in the Text Group, select Header & Footer to display the Header and Footer Dialog Box. Notice there are two tabs: Slide and Notes and Handouts. On the Notes and Handouts tab, check the box next to Data and Time. Ensure the check box next to Page Number is also selected. Click Apply to All.
- Select the File tab to display backstage view. Select Print to view the Print Options . Although PowerPoint slides are meant for presentations, there is the option to print slides for the presenter and participants. Click Full Page Slides to then choose Notes Pages . Scroll through the slides and notice that slides 2 and 4 are displaying the Notes.
- Select Notes Pages, and choose 6 slides Horizontal. Notice how the data and page number displays on the slide in Print Preview .
- Save your presentation, and take note of where it is located. There should be a total of 5 slides in your slide deck. Compare your presentation to the image below, and make any modifications if needed. Close out of PowerPoint and submit your entire presentation per your instructor’s instructions.

Media Attributions
- Practice It Icon © Jessica Parsons is licensed under a CC BY (Attribution) license
A set of unified design elements that provides a coordinated look for your presentation by applying colors, fonts and effects
A variation on the presentation theme style or color
The process of communicating a topic to an audience, typically a demonstration, introduction, lecture, or speech meant to inform, persuade, inspire, motivate, or to build good will or to present a new idea or product
The arrangement of elements in a PowerPoint slide such as title and subtitle, lists, pictures, shapes, charts, tables and media
A slide layout this is commonly used as the first slide in a presentation and contains and introduction to the presentation
A box on a slide with a dotted border that holds the title, body text, or other content such as charts, tables and media
The primary editing view in PowerPoint where you write and design your presentations
A PowerPoint view that displays the presentation outline to the left of the slide pane
Displays a miniature version of each slide
A printout that contains the slide image on the top half of the page and notes that you have entered on the notes pane in the lower half of the page
A view in PowerPoint that displays a presentation in a manner similar to a side show but in which the taskbar, title bar, and status bar remain available in the presentation window
Occupies the full computer screen exactly the way your presentation will look on a big screen when your audience sees it
Located at the bottom of the PowerPoint window and shows messages and information about the view, such as the slide number and the current theme template used
Allows you to apply preset colors and effects to quickly change the appearance of your shape
A command that removes unwanted or unnecessary areas of a picture
A function of the crop command that allows you to resize the picture so that the entire picture displays inside the picture area, while maintain the original aspect ratio
Helps presenters recall important points, such as key messages or stats, as they give a presentation
A gallery of text styles with which you can create decorative effects, such as shadowed or mirrored
Although presentations are not typically printed, this will allow efficient options for when printing is necessary
A backstage view feature that displays on the screen what a hard (printed) copy would looks like
Computer Usage and Applications Copyright © by Abigail Rusu & Maricopa Millions is licensed under a Creative Commons Attribution 4.0 International License , except where otherwise noted.
Share This Book
Purdue Online Writing Lab Purdue OWL® College of Liberal Arts
Designing an Effective PowerPoint Presentation: Quick Guide

Welcome to the Purdue OWL
This page is brought to you by the OWL at Purdue University. When printing this page, you must include the entire legal notice.
Copyright ©1995-2018 by The Writing Lab & The OWL at Purdue and Purdue University. All rights reserved. This material may not be published, reproduced, broadcast, rewritten, or redistributed without permission. Use of this site constitutes acceptance of our terms and conditions of fair use.
This presentation is designed to quickly introduce you into the world of PowerPoint creation. It covers concepts of visual rhetoric, design, and good presentation skills.
Lab: PowerPoint
What is microsoft powerpoint, slide layout and style, inserting a picture, animating the presentation, drawing in powerpoint, submitting your presentation.
Pardon Our Interruption
As you were browsing something about your browser made us think you were a bot. There are a few reasons this might happen:
- You've disabled JavaScript in your web browser.
- You're a power user moving through this website with super-human speed.
- You've disabled cookies in your web browser.
- A third-party browser plugin, such as Ghostery or NoScript, is preventing JavaScript from running. Additional information is available in this support article .
To regain access, please make sure that cookies and JavaScript are enabled before reloading the page.
Got any suggestions?
We want to hear from you! Send us a message and help improve Slidesgo
Top searches
Trending searches

21 templates

5 templates

education technology
258 templates

meet the teacher
30 templates

team introduction
23 templates
Laboratory Presentation templates
There have been many breakthroughs and discoveries thanks to the work of people who spent many, many hours working in a laboratory. with these google slides and powerpoint templates, your research will stand out.

It seems that you like this template!
Premium template.
Unlock this template and gain unlimited access
Chemistry Laboratory
Download the Chemistry Laboratory presentation for PowerPoint or Google Slides. Are you looking for a way to make your school or academy stand out among the competition? This template is designed to showcase all the fantastic aspects of your center. With perfect slides that allow you to easily add information...

Vaccine Research
To combat certain diseases, vaccines are one of the most effective (and sometimes, durable) solutions. Here's a new template where you can give a speech on vaccine research. To surprise your audience, we've opted for an abstract design, but don't worry: there are also photos and some blue tones, which...

Plant Genetics and Breeding
Download the Plant Genetics and Breeding presentation for PowerPoint or Google Slides and start impressing your audience with a creative and original design. Slidesgo templates like this one here offer the possibility to convey a concept, idea or topic in a clear, concise and visual way, by using different graphic...

Microscoping Materials!
There are many objects that cannot be seen just with our bare eyes. They're so tiny you need some extra help, like microscopes! This educational template can be used to talk about these tools and what they do. Tell your students everything about it in these kid-friendly slides, with science-related...

Hospital Labs
How many blood tests have you undergone in your life? Probably too many to count. Where do those samples of blood go? To the lab! These labs are equipped with advanced technology and skilled professionals who work tirelessly to analyze samples and provide accurate results, but that's not the only...

Science Subject for Elementary - 1st Grade: Inquiry
Turn your little first graders into real scientists by teaching them the basics of scientific inquiry! We have an hypothesis: if you prepare the lesson with this creative template full of illustrations, resources and fun icons, they will pay more attention to the lesson and retain all the vocabulary we...

Biostatistics Master’s Degree Infographics
Download the Biostatistics Master’s Degree Infographics template for PowerPoint or Google Slides and discover the power of infographics. An infographic resource gives you the ability to showcase your content in a more visual way, which will make it easier for your audience to understand your topic. Slidesgo infographics like this...

Wet Experiment Lab
There are certain laboratories in which scientists need to deal with hazardous substances, so safety equipment and a smart placement of every item are required. These are called "wet labs", in contrast to "dry labs", where low-risk experiments are carried out. How about you use this template to talk about...

General Chemistry - Bachelor of Science in Chemistry
Download the General Chemistry - Bachelor of Science in Chemistry presentation for PowerPoint or Google Slides. As university curricula increasingly incorporate digital tools and platforms, this template has been designed to integrate with presentation software, online learning management systems, or referencing software, enhancing the overall efficiency and effectiveness of student...

Biosafety Laboratory Company Profile
Creating a profile template is an essential step to promote your biosafety laboratory company. This template includes a gradient green color scheme, with pictures of laboratories and research team members. However, you can easily switch these out with pictures tailored to the message and aesthetic that you would like to...

Computed Tomography Breakthrough
Experience the avant-garde of technology with a computed tomography breakthrough. Present a breakthrough with this vivid infographics of soft colors and cool illustrations of computed tomography. Its easy-to-navigate functionality lets you explore new frontiers in diagnostics. Make this breakthrough an integral part of your healthcare solution and navigate the future...

Chemistry Lab Rules for High School
Download the Chemistry Lab Rules for High School presentation for PowerPoint or Google Slides. High school students are approaching adulthood, and therefore, this template’s design reflects the mature nature of their education. Customize the well-defined sections, integrate multimedia and interactive elements and allow space for research or group projects—the possibilities...

Quality Control Lab
A quality control lab is a must-have for any organization looking to ensure their production line meets the highest standards. This template offers a creative and professional approach to presenting quality control data. It features an illustrated background with a quality control lab theme, with bold colors and a minimalist...

Microbiology Laboratory Center
The things you work with are microscopical, but your reach is astronomical! With this creative template full of gradients and icons you can prepare a presentation about your center and speak about current research projects, ideas, your team, or future goals. Edit the resources we have included and turn your...

Innovative Science Lab
Download the Innovative Science Lab presentation for PowerPoint or Google Slides. Hospitals, private clinics, specific wards, you know where to go when in need of medical attention. Perhaps there’s a clinic specialized in treating certain issues, or a hospital in your area that is well-known for its state-of-the-art technology. How...

Biology Infographics
Download the Biology Infographics template for PowerPoint or Google Slides and discover the power of infographics. An infographic resource gives you the ability to showcase your content in a more visual way, which will make it easier for your audience to understand your topic. Slidesgo infographics like this set here...

Biochemistry and Biomolecules - Science - 9th Grade
If you're tasked with creating a presentation about biochemistry and biomolecules, then this Google Slides and PowerPoint template is exactly what you need. With its sleek and professional design, you can easily highlight your research findings and engage your audience. Whether you're a teacher, student, or scientist, this template provides...
- Page 1 of 8
Navigation menu
Microsoft office skill builder.
Important: Please note that you must register on the EG Website before performing the lab.
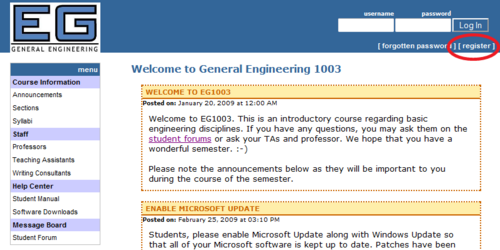
- Fill in the remaining information accordingly. Note: If your email is flast99 @students.poly.edu or fml999 @nyu.edu, then flast99 or fml999 , respectively, will be your username. IMPORTANT!!: After you are registered, a TA must approve your account before you can log in.
- 1 Objectives
- 2.1 Microsoft Office
- 2.2 Microsoft Word
- 2.3 Microsoft Excel
- 2.4 Microsoft PowerPoint
- 3.1 Individual Lab Report
- 4 Materials and Equipment
- 5.1 Microsoft Word
- 5.2 Microsoft Excel
- 5.3.1 Printing Instructions for Recitation
The objective of this lab is to use Microsoft Word, Excel, and PowerPoint to perform specific exercises and become accustomed with the tasks that each application is best suited for. Your goal is to complete the assigned tasks and obtain a basic familiarity with these three applications.
This lab is designed to introduce you to three Microsoft (MS) applications: Word, Excel and PowerPoint. These programs are widely used throughout academia and business so many of you may already have some familiarity with them. Completing your assignments in EG1004 will require a basic competency in them; the following exercises are designed to ensure you have this competency so please complete them.
Microsoft Office
With the recent release of MS Office 2010, EG1004 is in a transition period between MS Office 2007 and MS Office 2010. Either version of MS Office may be used to complete this lab. At this time, it is believed that there are no differences, other than cosmetic ones, which will impact how this lab is performed.
When Microsoft released MS Office 2007, they introduced a new user interface to the MS Office Suite. When a MS Office application is launched, you will see this new Ribbon interface at the top of the window. The Ribbon has several features. In the top-left corner of the windows is the Office Button , where functions that manage the document are found. MS Office 2010 replaced the button with the File tab. These functions include actions like opening, saving, and printing a document. Next to the Office Button , or above the Ribbon in MS Office 2010, is the Quick Access Toolbar where frequently used functions can be found. Initially, there are only three icons, corresponding to saving the document, an undo of what you just did because you changed your mind, and an icon that will have the MS Office application repeat what you just did. You can add more items to the Quick Access Toolbar if you want, but we won't be doing this in this lab. Below the Quick Access Toolbar is the Ribbon , where the tools you'll use for the file are located. At the top of the ribbon are a set of tabs, which operate like the tabs on physical folders in a file cabinet. Looking at the tabs, you can see the functions available. For example, upon launch you are on the Home tab. The area below the tab is organized into several collections which are named at the bottom of the ribbon. Collections are used to logically break down and group similar functions together. Figure 4 shows the initial Ribbon on the Home tab that you are presented with when MS Word is launched.

Clicking the question mark at the top right of any MS Office application will open its help manual. Use it as a reference whenever you are unsure of how to do something. This, and saving your work regularly, will save you many hours over your working lifetime.
Microsoft Word
MS Word is a word processing program. Its function is writing and editing text. It has features that make the mechanics of technical writing relatively easy, but it also has features that make academic dishonesty (e.g., plagiarism) easy as well. You are expected to do all exercises and assignments by yourself for all courses including this one, unless explicitly stated otherwise. Specifically for this course, the main exceptions to this rule are lab presentations (to be done with your lab partner(s) of the week), project presentations (to be done with your project partners) and team lab reports (to be done with your lab partner(s) of the week). You will be given adequate notice when a lab report is expected to be written as a team; otherwise, you are expected to write the lab report individually.
You can create tables and write equations in MS Word. It also has spelling and grammar checkers and a thesaurus to help you eliminate mistakes in your writing. But beware: running spelling and grammar checks does not eliminate the need for careful editing of all your documents. As powerful as these tools are, they are not foolproof.
In this course, you will use MS Word to write lab reports. The thesaurus allows you to quickly find synonyms, so that you can avoid boring repetition in your writing. To use the thesaurus, put the cursor anywhere within the word for which you would like to find a synonym. On the Ribbon, select the Review tab. Then, in the Proofing collection, click on the Thesaurus icon, which looks like an open book. The equivalent words (synonyms) will be shown on the right side of the screen. Just double-click on the one you want to use.
Use in EG1004: writing lab reports.
Microsoft Excel
MS Excel is a spreadsheet program. Its function is collecting, manipulating, and analyzing data. This data can come from a variety of sources, including experiments and design calculations.
MS Excel has many features that streamline data analysis. You can use it to generate tables, charts, and graphs. Excel includes formatting tools, editing features, built-in functions, data manipulation capabilities, and graphing features. It is especially useful for uncovering the relationships that exist between data and to identify trends. You will use it to create graphical elements that will be embedded in your reports and presentations.
Use in EG1004: general data manipulation and analysis. It is useful for uncovering the relationships between data sets and identifying trends. Graphs will be required for many lab reports and presentations.
Microsoft PowerPoint
MS PowerPoint is a presentation program; its function is to create slides for presentations. Presenting information has always been intrinsic to engineering projects. Product introductions, requests for funding, progress reports, and reports to management are just some examples of occasions in which technical professionals need presentation skills.
Remember, MS PowerPoint is a tool that will help you make better presentations. It is not a substitute for the longstanding rules to which good public speakers have always adhered. It is most effective when you use it to illustrate the points you want your audience to understand. In EG1004, you will use MS PowerPoint to report on your lab work and to present your progress on your semester-long design project.
MS PowerPoint is not a substitute for the longstanding rules that good public speakers adhere to. An effective presentation is one that illustrates the points that you want your audience to understand without taking the majority of their attention. Slides with excessive amounts of text do not illustrate anything and as such your presentation should not be written like a novel.
Use in EG1004: creating and giving presentations on your lab work and semester-long design project.
Your Assignment
Individual lab report.
You do not have to write a lab report for this lab. However, you do have to write one for Lab 1A: Mousetrap Car Competition , which you will perform in the second half of the lab session.
You must submit two files to the EG website :
- Generic document
- Personalized document Note: The title page and Microsoft Word exercises should be in a single MS Word document, with the title page and each exercise separated by page breaks. To make a page break, put the cursor where you want a page break, select the Insert tab on the Ribbon, and then click on the Page Break icon in the Pages collection.
- Lab report (Mousetrap Car only)
- Tables and graph
IMPORTANT! Submit your report electronically using the EG website . You will need to login and upload the lab report material. Submission instructions are available. A syllabus showing the deadlines for your section are located on the EG website .
Materials and Equipment
- Microsoft Office suite
You will be creating the following two documents:
Refer to this figure above as you follow the instructions below to spot any mistakes you may make.
- Launch Microsoft Word . To do this, click on the Windows icon in the bottom-left corner of the screen, which opens the Start Menu . Click on the All Programs item that appears just above the button. This will show you all the software on your computer. On the list that appears, click on the Microsoft Office menu item. This will expand to show the MS Office components. Click the Microsoft Word 2007 or Microsoft Word 2010 menu item. Alternatively, you can type "word" into the search field of the Start Menu and click on Microsoft Word 2010 .
- Add style to what you type. Finally, we can change how the letters look to add emphasis. We can make them bolded, italicized, or underlined. For example, the first time words are defined in this lab, we make them bold and italics. You can give letters these special attributes by clicking on the buttons in the Font collection shown in Figure 8.

- Align your text. We can choose how words fill the line on paper. The default is Left alignment which means the words start on the left side of the line and continue right until there is no more room and any text that follows is pushed to the left side of the next line. This is the way we write, where all the text is lined up on the left side of the page. There are other choices. We also have Centered alignment, where the text is centered on the line and if new text is smaller than the line what the line can hold, the existing text will shift left and right to accommodate the new text. There is also Right alignment, where the text is lined up against the right margin, and there is space on the left side. Finally, there is Justified and Distributed alignment. These two types of alignment make text appear as if text were both lined up on the left and right sides. With Justified alignment, space is added between words to make this possible. With Distributed alignment, space is added between characters. It is a good idea to use the Times New Roman 12-point font, with Justified alignment as your default, i.e., your starting font and format. This will give your reports a professional look. Paragraph adjustments are located in the Paragraph collection shown in Figure 9. In the bottom-left corner of this collection you'll see the alignment choices. For this lab, we're not producing a formal report, so we'll use left alignment instead. Select the leftmost icon among the alignment buttons (shown as depressed in Figure 9) to do this. Also, note that if you hold the cursor over any icon, a small message, called a tool tip, will pop up telling you what the icon does.
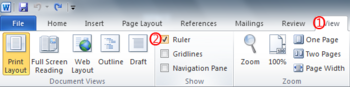
- Set a right-aligned tab at the right margin (6.5 inches). Sometimes we'd like to leave blank space and just move to a specific place on the line, filling in blank space as needed. In typography, this is called a tab , and MS Word allows us to set tab stops at specific places. This is why showing rulers helps. For example, if we right align text, all the text will be right aligned, which might not be what we want. If we want text to be placed in a specific location, we create a tab stop . Once again, open the paragraph control window by clicking on the small arrow in the bottom right corner of the Paragraph collection shown in Figure 9. This brings up the Paragraph dialog box from before. Click on the Tabs... button in the bottom-left corner of the window, and a new window also shown in Figure 9 will appear. You can set the alignment of tab stops, just as you can align text with the margins of the page. With tab stops, you can align text five ways. You can align tab stops to the left, center, and right just as with the margins of the page. There are two additional alignments you can choose from. One is the Decimal alignment, where text at that tab stop position is aligned to a decimal point in a number. This is especially helpful when displaying data with decimal points without the use of a table. The last alignment doesn't actually align text: the Bar alignment inserts a vertical bar at the tab stop position. Again, this alignment may be useful to separate data without the use of a table. Leaders can also be set. Leaders are punctuation marks (none, decimals, dashes, underscores, or dots) that fill in the space between where the tab is started to the tab stop position. Where tab stops are placed is determined using the Ruler we previously activated. Tab stop positions are measured from the left margin of the paper. By default, the unit of measure is inches. To set a tab stop using the Tabs dialog box, select the type of alignment and type of leader you wish for the tab stop . Next, enter the position you wish to place your tab stop, measured in inches (by default) from the left margin of the paper, in the Tab stop position text box. When you are satisfied, click the Set button to create the tab stop. You can create as many tab stops as you wish. After all tab stops have been set, select OK to confirm all your selections.
- Write the equation. Before we begin, check that the paragraphs we're going to create are initially set for left alignment. If the button that shows left alignment is not highlighted, click on it to select it. Now we're ready to start creating the page. First we'll make an equation.
- Focus on the workspace. The cursor should be blinking as a vertical line at the top-left corner of your page. If it's not blinking, click anywhere on the page to bring it into focus . The vertical bar shows where the equation will be placed.
- On the left side of the ribbon, you can select the kind of text you want. Select Normal Text from the list.
- Begin by typing "x=" (as usual, without the quotes).
- On the right side of the ribbon, you'll see the Structures collection. Click on the Fraction icon. Select the style of fraction you want by clicking on it. In this case we want the regular vertical fraction, which is the first one shown. Note that the fraction now appears in your document, with two empty boxes. You click on each box to fill in the top and bottom of the fraction. We'll start with the numerator (the top box), so click on it.
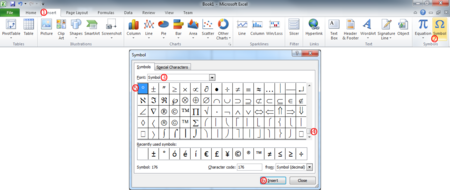
- Type "-b" and then select the plus-or-minus symbol from the Symbols collection (this is called a gallery by Microsoft) on the ribbon. The symbol you want is the very first one shown.
- Click on the Radical icon from the Structures collection. Select the square root item from the palette, and click the box inside the radical on the document so we can fill it in.
- To superscript text (necessary for the "2" in "b 2 "), click on the Script icon. We want the first selection, which is a simple superscript. The item appears in the equation. Click on the the larger box and put in the letter "b" term being squared. Next, click on the little box for the power and put a "2" in it. Next, press the right arrow to move the cursor right behind the b 2 term, and fill in the rest of the numerator, i.e., "-4ac".
- Click on the bottom box to fill in the denominator, and type in the "2a" term. When you are finished, click outside the equation box to return to the ordinary word processing mode.
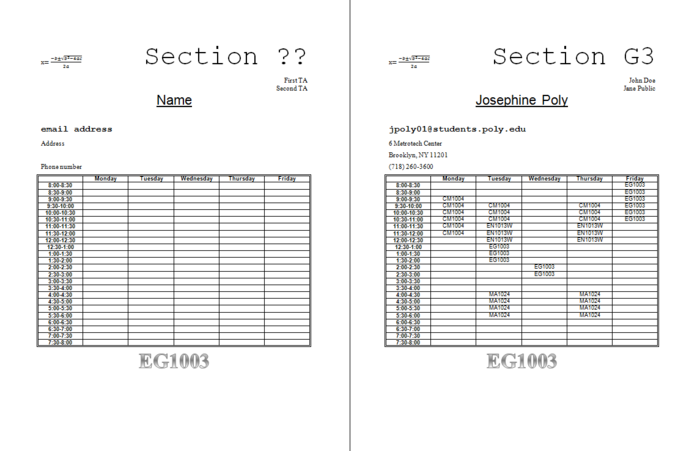
- Press the tab key and the cursor will jump to the tab stop you created on the right margin. Type "Section ??" and notice how it's filling in from the right margin. Using the methods we covered earlier, change this text to the following attributes: Courier New 48 points
- Now, type the text paragraphs and give them the following attributes: "First TA" Times New Roman 12 points, aligned right "Second TA" Times New Roman 12 points, aligned right "Name" Arial 24 points, underlined, centered "email address" Courier New 16 points, bold, aligned left "Address" Times New Roman 12 points, aligned left Leave an empty line since most addresses take up two lines. Times New Roman 12 points, aligned left "Phone Number" Times New Roman 12 points, aligned left The attributes should be applied to the typed text using the icons and menus described earlier. The attributes can be selected before you type the appropriate text, or applied afterward by selecting (highlighting) the text and then applying the attributes.
- for all text that is aligned right, use single spacing
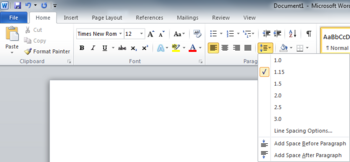
- for all text that is centered, use double spacing
- for all text that is aligned left, use 1.5-line spacing
- for all text that is inside the table, use single spacing
- Position the cursor by putting your mouse directly below the "Phone Number" line and clicking it. A vertical bar (the cursor) will appear at the left end of the line.
- Click on the Insert tab to get back the ribbon shown in Figure 10. Click on the Table icon. The gallery shown in Figure 14 will appear.
- You can create small tables by using your mouse to select the desired number of boxes off of the grid. However, our table will be bigger than the grid provides. Therefore, click on the "Insert Table..." item at the bottom of the gallery. This will bring up a dialog box that allows us to build a custom table.
- For your Word document, select 6 columns and 25 rows, and click OK. This will create your table and move you to the Design ribbon for the table.
- Now we need to fill in the cells in the table. Click on the Home tab so we can create and edit our text. You can give each cell font attributes or fill it in with text by clicking inside the cell with the mouse. You can also give multiple cells the same attributes by dragging the mouse over them to highlight. Make all the cells Arial, 10 points, center alignment for the text in the table. For the first row and the first column, make these cells bold text. If the cells have different attributes, Word will only show you the attributes for the first cell, so it's a good idea to set the attributes for the cells again even if they seem to be right. Center the table on the page. Label the columns with the five days of the week. Label the rows from 8AM to 8PM. Each row should contain one half-hour interval, e.g. 8:00 – 8:30. However, the row should not contain the AM or PM identifiers since the context is obvious.
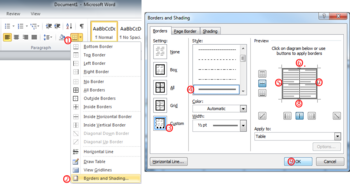
- Click on the last item in the menu: Borders and shading . This will bring up the dialog box shown on the right side of Figure 15.
- On the left side of the dialog box are various built-in borders. Click on the second item in the list: Box . Next, select the type of border we want by scrolling down the Style : list until we see the double lines. Click on it to select it, and click on OK.
- Now we'll repeat the process for the lines inside the table. Drag the mouse over the table cells to highlight them if they're not highlighted already. Click on the arrow next to the Borders and Shading icon you just selected for the outside. Select the last menu item again, bringing up the window in Figure 15. For the Style , scroll up to the top of the lines and select the single line. In the Preview pane on the right of the window you see an abstract version of your table, showing the double line on the outside and nothing on the inside. Click in the middle of the table and the solid lines will appear. As an alternative, you can click on the buttons surrounding the preview. Just click on the button in the middle of the left side and the button in the middle on the bottom of the preview to achieve the same effect. Click OK and the table is complete.
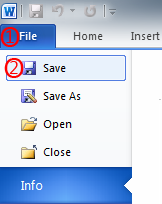
- Save the changes that have been made by selecting Save from inside the Microsoft Office Button or File tab.
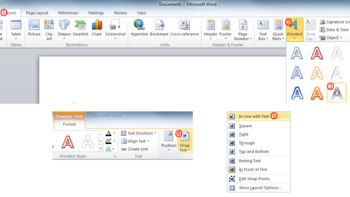
- Place the cursor where you want your object to appear.
- Click on the Insert tab to get the proper ribbon. On the right side is the WordArt icon. Click on it.
- A gallery of choices will appear. Select one that's shown in Figure 16. Click OK.
- Type "EG1004" in the box that appears. Click OK.
- WordArt's default wrap text setting is In Front of Text , which means it "floats above" text. On the Format tab, choose In Line with Text to make it exist on the line, so you can align it. Make sure your generic document looks like the one in Figure 16.
- Save the document again.

- Personalize the generic document you just created, keeping the appropriate attributes.
- Save this new file.
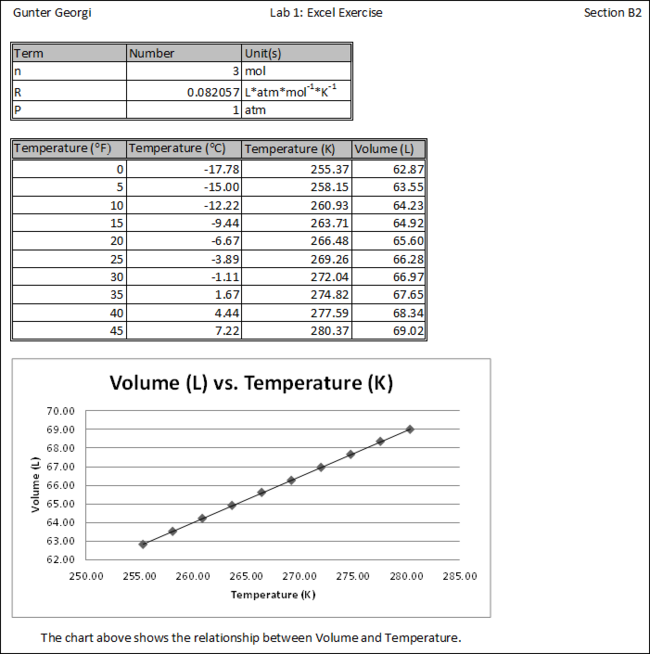
Now you will create a Microsoft Excel document. Your Excel document will include two tables and a graph showing how the volume of a gas changes when its temperature changes. Your Lab TAs will supply each student with a different value for the number of moles, n. The relationship you will graph is known as Charles' Law. When you are finished, your document will look like Figure 18.
- Launch Microsoft Excel. To do this, open the Start Menu, navigate to the Microsoft Office menu item and expand it. Click the Microsoft Excel 2007 or Microsoft Excel 2010 menu item. Alternatively, you can type "excel" into the search field of the Start Menu and click on Microsoft Excel 2010 .
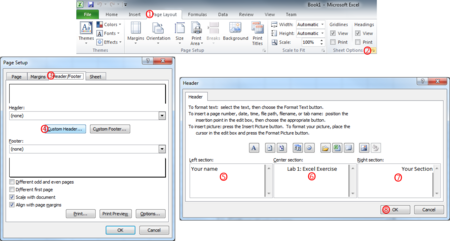
- In the new, blank workbook that opens, select the Page Layout tab. This will bring up the ribbon shown at the top of Figure 19.
- Left section: your name.
- Center section: "Lab 1: Excel Exercise".
- Right section: your section.
- Click "OK" to save this information. Click "OK" again to remove the "Page Setup" window and return to the spreadsheet.
- In cell A1 , enter Term
- In cell B1 enter Number
- In cell C1 enter Unit(s)
- In cell A2 , enter n
- In cell B2 , enter the value provided by your TA
- In cell C2 , enter mol
- in cell A3 , enter R
- In cell B3 enter 0.082057
- In cell A4 , enter P
- In cell B4 , enter 1
- In cell C4 , enter atm
- In cell A6 , enter Temperature (°F)
- In cell B6 , enter Temperature (°C)
- In cell C6 , enter Temperature (K)
- In cell D6 , enter Volume (L)

- Enter "=5/9*( A7 -32)" into cell B7 .
- Now we'll copy the formula into other cells. To do this, click on the cell. Click on the Home tab on the ribbon. Click on the Copy icon at the left end of the ribbon. highlight cells B8 through B16 by dragging the mouse over them. Click on the Paste icon that looks like a clipboard at the left end of the ribbon.
- Click on the cells between B7 and B16 one at a time and examine the contents. Notice that the cell reference in the formula has automatically been adjusted in each destination cell.

- Enter "= B7 +273.15" into cell C7 .
- Copy this formula into the cells C8 through C16 using the same method we used earlier.
- Click on the cell C16 and look at the contents. Notice that the cell reference in the formula ( B7 ) has automatically been adjusted to B16 .

- Enter "=( $B$2 * $B$3 * C7)/$B$4 " into cell D7 .
- Copy this formula into the cells D8 through D16 using the same method we used earlier.
- Click on cell D16 and notice that all the cell references except C7 have been kept constant. Typing a $ before a cell reference letter or number fixes the value, even if is it later copied. Two $ keeps both the cell letter and the cell number constant.
- Double click on the boundary between the column headers and the width of the column to the left will automatically resize. Do this for the other columns as well.
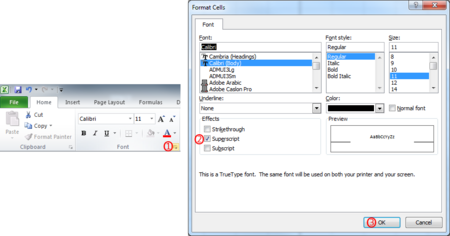
- In your Excel worksheet, highlight the table of constants (cells A1-C4), and right click within the highlighted area.
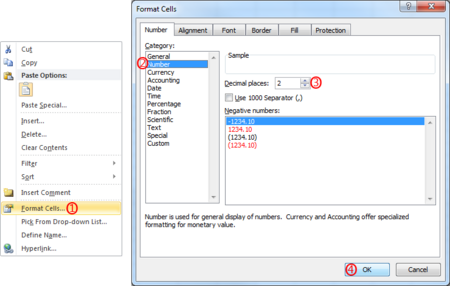
- From the dialog box that appears, select Format Cells. This will bring up the same Format Cells dialog box that you saw before.
- In the Format Cells dialog box, go to the Border tab. This will change the dialog box to what's shown in Figure 25:
- Make the constant table professional looking by selecting the double lines in the bottom right corner of the "Style", and the "Outline" preset. Now we'll put grid lines inside by selecting the single line in the bottom left corner of "Style", and the "Inside" preset. The preview picture will now show a grid with a double line frame and single line inside lines. Click "OK", and you'll now see the table of constants being nicely framed.
- Next, we'd like to separate the column headers from the numbers. Highlight the column header cells (A1-C1), and right click within the highligted area. Like before, select Format Cells from the context menu that appears and go to the Border tab. Select the double lines in the bottom right corner of "Style" and the "Outline" present.
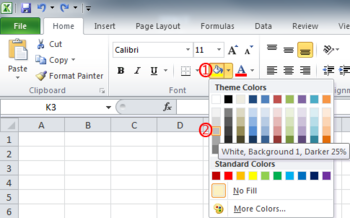
- Select the gray box in the middle row on the left side, which will be 25% darker. Click "OK", and you'll see that the column headers now have their own frame and shading.
- Repeat steps 1-6 for the table of computations.
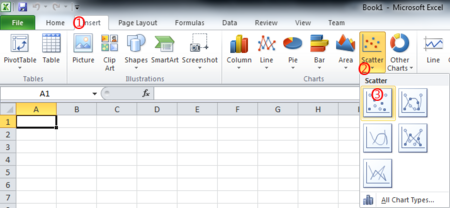
- Select the temperature and volume values in cells C7–D16 .
- Click on the Insert tab on the ribbon. The ribbon will change to what's shown in Figure 27.
- The Chart collection is in the middle of the ribbon. Click on the Scatter icon. This will bring up the pallette shown in Figure 27.
- On the pallette, click on the first icon: Scatter with only markers.

- The chart points are probably blue, which don't print well on a black and white printer. If you look at the ribbon, the chart style is probably "Style 2". Click on "Style 1" and you'll get black points, which will print better.
- Now we'll customize the chart by adding the axis labels and title. In the Chart Layouts collection, hover the cursor over the first icon, and the caption "Layout 1" will appear. This is the layout we want, so click on the icon.
- Click on the vertical axis title. Highlight the existing text that says "Axis Title" and change it to "Volume (L)".
- Click on the horizontal axis title. Highlight the existing text that says "Axis Title"and change it to "Temperature (K)".
- Click on the title. Highlight the existing text that says "Chart Title" and change it to "Volume (L) vs. Temperature (K)".
- Click on the Series 1 text on the right side, which is the chart legend. We don't need a legend for this chart. Put the cursor over the data point in front of the words and the cursor will change to a crosshair with arrows. Press the Delete key and the legend will disappear. The chart will also automatically resize to fill the space.

- Select any data point on your chart. Excel will automatically select all remaining points for you.
- Right-click within the chart. From the context menu that appears, select Add Trendline... . This will bring up the dialog box shown in Figure 29.
- As you can see, there are a lot of options. Fortunately, the defaults are exactly what we want, so just click the Close button. The chart now has the trendline we want.
- Reposition the chart within your worksheet so that it does not obstruct your data tables. Do this by clicking anywhere on the chart. Squares will appear around the border of the chart indicating that it has been selected. Click the mouse, and "drag" the chart to where you want it, which is typically on the left edge of the spreadsheet, with one row between the bottom of the data table and the top of the chart.
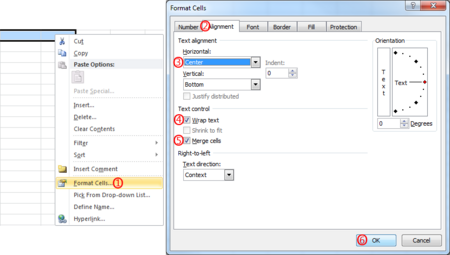
- In the Text alignment area, for Horizontal , click on the arrow to the right of the word "General" and a dropdown menu appears. Click on Center .
- In the Text control area, check the Wrap Text and Merge Cells checkboxes, and click OK .
- In the highlighted cells, enter a suitable caption for your chart.
- Since we're done with the worksheet, we'll save it for submission.
Microsoft PowerPoint (Optional Exercise)
Now you will create a PowerPoint presentation reporting on the work done in Lab 1 . PowerPoint has five viewing windows. Slide View displays one slide at a time, Outline View lists the text for each slide in your presentation, Slide Sorter View displays thumbnails of all your slides allowing you to reorder them easily, and Notes Page View lets you attach text to each slide. Finally, you can view your slides in order in the Slide Show View.
For your labs, your presentation must include a title slide, a brief overview of the presentation, examples of the work done in this lab (either screenshots, or material copied and pasted from the original documents) and a conclusion slide. You may use any design template that you like. Use a title slide at the beginning of your presentation and the bulleted slides for the information that follows. Figure 31 contains some examples of what your slides might look like.

- From the Slide group, click on the New Slide icon. This will advance your presentation to the next slide, which will be blank. When you select this, PowerPoint will display a number of alternatives for you to choose from on how to layout your next slide. Choose the one you like best.
- Click anywhere inside the box marked "Click to Add Text" and insert your information. Continue this process until you have outlined your entire presentation.

Printing Instructions for Recitation
You can print a copy of your presentation just like Word and Excel. To print a copy of your PowerPoint Presentation:
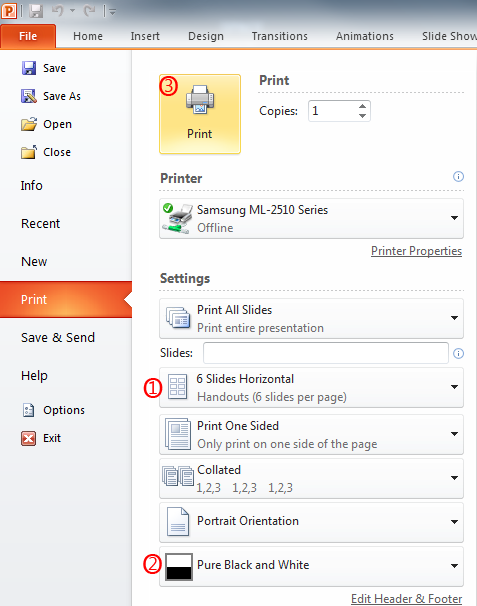
- In the box marked Print what: select Handouts .
- In the box marked Color/grayscale select Pure Black and White .
- In the box marked Slides per page choose six , using Horizontal border.
- Click OK to print.
Your lab work is now complete. Email copies of all the files you created to your personal account. Review the files for errors before submitting your report.
Please clean up your workstation before you leave the lab. Refer to section 3 Your Assignment for the list of the specific items you must submit for your report.
Free Laboratory PowerPoint Templates Free Lab Report PowerPoint TemplateThe Free Lab Report PowerPoint template is a presentation template designed for researchers, scientists, and students who need to present their findings and data in a clear and concise manner. The lab research template features a cover slide showing a laboratory, which makes it ideal for science projects, experiments, and research. The template lab slide … Deliver lectures on lab apparatus and how to use as advised using free Science PowerPoint themes . Prepare lectures on Organic Chemistry , inorganic Chemistry, Mechanics, and much more. Engineers and doctors may benefit from molecule, DNA structure, among other free Laboratory PowerPoint slides .  Free Scientific Research PowerPoint Template Free Vaccine Development PowerPoint Template Free Chemistry PowerPoint Template Free Lab Rat PowerPoint Template Free Science Research PowerPoint Template Free Science Lab PowerPoint Template Free Chemical Test PowerPoint Template Free Microscope PowerPoint TemplateWe will send you our curated collections to your email weekly. No spam, promise!  Writing Lab
Creating PowerPointsPowerpoint faqs.
PowerPoint presentations provide a chance to present information creatively. These presentations can have a significant impact because they can engage the audience in several ways. You can even include sound, videos, and movement in your slides. PowerPoint presentations are excellent preparation for the career workplace. The best place to get support and guidance on PowerPoint is through Microsoft.
 Lab and Project Assignments - PowerPoint PPT Presentation Lab and Project AssignmentsDescribe complete scope setup and threshold assumptions. ... one probe is on a data signal on the dimm before the series resistor (end closest to dram chip) ... – powerpoint ppt presentation.
PowerShow.com is a leading presentation sharing website. It has millions of presentations already uploaded and available with 1,000s more being uploaded by its users every day. Whatever your area of interest, here you’ll be able to find and view presentations you’ll love and possibly download. And, best of all, it is completely free and easy to use. You might even have a presentation you’d like to share with others. If so, just upload it to PowerShow.com. We’ll convert it to an HTML5 slideshow that includes all the media types you’ve already added: audio, video, music, pictures, animations and transition effects. Then you can share it with your target audience as well as PowerShow.com’s millions of monthly visitors. And, again, it’s all free. About the Developers PowerShow.com is brought to you by CrystalGraphics , the award-winning developer and market-leading publisher of rich-media enhancement products for presentations. Our product offerings include millions of PowerPoint templates, diagrams, animated 3D characters and more.  Search formFor first-year architecture students, an assignment of consequence. For decades, the Jim Vlock First Year Building Project has offered students at the Yale School of Architecture the opportunity to design and build a house in New Haven, creating badly needed homes for individuals and families who would otherwise struggle to afford one. The project recently launched a multi-year partnership with the Friends Center for Children, an early-childhood care and education in New Haven, offering to design and build five adjacent houses for two of the center’s educators and their families by 2027. The partnership is part of the Friends Center’s Teacher Housing Initiative, which addresses both the crisis in childcare and affordable housing by providing 20% of the center’s educators with rent-free homes, substantially increasing their take-home pay. Last year, Yale students designed and built the first duplex dwelling, in the Fair Haven Heights neighborhood of New Haven. In this video, we follow the Yale students throughout the year-long process, from the first site visits, through design and construction, and ultimately to the celebration of the newly completed home.  View Slideshow 9 Photos The project, a key facet of the curriculum in the school’s professional architecture degree program, was established in 1967 when the late Charles Moore, who directed Yale’s Department of Architecture from 1965 to 1971, sought to address students’ desire to pursue architecture committed to social action. The first-of-its-kind program is now emulated by many other architecture schools. In its early years, students traveled to sites in Appalachia to build community centers and medical facilities. Since 1989, when the project switched its focus to building affordable housing in New Haven, first-year students have designed and built more than 50 homes in the city’s economically challenged neighborhoods. Arts & Humanities Campus & Community  Noori launches virtual platform for trauma and PTSD care Office Hours with… Sam Raskin For Ghanian legal scholar, Yale Law experience made the difference Finding new ways to make computing greener
 Copilot tutorial: Create a branded presentation from a file Note: This feature is available to customers with a Copilot for Microsoft 365 (work) license. Duration: 56 seconds See how Copilot in PowerPoint effortlessly transforms templates, files, or PDFs into sleek, branded presentations, intuitively incorporating insightful speaker notes. Try in PowerPoint See more videos Kickstart a presentation  Create a presentation with a prompt  Summarize a presentation Browse all Copilot videos  Need more help?Want more options. Explore subscription benefits, browse training courses, learn how to secure your device, and more.  Microsoft 365 subscription benefits  Microsoft 365 training  Microsoft security  Accessibility center Communities help you ask and answer questions, give feedback, and hear from experts with rich knowledge.  Ask the Microsoft Community  Microsoft Tech Community  Windows Insiders Microsoft 365 Insiders Was this information helpful?Thank you for your feedback. | ||||||||
IMAGES
VIDEO
COMMENTS
Click on the File tab. Click on Save As. In the Save As Dialog Box: Be sure you are saving to the flash drive. Change the file name to Practice Part 1. Click the Save button. Call the teacher over to check your work. Close the PowerPoint program. Safely eject your flash drive.
In the head of the first column, type " Goals in College ," then center the heading. In the head of the second column, type " Goals after College ," then center the heading. Add at least three goals in each section. Make sure that slide #3 is selected from the left panel, then add a New Slide. Change the layout of the new slide to Blank.
Page 1 Microsoft PowerPoint 2013 Chapter 1 - Lab Test A Building a Presentation Purpose: To demonstrate the ability to design a presentation, apply a theme and a variant, insert an illustration, and save a presentation. Problem: You have been asked to create a presentation for an upcoming conference. You will be speaking about what makes a successful website.
Powerpoint Project 1. Kendall Myers December 22, 2017. In this practice project for Powerpoint, students will create a basic powerpoint based on the example given. Students will need to write titles, insert pictures and use different animations for key …. Categories:
2) Change the view in PowerPoint to portrait 3) For the layout, chose a blank slide 4) Use text boxes to orient your text according to the example above 5) Use Clip Art to insert a picture 6) Be sure to select a slide design theme Queens Library Job Information Center 89-11 Merrick Blvd. Jamaica, NY 11432 Come to the Job Information Center
PowerPoint Lab Assignment - Part 2. Before you begin: First, read page 847 because it will give you a good idea about what PowerPoint Chapter 2 is about. Second, you should watch this presentation: Audio PowerPoint: PPT Ch. 2 - Formatting PowerPoint Presentations.
On the Home tab, in the Slides Group, select New Slide and choose Picture with Caption Layout. In the picture placeholder, click to add a picture. Browse to your data files, and insert the image PowerPoint_Practice_1. On the Picture Tools Format tab, in the Size group select the arrow under Crop and select Fit.
Video-062This tutorial video is for all those viewers who are looking practical Assignment on Microsoft Powerpoint. In this video you can learn how to create...
Designing an Effective PowerPoint Presentation: Quick Guide. This presentation is designed to quickly introduce you into the world of PowerPoint creation. It covers concepts of visual rhetoric, design, and good presentation skills. This powerpoint resource, broken up into four parts, provides an excellent overview of how to design effective ...
Lab: PowerPoint Objectives. Learn how to use Microsoft PowerPoint Create a presentation Use drawing tools in PowerPoint ... Assignment You are to create a Power Point presentation on some topic you are interested in. You will only need to find enough information for 7-10 slides. Since this lab is more about learning to use PowerPoint than the ...
Download PowerPointLabTwoStartingFile.pptx. Save the presentation as PowerPointLabTwo.pptx. Apply the Ripple Transition to all slides. Add this ClipArt to the first slide beside Microsoft. : In the second slide, Demote all bullets below Great Presentation. Apply Grow & Turn animation to all slides. Reorder the second slide Animation as depicted ...
Instructions. Create a Blank Presentation. Save the presentation as PowerPointLabThree.pptx. Change the Slide Layout to Blank. Change the Slide Size to Banner; Ensure Fit. Format the Background Fill with Gradient Fill. Preset Gradient: Medium Gradient—Accent 5. Add this image to the right side of the Banner.
In this lab we will learn power point on a very basic level and have some introduction of it. We will learn to create the presentation, adding content in the slides, adding new slides, adding pictures in the slides, deleting and hiding the slides, adding animations in the slides, and slide transitions.
EDIT202 - PowerPoint Lab Assignment Guidelines 1. Create a folder named "LABSEC-CCID-PowerPoint". 2. Download the PowerPoint-Sample.avi video file from the course WebCT/Moodle site and save it into your newly created PowerPoint folder. 3. Create a five slide PowerPoint presentation adding the following guidelines for each slide: Slide 1 4a.
Lab-grown Meat. Download the Lab-grown Meat presentation for PowerPoint or Google Slides and start impressing your audience with a creative and original design. Slidesgo templates like this one here offer the possibility to convey a concept, idea or topic in a clear, concise and visual way, by using different graphic resources.
We are a HGSE resource created to help graduate students develop their presentation skills and to provide a space and. ltivate their oral and visual communication skillsNing ZouAssociate Director for Student A. ademic Services & Learning Design and a research librarian. She oversees Gutman Library's Writing Services and the Communications Lab ...
Your Assignment Individual Lab Report. You do not have to write a lab report for this lab. However, you do have to write one for Lab 1A: ... Now you will create a PowerPoint presentation reporting on the work done in Lab 1. PowerPoint has five viewing windows. Slide View displays one slide at a time, Outline View lists the text for each slide ...
The template lab slide …. Preview & Download FREE. Deliver lectures on lab apparatus and how to use as advised using free Science PowerPoint themes. Prepare lectures on Organic Chemistry, inorganic Chemistry, Mechanics, and much more. Engineers and doctors may benefit from molecule, DNA structure, among other free Laboratory PowerPoint slides.
Creating PowerPoints. PowerPoint presentations provide a chance to present information creatively. These presentations can have a significant impact because they can engage the audience in several ways. You can even include sound, videos, and movement in your slides. PowerPoint presentations are excellent preparation for the career workplace.
Question: of 12 PowerPoint Module Graded Lab Assignment Creating an Advanced PowerPoint Presentation You are a work study student in the Computer Technology Department. The dean has requestesd you create a PowerPoint to explain Computer Programming and its benefits in relation to FTCC GET READY. LAUNCH PowerPoint if it is not already running.
Purpose of the Assignment This assignment introduces you to PowerPoint; one of the four major applications in the Professional version of Microsoft Office (Microsoft Word, Microsoft Excel, Microsoft Access are the other three). PowerPoint enables you to create a professional presentation in a variety of ways.
PowerPoint Lab Assignment This assignment must be done in pairs. That means two students will be working together. This presentation should include the following: 1. The first slide, as an introduction, should present the definition of computer ethics. How does the use of computers apply to ethics?
Duration: 1 minute 14 seconds. Discover how Copilot in PowerPoint effortlessly creates captivating presentations in just a few prompts and access the full power of Microsoft Designer to bring your ideas to life with professional graphics.
Title: Lab and Project Assignments 1 Lab and Project Assignments 2 Lab Assignment Clock skew and jitter measurements. Hand PPT lab report. Activities ; Locate clock probe points on layout. Measures skew (at CPU0, CPU1, both P64H2s, MCH, and ICH) and Jitter at MCH. PPT minimum contents ; Hypothesis What you are measuring and why it is important.
For decades, the Jim Vlock First Year Building Project has offered students at the Yale School of Architecture the opportunity to design and build a house in New Haven, creating badly needed homes for individuals and families who would otherwise struggle to afford one. The project recently launched ...
Duration: 56 seconds. See how Copilot in PowerPoint effortlessly transforms templates, files, or PDFs into sleek, branded presentations, intuitively incorporating insightful speaker notes.